
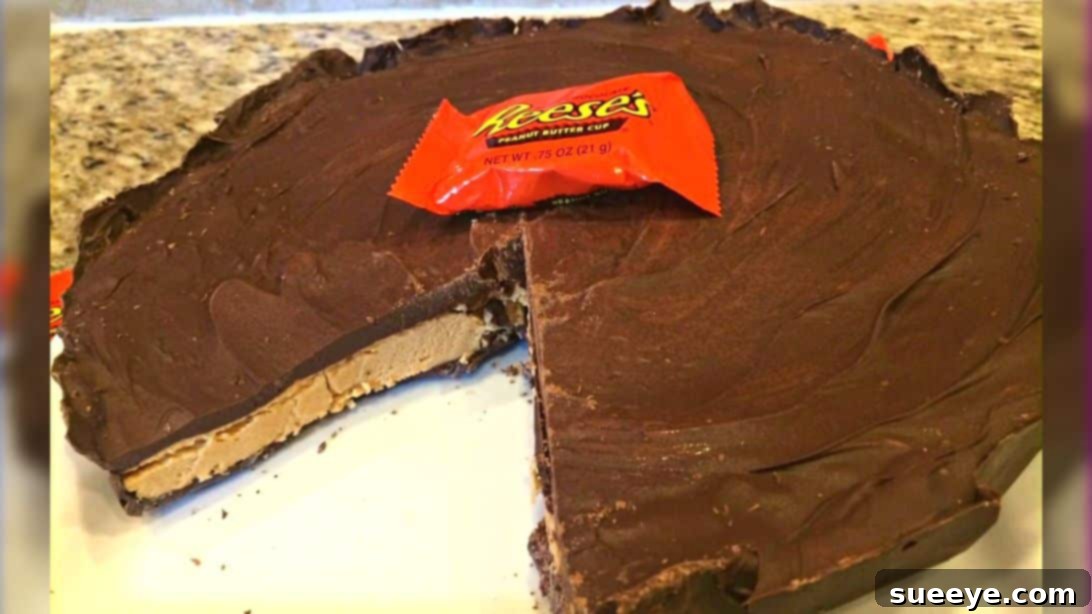
Giant Reese’s Peanut Butter Pie: Your New Favorite 4-Ingredient Homemade Dessert
Are you a devoted fan of Reese’s Peanut Butter Cups, constantly wishing they came in a grander, more shareable size? Prepare to have your culinary dreams come true! We’re talking about a magnificent, oversized version of your favorite treat, transformed into a luxurious pie that’s surprisingly simple to create. Forget complicated baking projects; this Giant Reese’s Peanut Butter Pie requires just four easy-to-find ingredients and minimal effort, delivering maximum indulgence. Once you experience the rich, creamy, chocolatey bliss of this homemade masterpiece, you’ll wonder why you ever settled for smaller bites or other pie recipes. Get ready to impress everyone with this show-stopping dessert, inspired by a fantastic video tutorial from FunFoods on YouTube.
This recipe isn’t just about making a bigger Reese’s cup; it’s about elevating the classic flavor combination to an art form. Imagine a thick, crisp chocolate shell encasing a generous, velvety peanut butter filling – a symphony of textures and tastes in every single slice. Whether you’re planning a party, looking for a unique potluck contribution, or simply want to treat yourself to an extraordinary dessert, this giant pie is the answer. It’s an unforgettable experience that brings together the best of chocolate and peanut butter in a way that’s both elegant and utterly comforting. Let’s dive into creating this spectacular giant Reese’s pie that promises to become a staple in your dessert repertoire.
Essential Ingredients for Your Giant Reese’s Pie
The beauty of this recipe lies in its simplicity. With just four core ingredients, you’ll be well on your way to crafting a truly spectacular dessert. Opting for quality ingredients can make a noticeable difference in the final taste and texture of your pie, especially when they are so few.
- 2½-3 cups of high-quality milk chocolate chips (or your preferred baking chocolate, roughly 16-18 ounces). Using good chocolate ensures a smooth melt and a delicious, sturdy crust.
- 1 jar (around 16-18 ounces) of creamy Reese’s peanut butter. While other brands can work, Reese’s own peanut butter offers that distinctive, perfectly balanced flavor profile that makes this pie truly authentic.
- 1 teaspoon of pure vanilla extract. A seemingly small addition, vanilla extract significantly enhances the overall flavor of the peanut butter filling, adding depth and warmth.
- 1-2 cups of powdered sugar (confectioners’ sugar). This finely milled sugar is key to achieving a silky-smooth, stiff peanut butter filling without any grainy texture.
Equipment You’ll Need
Having the right tools on hand will make the preparation process even smoother and more enjoyable. You don’t need highly specialized equipment, just a few kitchen essentials:
- A 10-inch tart pan with a removable bottom (or a springform pan) for easy serving and a beautiful presentation.
- Parchment paper for lining the pan, ensuring easy release of your finished pie.
- A microwave-safe bowl for melting chocolate, or a double boiler setup.
- A stand mixer with a paddle attachment, or a hand mixer, for achieving the perfect consistency for your peanut butter filling.
- Heat-resistant spatulas and mixing spoons.
- Measuring cups and spoons.
- Nonstick cooking spray.
Step-by-Step Directions: Crafting Your Homemade Giant Reese’s Pie
Step 1: The Irresistible Chocolate Crust Foundation
The base of your giant Reese’s pie is a rich, sturdy chocolate crust that provides the perfect contrast to the creamy filling. Precision in this step ensures a beautiful and delicious foundation for your dessert.
- Begin by preparing your 10-inch tart pan. Lightly grease the interior with nonstick cooking spray. This provides an initial layer of protection.
- Next, line the bottom and sides of the pan with parchment paper. For a tart pan with a removable bottom, you can cut a circle for the base and strips for the sides, ensuring a slight overlap. Trim any excess paper that extends too far beyond the rim of the pan. This parchment paper is crucial for preventing sticking and allowing for a clean, effortless removal of the pie once it’s set. Set the prepared pan aside.
- Now, it’s time to melt your chocolate. Place 2 to 2.5 cups of your milk chocolate chips (reserving a small portion for later, if using the full 3 cups) into a microwave-safe bowl.
- Heat the chocolate in the microwave in short bursts, typically 30-second intervals, stirring thoroughly after each interval. Chocolate can seize and burn if overheated, so patience is key. Continue this process until the chocolate is mostly melted and smooth.
- Once the initial batch is melted, take it out of the microwave and immediately add the remaining half cup (or so) of chocolate chips into the warm, melted chocolate. Stir continuously until these newly added chips completely melt into the mixture. This method, often called “seeding” or “tempering,” helps to cool down the melted chocolate slightly and creates a smoother, more stable chocolate that will set beautifully and have a lovely shine. Keep stirring gently every now and then to ensure a consistently smooth texture and prevent it from hardening too quickly.
- Carefully pour the perfectly melted and tempered chocolate into your prepared tart pan.
- Using the back of a spoon or a small spatula, spread the chocolate evenly across the bottom of the pan, ensuring a consistent layer. Then, gently work the chocolate up the sides of the tart pan, creating a generous chocolate wall. Make sure the chocolate extends high enough to contain the peanut butter filling later.
- Once spread, place the tart pan into the refrigerator. Allow it to chill and harden for at least 30 minutes, or until the chocolate is completely firm to the touch. This step is vital for a stable crust that won’t break when you add the filling.
Step 2: Crafting the Creamy Peanut Butter Filling and Final Layer
While your chocolate crust is setting, you’ll prepare the star of the show: the rich and creamy peanut butter filling. This is where the magic of Reese’s flavor truly shines.
- While patiently waiting for your chocolate base to set in the refrigerator, turn your attention to the peanut butter filling. Scoop the entire jar of Reese’s peanut butter into the mixing bowl of a stand mixer. If you don’t have a stand mixer, a large bowl and a sturdy hand mixer will work just as well.
- Add the teaspoon of vanilla extract to the peanut butter.
- Begin by adding 1 cup of the powdered sugar to the bowl. Start mixing on low speed to incorporate the sugar without creating a cloud of dust. Gradually increase the speed to medium.
- Beat the ingredients together thoroughly until they are well combined and the mixture starts to look creamy and smooth. Scrape down the sides of the bowl occasionally to ensure everything is fully incorporated.
- The goal is a thick, stiff consistency for your filling. If the mixture seems too soft or sticky, add an additional half cup of powdered sugar, a little at a time, continuing to mix until you achieve a firm yet smooth consistency that holds its shape. You may even need up to 2 cups total depending on the exact consistency of your peanut butter. The filling should be dense enough to spread easily but not be runny.
- Once your chocolate base has chilled for 30 minutes and is completely firm, carefully remove it from the refrigerator.
- Now, scoop the prepared peanut butter filling onto the hardened chocolate base. Using an offset spatula or the back of a spoon, spread the filling evenly across the chocolate crust, working it right up to the chocolate walls. Aim for a smooth, uniform layer of peanut butter goodness.
- For the final touch, take your remaining chocolate chips (if you have any left, or melt a fresh half cup if needed, using the same “seeding” method as before for a smooth pour). Pour this freshly tempered chocolate all over the peanut butter filling.
- Gently spread the top chocolate layer evenly with a spatula to create a smooth, glossy finish that completely encases the peanut butter. This final chocolate cap will seal in the flavor and provide an extra layer of structural integrity.
- Carefully place the entire pie back inside the refrigerator to set for another 30 minutes to an hour, or until both the peanut butter filling and the top chocolate layer are completely firm. This final chill is crucial for making clean cuts.
- Once fully set, remove the pie from the fridge. If using a tart pan with a removable bottom, gently push the bottom up to release the pie. If there are any slight imperfections or excess chocolate around the edges from the final pour, you can carefully trim them off with a warm knife for a neat and professional appearance.
- Slice, serve, and savor every magnificent bite of your homemade Giant Reese’s Peanut Butter Pie! Enjoy the cheers and delight from everyone who gets to experience this incredible treat.
Tips for a Perfect Giant Reese’s Pie
- Don’t Overheat Chocolate: When melting chocolate, use low heat and stir frequently. Overheated chocolate can become grainy or seize, making it unusable for a smooth crust.
- Room Temperature Peanut Butter: For a smoother, easier-to-mix filling, ensure your peanut butter is at room temperature before you start.
- Adjust Powdered Sugar: The amount of powdered sugar needed can vary slightly depending on the brand and consistency of your peanut butter. Add it gradually until you reach a firm, spreadable consistency.
- Patience with Chilling: Rushing the chilling steps can result in a messy pie. Ensure each layer is fully set before proceeding to the next step or slicing.
- Warm Knife for Slicing: For perfectly clean slices, dip your knife in hot water and wipe it dry between each cut. This helps to glide through the chocolate layers without cracking them.
- Use a Springform Pan: If you don’t have a tart pan, a 9-10 inch springform pan is an excellent alternative and makes for very easy removal.
Variations and Customizations
While the classic Giant Reese’s Pie is incredible on its own, feel free to get creative and customize it to your liking:
- Dark Chocolate Delight: For a less sweet, more intense flavor, use dark chocolate chips for your crust and top layer.
- Crunchy Peanut Butter: If you love a bit of texture, swap out creamy Reese’s peanut butter for the crunchy variety.
- Nutty Addition: Fold in some finely chopped peanuts, pecans, or almonds into your peanut butter filling for an extra layer of crunch and flavor.
- Mini Reese’s Pies: For individual servings, use mini tart pans or cupcake liners. Adjust chilling times accordingly.
- Garnish Galore: Before the top chocolate layer fully sets, sprinkle with additional mini Reese’s cups, chopped peanuts, sea salt flakes, or a drizzle of caramel for an extra fancy touch.
Storage Recommendations
This magnificent pie can be made ahead of time, making it perfect for entertaining:
- Refrigeration: Store any leftover pie in an airtight container in the refrigerator for up to 5-7 days. The chocolate will remain firm and the peanut butter filling will stay delightfully creamy.
- Freezing: For longer storage, slices can be individually wrapped in plastic wrap and then placed in an airtight freezer-safe container or bag. It can be frozen for up to 2-3 months. Thaw in the refrigerator before serving.
Frequently Asked Questions (FAQ)
Here are some common questions you might have about making your Giant Reese’s Pie:
- Can I use a different brand of peanut butter?
Yes, you can, but for the authentic Reese’s flavor, their brand is recommended. Other brands might have different oil content, which could affect the consistency of the filling. You might need to adjust the powdered sugar more precisely. - My chocolate seized when melting. What happened?
Chocolate seizes when even a tiny drop of water gets into it, or if it’s overheated too quickly. Always ensure your bowl and utensils are completely dry, and melt chocolate slowly in short bursts, stirring often. - Can I make this pie ahead of time for a party?
Absolutely! This pie is an excellent make-ahead dessert. You can prepare it a day or two in advance and store it in the refrigerator. This allows the flavors to meld beautifully and ensures it’s perfectly chilled for serving. - Is this recipe gluten-free?
Yes, typically the ingredients listed (milk chocolate chips, Reese’s peanut butter, vanilla extract, powdered sugar) are naturally gluten-free. However, always check the labels of your specific brands to confirm, especially for cross-contamination warnings.
There you have it – the ultimate guide to creating a truly spectacular Giant Reese’s Peanut Butter Pie! This simple yet incredibly impressive dessert is a testament to the fact that you don’t need a pantry full of obscure ingredients or hours in the kitchen to create something extraordinary. With just four humble components, you can transform the beloved Reese’s flavor into a show-stopping pie that will undoubtedly be the highlight of any gathering, or simply a magnificent indulgence for yourself.
So, gather your ingredients, follow these straightforward steps, and prepare to embark on a delectable journey. The joy of homemade treats, especially when they are this easy and satisfying, is unmatched. Don’t just dream about a bigger Reese’s cup; create it! We encourage you to try this recipe, share your magnificent creations with friends and family, and perhaps even tag us in your photos online. Happy baking, and more importantly, happy eating!
*These amazing images are all credited to FunFoods via YouTube. Check his other content and follow for more delicious inspiration!