
Sew a Charming Christmas Hanging Tea Towel Holder: Your Ultimate DIY Guide
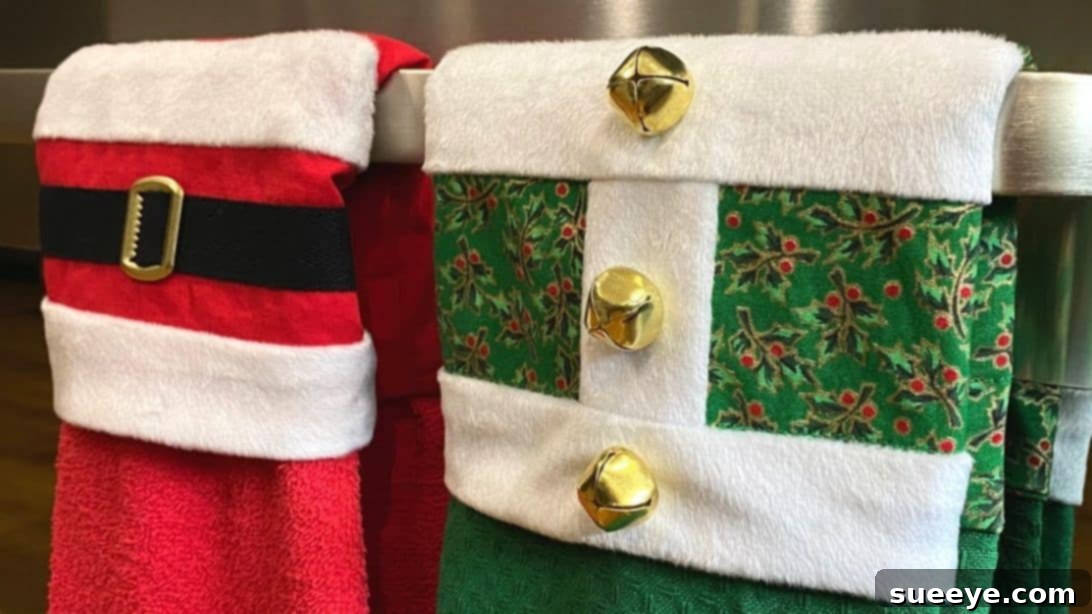
Infuse your kitchen with the joyous spirit of the holidays by crafting this delightful Christmas hanging tea towel holder. This charming sewing project, inspired by the creative talents of Notches Sewing on YouTube, is more than just a functional accessory; it’s a festive statement piece that perfectly captures the essence of the season. Imagine a cheerful Santa belt design adorning your kitchen, keeping your tea towels neatly organized and easily accessible. Whether you’re looking to add a touch of handmade warmth to your own home, create unique and thoughtful gifts for loved ones, or even craft items to sell at holiday markets, this project is a perfect choice.
With its simple design and clear instructions, this hanging tea towel holder is suitable for sewers of all skill levels, from beginners eager to learn a new craft to experienced enthusiasts looking for a quick and rewarding project. We’ll guide you through each step, ensuring you have all the information needed to bring this festive creation to life. Dive into the world of fabric and thread, and get ready to sew a piece that will surely be adored for many Christmases to come.
Why This Festive Tea Towel Holder is a Must-Sew Project
There are countless reasons why this particular sewing project stands out, especially during the holiday season:
- Elevate Your Holiday Decor: Transform your kitchen into a festive wonderland. The iconic Santa belt design instantly adds a whimsical and seasonal touch, making everyday chores feel a little more magical.
- Practical & Functional: Beyond its aesthetic appeal, this holder is incredibly practical. It keeps your tea towels secure and within reach, preventing them from slipping off hooks or cluttering countertops. The removable design also means you can easily swap out towels.
- Perfect Handmade Gifts: Nothing says “I care” like a handmade gift. These tea towel holders make thoughtful and personalized presents for friends, family, teachers, or hosts. They are unique, useful, and show a genuine effort.
- Beginner-Friendly: If you’re new to sewing, this project is an excellent starting point. It introduces fundamental sewing techniques such as cutting with a pattern, fusing interfacing, working with different fabrics, and basic assembly, all in a manageable size.
- Quick & Rewarding: This project doesn’t require a significant time commitment, making it ideal for busy individuals or for whipping up multiple gifts. The satisfaction of creating something beautiful and functional with your own hands is incredibly rewarding.
- Customizable Fun: While the Santa theme is charming, the basic pattern can be adapted for other seasons or personal styles by simply changing fabric choices. Imagine spring flowers, autumn leaves, or classic farmhouse patterns!
Essential Materials for Your Christmas Tea Towel Holder
Gathering all your supplies before you begin will ensure a smooth and enjoyable sewing experience. Here’s a detailed list of what you’ll need, along with some tips for choosing the best materials:
- Red Quilting Cotton: This will be the main fabric for the body of your towel holder, creating the vibrant “Santa suit” effect. Quilting cotton is ideal because it’s easy to work with, durable, and comes in a vast array of colors and prints. Opt for a high-quality red to ensure a rich, festive look.
- Lining Fabric: Choose a complementary fabric for the inside lining. This could be a solid color that matches your red cotton, a festive print, or even a simple white or cream to keep the focus on the exterior. The lining adds structure and a professional finish.
- White Nursery Fleece: This soft, plush fabric is perfect for creating the “fur” trim of the Santa belt. Nursery fleece is usually soft, stable, and easy to cut. A small piece will be sufficient for this detail.
- Lightweight Non-Woven Fusible Interfacing: Interfacing is crucial for adding stability and body to your fabric, ensuring the towel holder maintains its shape. A lightweight, non-woven fusible type means you can easily iron it onto your fabric, making the process simple and efficient.
- Magnetic Buttons: These provide a secure and discreet closure for your towel holder, allowing you to easily attach and detach tea towels. You’ll need two sets, typically sew-in or crimp-on magnetic snaps.
- ¾-inch Cotton Twill Tape or Black Fabric: To create the iconic Santa belt, you’ll need either pre-made ¾-inch black cotton twill tape (which saves a step) or a strip of black fabric that you can fold and press to create the belt. Black quilting cotton or a sturdy poplin would work well for this if you’re making your own.
- ¾-inch Belt Buckle or Slider: This piece adds authenticity to the Santa belt design. A metal buckle or slider of the specified width will complete the look.
- Needle and Thread: Essential for all sewing projects. Choose a good quality polyester all-purpose thread that matches your main fabrics (red, white, black) for discreet stitching.
- Scissors or Rotary Cutter and a Cutting Mat: Precision is key. A sharp pair of fabric scissors or a rotary cutter with a self-healing mat will ensure clean, accurate cuts.
- Fabric Clips and Pins: These tools help hold fabric pieces together securely before and during sewing, preventing shifting and ensuring accurate seams.
- Iron, for pressing: An iron is indispensable for pressing seams flat, fusing interfacing, and creating crisp folds, all of which contribute to a professional-looking finish.
- Sewing Machine: While small parts could be hand-sewn, a sewing machine will make this project much quicker and give it a more durable finish.
- Pattern: The foundation of your project! Click here to download the pattern from Notches Sewing. Make sure to print it at 100% scale.
Step-by-Step Instructions: Crafting Your Festive Tea Towel Holder
Follow these detailed steps carefully to construct your beautiful Christmas hanging tea towel holder. Taking your time with each stage will ensure a professional and durable result.
Step 1: Pattern Preparation and Precise Fabric Cutting
Begin by printing out your downloaded pattern pieces at 100% scale to ensure accurate sizing. Carefully cut out each paper pattern piece, taking note of any notches or markings. Before you even touch your fabric, it’s crucial to prepare your quilting cotton by washing and pressing it. This pre-shrinks the fabric and removes any wrinkles, giving you a smooth canvas to work with. When laying out your fabric, avoid using the selvage edges (the tightly woven edges of the fabric that prevent fraying), as these can be less stable. Instead, place your paper templates on the fabric, aligning the grain lines on the pattern pieces parallel to the selvage edges. This ensures the fabric drapes and behaves correctly. Cut out all the necessary pieces from your red quilting cotton and lining fabric as indicated on the pattern, being sure to snip all notches. Next, use the white nursery fleece for the delightful “fur” parts of the towel holder; cut these pieces with care. Finally, cut the fusible interfacing using the back piece template. Place the fusible interfacing cutout onto the wrong side of your back fabric piece, with its glue side facing down. Mark the precise locations where your magnetic buttons will be installed later. Then, flip the interfacing so its glue side is facing up, ready for the next step.
Step 2: Assembling the Front Panel and Crafting the Santa Belt
With the interfacing now glue side up on your back fabric piece, carefully place the main red back piece on top, ensuring it’s perfectly aligned. Apply even pressure with a hot iron to fuse the interfacing securely to the fabric. Once fused, snip through the marks you made for the magnetic buttons; these small openings will make it easier to install the buttons later. Now, let’s create the iconic Santa belt! If using black fabric instead of twill tape, cut a strip of black fabric according to your pattern or desired width. Fold this strip in half lengthwise and press firmly to create a crease. Open it up, then fold both raw edges in toward the center crease and press again, creating a neat, finished strip. Carefully thread this prepared belt piece through your ¾-inch belt buckle or slider, positioning it centrally. Place this complete Santa belt assembly onto the front fabric piece of your towel holder, ensuring it’s perfectly centered and aligned as per the pattern. Pin it securely in place, then stitch both ends of the belt to the front fabric piece. Next, take your white fleece strips (the “fur” trim) and place them at the top and bottom edges of the red front piece, right sides facing and raw edges matching. Pin them in place, then sew along each side to attach them. Open the fabric flat, then place the large main red fabric piece on top of this assembly, right sides facing, and sew them together along one side, creating a continuous front panel.
Step 3: Constructing the Back Panel and Integrating Magnetic Buttons
After sewing the large red fabric piece to your front panel, open the fabric flat and flip it over to the wrong side. Give it a nice, crisp press with your iron, ensuring the seams are pressed neatly in one direction. Then, flip it back so the right side is facing up. Now, take your back pieces (the ones with the fused interfacing) and place them above the top and bottom of your assembled front panel, ensuring their right sides are facing together and the glue side of the interfacing is facing up. Match up the notches on these pieces and pin them securely. Next, prepare the inner panels of your towel holder. These are typically smaller lining pieces that will form the inside of the loop where the towel hangs. Refer to the video tutorial by Notches Sewing for precise guidance on how to prepare and position these inner panels. Once positioned correctly, sew them along each long side. Give both the front and back panel assemblies another thorough press, including all the seams, to ensure a neat and professional finish. Now is the time to attach the magnetic buttons. Following the marks you made earlier and your pattern instructions, securely install the magnetic buttons onto the designated spots on the back panel. Finally, insert your chosen lining fabric piece, carefully aligning it with the outer fabric layers, right sides together.
Step 4: Final Assembly, Turning, and Professional Finishing
With all layers (outer fabric, inner panels, and lining) carefully aligned and right sides facing, use fabric clips or pins to secure them all around the edges. Sew all these layers together along one short side and then along the long curved edges, leaving a small gap on one of the straight sides (as indicated in the pattern or tutorial) for turning the project right side out. Be sure to backstitch at the beginning and end of your seams for added durability. Carefully trim any excess seam allowance and clip the curves (make small snips into the seam allowance, being careful not to cut the stitching) to help the edges lie flat when turned. Gently pull the entire piece right side out through the gap you left. Take your time with this step to avoid stressing the seams. Once turned, use a point turner or a dull pencil to gently push out all the curves and corners, achieving a smooth and well-defined shape. Give the entire project a nice press with your iron. Now, fold over the raw edges of the gap to the inside, tucking them neatly. Pin this opening closed. You will then topstitch along the bottom edge where the magnetic buttons are, reinforcing that area and adding a decorative touch. To close the remaining gap, you can either topstitch all around the outer edge for a complete finish (which also adds durability) or carefully hand-stitch the gap closed using a ladder stitch for an invisible finish. Your Christmas hanging tea towel holder is now complete! To use it, simply fold a tea towel into thirds lengthwise and insert it through the opening of the holder, securing it with the magnetic buttons.
Tips for a Flawless Tea Towel Holder
To ensure your sewing project goes smoothly and results in a beautiful, durable tea towel holder, keep these tips in mind:
- Accurate Cutting: Precision in cutting your fabric pieces will make a significant difference in the final outcome. Use sharp scissors or a rotary cutter and mat for clean, straight edges and accurate curves.
- Pressing is Your Friend: Don’t underestimate the power of an iron! Pressing seams flat and fusing interfacing correctly creates crisp, professional-looking results. Pressing at each stage helps your fabric lie flat and makes subsequent sewing easier.
- Pre-Wash Your Fabrics: Always pre-wash and dry your cotton fabrics before cutting and sewing. This prevents potential shrinkage after your project is completed and ensures all your fabrics will react similarly when washed.
- Use Good Quality Thread: A strong, all-purpose polyester thread will hold up well to repeated use and washing. Match your thread color to your fabric as closely as possible for a seamless finish.
- Test Your Stitch Settings: Before sewing on your actual project, always test your sewing machine’s stitch length and tension on a scrap piece of your project fabric. This helps avoid unraveling seams or puckering fabric.
- Clip Curves Carefully: When sewing curved seams, remember to clip the seam allowances after stitching. For outward curves, snip V-shapes; for inward curves, make small straight cuts. This allows the fabric to lay smoothly when turned right side out.
- Take Your Time: Rushing can lead to mistakes. Enjoy the process! Take breaks if you feel frustrated, and approach each step with patience and attention to detail.
Creative Variations & Customization
While the Santa-themed design is undeniably charming for the holidays, the beauty of DIY projects lies in their potential for customization. Here are some ideas to inspire you to make this tea towel holder truly your own, or adapt it for different occasions:
- Seasonal Themes: Instead of red and white, imagine a fall-themed holder with orange and brown fabrics, perhaps with a pumpkin-shaped buckle. For spring, pastel colors and floral prints would be lovely.
- Everyday Elegance: This design isn’t just for holidays. Use solid colors or neutral patterns to create an elegant everyday towel holder for your kitchen or bathroom.
- Fabric Play: Experiment with different fabric textures. A velvet for a luxurious feel, or a linen blend for a rustic touch. Just be mindful of how different fabrics sew and handle.
- Embellishments: Add embroidery, appliqué, or decorative stitches to further personalize your holder. Small buttons, charms, or even a mini jingle bell could add extra festive flair to the Santa design.
- Closure Alternatives: If magnetic buttons aren’t your preference, consider using sturdy snap fasteners, Velcro, or even a small button with a fabric loop closure for a different look.
- Size Adjustments: Want a holder for larger hand towels or smaller dishcloths? You can slightly adjust the pattern size, but remember to adjust the buckle and fabric strip width accordingly.
Wrap Up Your Holiday Sewing Project
Congratulations! You’ve successfully navigated the steps to create your very own charming Christmas hanging tea towel holder. This project is a testament to the joy of handmade crafts, offering both practical utility and a delightful aesthetic appeal that brightens any kitchen. Whether it’s hanging proudly in your home, gracing a friend’s kitchen as a thoughtful gift, or sparkling at a holiday craft fair, this tea towel holder is sure to spread cheer.
We hope this detailed guide has empowered you to embrace your sewing machine and create something truly special. Don’t forget to visit Notches Sewing’s YouTube channel for the original video tutorial and to discover more inspiring sewing projects. Happy sewing, and may your holidays be filled with handmade warmth and joy!