
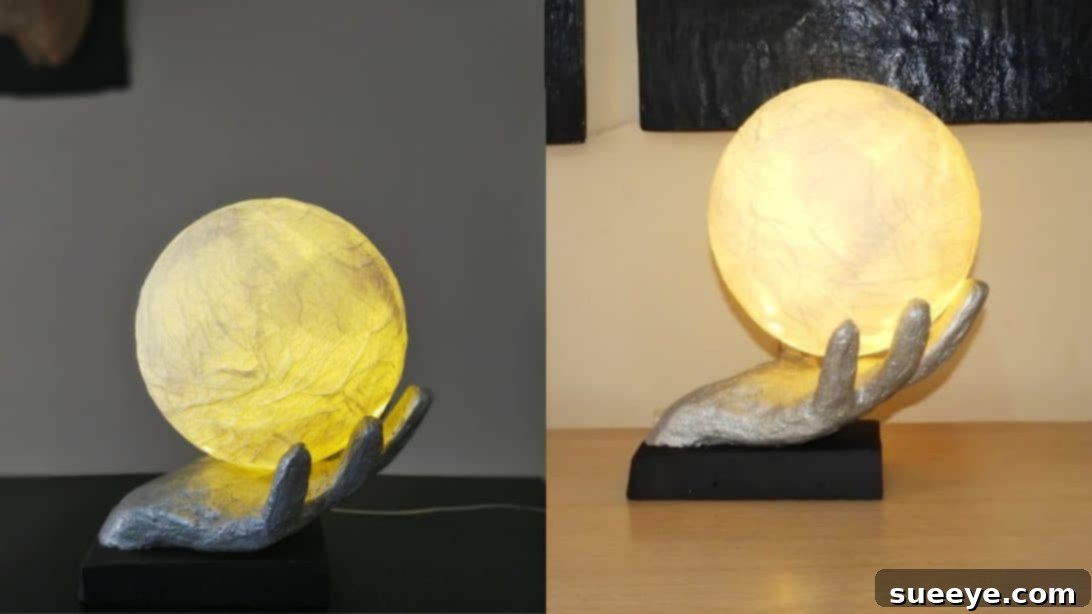
A Captivating DIY Project: Crafting Your Own Hand-Holding-the-Moon Lampshade
There’s an undeniable allure to cement projects, transforming a utilitarian material into something truly artistic and functional. My latest obsession led me to create this mesmerizing hand-holding-the-moon lampshade, a piece that has completely captivated me with its unique charm and ethereal glow. This stunning DIY tutorial, originally shared by the incredibly talented Hüseyin Güler on his YouTube channel, instantly stole my heart. It’s a project that combines sculpting with practical lighting, resulting in a show-stopping piece of home decor that’s guaranteed to spark conversation. If you’re looking for a creative outlet and a way to add a deeply personal, artistic touch to your living space, this guide will walk you through every step of bringing this enchanting vision to life.
Why Choose This Unique Cement Lampshade?
In a world of mass-produced decor, a handmade item like the Hand-Holding-the-Moon Lampshade stands out. This isn’t just a light source; it’s a piece of sculptural art that tells a story. Cement, often overlooked in home crafts, offers incredible durability and a rustic, industrial aesthetic that beautifully complements modern and eclectic interiors alike. Crafting this lamp allows you to personalize your space with a truly one-of-a-kind creation, showcasing your ingenuity and style. Imagine the soft, ambient glow of the ‘moon’ cradled in a cement hand, casting a serene atmosphere in any room. Beyond its aesthetic appeal, undertaking such a DIY project brings immense satisfaction, empowering you with new skills and a tangible testament to your creativity. It’s an eco-friendly option too, as you’re making something new and lasting with readily available materials, rather than buying something mass-produced.
Essential Materials You’ll Need
Before embarking on this creative journey, gathering all your materials is key. While some items are standard craft supplies, others are specific to working with cement. Ensure you have everything on hand to make the process smooth and enjoyable. Don’t be afraid to think ahead about colors or finishes you might want to use to truly make this project your own.
For the Sturdy Cement Hand Sculpture:
- Wool gloves: These will serve as the mold for your hand, giving it a realistic texture. Choose a pair that fits snugly but allows for some movement once filled.
- Metal wire: Essential for creating the armature, providing the initial shape and structural integrity for your hand sculpture. A medium-gauge wire that can be bent but holds its shape is ideal.
- Aluminum foil: Used to bulk up the wire armature and help define the hand’s shape before applying cement. It’s lightweight and easy to mold.
- Cement: The primary material for the hand. A general-purpose cement mix will work well, but ensure it’s suitable for sculpting.
- Water: For mixing with cement to achieve the right consistency for brushing and pasting.
- Brush: A sturdy brush is needed for applying the initial cement mixture onto the gloved hand.
- Container: For mixing cement and water. You might want several containers for different consistency mixes.
- Sand: Used in combination with cement for a stronger, more substantial base for the hand.
- Wood border: This will act as a temporary mold for the base of the hand, ensuring a clean, rectangular shape.
- Sandpaper: Essential for smoothing out rough edges and achieving a polished finish on the dried cement. Various grits will be helpful.
- Paint: For decorating your finished hand sculpture. Acrylic or spray paints designed for concrete/masonry are recommended for durability.
For the Ethereal Moon Lamp:
- Tissue: Or thin paper, used to create the paper mâché moon shell. Napkins, toilet paper, or delicate craft paper can work.
- Wood glue: Mixed with water, this acts as the adhesive for your paper mâché, providing a hard, durable shell.
- Balloon: The foundational mold for your moon. Choose a round balloon that can be inflated to your desired moon size.
- Fairy lights (LED string lights): To illuminate your moon, creating a magical glow. Battery-operated ones are often best for portability and safety.
- Thick round paper: For creating the base that holds the fairy lights and sits on the hand. Cardboard or strong craft paper will suffice.
Step-by-Step Guide to Crafting Your Lunar Hand Lampshade
This project is a journey of sculpting and assembly, requiring patience and attention to detail. Take your time with each phase, allowing sufficient drying times, as this is crucial for the structural integrity and longevity of your lampshade. Remember, handmade pieces carry the unique imprint of their creator, so embrace any imperfections as part of its charm.
Phase 1: Constructing the Hand Base
Step 1: Forming the Wire Armature
Begin by meticulously forming the metal wire into the skeletal structure of a hand. This is the foundation upon which your sculpture will be built, so take care to get the general proportions right. Create distinct fingers, a palm, and a wrist area. Bend the wire carefully to ensure it’s stable and can support the subsequent layers. This armature provides the strength and pose for your cement hand, so a well-formed wire frame is critical for the overall success of the project.
Step 2: Adding Volume with Aluminum Foil
Once your wire hand is shaped, cover it entirely with aluminum foil. This step serves multiple purposes: it adds necessary volume, helps to refine the contours of the hand, and provides a surface for the wool glove to adhere to more smoothly. Wrap the foil tightly but gently, avoiding sharp edges, and ensure the basic anatomical shapes of the hand are discernible. The foil will also act as a barrier and prevent the cement from soaking into the glove too much initially.
Step 3: Preparing the Wool Glove Form
Carefully insert the wool glove over the aluminum foil and wire armature. Position the glove so that the fingers align with the wire frame, and then sculpt the fingers into a natural, cupped position, as if gently holding a spherical object – in this case, the moon. The pose should look relaxed yet capable of supporting the moon. Adjust and manipulate the glove to ensure a realistic and appealing hand posture, paying attention to how the thumb and fingers would naturally curve.
Step 4: The First Cement Layer – Building the Foundation
In a container, combine cement and water, mixing thoroughly until you achieve a smooth, pourable consistency, similar to a thick pancake batter. This initial cement wash will be brushed onto the gloved hand. Apply the mixture evenly to all sides of the hand, ensuring it saturates the wool and begins to adhere to the underlying foil. This first layer is crucial for hardening the glove and providing a base for further sculpting. Once fully coated, set the hand aside in a stable position and allow it to dry completely. This might take several hours or even overnight, depending on humidity.
Phase 2: Crafting the Luminous Moon Orb
Step 5: Inflating and Sizing Your Balloon
Inflate a balloon to your desired ‘moon’ size. Before tying it off, place it onto the cement hand to verify that the proportions are visually pleasing. The moon should nest comfortably within the hand’s grasp without looking too large or too small. Adjust the inflation as necessary until you achieve the perfect balance. Once satisfied with the size, securely tie the balloon’s opening. This balloon will serve as the temporary mold for your paper mâché moon.
Step 6: Creating the Paper Mâché Moon Shell
To prepare the balloon for paper mâché, tie a flat object to the bottom of the balloon. This elevates it slightly and provides a stable base for working, preventing it from rolling around. Next, begin covering the balloon with layers of tissue paper. For each layer, generously brush the balloon with a mixture of wood glue and a small amount of water (about 2 parts glue to 1 part water). Apply strips of tissue, overlapping them slightly, and smooth out any air bubbles or wrinkles as you go. Build up several layers to ensure the moon shell is sturdy enough once dry. Once the entire balloon is covered, allow it to dry completely. This step is crucial for the moon’s structural integrity, so patience is key. It might take 24 hours or more, depending on the number of layers and humidity.
Phase 3: Sculpting and Refining the Hand
Step 7: Applying the Sand-Cement Mixture for a Stable Base
Prepare a new cement mixture by combining 2/3 sand and 1/3 cement in a container. Gradually add a small amount of water, mixing until the consistency resembles a thick, workable paste. This sand-cement mix offers greater density and strength, ideal for the hand’s dorsal side (back) and base. Brush this paste onto the back of the hand, smoothing it out to create a flatter, more substantial surface. This step also involves carefully removing any excess aluminum foil that might be visible, ensuring a cleaner look for the final sculpture.
Step 8: Shaping the Hand’s Foundation in a Mold
Take your wooden border and fill it with the prepared sand-cement-water mixture. This creates a mold for the rectangular base of your hand sculpture. Carefully place the cement hand into this border, palm side facing up, ensuring it’s centered and stable. To slightly elevate the fingers and define the palm, add a small piece of wood scrap underneath the fingers. This detail will enhance the realism of the hand’s pose. Cover any exposed aluminum parts within the base with the sand-cement mixture, blending it seamlessly. Allow this entire assembly to set and partially dry.
Step 9: The Final Cement Coat for Smoothness and Durability
Once the previous layers have set, prepare another batch of pure cement and water mixture, similar to the consistency of step 4. This is your final, refining coat. Carefully brush this smoother mixture over the entire hand sculpture, ensuring all surfaces are covered evenly. This layer will fill in any minor imperfections, create a uniform texture, and significantly enhance the durability and finished look of the cement hand. Pay particular attention to smoothing out any brush strokes for a cleaner finish. After this final application, allow the hand to dry completely, ideally for at least 24-48 hours, to ensure maximum hardness and stability.
Phase 4: Finishing Touches and Assembly
Step 10: Demolding and Sanding for a Polished Finish
Once the cement is completely dry and cured, carefully remove the wood scrap and the surrounding wood border. This might require gentle prying. Now comes the crucial step of refining the surface. Don a dust mask to protect yourself from cement dust, and begin sanding the entire hand sculpture with sandpaper. Start with a coarser grit for any major bumps, then move to finer grits to achieve a smooth, touchable finish. Focus on any rough edges or uneven areas, ensuring the hand feels pleasant to the touch and looks professionally sculpted.
Step 11: Priming and Painting Your Masterpiece
With the hand smoothed to perfection, it’s time to add color. Apply a suitable primer if recommended for your chosen paint, then paint the hand white, providing a clean, classic, and ethereal base. The rectangular bottom base can be painted black to create a striking contrast, enhancing the visual weight and modernity of the piece. You might consider other color combinations that suit your personal decor style. Allow the paint to dry thoroughly between coats and before proceeding.
Step 12: Assembling the Moon Lamp with Fairy Lights
Now, turn your attention to the moon. Carefully remove the deflated balloon from inside the dried paper mâché shell. Next, take your thick round paper and cut a circle that fits perfectly to cover the bottom opening of your moon. Cut a hole in the center of this paper circle. Insert the fairy lights into the moon shell through this hole, arranging them inside to ensure an even glow. Secure the paper circle to the bottom of the moon. Finally, carefully place the finished paper mâché moon orb onto the cupped cement hand, ensuring it sits securely and majestically. Your Hand-Holding-the-Moon Lampshade is now complete, ready to illuminate your space with its unique charm.
Tips for Success and Customization
Crafting this unique lampshade is an incredibly rewarding experience. To ensure your project goes smoothly and to inspire further creativity, here are some additional tips:
- Patience is Key: Cement projects demand ample drying time. Rushing the drying process can lead to cracks or structural weaknesses. Always allow each layer to fully cure before moving on to the next step.
- Safety First: When working with cement and sanding, always wear gloves, a dust mask, and eye protection. Ensure you’re in a well-ventilated area to avoid inhaling cement dust.
- Experiment with Finishes: While white and black offer a classic contrast, consider painting the hand in a metallic tone like bronze or silver, or a natural stone color for a different aesthetic. A clear sealant can also add shine and protect the paint.
- Alternative Lighting: Instead of traditional fairy lights, explore using a small, battery-operated LED puck light or a single, warm LED bulb if you can integrate a socket securely. Just ensure any electrical components are safe and properly installed.
- Base Variations: The rectangular base offers stability, but you could experiment with other shapes, like a round or organic base, using different molds. You might even integrate small pebbles or decorative elements into the base before it fully sets.
- Hand Poses: Don’t be limited to the cupped hand. With practice, you could try different hand gestures, such as an open palm, a pointing finger, or even a more intricate pose, to hold other decorative elements or light sources.
- Embrace Imperfection: Handmade items inherently have unique characteristics. Don’t stress over minor imperfections; often, these add to the charm and individuality of your custom piece.
Conclusion: Illuminate Your Space with DIY Artistry
Creating your own Hand-Holding-the-Moon Lampshade is more than just a craft project; it’s an opportunity to infuse your living space with personalized artistry and a touch of magic. This detailed guide, inspired by Hüseyin Güler’s brilliant concept, equips you with the knowledge and steps to build a truly unique piece of home decor. From sculpting the sturdy cement hand to crafting the delicate, glowing moon, each stage is a testament to your creativity and dedication. The resulting lampshade will not only serve as a functional light source but also as a captivating sculpture, drawing eyes and compliments alike. So, gather your materials, embrace the crafting process, and prepare to illuminate your home with a handmade masterpiece that reflects your personal style and passion for DIY. Don’t forget to share your incredible creations!