
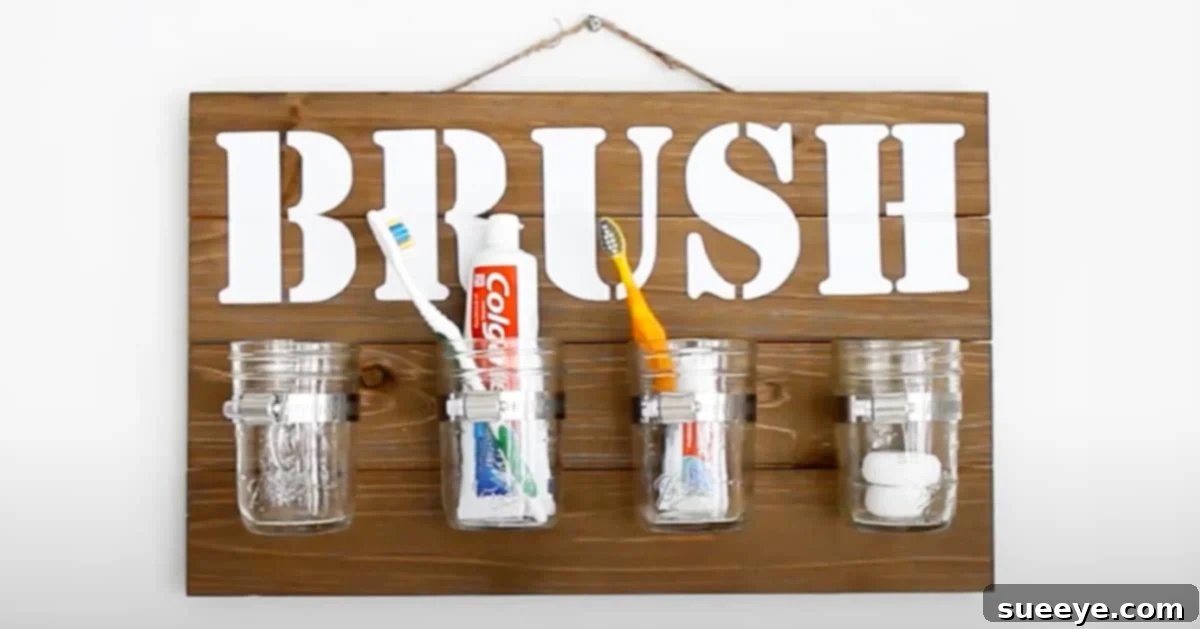
In the realm of home decor, especially when it comes to bathrooms, striking a balance between aesthetic appeal and practical organization can often feel like a formidable challenge. Many of us prefer a minimalist approach, favoring simplicity over clutter. However, what if you could achieve both elegance and exceptional functionality with a single, delightful DIY project? Introducing the **Mason Jar Wall Decor Bathroom Organizer**, a brilliant 2-in-1 craft that seamlessly blends rustic charm with ingenious storage solutions. This project is designed to perfectly complement a simple, clean bathroom aesthetic while ensuring all your essentials are neatly tucked away. Imagine adding a touch of natural beauty with fresh flowers in some jars, even when you have ample storage space. This farmhouse-inspired bathroom organizer brings warmth and character to your home without contributing to countertop clutter, making it an ideal addition for anyone seeking both style and order. Beyond the bathroom, its versatility knows no bounds; it’s an adorable way to organize toothbrushes for a family, or it can effortlessly transform into a handy holder for pens, highlighters, and office supplies in your workspace. Inspired by the incredibly detailed and easy-to-follow tutorial by Angie Holden on YouTube, this guide will walk you through creating your own personalized wall decor organizer, bringing a touch of handmade charm and order to any room.
Why This DIY Mason Jar Organizer Is a Must-Have for Your Home
Beyond its charming aesthetic, the DIY Mason Jar Wall Decor Organizer offers a multitude of benefits that make it an indispensable addition to any household. It’s more than just a craft; it’s a strategic solution for common home organization dilemmas.
Aesthetic Appeal Meets Functional Design
The beauty of this project lies in its ability to marry rustic farmhouse elegance with highly practical storage. Mason jars evoke a timeless, vintage feel that can effortlessly enhance a variety of decor styles, from classic farmhouse to shabby chic, and even modern minimalist with a touch of warmth. Mounting them on the wall instantly frees up valuable counter space, which is especially beneficial in smaller bathrooms or kitchens. This design not only keeps your essentials organized but also turns everyday items into a decorative display.
Ultimate Versatility and Customization
One of the standout features of this organizer is its incredible adaptability. While perfect for the bathroom – holding toothbrushes, toothpaste, cotton swabs, and makeup brushes – its utility extends far beyond. Envision it in your craft room, neatly storing paintbrushes, scissors, or beads. In an office, it becomes a stylish home for pens, pencils, and paperclips. Even in a kitchen, it can hold small utensils or fresh herbs. The ability to personalize this project, from the color of the wood to the design of the labels and the finish of the jars, ensures that your creation will perfectly reflect your personal style and needs. This level of customization makes it a truly unique piece of DIY home decor.
Cost-Effective and Environmentally Friendly
Crafting your own wall organizer is significantly more economical than purchasing pre-made storage solutions, especially those with a similar rustic or farmhouse appeal. Many of the supplies, such as mason jars, are readily available and often affordable, or can even be repurposed from items you already have. This project not only saves you money but also encourages a sustainable approach to home decor by utilizing common materials to create something beautiful and functional that would otherwise end up in landfill. It’s a rewarding way to contribute to a greener lifestyle while enhancing your living space.
A Family-Friendly Project for All Ages
Engaging in DIY projects can be a fantastic way to spend quality time with family. While some steps may require adult supervision, the design and assembly can be a fun, collaborative effort. For instance, children can help decide on the layout, choose label designs, or even decorate the mason jars (with non-toxic paints). In a family bathroom, designating individual jars for each child’s toothbrush or comb can teach responsibility and keep things organized, minimizing morning rush hour chaos. It truly is a project that delivers both practical benefits and cherished memories.
Essential Supplies for Your Mason Jar Wall Organizer
Gathering all your materials before you begin is the first step to a smooth and enjoyable crafting experience. Most of these items are readily available at craft stores, hardware stores, or online. Here’s what you’ll need to create your own functional masterpiece:
- Mason jars: Choose jars that suit your needs. Standard pint-sized jars are versatile, but you might opt for larger quart jars for bulkier items or smaller half-pint jars for cotton swabs. The number of jars depends on the length of your wooden board and desired storage capacity.
- Wooden board: The foundation of your organizer. Select a piece of wood that is sturdy, appropriately sized for your chosen location, and complements your decor. You can use reclaimed wood for an authentic rustic look, or a new piece that you can stain or paint.
- Pipe clamps: These metal clamps are crucial for securely holding the mason jars to the wooden board. Ensure they are the correct size to snugly fit around your chosen mason jars. Adjustable clamps are often the most flexible option.
- White vinyl (or preferred color): Used with a craft cutter to create custom labels or decorative elements. High-quality permanent vinyl will ensure your design lasts.
- Transfer tape: Essential for transferring your cut vinyl design smoothly and accurately from its backing onto the wooden board.
- Cricut machine (or similar craft cutter): A fantastic tool for cutting intricate designs and lettering from vinyl. If you don’t have one, stencils and paint markers can be an alternative.
- Weeding tools: Small hooks and tweezers designed to remove excess vinyl from your cut design, leaving only the desired graphic or text.
- Scraper (or credit card): Used to firmly press down transfer tape onto your vinyl and then the vinyl onto your wooden board, ensuring a strong adhesion and preventing bubbles.
- Screwdriver: For tightening the screws that secure the pipe clamps to the wooden board.
- Drill: To pre-drill pilot holes in the wooden board before attaching the pipe clamps with screws. This prevents the wood from splitting and makes screw insertion easier.
- Screws: Specifically chosen to be long enough to securely fasten the pipe clamps to the wooden board without poking through the front. Match them to your drill bit size.
- BRUSH SVG file: This specific digital file contains the “BRUSH” lettering design, ideal for creating a themed bathroom organizer. You can also create or download other designs.
- Measuring tape or ruler: For precise spacing and marking of jar placement.
- Pencil: For marking drilling points and jar placements on the wooden board.
- Wall hanging hardware: (Optional, but recommended) D-rings, keyhole hangers, or picture wire and hooks to safely mount your finished organizer to the wall. Ensure they are rated for the weight of your board, jars, and their contents.
Step-by-Step Guide to Crafting Your Mason Jar Wall Organizer
Follow these detailed instructions to create your beautiful and functional farmhouse-style mason jar wall decor organizer. Each step is designed for clarity, ensuring a successful DIY experience.
Step 1: Design and Cut Your Vinyl Labels with a Craft Cutter
The first step involves preparing your custom labels or decorative text using a craft cutter like a Cricut machine. This adds a personalized touch and clearly defines the organizer’s purpose. Begin by downloading your desired design file. For a classic bathroom organizer, you can download the “BRUSH” SVG file here. Once downloaded, import the file into your Cricut design software. Adjust the size of the lettering to fit proportionally on your wooden board. Place your chosen white (or colored) vinyl onto a cutting mat and load it into your Cricut machine. Follow the software’s prompts to cut your design. After cutting, carefully remove the vinyl from the mat. This is where your weeding tools come in handy: meticulously peel away all the excess vinyl, leaving only your “BRUSH” lettering or chosen design on the backing paper. This precision ensures a clean and professional look. If you don’t have a craft cutter, you can achieve a similar effect by using stencils and paint, or even hand-painting your labels for a more rustic, freehand style.
Step 2: Transferring Your Vinyl Design to the Wooden Board
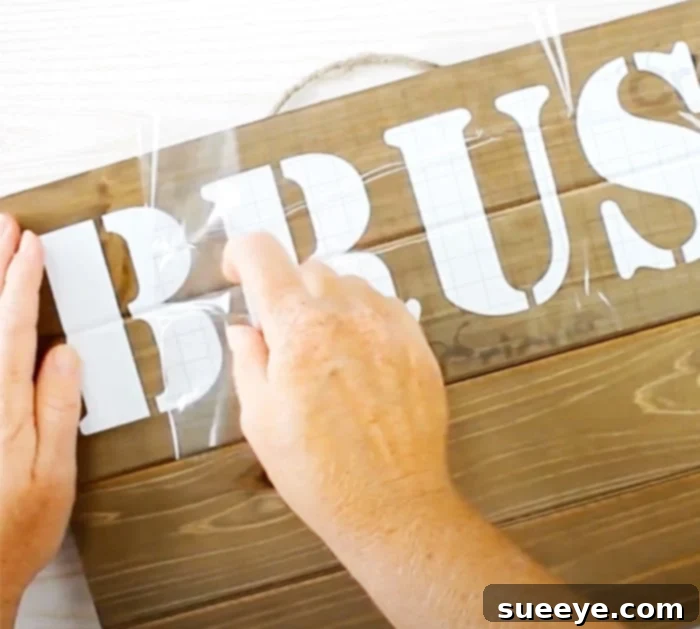
With your vinyl design weeded, it’s time to transfer it onto your wooden board. This step requires a steady hand and patience to ensure a smooth, bubble-free application. Cut a piece of transfer tape slightly larger than your vinyl design. Carefully place the transfer tape over your weeded vinyl design, pressing down firmly with your scraper or a credit card to ensure the vinyl adheres well to the tape. Slowly peel the transfer tape, making sure the vinyl design lifts off its backing paper and sticks to the transfer tape. Now, position your vinyl design, still attached to the transfer tape, onto your wooden board. Take your time to align it perfectly, as repositioning can be tricky. Once in place, use your scraper to rub firmly over the entire design, working from the center outwards to push out any air bubbles and ensure strong adhesion to the wood. Finally, slowly and carefully peel back the transfer tape at a sharp angle. If any part of the vinyl lifts, simply lay the tape back down and rub over that section again. For a visual demonstration of this technique, refer to Angie Holden’s tutorial, which provides excellent guidance on achieving a flawless transfer.
Step 3: Strategic Placement and Marking for Your Mason Jars
The layout of your mason jars will significantly impact the overall look and functionality of your organizer. Begin by laying your wooden board on a flat surface. Arrange your mason jars on the board in your desired configuration. This “dry run” allows you to visualize the spacing and make any adjustments before drilling. Consider equal spacing for a symmetrical look, or try an asymmetrical arrangement for a more dynamic design. Once you are satisfied with the placement of each jar, use a pencil to mark the exact spot where the pipe clamps will be attached to secure each jar. Ensure these marks are centered and consistent for a polished finish. This step is crucial for achieving both aesthetic balance and secure attachment for your jars.
Step 4: Securing the Pipe Clamps to the Wooden Board
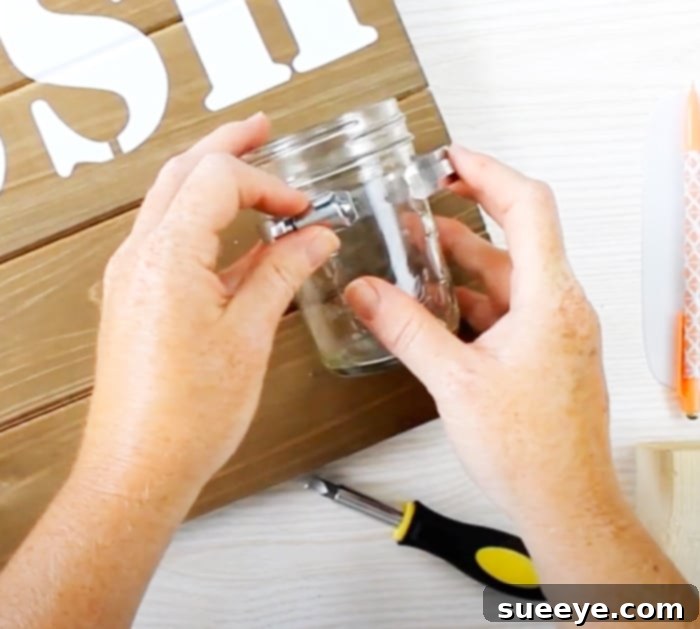
With your marks in place, it’s time to attach the pipe clamps that will cradle your mason jars. Take one pipe clamp and align it with one of your pencil marks. Using a drill, carefully pre-drill a pilot hole through the designated screw hole of the pipe clamp and into the wooden board. Pre-drilling is vital to prevent the wood from splitting, especially if you are using a softer wood or working close to the edge. Once the pilot hole is ready, use your screwdriver to firmly secure the pipe clamp to the board with a screw. Repeat this process for all the remaining pipe clamps, ensuring each one is tightly fastened. Double-check that all clamps are oriented correctly and securely attached, as these will bear the weight of your jars and their contents. This step is about stability and safety, so take your time and ensure each clamp is robustly in place.
Step 5: Final Assembly and Hanging Your Organizer
Once all your pipe clamps are securely attached to the wooden board, you can now insert your mason jars. Loosen each pipe clamp slightly (if necessary) and slide a mason jar into each one. Gently tighten the clamps around the neck or body of the jars until they are held firmly in place, but not so tight that they might crack the glass. You want them snug and secure. With your jars in place, your organizer is almost complete! The final step is to prepare it for hanging. While not explicitly covered in the original content, for secure wall mounting, you’ll need to attach appropriate hanging hardware to the back of your wooden board. Options include D-ring hangers, keyhole hangers, or a sturdy picture wire, depending on the weight of your finished piece and the contents you plan to store. Measure and attach these hangers evenly on the back. Choose sturdy wall anchors appropriate for your wall type (drywall, plaster, studs) to ensure your organizer is safely supported. Hang your beautiful new mason jar wall decor organizer in your chosen spot, step back, and admire your handiwork.
Creative Ways to Utilize Your Mason Jar Organizer Beyond the Bathroom
While this project is perfectly suited as a stylish bathroom organizer, its inherent versatility means it can enhance virtually any room in your home. Let your imagination run wild with these creative applications:
- In the Bathroom: The classic use! Perfect for neatly storing toothbrushes, toothpaste, cotton balls, Q-tips, makeup brushes, hair ties, small soaps, or even fresh eucalyptus sprigs for a spa-like aroma. It helps declutter countertops and keeps essentials within easy reach.
- In the Kitchen: Transform it into a charming rustic kitchen organizer. Use the jars to hold cooking utensils (spatulas, whisks), frequently used spices, small snack packets, tea bags, or even a mini herb garden with small potted herbs. It adds a touch of country charm while keeping your kitchen essentials organized.
- In the Office or Craft Room: Say goodbye to cluttered desks! This organizer is ideal for holding pens, pencils, markers, highlighters, scissors, rulers, paper clips, rubber bands, and other stationery. For crafters, it’s perfect for paintbrushes, knitting needles, beads, buttons, or small fabric scraps.
- In a Child’s Room or Playroom: A fantastic solution for organizing art supplies like crayons, colored pencils, and small paint tubes. It can also hold tiny toys, building blocks, or hair accessories, making cleanup a breeze and adding a playful touch.
- In the Entryway or Mudroom: Create a functional drop zone for everyday items. Use the jars to store keys, mail, sunglasses, loose change, or even small leashes for pets. It’s a stylish way to keep your entryway tidy and welcoming.
- As Decorative Floral Display: If you love fresh flowers but lack vase space, these jars make charming individual vases. Fill each jar with a different flower, or a cohesive bouquet, to bring natural beauty and color to any room.
The possibilities are truly endless, making this DIY project one of the most adaptable and rewarding crafts for home organization.
Personalizing Your Farmhouse Masterpiece
One of the most exciting aspects of any DIY project is the opportunity for personalization. Your Mason Jar Wall Decor Organizer can be tailored to perfectly match your home’s aesthetic and your individual style. Here are some ideas to make your creation truly unique:
- Wood Finish:
- Stain: Choose a wood stain that complements your existing furniture or cabinetry. Darker stains create a more traditional farmhouse look, while lighter stains offer a breezy, modern rustic vibe.
- Paint: Opt for chalk paint for a distressed, vintage feel, or use a semi-gloss paint for a cleaner, more contemporary appearance. You could even paint it a bold color to create a focal point.
- Natural: Embrace the raw beauty of the wood by simply sealing it with a clear coat to protect it while showcasing its natural grain.
- Mason Jar Embellishments:
- Paint: Spray paint the jars in a matte finish, or use frosted glass spray for a softer look. You can also paint patterns or dip the bottoms in a contrasting color.
- Twine or Ribbon: Wrap the necks of the jars with natural jute twine, lace, or colorful ribbons to add texture and a decorative touch.
- Labels: Beyond the “BRUSH” design, create custom labels for “COTTON,” “Q-TIPS,” “MAKEUP,” or even individual names for each family member’s items.
- Tinting: You can find methods to tint mason jars with food coloring for a transparent colored glass effect.
- Pipe Clamp Finish:
- Leave them as their natural metallic color for an industrial touch.
- Spray paint them black, white, or bronze to blend seamlessly with your wood choice or to add a subtle contrast.
- Additional Decor:
- Attach small decorative hooks to the bottom edge of the wooden board for hanging towels, loofahs, or small decorative items.
- Add stenciled patterns or freehand artwork directly onto the wood for extra flair.
By experimenting with different colors, textures, and finishes, you can transform this simple craft into a sophisticated, one-of-a-kind piece that truly reflects your personal style and enhances the overall ambiance of your home.
Transform Your Space with This Easy DIY Organizer
In conclusion, the Mason Jar Wall Decor Bathroom Organizer stands out as a truly remarkable DIY project. It elegantly solves the perennial challenge of integrating practical storage with attractive home decor, especially for those who appreciate simplicity and a clean aesthetic. Its charming farmhouse flair brings a comforting warmth to any space, making it feel more like home, without adding to the dreaded clutter. This project isn’t just about creating a storage solution; it’s about adding character, enhancing functionality, and injecting your unique personality into your living environment. Whether you’re organizing a busy family bathroom, decluttering a crafting corner, or simply adding a decorative touch to your kitchen, this versatile organizer fits the bill perfectly. It’s an accessible craft, made even easier by detailed tutorials like Angie Holden’s, ensuring that even novice DIYers can achieve a professional and beautiful result. So, why wait? Gather your supplies, unleash your creativity, and embark on this rewarding journey to create a stunning, customized piece that will not only organize your essentials but also elevate the style of your home. Transform your space today with this super cute and incredibly functional DIY mason jar organizer and enjoy the beauty of an organized life.