
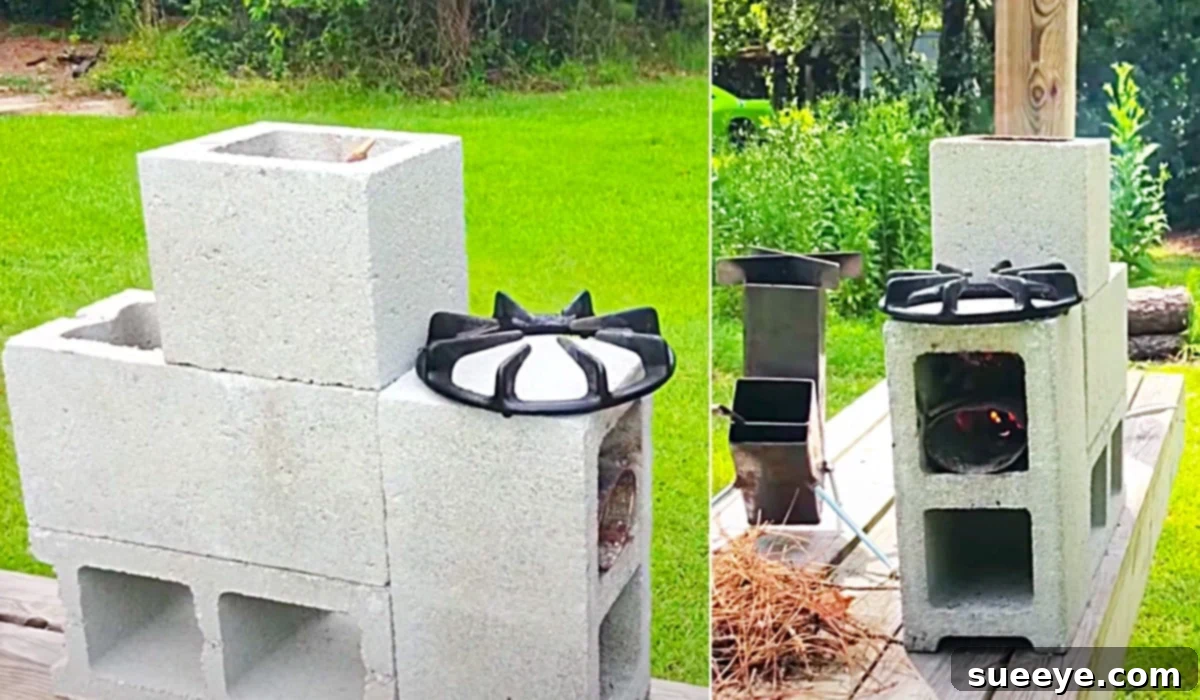
In an unpredictable world, self-sufficiency and preparedness are invaluable skills. Growing up along the Texas Gulf Coast, I’ve witnessed firsthand the disruptive power of severe weather events. These experiences underscore the critical importance of knowing how to create essential tools, especially for outdoor cooking, when conventional utilities might be unavailable. A rocket stove stands out as an exceptionally efficient and practical solution for emergency cooking or simply enhancing your outdoor adventures.
This comprehensive guide will walk you through the process of building a quick and effective DIY rocket stove using readily available cinder blocks. Inspired by an excellent video tutorial by Banshee Moon on YouTube, this method is so straightforward that you’ll be able to assemble a functional outdoor stove in mere minutes. Whether you’re a seasoned prepper, a camping enthusiast, or someone simply looking to expand your practical skills, mastering the construction of a cinder block rocket stove is a truly valuable endeavor that could prove indispensable someday.
How to Build a Cinder Block Rocket Stove in Minutes: Your Ultimate Guide
The beauty of the cinder block rocket stove lies in its simplicity, efficiency, and robustness. Unlike complex metal fabrications, this design requires minimal materials and no specialized tools, making it accessible to virtually anyone. Its ability to generate intense heat from small amounts of biomass fuel makes it an eco-friendly and highly practical choice for a variety of scenarios.
Understanding the Rocket Stove Principle
Before diving into construction, it’s helpful to understand what makes a rocket stove so efficient. At its core, a rocket stove is designed to achieve nearly complete combustion of fuel at high temperatures, thanks to its insulated vertical combustion chamber. This design creates a powerful draft, drawing air into the fuel chamber (the “feed tube”) and up through the chimney (the “heat riser”). This concentrated airflow and insulation lead to several benefits:
- High Efficiency: Burns small diameter wood fuel (twigs, small branches, biomass) very efficiently, producing more heat with less fuel.
- Minimal Smoke: The high combustion temperatures reduce smoke output significantly compared to an open fire.
- Focused Heat: The heat is directed upwards to the cooking surface, minimizing heat loss and speeding up cooking times.
- Clean Burn: More complete combustion means fewer harmful emissions.
A cinder block rocket stove leverages these principles using inexpensive and widely available building materials, making it a perfect DIY project for preparedness or casual outdoor cooking.
Materials For Your DIY Cinder Block Rocket Stove:
Gathering your materials is the first step towards building your efficient outdoor cooking station. The beauty of this project is that most items are either readily available around your home or inexpensive to purchase.
- 4 Cinder Blocks: Standard full-size cinder blocks (also known as concrete masonry units or CMUs) are ideal. Their hollow cores are essential for creating the stove’s internal structure. Ensure they are clean and free from any combustible residues. You might consider having an extra one on hand just in case, or for experimenting with slightly different configurations.
- Twigs or Small Wood Fuel: A key advantage of a rocket stove is its ability to burn small diameter biomass. Collect dry twigs, small branches, wood chips, or even dried leaves. The smaller the fuel, the more efficiently it will burn in the stove’s chamber. Avoid large logs; they defeat the purpose of the rocket stove’s design.
- A Tin Can (or similar pot stand): A sturdy tin can (like a large vegetable can, opened at both ends, or a coffee can) works perfectly as a pot stand. It elevates your cooking pot slightly above the chimney opening, allowing heat to circulate around the base of the pot for even cooking. Alternatively, you can use a few smaller bricks or stones to create a stable pot support.
- A Grill or Metal Grate: This will serve as your cooking surface. A small barbecue grill grate, an old oven rack, or even a sturdy metal mesh can work. The size should be appropriate for the pots and pans you plan to use, providing a stable platform over the stove’s heat source.
- A Lighter or Matches: Essential for igniting your fuel. Always have a reliable fire starter on hand, along with appropriate fire safety measures.
Step-by-Step Directions for Assembly:
Building your cinder block rocket stove is surprisingly quick and intuitive. Follow these detailed steps to assemble your efficient outdoor cooking station. While the Banshee Moon YouTube tutorial provides excellent visual guidance, these written instructions will ensure you grasp every detail.
Step 1: Choose Your Location Wisely
Before placing any blocks, select a safe, level, and non-combustible surface for your stove. This could be bare earth, gravel, or concrete. Ensure there’s ample clearance from any flammable materials like dry grass, tents, or buildings. Wind direction is also a factor; try to position the stove so that prevailing winds don’t blow sparks towards dry vegetation. Fire safety is paramount.
Step 2: Lay the Foundation (First Cinder Block)
Take your first cinder block. This block will form the base and part of the fuel feed chamber. Place it horizontally on your chosen flat surface. One of its hollow cores will be where you feed your fuel (twigs, small wood), and the other will connect to the combustion chamber.
Step 3: Construct the Fuel Feed and Combustion Chamber (Second Cinder Block)
Next, take your second cinder block. Place it perpendicular to the first block, sitting on top of one of the open ends of the first block’s hollow cores. This creates an “L” shape. The hollow core of this second block will become the main combustion chamber, and it should align directly above one of the first block’s hollow sections. The remaining hollow section of the first block will serve as the opening for feeding fuel into the combustion chamber.
Step 4: Form the Chimney/Heat Riser (Third Cinder Block)
Now, place your third cinder block directly on top of the second block. Ensure its hollow core aligns perfectly with the hollow core of the second block below it. This vertical stacking of hollow cores creates your chimney or “heat riser.” This is where the magic of the rocket stove happens, as the hot gases and flames will be drawn upwards, creating a strong draft and concentrated heat.
Step 5: Create the Pot Support (Fourth Cinder Block)
Finally, position your fourth cinder block horizontally across the top of the third block (the chimney). The hollow cores of this top block should span across the opening of the chimney. This block provides a stable base for your grill grate and cooking pot, ensuring that the pot is slightly elevated above the chimney exit, allowing optimal heat transfer and airflow.
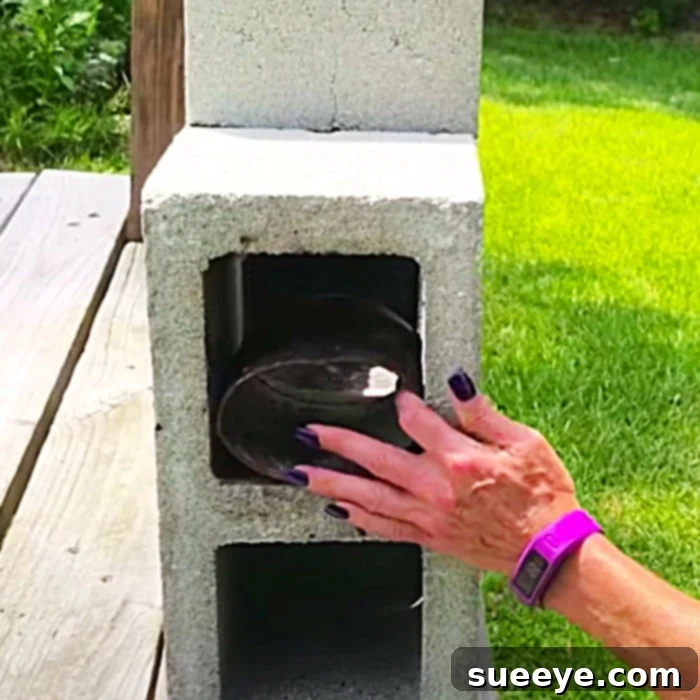
Step 6: Add the Grill and Pot Stand
Place your metal grill grate directly on top of the fourth cinder block. Then, position your tin can (or alternative pot stand) on the grill, directly over the chimney opening. This setup ensures that your cooking vessel is perfectly positioned to receive the maximum, concentrated heat from the stove.
Step 7: Fueling and Ignition
Now your rocket stove is assembled and ready for its first burn! Gather a handful of very fine, dry kindling (small twigs, dry leaves, paper scraps). Insert these into the horizontal fuel feed opening of the first cinder block. Light the kindling using your lighter or matches. Once the kindling is burning steadily, you can gradually introduce slightly larger twigs and small pieces of wood into the feed tube. The design will draw the flame into the combustion chamber, and you’ll quickly notice the characteristic “rocket” roar as the stove reaches its operating temperature.
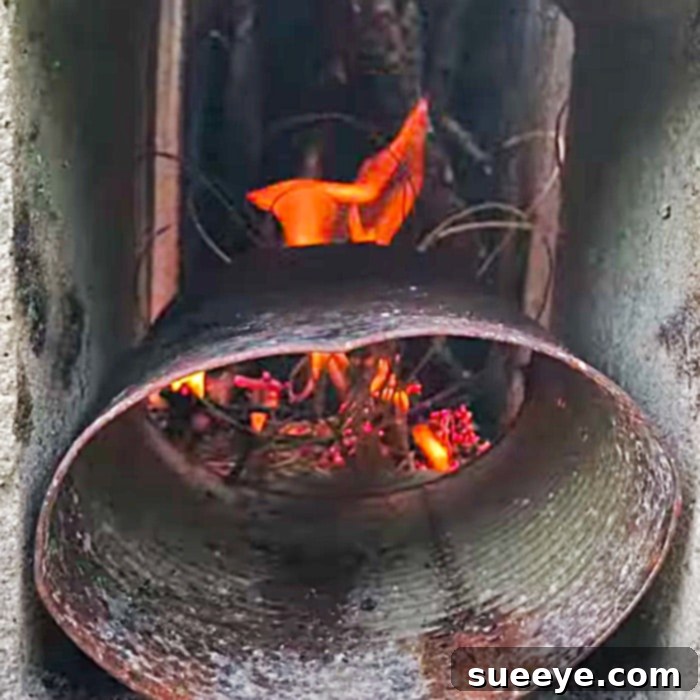
Operating Your Cinder Block Rocket Stove
Once your fire is lit, operating the rocket stove is straightforward. Continue to feed small pieces of fuel into the horizontal feed tube as needed. The key is to avoid overfilling the chamber, as this can smother the flame and produce more smoke. Listen for the distinct “roaring” sound, which indicates efficient combustion. You’ll be amazed at how quickly water boils or food cooks on this simple setup.
- Fuel Management: Feed fuel horizontally into the feed tube, allowing it to slowly push into the hot combustion chamber.
- Heat Control: Adjusting the amount of fuel dictates the heat intensity. Less fuel for simmering, more for boiling or high-heat cooking.
- Safety First: Never leave the stove unattended while burning. Keep a bucket of water or sand nearby for emergencies. Ensure all embers are completely extinguished before walking away.
Advantages of the Cinder Block Rocket Stove:
Beyond its easy construction, the cinder block rocket stove offers a plethora of benefits that make it an essential tool for emergency preparedness, camping, or everyday outdoor cooking:
- Cost-Effective: Cinder blocks are inexpensive and often found lying around construction sites (with permission, of course!).
- Highly Efficient: It burns small fuel very effectively, reducing the amount of wood needed and minimizing your fuel footprint.
- Low Smoke Output: Due to efficient combustion, it produces significantly less smoke than an open campfire, making it more pleasant to cook around.
- Rapid Assembly & Disassembly: You can set it up in minutes and take it apart just as quickly for storage or transport.
- Durability: Cinder blocks are robust and can withstand high temperatures, ensuring your stove lasts for many uses.
- Versatile Fuel: It thrives on biomass like twigs, small branches, pinecones, and other readily available natural debris.
- Focused Heat for Cooking: The directed heat means faster cooking times and less energy wasted.
- Empowering Skill: Knowing how to build and operate this stove boosts your self-reliance and preparedness for unforeseen circumstances.
Important Considerations and Safety Tips:
While remarkably simple and effective, a cinder block rocket stove requires mindful operation to ensure safety and longevity.
- Stable Base: Always build your stove on a perfectly flat and stable surface to prevent it from toppling, especially when a hot pot is on top.
- Ventilation: Although it produces less smoke, ensure you are in a well-ventilated outdoor area. Never use this stove indoors or in enclosed spaces due to carbon monoxide risk.
- Heat Retention: Cinder blocks absorb and retain a significant amount of heat. They will remain very hot for a considerable time after the fire has gone out. Exercise extreme caution and use gloves if handling the blocks shortly after use.
- Fuel Type: Stick to dry, small-diameter biomass. Avoid treated wood, plastics, or other synthetic materials that can release toxic fumes.
- Fire Prevention: Clear a wide area around your stove of any combustible materials. Have a fire extinguisher, a bucket of water, or sand readily available. Never leave a burning stove unattended.
- Disassembly: Allow the blocks to cool completely before attempting to disassemble and store them.
Maintenance and Storage
Maintaining your cinder block rocket stove is as easy as building it. After each use, ensure all embers are completely extinguished and the blocks have cooled down. You can simply brush out any ash from the combustion chamber and feed tube. Since there’s no mortar, you can easily disassemble the blocks and store them neatly, protecting them from weather and making them ready for your next adventure or emergency.
Conclusion: Your Path to Self-Reliance
The ability to build a highly efficient cooking apparatus from basic materials is a testament to human ingenuity and a cornerstone of practical self-reliance. This DIY cinder block rocket stove provides a reliable, efficient, and cost-effective solution for anyone seeking to enhance their emergency preparedness, enjoy more comfortable camping trips, or simply explore sustainable outdoor cooking methods.
Its ease of construction, combined with its impressive fuel efficiency and clean burn, makes it an indispensable tool for a variety of situations. Don’t wait for a disaster to strike; take a few minutes today to build this fantastic stove. You’ll not only gain a valuable skill but also a versatile cooking appliance that can adapt to almost any outdoor scenario. Now, go forth, gather your blocks, and experience the satisfaction of creating something incredibly useful with your own hands!