
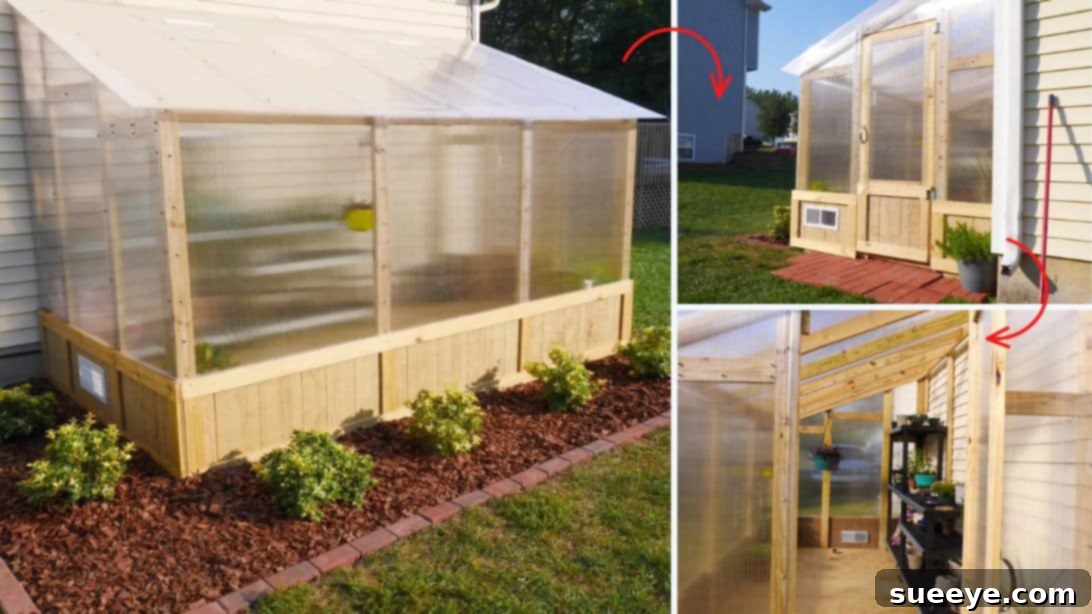
Build Your Own Simple DIY Greenhouse: A Comprehensive Guide for Gardeners
Are you an avid gardener dreaming of extending your growing season, protecting delicate plants, or cultivating exotic flora? A personal greenhouse is the perfect solution, offering a controlled environment for your green companions to thrive year-round. While commercial greenhouses can be costly, building your own DIY greenhouse is a rewarding and surprisingly achievable project. Inspired by the expert craftsmanship of “I Like To Make Stuff” on YouTube, this guide will walk you through the process of constructing a durable and functional greenhouse from the ground up, designed to be both efficient and aesthetically pleasing.
This project is an excellent opportunity to enhance your gardening capabilities, providing a dedicated space where temperature, humidity, and light can be meticulously managed. Whether you’re looking to start seedlings earlier, overwinter sensitive plants, or simply create a beautiful botanical sanctuary, a homemade greenhouse offers unparalleled flexibility. Gather your tools, enlist a friend for assistance, and prepare to transform your backyard into a gardener’s paradise.
Why Build a DIY Greenhouse? The Benefits Unveiled
Investing time and effort into building your own greenhouse brings a multitude of advantages for any gardening enthusiast. Understanding these benefits can motivate you further and help you appreciate the value of your new structure:
- Extended Growing Season: One of the primary advantages is the ability to start planting earlier in spring and continue harvesting later into fall, sometimes even through winter, depending on your climate and heating solutions. This significantly increases your annual yield.
- Optimal Growing Environment: Greenhouses allow you to control crucial environmental factors like temperature, humidity, and ventilation. This stable environment minimizes stress on plants, leading to healthier growth and stronger harvests compared to open-air gardening.
- Protection from Elements: Shield your plants from harsh weather conditions such as frost, strong winds, heavy rain, and hail. It also offers a barrier against common pests and diseases, reducing the need for chemical interventions.
- Grow Exotic and Delicate Plants: Cultivate species that wouldn’t normally survive in your local climate. Tropical flowers, citrus trees, or specific vegetables can flourish in the controlled warmth and humidity of a greenhouse.
- Cost Savings: While there’s an initial investment, growing your own produce can lead to substantial savings on groceries over time. You also gain access to fresher, organic options.
- Hobby and Therapy: Gardening is a therapeutic activity, and having a dedicated, comfortable space to pursue it can enhance the experience. It becomes a personal sanctuary for relaxation and connection with nature.
- Sustainability: By growing your own food, you reduce your carbon footprint associated with transportation and packaging, contributing to a more sustainable lifestyle.
Planning Your DIY Greenhouse Project: Key Considerations
Before you even pick up a tool, thorough planning is essential for a successful DIY greenhouse build. A well-thought-out plan will save you time, effort, and potential headaches down the line.
Site Selection: Location, Location, Location
Choosing the right spot for your greenhouse is paramount. Consider the following:
- Sunlight Exposure: Ideally, your greenhouse should receive at least 6 hours of direct sunlight daily, especially during the winter months. A south-facing location is often optimal in the northern hemisphere.
- Drainage: Ensure the chosen area has good natural drainage to prevent waterlogging around the foundation, which can lead to structural issues.
- Accessibility: Locate your greenhouse conveniently close to a water source and an electrical outlet if you plan to install lighting, heating, or automated ventilation. Easy access for tending to plants and transporting materials is also a plus.
- Shelter from Wind: While sunlight is crucial, some protection from strong winds can help maintain internal temperatures and prevent structural damage. Nearby buildings or dense hedges can offer a windbreak.
Design and Size
Determine the dimensions of your greenhouse based on your available space, budget, and gardening needs. Consider the types of plants you intend to grow and the amount of walking room you’ll require. This project focuses on a simple, backyard-friendly design, but understanding your specific needs will help tailor the build.
Budgeting and Tools
Create a realistic budget for materials and factor in any tool rentals if you don’t own all the necessary equipment. Ensure you have all the required tools on hand before starting to avoid interruptions. Safety gear, such as gloves, eye protection, and ear protection, should always be a priority.
Materials Needed for Your DIY Greenhouse Project
Building a robust and functional greenhouse requires specific materials designed to withstand the elements and create an optimal growing environment. Here’s a detailed list of what you’ll need, inspired by the “I Like To Make Stuff” project:
- Sunlite Polycarbonate Sheets: These clear, durable panels are ideal for greenhouse walls and roofing. They offer excellent light transmission, insulation, and are significantly more impact-resistant than glass.
- Brown Engineered Panel Siding: Used for the base and lower sections of the walls, this material provides a sturdy, weather-resistant foundation and can offer a degree of insulation.
- Tuftex 6mm H Channel: Essential for connecting and sealing the edges of your polycarbonate sheets, ensuring a watertight and secure enclosure.
- National Hardware Spring Hinges: Durable hinges for the greenhouse door, allowing it to open and close smoothly and securely.
- Kreg Accu-Cut: A precise cutting guide for circular saws, ensuring straight and accurate cuts on larger panels and wood.
- 30 Seconds Outdoor Cleaner: Useful for preparing the ground or cleaning finished surfaces, ensuring a pristine look and preventing mildew.
- Bostitch Framing Nailer: Speeds up the framing process, making quick and strong connections for the wooden structure.
- DeWalt 20-Volt Circular Saw: A versatile tool for cutting various materials, especially framing lumber and paneling.
- DeWalt 20-Volt Jigsaw: Perfect for making curved cuts or intricate shapes, useful for ventilation openings or custom designs.
- DeWalt Drill & Driver Combo: Essential for pre-drilling holes and driving screws with precision and power.
- DeWalt Miter Saw: Crucial for making accurate angle cuts on lumber, ensuring tight-fitting frames and joins.
- Union Washer Wood Screws: Reliable fasteners for securing wood components, providing a strong hold.
- Keter Shelving Unit: Practical, weather-resistant shelving for organizing plants, tools, and supplies inside your greenhouse.
- Accord Ventilation Register: Used for creating adjustable vents, allowing you to control airflow and temperature.
- AcuRite Digital Thermometer: An indispensable tool for monitoring the internal temperature of your greenhouse, ensuring optimal conditions for your plants.
- Additional Supplies: Don’t forget measuring tape, pencils, levels, wood glue, caulk, weather stripping, and appropriate safety gear (gloves, eye protection, ear protection).
Step-by-Step Directions: Building Your Simple DIY Greenhouse
Follow these detailed instructions to construct your very own functional and beautiful backyard greenhouse. Patience and precision are key!
Step 1: Site Preparation and Foundation Construction
The success of your greenhouse begins with a solid foundation and proper site preparation.
1.1 Prepare the Ground
Before any construction, clear the chosen area of any debris, rocks, or vegetation. Use a rake and shovel to meticulously grade and level the land. A perfectly level base is crucial for structural integrity and preventing water accumulation. Consider laying a layer of gravel to improve drainage and prevent weed growth under the greenhouse.
1.2 Build the Floor Base
Construct the rectangular or square floor base using durable, weather-resistant lumber. Ensure the corners are perfectly square using a large carpenter’s square or the 3-4-5 rule. This base will serve as the anchor for your entire greenhouse structure. Once assembled, carefully transfer this base to your leveled site and secure it firmly. You may use ground anchors or concrete footings, depending on your local climate and desired permanence.
1.3 Frame the Walls
Begin by framing the back wall. Measure, cut, and assemble the vertical studs and horizontal plates according to your design specifications. Use your framing nailer for strong, efficient connections. Once the back wall frame is complete, stand it up on the floor base, adjust it into its precise position, and temporarily brace it to ensure it remains plumb and square. Repeat this process for the front wall and the two side walls. Ensure all wall frames are securely nailed or screwed to the floor base.
1.4 Install Ceiling Joists
Once all four wall frames are standing and secured, connect them at the top with ceiling joists. These joists will form the framework for your roof. Ensure they are evenly spaced and securely fastened to the top plates of your wall frames. This structure provides rigidity and support for the roofing material.
Step 2: Enclosure, Roofing, and Ventilation Systems
With the main frame complete, it’s time to enclose your greenhouse and install essential features for plant health.
2.1 Install Weather-Resistant Flooring
For the interior floor, install weather-resistant panels. Plywood treated for outdoor use, composite decking, or even a simple gravel floor with a weed barrier are excellent choices. This will create a durable surface that can withstand spills and regular watering without deteriorating. Extend this same material up to cover the lower section of your greenhouse walls, providing an attractive base and additional insulation.
2.2 Attach Polycarbonate Wall Sheets
Carefully measure and cut the Sunlite polycarbonate sheets to fit the framed wall sections. Use the Tuftex 6mm H channel to connect and seal the edges of these sheets, ensuring a watertight and insulated enclosure. Secure the polycarbonate panels to the wooden frame using appropriate screws with sealing washers to prevent leaks. Work methodically around all four walls.
2.3 Construct and Install the Roof
Following the same method as the walls, cut and install polycarbonate sheets for the roof. Ensure a slight slope to allow for water runoff. Use the H channels and sealants to create a secure and waterproof roof. This is critical for maintaining internal temperatures and protecting plants from rain.
2.4 Integrate Ventilation Systems
Proper ventilation is vital for preventing overheating and ensuring healthy airflow. Construct a flap on the roof, typically hinged along one side, that can be opened manually or with an automatic vent opener to release hot air. Additionally, install Accord ventilation registers on the lower sections of the walls. These strategically placed vents will allow cooler air to enter and circulate, preventing stagnant air and reducing the risk of fungal diseases.
2.5 Build and Install the Door
Construct a sturdy door frame using similar lumber to your main structure. Cover the door with polycarbonate panels, matching the rest of the greenhouse. Attach the door to the front wall frame using National Hardware spring hinges, ensuring it opens and closes smoothly. Install a latch for security and weather stripping around the door frame to seal any gaps, preventing drafts and heat loss.
Finishing Touches and Greenhouse Optimization
Once the main structure is complete, adding the finishing touches and optimizing the interior will make your greenhouse truly functional and enjoyable.
Interior Setup and Organization
- Shelving: Install Keter shelving units or custom-built shelves along the interior walls. These provide valuable vertical space for pots, trays, and gardening tools, maximizing your growing area. Ensure shelves are sturdy and resistant to humidity.
- Monitoring Temperature: Place your AcuRite digital thermometer inside the greenhouse in a central location, out of direct sunlight, to accurately monitor the internal temperature. This is crucial for knowing when to open/close vents or activate heating/cooling systems.
- Watering System: Consider setting up a simple irrigation system, like drip lines or a soaker hose system, connected to your outdoor water source. This saves time and ensures consistent watering for your plants.
Maintenance and Longevity
- Cleaning: Use the 30 Seconds Outdoor Cleaner to keep the exterior of your polycarbonate sheets clear and free of algae or dirt, ensuring maximum light transmission. Regular cleaning of the interior will also help prevent pest infestations and diseases.
- Sealing Gaps: Periodically inspect your greenhouse for any small gaps or cracks, especially around the edges of the polycarbonate panels and the door. Use clear silicone caulk or weather stripping to seal these areas, preventing drafts and maintaining consistent temperatures.
- Structural Checks: Annually check all screws, nails, and structural connections for tightness and integrity. Address any loose fasteners or signs of wear promptly to ensure the longevity of your greenhouse.
Conclusion: Your Thriving DIY Greenhouse Awaits!
Congratulations! By following this comprehensive guide, you’ve taken the significant step of building your very own DIY greenhouse. This project, inspired by the innovative team at “I Like To Make Stuff,” is more than just a structure; it’s an investment in your gardening passion, offering a versatile space where your plants can flourish regardless of the external weather.
From extending your growing season to cultivating exotic species, the benefits of a homemade greenhouse are immense. You now have the power to control your plants’ environment, nurture them through delicate stages, and enjoy fresh produce or beautiful blooms year-round. Remember to regularly monitor your greenhouse’s conditions, keep it clean, and make adjustments as needed to ensure optimal health for your green residents.
We extend our deepest gratitude to the creators at I Like To Make Stuff via YouTube for their inspiring video tutorial and excellent craftsmanship. Their detailed instructions were invaluable in shaping this guide. We highly encourage you to visit their channel, subscribe, and explore their other fantastic DIY projects for more creative inspiration! Happy gardening!