
Craft Your Own Nature-Inspired Decor: Easy DIY Concrete Leaf Bowls and Bird Baths
Imagine transforming a simple garden leaf into a beautiful, durable piece of art for your home or garden. This incredibly rewarding DIY project allows you to create stunning concrete leaf bowls and bird baths with ease, capturing the intricate details of nature in a lasting form. Whether you’re looking to add a unique touch to your outdoor space, create charming indoor catch-all dishes, or craft thoughtful handmade gifts, this guide will walk you through every step. I was so captivated by the process and the elegant results that I ended up making several for my own garden, and they’ve truly become a focal point.
Why This DIY Concrete Leaf Project is a Must-Try
There’s something uniquely satisfying about crafting items that marry natural beauty with robust durability. This concrete leaf project stands out for several compelling reasons, making it a favorite among DIY enthusiasts and garden lovers alike. Firstly, the aesthetic appeal is undeniable. Each finished piece is a unique sculpture, showcasing the delicate veining and organic shape of the original leaf, transformed into a sturdy concrete form. It’s a fantastic way to bring a touch of the outdoors in, or to enhance your garden with truly bespoke decor.
Beyond their visual charm, these concrete creations are incredibly versatile. They make fabulous and functional bird baths, providing a welcome watering hole for your feathered friends while adding an artistic element to your landscape. Indoors, they serve as elegant bowls for holding jewelry, keys, loose change, or potpourri, keeping small essentials organized with a natural flair. Moreover, the process itself is surprisingly straightforward, requiring minimal specialized skills, yet yielding results that look professionally crafted. It’s also a wonderfully cost-effective way to produce high-quality, personalized gifts that your friends and family will cherish.
Essential Materials for Your Concrete Leaf Craft
Embarking on this creative journey requires just a few key materials, most of which are readily available at your local craft or hardware store. The quality and type of your materials will significantly impact the final look and durability of your concrete leaf bowl or bird bath.
1. The Perfect Leaf
- Size and Shape: Opt for large, sturdy leaves with prominent veining. Excellent choices include rhubarb leaves, hosta leaves, burdock, or even large varieties of elephant ear. The more defined the veins, the more intricate the pattern will be on your finished concrete piece.
- Freshness: Ensure your leaf is fresh and supple, not dry or brittle. A fresh leaf will be easier to work with and will impart a clearer impression.
- Preparation: Gently clean your chosen leaf to remove any dirt or debris.
2. The Right Concrete Mix
This is where precision truly pays off. For a smooth, detailed finish that perfectly captures the leaf’s texture without rough aggregates, a special type of concrete is ideal. I highly recommend a product like “Cement All Rapid Set” (or a similar high-strength, fine-grain repair cement). This is not your standard concrete mix, which typically contains small rocks and aggregates that would obscure the delicate leaf details.
- Why “Cement All Rapid Set”? This particular type of cement offers a very smooth finish, similar to Plaster of Paris in texture, but with significantly superior strength and durability. It sets incredibly fast, often allowing for demolding in as little as an hour, yet it cures to a strength that can withstand outdoor conditions and pressure, making it perfect for thin, delicate projects like these. Unlike regular cement, it lacks the coarse aggregate that would otherwise create a bumpy surface and prevent the intricate leaf veins from being replicated.
- Quantity: A small bag (e.g., 25 lbs) is usually more than enough for several projects, depending on the size of your leaves.
3. Additional Tools & Safety Gear
- Mixing Container: A sturdy bucket or plastic tub for mixing your concrete.
- Mixing Tool: A trowel, spade, or sturdy stick for thorough mixing.
- Water: Essential for mixing the concrete.
- Protective Gloves: Concrete can be caustic to skin. Always wear sturdy work gloves.
- Dust Mask: Inhaling cement dust can be harmful. A dust mask is crucial during mixing.
- Plastic Sheeting or Drop Cloth: To protect your work surface from spills and splashes.
- Sand or Dirt Mound / Crumpled Newspaper: To create a supportive bed for your leaf, allowing you to control its final curvature and shape as the concrete cures.
- Optional: Cooking oil or a concrete release agent (to ensure easy removal of the leaf), wire brush or sandpaper (for smoothing edges), concrete sealer (for enhanced durability, especially for outdoor pieces).
Step-by-Step Guide: Crafting Your Concrete Leaf Masterpiece
With your materials gathered and your creativity flowing, let’s dive into the practical steps of transforming a simple leaf into a beautiful concrete creation. Remember, patience and attention to detail are key to achieving stunning results.
Step 1: Prepare Your Workspace
Choose a flat, stable surface, preferably outdoors or in a well-ventilated area, and lay down your plastic sheeting or drop cloth to protect it. Create a mound of damp sand or dirt, or tightly crumpled newspaper, in the shape you desire for your finished bowl. This will be the mold that supports your leaf and gives it its unique curvature as the concrete sets. Think about how you want the finished bowl to sit and shape your mound accordingly.
Step 2: Ready Your Leaf
Carefully place your clean, fresh leaf vein-side up onto the prepared mound. Gently press it into the mound to ensure it holds the desired shape. This vein side is what will receive the concrete and ultimately display the intricate pattern. For easier demolding, you may lightly brush a thin layer of cooking oil (vegetable oil works well) or a dedicated concrete release agent onto the entire vein-covered surface of the leaf. This step is optional but highly recommended to prevent the leaf from sticking.
Step 3: Mix the Concrete
Safety First: Before opening your concrete mix, put on your protective gloves and dust mask. In your mixing container, carefully add the “Cement All Rapid Set” according to the manufacturer’s instructions. Slowly add water, mixing continuously with your trowel or stick. The goal is to achieve a consistency similar to thick peanut butter – firm enough to hold its shape when applied, but still spreadable. Avoid making it too watery, as this can weaken the final product and make it difficult to work with. Mix thoroughly to eliminate any dry lumps.
Step 4: Apply the Concrete to the Leaf
Once your concrete is perfectly mixed, begin carefully spooning or troweling it onto the vein-side of the leaf, starting from the center and working outwards towards the edges. Aim for an even thickness across the entire leaf, typically between 1/2 to 1 inch, depending on the desired strength and weight of your finished piece. Thicker edges generally provide more durability. Gently tap the leaf support or the edges of the concrete to help release any trapped air bubbles, which can create weak spots. Smooth the surface of the concrete as much as possible, especially along the edges, for a neat finish.
Step 5: The Curing Process
This is a crucial stage for the strength and longevity of your concrete leaf. Once the concrete is applied, loosely cover the entire setup with a plastic sheet. This helps to retain moisture and slow down the drying process, which is essential for proper curing and preventing cracks. While “Cement All Rapid Set” begins to set very quickly (often within an hour), it requires a longer period for full curing. Allow your concrete leaf to cure undisturbed for at least 24 to 48 hours, or even longer for maximum strength, especially if it’s a large piece destined for outdoor use. Keep it in a shaded, relatively warm spot, away from direct sunlight, strong winds, or freezing temperatures, all of which can negatively impact the curing process.
Step 6: Demolding and Finishing Touches
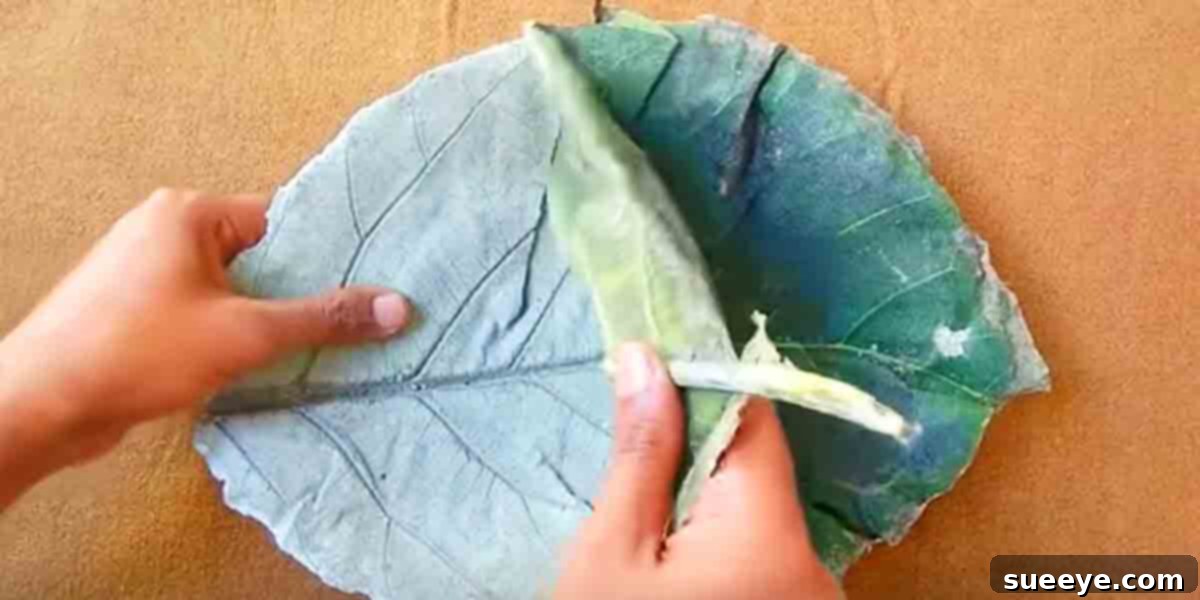
Once the concrete is fully cured, carefully lift your new concrete creation from its bed. Gently and slowly peel away the natural leaf from the concrete form. If you applied a release agent, this step should be quite easy, revealing the beautiful, intricate vein pattern imprinted on the concrete. Any small bits of leaf residue can usually be scrubbed off with a wire brush and water, or carefully scraped away. Use sandpaper or a sanding sponge to smooth any rough edges or imperfections around the rim of your bowl. Rinse the finished piece to remove any dust and allow it to dry completely.
Optional Finishing: For outdoor use, especially as a bird bath, applying a concrete sealer is highly recommended. This will protect your piece from water absorption, staining, and weathering, extending its lifespan. You can also paint your concrete leaf bowls with acrylic paints for added color and personalization, then apply a sealant over the paint for protection.
Creative Uses for Your Finished Concrete Leaf Bowls
The beauty of this project lies not just in its creation, but in the myriad ways you can integrate these unique pieces into your life and decor. Each concrete leaf bowl is a testament to natural artistry and your own craftsmanship.
- Garden Sanctuaries: Their original purpose, and arguably their most popular, is as elegant bird baths. The shallow depression is perfect for small birds, and the natural aesthetic blends seamlessly into garden landscapes. They can also serve as charming water features for beneficial insects, or even as decorative planters for succulents or small flowers.
- Indoor Elegance: Bring the outdoor charm inside! These bowls are perfect as decorative catch-all dishes for your entryway or bedside table, beautifully organizing keys, loose change, or jewelry. They make striking centerpieces, especially when filled with natural elements like pebbles, small shells, or potpourri.
- Thoughtful Gifts: Handmade gifts always hold a special place. A concrete leaf bowl, personalized by your choice of leaf and perhaps a custom finish, makes an incredibly thoughtful present for gardeners, nature lovers, or anyone who appreciates unique home decor.
- Beyond Bowls: With a little imagination, the technique can be adapted for other garden art, such as stepping stones (by creating flatter, thicker forms) or even wall art, by embedding a hanger before the concrete sets.
Tips for an Even More Successful Project
- Experiment with Leaves: Don’t be afraid to try different types and sizes of leaves to see what unique patterns and shapes you can create.
- Prioritize Safety: Always wear gloves and a dust mask when handling concrete.
- Master the Mix: The consistency of your concrete is crucial. Practice mixing a small batch first if you’re unsure.
- Patience is a Virtue: Resist the urge to demold your piece too early. Proper curing time ensures maximum strength and durability.
- Seal for Longevity: If your piece will be outdoors, especially exposed to water, a good quality concrete sealer is a worthwhile investment.
- Embrace Imperfections: Each leaf is unique, and so will be your concrete creation. Small imperfections often add character and authenticity.
Unleash Your Inner Artisan
This DIY concrete leaf bowl project is a testament to how simple materials and a touch of creativity can yield truly spectacular results. It’s an easy, enjoyable, and rewarding craft that allows you to connect with nature and create beautiful, lasting pieces for your home and garden. Whether you’re crafting a tranquil bird bath or a unique indoor accent, the satisfaction of seeing your vision come to life is immense. So, grab your gloves, find your perfect leaf, and start crafting your own little piece of natural elegance today!