
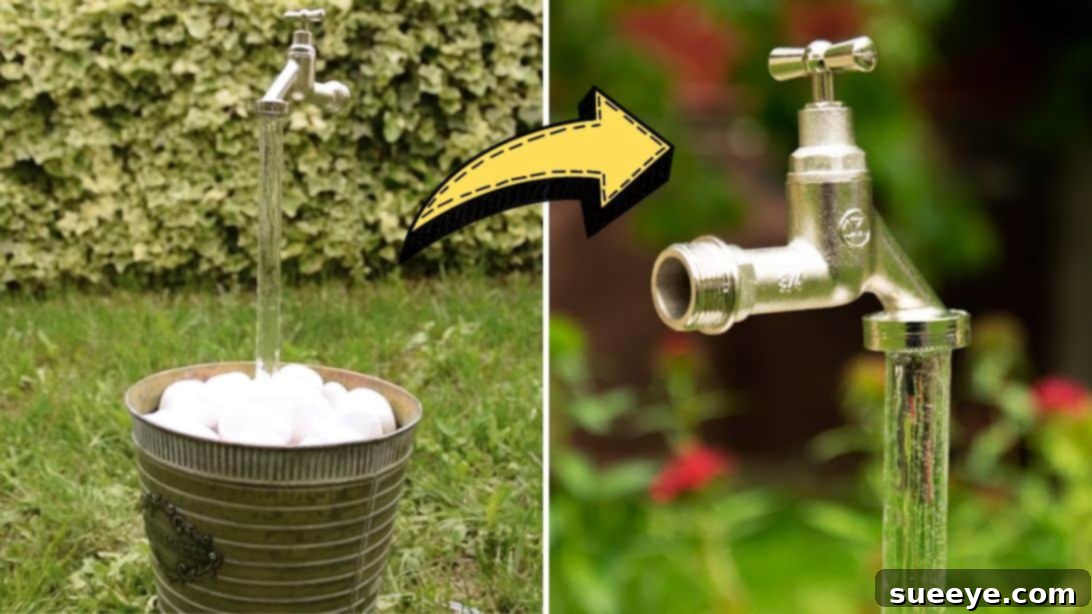
How To Build A Mesmerizing DIY Floating Faucet Fountain for Your Garden
Transform your garden into a whimsical wonderland with a stunning DIY floating faucet fountain. This captivating water feature creates an optical illusion, making it appear as if a faucet is suspended in mid-air, endlessly pouring water into a container below. It’s a truly magical addition that will mesmerize guests and provide a soothing ambiance to your outdoor space. While it looks incredibly complex and high-tech, this project is surprisingly simple and accessible for any DIY enthusiast. You don’t need advanced plumbing skills or specialized tools; just a few common materials and a willingness to follow our clear, step-by-step instructions. Inspired by the ingenious design from Creativity Hero on YouTube, this guide will walk you through everything you need to know to construct your very own gravity-defying water fountain with ease. Get ready to add a unique, serene, and conversation-starting element to your backyard decor!
Why Create a Floating Faucet Fountain?
Beyond its striking visual appeal, a DIY floating faucet fountain offers numerous benefits for your outdoor living area. Firstly, it’s an incredibly unique piece of garden art. Unlike conventional fountains, its illusionary effect captures immediate attention and sparks curiosity. Secondly, the gentle sound of flowing water is naturally calming and can help mask unwanted neighborhood noises, creating a more peaceful environment. This makes your garden an ideal spot for relaxation, meditation, or simply unwinding after a long day. Thirdly, this project is a fantastic way to personalize your space. You can customize the container, the faucet style, and the decorative elements to perfectly match your aesthetic. Finally, it’s an eco-friendly way to enjoy a water feature, as the system recirculates the same water, minimizing waste. With its blend of beauty, tranquility, and uniqueness, a floating faucet fountain is more than just a decoration – it’s an experience.
Materials You’ll Need:
Gathering all your materials before starting will make the construction process much smoother. Here’s a comprehensive list of what you’ll need, along with some tips for selection:
- Rustic Metal Bucket: This will serve as the base and water reservoir for your fountain. Opt for a bucket that is watertight and made from a material that can withstand outdoor conditions. A galvanized metal bucket or an old-fashioned tin pail works perfectly for a rustic look. Ensure it’s large enough to hold your pump, tubing, and decorative rocks.
- Decorative Water Faucet: This is the star of the show! Choose a faucet that complements your garden’s style. You can find new decorative faucets at hardware stores or unique vintage ones at flea markets. The key is to select one that is robust and visually appealing, as it will be prominently displayed.
- Rigid Acrylic Tubing: This transparent tubing is crucial for creating the “floating” illusion. It needs to be rigid enough to support the faucet’s weight and provide a stable channel for the water flow. A clear, sturdy acrylic or PVC pipe (often found in plumbing or craft stores) will work best. The diameter should fit snugly into the faucet’s mouth and around the pump’s nozzle.
- Submersible Water Pump: The heart of your fountain, this pump circulates the water. Select a submersible pump designed for outdoor use with an appropriate flow rate for the size of your fountain. Look for one with a strong enough “head height” (the maximum height it can pump water) to push water through the tube and out the faucet effectively. A small to medium-sized pump is usually sufficient for this project.
- White River Rocks (or other decorative stones): These serve multiple purposes: they hide the pump and tubing, stabilize the acrylic tube, and add a beautiful aesthetic touch to the fountain. White river rocks create a clean, serene look, but you can choose any color or type of stone that matches your garden’s theme.
- Soldering Gun & Solder: Essential for securely connecting electrical wires, specifically for the DC power jack. If you’re new to soldering, there are many beginner tutorials online. Safety first!
- Power Drill & Drill Bits: You’ll need various drill bit sizes to create holes in the bucket and potentially the tubing. Ensure you have bits suitable for both metal and plastic.
- Hot Glue Gun and Glue Sticks: Excellent for initial securing and sealing of components, especially for the pump connection and minor seals.
- 2-Part Epoxy Adhesive: This provides a strong, waterproof, and permanent bond, especially for securing the faucet to the acrylic tubing. Epoxy ensures your fountain is durable and leak-proof.
- Heat Shrink Tubing & Lighter: Used to insulate and protect electrical connections, providing a professional and safe finish.
- DC Power Jack: For connecting the pump’s power supply securely.
Step-by-Step Directions: Building Your Floating Faucet Fountain
Follow these detailed instructions carefully to construct your elegant floating faucet fountain. Take your time with each step, paying close attention to sealing and electrical connections for safety and longevity.
Step 1: Prepare the Bucket and Electrical Connections
- Drill the Cord Hole: Begin by drilling a small, neat hole at the back of your rustic metal bucket, close to the bottom rim. This hole will be just large enough for the power cord of your water pump to pass through. Precision here helps with sealing later.
- Prepare the Pump Wire: Take your water pump’s power wire. Cut off a section of black heat shrink tubing and slide it over the wire. Make sure to leave about 2cm (approximately 0.7 inches) of the inner wires exposed at the end. Use a lighter or heat gun to carefully shrink the tubing, insulating the main part of the wire.
- Run the Cord: Thread the prepared cord through the hole you drilled in the back of the bucket. This allows the pump to be inside the bucket while the power source remains outside.
- Solder the DC Power Jack: Now, prepare the other end of your pump’s power wire. Cover the individual exposed wires (red and black) with smaller pieces of heat shrink tubing. Carefully solder the red wire to the shorter tip of your DC power jack and the black wire to the longer tip. Once soldered, slide the heat shrink tubing over the connections and shrink them using a lighter. This ensures a secure and insulated electrical connection.
- Prepare the Acrylic Tubing: Take your rigid acrylic tubing. Drill several small holes around the rim of the tube near one edge. These holes will allow water to flow freely from the faucet. After drilling, gently sand the edges of these holes and the tube opening to remove any rough burrs, ensuring a smooth finish and better adhesion.
- Attach the Faucet to the Tubing: Apply a generous amount of 2-part epoxy adhesive to the mouth of your chosen decorative faucet. Carefully insert the prepared end of the acrylic tubing (the one with the drilled holes) into the faucet’s opening. Ensure a firm, watertight seal. Hold it in place or use clamps if necessary, and let it begin to cure.
Step 2: Connect the Pump, Secure, and Set Up Your Fountain
- Allow Epoxy to Cure: Let the epoxy cure for at least 5 minutes, or as per the product’s instructions, until the faucet and tube are perfectly glued and set. A strong bond here is critical for the fountain’s stability and to prevent leaks.
- Connect Tubing to Pump: Once the epoxy is cured, apply a strong dab of hot glue to the nozzle of your submersible water pump. Carefully and firmly attach the other, un-drilled end of the acrylic tubing to the pump’s nozzle. The hot glue provides immediate hold and a preliminary seal.
- Reinforce the Connection: To ensure a robust and watertight connection between the tube and the pump nozzle, apply more hot glue around the joint. Create a thick, even layer of glue to hold them securely in place. Allow this to dry completely. You can also add epoxy here for a more permanent seal if desired.
- Position and Stabilize: Carefully position the entire assembly (faucet, tube, and pump) inside the bucket. The goal is for the faucet to appear to float above the bucket’s rim. The rigid acrylic tubing will be nearly invisible once submerged, creating the illusion.
- Fill with Rocks: Begin filling the bucket with your chosen white river rocks or decorative stones. Arrange them carefully to completely cover and conceal the water pump and the acrylic tubing. The rocks will also help to stabilize the tubing, holding the faucet in its “floating” position. Ensure the rocks create a visually appealing base for your fountain.
- Seal the Cord Hole: Once the rocks are in place and the cord is firmly positioned, use a generous amount of hot glue or waterproof sealant around the cord where it exits the hole at the back of the bucket. This prevents water from leaking out and secures the cord in place. Allow the sealant to dry completely.
- Add Water and Power Up: Finally, fill the bucket with as much water as you desire, ensuring the pump is fully submerged and the water level is high enough to create the flowing effect from the faucet. Once filled, connect your DC power jack to the pump’s power supply, and power up your fountain! Watch as water magically flows from your seemingly floating faucet, creating a mesmerizing water feature.
Advanced Tips for a Flawless Finish
- Pre-test Your Pump: Before assembly, always test your submersible pump in a separate bucket of water to ensure it’s working correctly and has adequate flow.
- Measure Twice, Cut Once: Carefully measure the length of your acrylic tubing. It needs to be long enough to reach from the pump nozzle to the faucet, allowing the faucet to “float” at your desired height above the rocks.
- Watertight Seals are Key: The success and longevity of your fountain depend on effective sealing. Don’t skimp on epoxy or waterproof sealant where connections are made.
- Conceal Wires Effectively: Beyond the initial heat shrink tubing, ensure all internal wires are safely tucked away and hidden by the rocks.
- Level Surface: Place your finished fountain on a level surface in your garden to prevent water from spilling unevenly and to ensure the optical illusion works best.
Maintaining Your New Water Feature
To keep your floating faucet fountain running smoothly and looking great, a little maintenance goes a long way:
- Regular Water Checks: Evaporation will naturally reduce the water level over time. Top up the water regularly to ensure the pump remains fully submerged, preventing it from running dry and burning out.
- Clean the Pump Filter: Submersible pumps often have a small filter that can get clogged with debris or algae. Periodically clean this filter to maintain optimal water flow.
- Prevent Algae Growth: In sunny conditions, algae can form in the water. You can add a small amount of fountain algaecide (available at garden or pond supply stores) to the water, or simply replace the water entirely every few weeks.
- Winter Storage: If you live in an area with freezing winters, it’s crucial to drain your fountain, clean all components, and store them indoors to prevent damage from ice expansion.
Customization Ideas to Make It Yours
This DIY project offers incredible flexibility for personalization:
- Different Containers: Instead of a metal bucket, consider a ceramic pot, a wooden barrel, a large birdbath, or even a reclaimed sink for a unique look.
- Faucet Styles: Experiment with different faucet designs – a vintage spigot, a modern chrome tap, or even a whimsical animal-shaped faucet.
- Decorative Elements: Add floating candles, small water plants, or LED submersible lights to create different moods, especially enchanting in the evening.
- Base Embellishments: Surround the bucket with larger rocks, pebbles, or even plants to integrate the fountain seamlessly into your garden landscape.
Conclusion: Enjoy Your Magical Garden Fountain!
Congratulations! You’ve successfully built a captivating DIY floating faucet fountain that will be a magical centerpiece in your garden. This project not only enhances the aesthetic appeal of your outdoor space but also provides a soothing auditory experience with the gentle flow of water. It’s a testament to how simple materials and a clever design can create something truly extraordinary. Enjoy the serene beauty and the admiring glances this unique water feature will bring. Remember, the key to a successful DIY project is patience, attention to detail, and a dash of creativity. We hope this comprehensive guide has empowered you to bring this charming illusion to life in your own backyard.
*All image credit belongs to Creativity Hero via YouTube. Follow and subscribe to her channel for more ingenious DIY projects!