
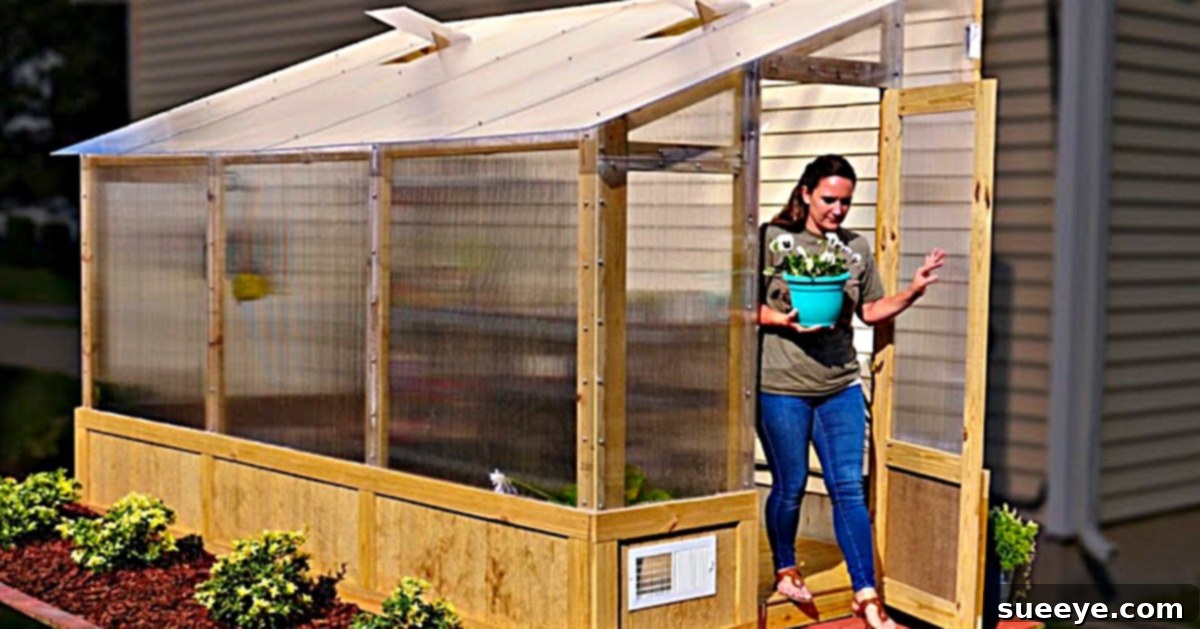
Build Your Dream Home: The Ultimate DIY Greenhouse Project
For any gardening enthusiast, the dream of having a personal greenhouse is often at the top of the list. Imagine stepping out of your kitchen directly into a lush sanctuary, brimming with fresh herbs and vibrant vegetables, ready for harvest year-round. This dream became a reality for me after discovering an inspiring DIY greenhouse project on YouTube. The excitement was contagious; a few friends enthusiastically offered to pitch in, turning a long-held aspiration into a collaborative and rewarding adventure. This guide will walk you through the journey of constructing your very own backyard oasis, ensuring easy access to organic produce and a fulfilling gardening experience.
Why Embark on a DIY Greenhouse Project?
Building your own greenhouse offers a myriad of benefits that extend beyond simply growing plants. It’s an investment in sustainable living, providing a controlled environment where you can cultivate a wider variety of plants, extend growing seasons, and protect delicate flora from harsh weather conditions. A DIY approach not only saves significant costs compared to purchasing a pre-fabricated unit but also allows for complete customization to fit your specific needs, aesthetic preferences, and available space. It’s a deeply satisfying project that enhances your property, reduces your grocery bill, and connects you more intimately with nature. Furthermore, the knowledge and skills gained during construction are invaluable, empowering you for future home improvement projects.
Planning Your Perfect Greenhouse Oasis
Before gathering your materials and tools, thoughtful planning is crucial for the success of your DIY greenhouse. Consider the ideal location: aim for a spot that receives ample sunlight throughout the day, particularly during the colder months. Southern exposure is often preferred. Ensure the ground is relatively level, or be prepared to create a level foundation. Think about accessibility to water and electricity if you plan to incorporate irrigation or lighting. Determine the appropriate size based on your gardening ambitions and available space. A smaller footprint might be perfect for an herb garden, while a larger structure can accommodate extensive vegetable beds. Sketching out your design, even roughly, will help visualize the final product and identify potential challenges early on.
Essential Materials and Tools for Your DIY Greenhouse
Constructing a robust and functional greenhouse requires a selection of quality materials and reliable tools. The following list comprises the core components and equipment that will enable you to bring your vision to life. Each item plays a vital role in ensuring the longevity, efficiency, and aesthetic appeal of your new growing space.
Materials:
- Sunlight Polycarbonate Sheets: Chosen for their excellent light transmission, durability, and superior insulation properties compared to traditional glass, making them ideal for a greenhouse.
- Brown Engineered Panel Siding: Provides a sturdy, weather-resistant base for the lower sections of the greenhouse, adding an attractive finish and protecting the foundation.
- Tuftex 6mm H Channel: Essential for securely joining and sealing the polycarbonate sheets, ensuring a watertight and insulated structure.
- National Hardware Spring Hinges: Used for the greenhouse door, offering reliable function and automatically closing if desired, maintaining internal climate.
- Union Washer Wood Screws: These specialized screws, often with rubber washers, are critical for fastening the polycarbonate sheets. The washers prevent cracking and create a tight seal.
- Keter Shelving Unit: Provides practical storage and display solutions within the greenhouse, maximizing vertical space for potted plants or supplies.
- Accord Ventilation Register: Key for managing internal airflow and temperature, allowing for controlled ventilation to prevent overheating and promote healthy plant growth.
- AcuRite Digital Thermometer: An indispensable tool for monitoring the internal temperature and humidity, crucial for maintaining optimal growing conditions for your plants.
Tools:
- Kreg Accu-Cut: A precision cutting guide system that ensures straight, accurate cuts on larger sheet materials, vital for neat paneling.
- 30 Seconds Outdoor Cleaner: Useful for preparing surfaces, cleaning materials, or maintaining the finished greenhouse.
- Bostitch Framing Nailer: Speeds up the framing process by efficiently driving nails, essential for constructing the structural framework.
- DeWalt 20 Volt Circular Saw: A versatile saw for making straight cuts through lumber, foundational for sizing frame components.
- DeWalt 20 Volt Jigsaw: Perfect for making intricate or curved cuts, useful for customizing panels or creating openings.
- DeWalt Drill And Driver Combo: An essential duo for drilling pilot holes and driving screws, simplifying assembly.
- DeWalt Miter Saw: Crucial for making precise angle cuts on lumber, ensuring tight joints for the frame and roof.
Step-by-Step Directions: Constructing Your DIY Greenhouse
With your materials gathered and tools ready, it’s time to begin the construction process. Follow these detailed steps to build a durable and efficient greenhouse that will serve your gardening needs for years to come.
Step 1: Framing the Foundation and Floor
The journey begins with laying a solid and level foundation, which is paramount for the structural integrity of your greenhouse. Start by framing the perimeter of your greenhouse floor using treated lumber to resist moisture and rot. Once the perimeter is established, add internal floor joists or studs, spaced appropriately for support. Use a level extensively during this phase. Any studs that sit too high should be carefully sawed down to ensure a perfectly flat surface. This meticulous attention to leveling in the initial stage will prevent future issues with the alignment of walls and roof panels, making the subsequent steps much smoother. A strong, level base is the secret to a long-lasting greenhouse.
Step 2: Constructing the Sloped Roof Framework
Once the floor is robust and level, the next critical step is to frame the sloped roof. A sloped roof is vital for several reasons: it efficiently sheds rainwater and snow, preventing accumulation and potential damage, and it optimizes sunlight exposure, especially during low-angle winter sun. Carefully measure and cut your lumber to create the rafters and support beams that will form the desired pitch for your roof. Ensure all joints are secure and precisely angled using your miter saw. This framework will house the polycarbonate panels, so accuracy here is key to a snug and weatherproof fit. Double-check your measurements to ensure symmetry and stability.
Step 3: Installing the Polycarbonate Panels
With the main structure in place, it’s time to enclose your greenhouse. Begin by carefully cutting the polycarbonate sheets to fit each section of your roof and walls. The Tuftex 6mm H channel will be used to seamlessly join these panels, creating a continuous, insulated surface. When fastening the polycarbonate, use the specialized union washer wood screws. The integrated rubber washers are crucial: they not only hold the plastic securely in place but also provide a cushioned barrier, preventing the panels from cracking as the screws are tightened. This ensures a durable, airtight, and waterproof seal, which is essential for maintaining a stable internal climate and maximizing the insulating properties of the polycarbonate.
Step 4: Adding Side Paneling and Ventilation
To complete the lower exterior of your greenhouse and enhance its thermal regulation, add the engineered panel siding around the bottom perimeter. This not only adds a finished aesthetic but also provides an extra layer of insulation at ground level. Crucially, install Accord Ventilation Registers at either end of your greenhouse. Proper ventilation is critical for a healthy greenhouse environment. Without adequate airflow, temperatures can soar to dangerous levels, leading to plant stress, disease, and fungal growth. These vents allow for controlled air exchange, helping to regulate temperature, reduce humidity, and introduce fresh CO2 for photosynthesis, ensuring your plants thrive.
Step 5: Crafting and Installing the Greenhouse Door
The final structural element is the door, which can either be custom-built or purchased. For a cohesive look, crafting a door that mirrors the aesthetic of the rest of your greenhouse is often preferred. Construct a simple yet sturdy frame for your door, then clad it with the same polycarbonate panels and engineered siding used elsewhere. Attach it to the greenhouse frame using National Hardware Spring Hinges, which provide smooth operation and can help ensure the door closes securely. Pay attention to sealing around the door frame with weatherstripping to prevent heat loss or drafts. A well-fitted door is essential for maintaining the internal climate and providing easy, yet secure, access to your burgeoning garden.
Maintaining Your New Greenhouse
Once your DIY greenhouse is complete, a little ongoing maintenance will ensure its longevity and continued success. Regularly clean the polycarbonate panels to maximize light transmission. Check seals and fasteners periodically to prevent leaks or drafts. Monitor the internal temperature and humidity with your AcuRite Digital Thermometer, adjusting ventilation as needed. With a Keter shelving unit, you can keep your tools organized and display plants efficiently, making your greenhouse not just productive but also a beautifully arranged space. Enjoy the fruits (and vegetables!) of your labor!
Conclusion: Embrace Year-Round Gardening with Your Own DIY Greenhouse
Building your own greenhouse is more than just a construction project; it’s an investment in a lifestyle of fresh, homegrown produce and a deepened connection to nature. From the initial framing to the final touches, each step brings you closer to realizing a dream of year-round gardening. The satisfaction of harvesting your own herbs and vegetables, nurtured in a space you built with your own hands, is unparalleled. This magnificent DIY greenhouse provides the perfect environment to cultivate a thriving garden, offering a sustainable source of fresh food and a peaceful retreat right outside your kitchen door. Get ready to enjoy an abundance of fresh herbs and vegetables all year round!