
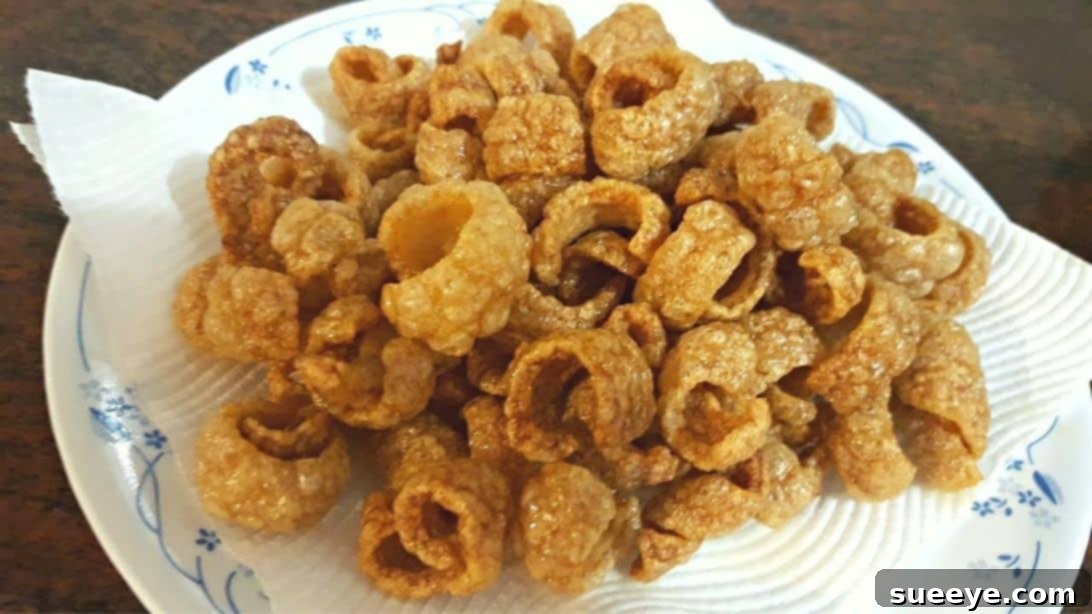
Embark on a culinary adventure that promises to delight your taste buds and impress your friends: making your own crispy pork rinds at home. If you’ve never experienced the joy of biting into a perfectly puffed, incredibly savory, and utterly addictive piece of fried pork skin, then you are truly missing out on one of life’s simplest yet most profound snacking pleasures. Known by various names across cultures—from crunchy pork cracklings to the beloved chicharrón—these irresistible treats are the ultimate companion for a cold beverage, a delightful topping for your favorite dishes, or simply a standalone snack that’s impossible to resist. While many enjoy store-bought versions, nothing compares to the unparalleled freshness, flavor control, and sheer crispness of homemade pork rinds. The process, while requiring a touch of patience, is surprisingly straightforward and incredibly rewarding. This comprehensive guide will walk you through every step, ensuring you achieve that golden-brown perfection and satisfying crunch that will make you a pork rind connoisseur. Prepare to create a snack so superior, you’ll wonder why you ever settled for anything less.
The Allure of Homemade Pork Rinds: A Culinary Revelation
There’s a distinct charm that comes with crafting your own snacks, and pork rinds are no exception. Beyond the sheer satisfaction of creating something delicious from scratch, making chicharrón at home offers numerous benefits. You gain complete control over the quality of ingredients, ensuring only the freshest pork skin and your preferred seasonings make it into your snack. This means no artificial preservatives, unwanted additives, or excessive sodium often found in commercial products. Moreover, homemade pork rinds often boast a more intense flavor and a superior, lighter texture that simply cannot be replicated by mass-produced varieties. The subtle aroma of freshly fried pork, combined with the explosive crunch, creates an experience that transcends mere snacking. It’s an opportunity to embrace a traditional cooking method and rediscover a timeless comfort food.
What Are Pork Rinds, And Why Are They So Popular?
Pork rinds, or chicharrón, are essentially deep-fried pieces of pork skin. The magic happens during the frying process when the rendered fat and trapped moisture cause the skin to puff up dramatically, transforming into a light, airy, and incredibly crispy snack. Their popularity spans continents, finding a cherished place in Mexican, Spanish, Filipino, and Southern American cuisines, among many others. In recent years, they’ve also gained significant traction as a low-carb, high-protein snack, making them a favorite among those following ketogenic diets. Their versatility extends beyond just snacking; they can be crumbled over salads for added texture, used as a gluten-free breading for various foods, or even incorporated into rich, savory stews. The combination of their savory taste, satisfying crunch, and adaptability makes them a truly beloved and enduring snack.
Ingredients for Irresistible Pork Cracklings
Crafting the perfect pork rinds begins with selecting quality ingredients. While the list is simple, the freshness and preparation of each component play a crucial role in the final outcome. Focus on sourcing fresh pork skin from a reputable butcher, ensuring it’s as clean as possible. This foundational ingredient, combined with just a few seasonings, is all you need to create a truly spectacular snack.
- 1 kilogram (approximately 2.2 pounds) of fresh pork skin, ideally with a thin layer of fat attached
- 1½ tablespoons of high-quality salt (kosher or sea salt recommended)
- ½ tablespoon of chicken powder (optional, but enhances savory depth)
- Plenty of cooking oil for deep frying (vegetable, canola, or peanut oil are good choices)
Essential Kitchen Tools for Success
Having the right tools at hand will streamline your cooking process and help ensure perfect results every time. Most of these items are likely already in your kitchen, but a quick check can prevent any last-minute scrambling.
- Large Pot: For boiling the pork skin.
- Sharp Knife: Essential for efficiently removing fat and slicing the cooked skin.
- Large Bowl: For seasoning the pork skin.
- Strainer or Colander: To drain water from the boiled skin.
- Drying Racks or Baking Sheets: For air-drying the seasoned pork skin.
- Deep Fryer or Large Wok/Deep Pan: For safely deep frying the pork rinds.
- Slotted Spoon or Spider Skimmer: For safely removing fried pork rinds from hot oil.
- Paper Towels: To drain excess oil from the finished product.
- Heat-Resistant Spatula or Tongs: For maneuvering the pork skin during boiling and frying.
The Art of Crispy Pork Skin Crackers: A Detailed Step-by-Step Guide
Patience and precision are key when making homemade pork rinds. Each step, from thorough cleaning to meticulous drying, contributes significantly to the final crispness and flavor. Follow these detailed instructions to achieve crackling perfection.
Step 1: Preparation and Boiling for Tenderness
The journey to perfect pork rinds begins with diligent preparation. Start by carefully inspecting your pork skin. Use a sharp knife to scrape off any lingering fur or hair, ensuring the skin is completely smooth. This meticulous cleaning is crucial for both hygiene and aesthetics. Next, trim off any excessive layers of fat from the underside of the skin. While a thin layer of fat is desirable for flavor and puffing, too much will result in a greasy, heavy product. Wash the cleaned skin thoroughly under cold running water, scrubbing gently to remove any impurities. Once clean, place the pork skin in a large, sturdy pot. Fill the pot with enough water to completely submerge the skin, then add about 1 tablespoon of salt. Place the pot on your stovetop and bring the water to a rolling boil over medium to medium-high heat. Allow the pork skin to simmer gently for approximately 30 minutes. This boiling process is vital as it tenderizes the skin, partially renders the fat, and prepares it for efficient drying and ultimate puffing. After 30 minutes, carefully remove the softened pork skin from the pot using tongs or a slotted spoon. Immediately rinse it under cold water to stop the cooking process and wash away any residual impurities, then drain it thoroughly. Once cooled, pat the skin dry with paper towels and slice it into small, uniform pieces, aiming for a thickness of about half an inch and a length of around 2 inches. Uniformity in size ensures even cooking and consistent crispness.
Step 2: Seasoning, Drying, and the Final Fry
With your pork skin prepped and sliced, it’s time to infuse it with flavor and prepare it for its ultimate transformation. Transfer the sliced pork skin pieces into a large mixing bowl. Sprinkle about half a tablespoon of chicken powder and another half tablespoon of salt evenly over the skin. Using your clean hands, gently toss and massage the seasonings into each piece of pork skin, ensuring every surface is thoroughly coated. This step not only adds a delicious savory base but also helps draw out additional moisture. Once seasoned, allow the pork skin to rest in the bowl for at least 2 hours, or ideally overnight in the refrigerator. This resting period allows the flavors to deeply penetrate the skin, resulting in a more robust and satisfying taste. The most critical step for achieving truly puffy and crispy pork rinds is thorough drying. After resting, arrange the seasoned pork skin pieces in a single layer on drying racks or baking sheets. Now, the drying process begins. Traditionally, this involves sun-drying for 2 to 3 days, especially in warm, dry climates. If sun-drying isn’t feasible or weather conditions aren’t ideal, you can use a dehydrator set to a low temperature (around 135°F / 57°C) for 10-12 hours, or a very low oven (the lowest setting, often 150-200°F / 65-93°C) with the door slightly ajar to allow moisture to escape, for several hours. The goal is to remove as much moisture as possible from the skin, turning it hard and brittle. This dehydration is absolutely crucial; insufficient drying will prevent the skin from puffing properly during frying. You’ll know they’re ready when they are stiff, dry, and no longer pliable.
Once thoroughly dried, it’s time for the grand finale: deep frying. Place a wok or a deep, heavy-bottomed pan on your stove over medium-high heat. Pour in enough cooking oil to completely submerge the pork skin pieces. Heat the oil to approximately 350-375°F (175-190°C). If you don’t have a thermometer, you can test a small piece of skin; it should immediately sizzle and begin to bubble vigorously. Carefully drop the dried pork skin pieces into the hot oil in small batches. It’s essential not to overcrowd the pan, as this will drop the oil temperature and result in soggy rather than crispy rinds. As they fry, you’ll observe them magically puffing up and expanding. Stir them gently to ensure even cooking. Fry until they achieve a beautiful light golden-brown color and are visibly puffed and crispy, which typically takes a few minutes per batch. Using a slotted spoon or spider skimmer, scoop out the fried pork rinds and transfer them immediately to a serving plate or a baking sheet generously lined with paper towels. The paper towels will absorb any excess oil, ensuring your chicharrón remain perfectly crisp and non-greasy. Repeat the process with the remaining batches, maintaining the oil temperature between batches. Once all batches are fried and drained, your homemade crispy pork skin crackers are ready to be devoured.
Expert Tips for Achieving Ultimate Crispness and Flavor
While the recipe provides a solid foundation, these expert tips will help elevate your homemade pork rinds from great to absolutely legendary:
- Quality Pork Skin is Key: Start with the freshest pork skin you can find. A reputable butcher can often provide skin that is already relatively clean and has a good, even thickness.
- Thorough Cleaning: Don’t skip or rush the initial cleaning. Any residual hair or impurities can affect the taste and texture.
- Even Slicing Matters: Uniformly sized pieces will cook evenly, preventing some pieces from burning while others remain undercooked or less crispy.
- The Drying Process is NON-NEGOTIABLE: This is arguably the most crucial step. Any moisture left in the skin will prevent it from puffing up and result in tough, chewy rinds. If sun-drying isn’t an option, a dehydrator or a very low oven for an extended period are excellent alternatives. The skin should feel like hard plastic or thin wood when fully dry.
- Maintain Oil Temperature: Use a kitchen thermometer to monitor your oil. Too cool, and the rinds absorb too much oil; too hot, and they burn before puffing. Aim for the suggested temperature range.
- Don’t Overcrowd the Pan: Fry in small batches to maintain optimal oil temperature and allow each piece enough space to puff and crisp perfectly. Overcrowding leads to temperature drops and less desirable results.
- Listen and Watch: The sound of frying pork rinds changes as they cook. Initially, they’ll bubble vigorously, then the bubbling will subside as they become crisp. Their color will transition to a beautiful golden brown.
- Proper Draining: Always drain fried pork rinds on paper towels to remove excess oil. This keeps them light and crispy, not greasy.
- Season Immediately: For extra flavor, you can sprinkle additional salt or your preferred seasoning blend immediately after draining, while they are still warm and the oil can help the seasoning adhere.
Flavor Variations and Serving Suggestions
While classic salted pork rinds are undoubtedly delicious, don’t hesitate to experiment with different seasonings to create your signature snack. The possibilities are endless!
- Spicy Chili: Add a generous dash of cayenne pepper, smoked paprika, or chili powder to your seasoning mix before drying.
- Garlic Parmesan: Toss the warm, freshly fried rinds with garlic powder and grated Parmesan cheese.
- Salt & Vinegar: For a tangy kick, lightly mist the warm rinds with distilled white vinegar (use a fine spray bottle) and then sprinkle with extra salt.
- BBQ Blast: Use your favorite BBQ seasoning blend for a smoky, sweet, and savory twist.
- Herby Delight: Finely chopped dried rosemary or thyme can add an aromatic layer.
As for serving, crispy pork rinds are incredibly versatile:
- Classic Snack: Enjoy them plain, as a satisfying snack on their own.
- Beer Pairing: They are the quintessential companion for a cold beer or your favorite craft brew.
- Dip It: Serve with fresh salsa, creamy guacamole, a spicy cheese dip, or even a simple hot sauce.
- Soup Topping: Crush them lightly and sprinkle over hearty soups or stews for an added crunch and savory depth.
- Salad Croutons: A fantastic gluten-free alternative to croutons, adding texture and flavor to any salad.
- Breadcrumb Substitute: Finely crush them and use as a breading for fried chicken, fish, or vegetables for a unique twist.
Storing Your Homemade Delight
To maintain the incredible crispness of your homemade pork rinds, proper storage is essential. Once cooled completely, transfer them to an airtight container. Store them in a cool, dry place at room temperature. Avoid refrigerating, as this can introduce moisture and cause them to lose their crunch. Stored correctly, homemade pork rinds can remain fresh and crispy for up to 1-2 weeks. If they start to lose their crispness, a quick reheat in a dry pan or a low oven for a few minutes can often revive them.
Conclusion: The Satisfaction of Homemade Perfection
Crafting your own crispy pork rinds is more than just following a recipe; it’s an experience that connects you with traditional culinary practices and rewards you with an incredibly satisfying snack. From the initial meticulous cleaning to the magical puffing in hot oil, each step is a testament to the transformative power of simple ingredients and patient technique. The result is a snack that far surpasses any store-bought alternative, offering a freshness, flavor, and crunch that are truly in a league of their own. Whether you’re a seasoned home cook or a curious beginner, this recipe for homemade chicharrón promises a delightful and delicious journey. So, gather your ingredients, set aside some time, and prepare to indulge in the ultimate crispy pork skin crackers. Your taste buds—and perhaps your next gathering—will thank you for it. For a visual guide to perfecting this recipe, be sure to watch the helpful video tutorial by Cooking With Me on YouTube. Happy cooking!
*All images in this article are credited to Cooking With Me via YouTube. We highly recommend visiting their channel and subscribing for more fantastic cooking inspiration!