
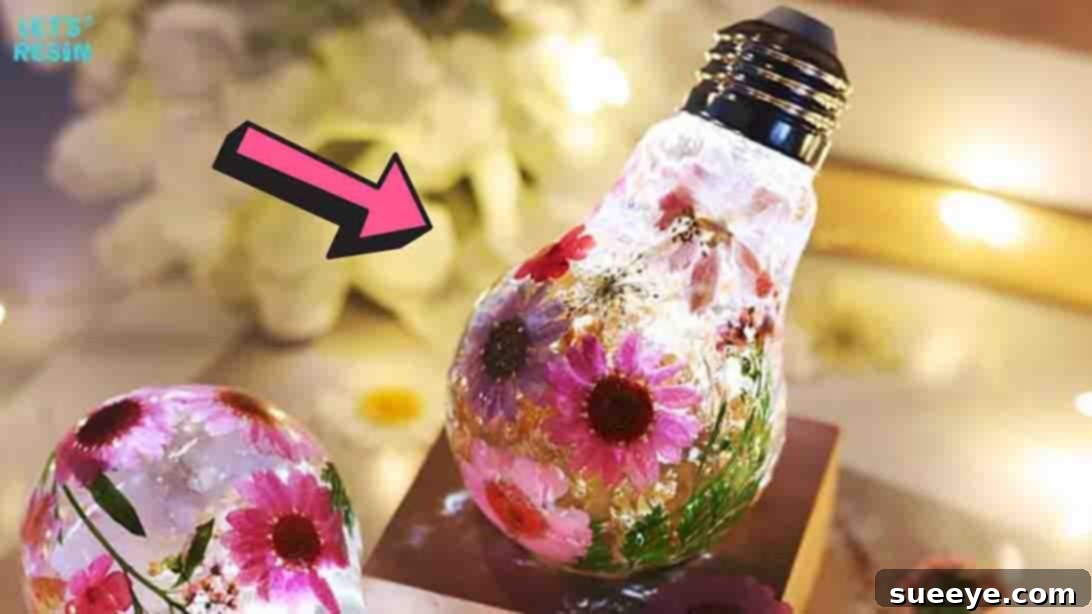
Craft Your Own Enchanting DIY Resin Light Bulb with Dried Flowers
Have you ever wanted to create a truly unique and personalized piece of home decor or a heartfelt gift that leaves a lasting impression? Look no further than this exquisite DIY resin light bulb project featuring delicate dried flowers. Inspired by the brilliant creators at LET’S RESIN on YouTube, this project transforms simple materials into a breathtaking luminous art piece. It’s more than just a light bulb; it’s a miniature garden encased in crystal-clear resin, glowing softly to illuminate any space. Whether you’re a seasoned crafter or just dipping your toes into the world of resin art, this guide will walk you through every step, ensuring a rewarding and enjoyable experience. Imagine the delight of your friends and family receiving a custom-made resin light bulb, perfectly tailored to their taste, for birthdays, holidays, or just because. This project offers an unparalleled opportunity for creative expression, allowing you to capture the ephemeral beauty of nature in a lasting, functional art piece. The initial thought of working with resin might seem a little daunting, but we assure you, with the right guidance and a little patience, you’ll be amazed at how straightforward and immensely satisfying this DIY truly is. Get ready to embark on a creative journey that culminates in a dazzling, custom-made light fixture, perfect for enhancing your home décor or gifting a truly memorable token of affection.
Why Craft a Resin Light Bulb? The Magic of Handmade Luminaries
Beyond the sheer joy of creating something with your own hands, there are numerous reasons why this DIY resin light bulb stands out. Firstly, it offers unparalleled personalization. Each bulb becomes a unique canvas for your creativity, allowing you to choose specific flowers, colors, and arrangements that resonate with you or your recipient. This level of customization makes it an exceptionally thoughtful gift, far surpassing mass-produced items. Secondly, it’s a fantastic way to preserve the beauty of nature. Those cherished petals from a special occasion or a walk in the park can find a new life, encased forever in a shimmering globe. Thirdly, the finished product is not only decorative but also functional, casting a warm, inviting glow. It acts as a subtle nightlight, a charming desk accessory, or a captivating accent piece in any room. The satisfaction of turning raw materials into such a beautiful, glowing object is immense, fostering a sense of accomplishment that encourages further crafting adventures.
Gathering Your Artisan Toolkit: Essential Materials for Your Resin Light Bulb Masterpiece
Before diving into the creative process, ensuring you have all your materials ready is key. Quality materials contribute significantly to the beauty and longevity of your finished resin light bulb. Here’s what you’ll need, along with some tips for selection:
- Epoxy Resin (Two-Part System): This is the heart of your project. Opt for a high-quality, clear casting epoxy resin designed for art and crafting. Look for brands known for low yellowing and excellent clarity. Some resins are thicker, which helps with embedding, while others are thinner for fewer bubbles. Always read the manufacturer’s instructions for mixing ratios and curing times.
- Light Bulb Silicone Mold: The foundational shape for your project. These molds are specifically designed to replicate the classic light bulb shape. Ensure it’s made from durable, flexible silicone for easy demolding. You can find various sizes, so choose one that suits your desired finished product.
- Epoxy Mixing Cups & Stirring Sticks: Essential for precise mixing. Use disposable plastic or silicone cups (silicone cups are reusable). BBQ sticks, craft sticks, or dedicated resin stirring tools work well. Avoid using anything that might introduce lint or debris.
- Dried Flowers and Leaves: The decorative elements that bring your bulb to life. Source these from craft stores, online suppliers, or dry your own (press them between heavy books or use silica gel). Ensure they are completely dry to prevent mold or discoloration within the resin. Small, flat flowers like forget-me-nots, baby’s breath, small daisies, or fern fronds work wonderfully.
- Gold Leaf Flakes (Optional): Adds a touch of elegance and shimmer. These delicate flakes can be mixed into the resin to create a glittering effect, enhancing the light’s sparkle. Silver or copper flakes are also beautiful alternatives.
- UV Resin (Small Amount): Useful for tacking down dried flowers in place before your main epoxy pour. This resin cures instantly under a UV light, saving time and preventing flowers from floating or shifting.
- UV Light (Small, Handheld): Necessary if using UV resin. A small nail lamp or a dedicated UV flashlight will work perfectly.
- Protective Gear: Always prioritize safety when working with resin. This includes disposable gloves (nitrile are best), safety glasses, and ensuring you work in a well-ventilated area. A respirator mask is also highly recommended, especially for prolonged exposure.
- Rubbing Alcohol (or Soapy Water): For cleaning your mold before use and for lubricating the mold during demolding. Alcohol can also help clean up minor resin spills.
- LED Light & Bulb Cap: These components transform your resin creation into a functional light. The LED light should be small enough to fit inside your finished resin bulb. Many craft stores or online suppliers offer battery-operated LED cork stoppers or small disc lights designed for decorative bottles or crafts. The bulb cap provides a base and often houses the LED components. Ensure the LED light is low heat to avoid damaging the resin over time.
Step-by-Step Guide: Crafting Your Enchanting Resin Light Bulb with Dried Flowers
This detailed tutorial will guide you through each phase of creating your beautiful resin light bulb. Remember, patience is a virtue when working with resin, and taking your time will yield the best results.
Step 1: Preparing Your Design and First Resin Pour
Begin your artistic journey by preparing your silicone mold and selecting your botanical elements. Thoroughly clean your light bulb silicone mold with soapy water or rubbing alcohol to remove any dust or residue, then let it dry completely. A clean mold ensures a crystal-clear finish. Now comes the creative part: arranging your dried flowers and leaves. Gently position them onto the inner walls of the silicone mold. This is where UV resin comes in handy; apply a tiny dab of UV resin to the back of each flower or leaf and press it against the mold wall. Use your UV light to instantly cure the resin, securing the botanicals in place. This crucial step prevents your delicate elements from floating or shifting during the main epoxy pour, preserving your intended design. Experiment with different arrangements – a sparse, elegant look or a vibrant, dense floral display – the choice is yours!
Once your floral arrangement is secure, it’s time to prepare your epoxy resin. Always wear gloves and safety glasses, and work in a well-ventilated area. Following your resin manufacturer’s instructions precisely, measure out equal parts of resin and hardener into a clean epoxy mixing cup. Stir slowly and continuously for at least 3-5 minutes, scraping the sides and bottom of the cup to ensure thorough mixing. Improperly mixed resin will not cure correctly. If you’re incorporating gold leaf flakes, add them gradually during the mixing process, stirring them in gently to distribute them evenly without introducing too many bubbles. Once satisfied with the mix, let the resin sit for a few minutes to allow any surface bubbles to rise and pop, or use a heat gun/lighter carefully to remove them.
Now, pour your first thin layer of mixed epoxy resin into the silicone mold. A thin layer is crucial for several reasons: it helps to encapsulate the delicate flowers without disturbing them, minimizes the chance of trapping large bubbles, and allows for better light penetration later. Don’t fill the mold entirely; aim for about 1/4 to 1/3 of the mold’s capacity. Gently tilt and rotate the mold to ensure the resin coats all the interior surfaces and around your embedded flowers. Use a BBQ stick or a toothpick to carefully dislodge any bubbles clinging to the flowers or mold walls. Cover your mold to protect it from dust and allow this first layer to cure for at least 8 to 12 hours, or as per your resin’s instructions, until it is tacky but not fully hard. This “tacky” stage is ideal for adding subsequent layers without visible seam lines.
Step 2: Layering Resin for Depth and Durability
After the initial layer has partially cured to a tacky state, it’s time to add the next layer of resin. Prepare another batch of epoxy resin, following the same careful measuring and mixing procedures as in Step 1. Ensure thorough mixing to guarantee a proper cure. This layer will add more depth and encase the flowers further. Pour another thin to medium layer of freshly mixed resin, carefully adding it over the first layer. Again, avoid overfilling. Use a BBQ stick to gently guide the resin and pop any new bubbles that may have formed. Allow this second layer to cure for another 8 to 12 hours, or until it is firm but still slightly flexible, depending on your resin’s specific curing schedule.
For your third and final pour, prepare a larger batch of epoxy resin. This pour will fill the mold completely, bringing your light bulb to its full volume and providing structural integrity. Pour the resin slowly and steadily into the mold until it reaches the top edge. Be mindful not to overfill, as excess resin will overflow and create a messy edge. Once filled, inspect the surface for any lingering bubbles. A gentle pass with a heat gun (from a safe distance) or a quick spray of isopropyl alcohol can help eliminate these surface bubbles, leaving you with a perfectly smooth, clear finish. Now, the most crucial part: the final cure. Cover your mold to protect it from dust and leave it undisturbed for a minimum of 24 to 72 hours. The exact curing time will depend on the brand of resin you are using, ambient temperature, and humidity. It’s always best to err on the side of caution and allow extra time for a full, hard cure to prevent stickiness or soft spots.
Step 3: Demolding and Assembling Your Radiant Creation
Once your resin light bulb has fully cured and feels hard to the touch with no tackiness, it’s time for the exciting moment of demolding! To make this process easier and prevent damage to your finished piece or the mold, apply a small amount of soapy water or rubbing alcohol around the edges of the mold. Gently squeeze and stretch the silicone mold, working your way around the bulb. Silicone is flexible, so take your time and slowly peel the mold away from your resin piece. With a bit of careful coaxing, your beautiful, clear resin light bulb will pop out. Inspect your creation for any rough edges or minor imperfections. These can usually be carefully trimmed with a craft knife or sanded smooth with fine-grit sandpaper (wet sanding is recommended for resin) and then polished for a high-gloss finish if desired.
The final step is to bring your resin art to life by adding the LED light and bulb cap. Most decorative LED light kits designed for crafts come with a cap that fits snugly onto the base of the resin light bulb. Carefully insert your chosen LED light (ensure it’s a cool-burning LED to prevent heat damage to the resin over time) into the cavity at the base of your resin bulb. Then, attach the bulb cap. These caps often twist or clip into place, providing a stable base and housing for the light source. Test your light, and marvel at your stunning, handcrafted resin light bulb! This luminary is now ready to adorn your desk, shelf, or serve as an unforgettable gift.
Pro Tips for a Flawless Resin Light Bulb Creation
To elevate your resin crafting experience and ensure the best possible outcome, consider these expert tips:
- Temperature Matters: Work in a room with a stable temperature, ideally between 70-75°F (21-24°C). Extreme temperatures can affect resin cure times and increase bubble formation.
- Patience with Bubbles: Bubbles are the bane of resin artists. Mix slowly, pour slowly, and use a heat gun or torch (briefly and carefully!) to pop surface bubbles after each pour. A pressure pot can eliminate bubbles entirely, but it’s an advanced tool.
- Flower Selection: Choose thin, completely dried flowers. Thicker flowers can be harder to embed and may introduce more air pockets. Ensure they are bone dry to prevent rotting or discoloration in the resin.
- Layering is Key: Don’t try to pour a very thick layer all at once, especially with botanicals. Multiple thin layers (as outlined in the steps) allow better bubble release, secure inclusions, and prevent excessive heat buildup during curing.
- Dust Control: Dust is a resin’s enemy. Work in as clean an environment as possible. Cover your curing pieces with a box or dome to protect them from airborne particles.
- Gloves are Non-Negotiable: Always wear nitrile gloves. Resin is sticky and can cause skin irritation.
- Ventilation First: Work in a well-ventilated area. If working indoors, ensure windows are open, and use a fan. Consider a respirator mask for added protection against fumes.
- Clean Up Immediately: If you spill resin, clean it up immediately with rubbing alcohol before it cures.
- Test Small Batches: If using a new resin brand or colorant, do a small test pour to ensure you understand its working time and curing properties.
Caring for Your Handmade Resin Light Bulb
Your beautiful resin light bulb is a piece of art that, with proper care, will last for years.
- Cleaning: Dust your light bulb regularly with a soft, dry cloth. For more stubborn marks, use a slightly damp cloth with mild soap, then wipe dry immediately. Avoid harsh chemicals or abrasive cleaners, which can scratch or dull the resin.
- Avoid Direct Sunlight: Prolonged exposure to direct sunlight can cause some resins to yellow over time. Place your light bulb in an area with indirect light to preserve its clarity and color.
- Heat Source: Always use cool-burning LED lights. Incandescent bulbs generate significant heat which can warp or damage the resin.
- Handling: While resin is durable, avoid dropping your light bulb as it can crack or chip.
Frequently Asked Questions About DIY Resin Light Bulbs
- Q: Can I use fresh flowers instead of dried ones?
- A: No, it is strongly advised against using fresh flowers. Fresh flowers contain moisture, which will rot and mold inside the resin, causing discoloration and degradation of your beautiful creation. Always ensure your flowers are completely dried before embedding them.
- Q: My resin is sticky after curing. What went wrong?
- A: Stickiness usually indicates improper mixing of the epoxy resin. Ensure you measure both parts precisely according to the manufacturer’s instructions and stir thoroughly for the recommended time (typically 3-5 minutes), scraping the sides and bottom of your mixing cup. Temperature can also play a role; very cold environments can inhibit proper curing.
- Q: How do I get rid of bubbles in my resin?
- A: Mix slowly to minimize air incorporation. After pouring, you can use a heat gun or a butane torch (briefly waving it over the surface) to pop surface bubbles. A toothpick or BBQ stick can also be used to manually remove bubbles clinging to inclusions or mold walls. Pouring in thin layers also helps significantly.
- Q: Can I use any type of LED light?
- A: It’s important to use cool-burning LED lights. Traditional incandescent bulbs generate too much heat, which can damage, melt, or yellow the resin over time. Battery-operated LED cork lights or small craft LEDs are generally ideal.
- Q: How long does the resin take to fully cure?
- A: Curing times vary significantly based on the type of resin, brand, ambient temperature, and humidity. Most epoxy resins require 24-72 hours to reach a full, hard cure. Always refer to your specific resin’s instructions.
Your Creative Journey Awaits: Crafting Beyond the Light Bulb
Congratulations on completing your exquisite DIY resin light bulb! This project is not just about creating a beautiful object; it’s about discovering the joy of resin crafting and the endless possibilities it offers. The skills you’ve learned here—resin mixing, layering, embedding, and demolding—are foundational and can be applied to countless other resin projects, from jewelry to coasters, decorative trays, and more. We hope this tutorial has sparked your imagination and encouraged you to explore further into the fascinating world of handmade crafts. Share your creations, inspire others, and continue to illuminate your world with your unique artistic touch. Happy crafting!