
DIY Dollar Tree Fall Apple Decor: Budget-Friendly Autumn Crafts for Your Home
As the leaves begin to change and a crisp breeze fills the air, there’s no better time to infuse your home with the cozy spirit of autumn. And what better way to celebrate the harvest season than with charming apple-themed decor? Rebecca Virginia DIY has truly outdone herself with these absolutely adorable and incredibly budget-friendly Dollar Tree Fall apple home decor ideas. These delightful projects prove that you don’t need to spend a fortune to create stunning, personalized decorations that reflect the warmth and beauty of the season. Each craft is not only easy and inexpensive to make but also bursts with creativity, offering unique touches that will make your home feel inviting and festive. Get ready to transform ordinary Dollar Tree finds into extraordinary autumnal accents!
Decorating for fall should be an enjoyable and accessible experience for everyone. These Dollar Tree DIY projects embody that philosophy, allowing you to craft high-impact decor without breaking the bank. From charming table centerpieces to captivating wall accents, these apple-inspired crafts are versatile and can complement a variety of home styles, from modern farmhouse to classic rustic. Prepare to be inspired as we dive into these fantastic DIY ideas, perfect for adding that special autumn touch to every corner of your living space. Let’s gather our supplies and unleash our creativity!
Why Choose Apple Decor for Your Fall Home?
Apples are a quintessential symbol of autumn, representing harvest, abundance, and the simple joys of the season. Incorporating apple themes into your fall decor brings a sense of traditional warmth and natural beauty to your home. Beyond their symbolic meaning, apples offer a vibrant color palette, from deep reds and crisp greens to golden yellows, which beautifully complements other fall staples like pumpkins, gourds, and autumn foliage. Using Dollar Tree supplies makes these projects incredibly appealing, as you can achieve a high-end look on a minimal budget, allowing you to experiment with different styles and themes without financial pressure. These crafts are perfect for adding personal touches to your entryway, dining table, kitchen, or even your mantelpiece, ensuring your home is fall-ready in every aspect.
Essential Tips for Successful Dollar Tree DIY Crafts
Before embarking on your crafting journey, here are a few general tips to ensure your Dollar Tree DIY projects turn out perfectly:
- Prep Your Workspace: Always lay down newspaper or a protective mat to keep your surfaces clean.
- Layering Paint: For best results, apply multiple thin coats of paint rather than one thick coat. This prevents streaks and speeds up drying time.
- Patience is Key: Allow each layer of paint and glue to dry completely before moving on to the next step. This prevents smudging and ensures durability.
- Test Materials: Sometimes Dollar Tree items can be a bit tricky. If you’re unsure, test paints or glues on a small, inconspicuous area first.
- Personalize: Don’t be afraid to put your own spin on these ideas! Change colors, add different embellishments, or combine elements from different projects to create something truly unique.
- Safety First: Always supervise children when crafting, especially when using sharp tools or strong adhesives.
Project 1: Faux Caramel Apple
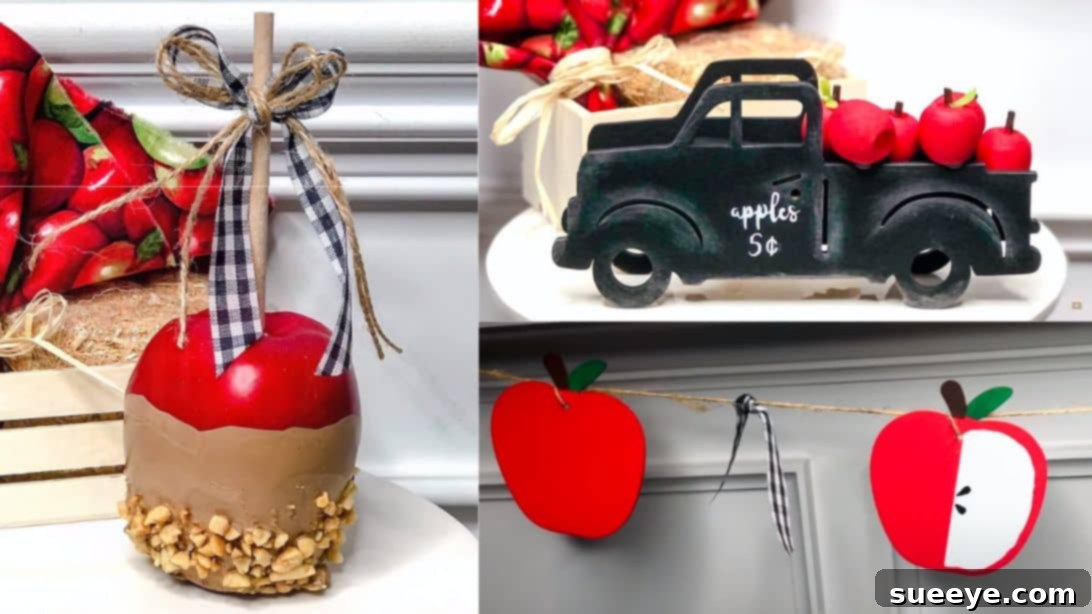
Recreate the sweet allure of a classic caramel apple without the sticky mess! This project captures the rustic charm and delicious appeal of a fall festival treat, making it a perfect decorative accent for your kitchen island, dining table, or a tiered tray. It’s an incredibly realistic and charming piece that brings a touch of autumnal sweetness to any display.
Materials:
- Faux apple (plastic or foam from Dollar Tree)
- Paint (khaki and dark brown for caramel, or pre-mixed caramel color)
- Mod Podge (or a similar clear sealant/glue)
- Wood dowel (a small stick or skewer works too)
- Crushed nuts (walnuts, peanuts, or pecans; optional)
- Clear cellophane wrap (or small clear plastic bags)
- Ribbon (burlap, plaid, or any fall-themed ribbon)
- Jute twine
- Paintbrush
Steps:
Begin by preparing your faux apple. Carefully poke the wood dowel into the top center of the faux apple, ensuring it’s secure and straight. This dowel will serve as the “stick” of your caramel apple. Trim the dowel to your desired length – usually about 4-6 inches protruding from the apple is ideal for a realistic look. Next, prepare your “caramel” paint. If you don’t have a specific caramel color, mix the khaki paint with a small amount of dark brown paint until you achieve a rich, golden-brown hue that mimics real caramel. Once you’re satisfied with the color, mix in a generous amount of Mod Podge. The Mod Podge will give the paint a glossy, slightly textured finish, making it look like melted caramel, and also acts as a sealant.
Using a paintbrush, carefully paint the bottom portion of the apple with your caramel mixture. Apply it in a way that suggests the apple has been freshly dipped, allowing some “drips” to form naturally around the sides for an authentic, dripping caramel effect. While the “caramel” paint is still wet, gently sprinkle your crushed nuts over the painted area. The wet paint will help the nuts adhere. Don’t be afraid to let some nuts fall off, as this adds to the realistic, just-dipped appearance. Allow the apple to dry completely. This might take a few hours, so be patient!
Once dry, it’s time for the finishing touches. Create a small bow using your chosen ribbon. Now, carefully wrap the entire apple, including the dowel, with clear cellophane wrap, much like you would find at a candy shop. Secure the wrap tightly at the base of the dowel with a piece of jute twine, tying it into a neat knot or bow. Finally, attach your decorative ribbon bow just below where you tied the jute. Your faux caramel apple is now ready to be displayed! These look fantastic grouped on a platter, nestled in a basket, or as part of a larger fall centerpiece.
Project 2: Apple Truck
Bring a touch of vintage charm and rustic appeal to your fall decor with this adorable apple truck project. A classic farm truck laden with a fresh apple harvest is an iconic image of autumn, and this DIY version captures that essence perfectly. It’s a delightful piece for a mantel, shelf, or as a centerpiece on a farmhouse-style table, adding a playful and nostalgic touch to your seasonal display.
Materials:
- Wood truck cutout (often found at Dollar Tree or craft stores)
- Small wooden apples (or other small apple-shaped embellishments)
- Black, gray, and red acrylic paint
- Small piece of craft foam (black, or paintable)
- Craft glue
- Small paintbrush
- Optional: Small green felt or paper for leaves
Steps:
Start by painting the entire wood truck cutout with black paint. Ensure good coverage, as this will serve as the base color. Let the black paint dry completely. Once dry, create a “distressed” or weathered look by lightly brushing gray paint onto the wheels and along the edges and raised areas of the truck. This technique involves dry-brushing, where you put very little paint on your brush and lightly graze the surface, allowing the black base to show through and create an aged effect. This gives the truck a charming, antique appearance, as if it’s been hauling apples for many seasons.
Next, take your small piece of craft foam. If it’s not already black, paint it black and let it dry. Cut a small, rectangular piece of foam to fit in the middle “bed” area of the truck, then glue it into place. This foam piece can serve as a base for your apples, making them stand out. Now, paint your small wooden apples with red paint. Apply a few coats if necessary to get a vibrant, rich red color. Once the apples are dry, glue them onto the back area of the truck, carefully arranging them to look like a bountiful harvest. For an extra touch of realism and cuteness, you can cut tiny green leaves from felt or paper and glue them onto the tops of the painted wooden apples. This adds a lovely pop of color and makes the apples look even fresher. Your charming apple truck is now ready to display, bringing a slice of the orchard to your home!
Project 3: Apple Garland
Garlands are incredibly versatile decor pieces that can instantly add a festive touch to any space. This apple garland project is perfect for draping across a mantel, hanging in a doorway, or adorning a shelf, bringing a continuous stream of autumnal cheer. The mix of solid and half-painted apples creates a dynamic visual interest, making this garland a standout piece of Dollar Tree Fall decor.
Materials:
- Wood apple cut-outs (or other small apple shapes)
- Ribbon or jute twine (for stringing and bows)
- Red, green, white, black, and brown acrylic paint
- Painter’s tape
- Small paintbrushes
Steps:
Begin by painting your wood apple cut-outs. Paint some apples entirely red and others entirely green. Allow these to dry completely. For a unique touch, select some of the apples (either red or green) and place a strip of painter’s tape across the middle. This will create a clean line for the “dipped” effect. Paint one half of these taped apples with white paint, making sure to get a crisp edge along the tape. Once the white paint is dry, carefully remove the painter’s tape to reveal a perfectly divided apple. This alternating solid and half-painted design adds a contemporary flair to your traditional apple theme.
Next, using a fine-tipped brush and black paint, carefully paint small “seeds” onto the white-painted half of the apples. You can also add small brown stems to the tops of all the apples, enhancing their realistic appeal. Once all the paint is dry, it’s time to assemble your garland. Thread your ribbon or jute twine through holes in the top of each apple, alternating between the solid red/green apples and the half-painted ones. Space them out evenly along the twine to create a balanced look. Finally, for an extra decorative flourish, tie a small piece of ribbon into a bow around the middle of each apple as you string them. These little bows can be a contrasting color or texture, adding another layer of visual interest to your beautiful, handmade apple garland.
Project 4: Apple Rolling Pin
Decorative rolling pins have become a popular trend in home decor, adding a rustic and charming touch to kitchens, coffee bars, and tiered trays. This apple-themed rolling pin project transforms a simple kitchen tool into a delightful seasonal accent, perfect for celebrating the harvest season. It’s an easy and elegant way to incorporate apples into your functional decor.
Materials:
- Miniature or decorative rolling pin (can often be found at Dollar Tree or craft stores)
- Lettering (vinyl decals, stencils, or hand-painted if skilled)
- Small embellishments (e.g., small apple cutouts, tiny leaves, berries)
- Ribbon (burlap, plaid, or fall-themed)
- White and red acrylic paint
- Craft glue
- Small paintbrush
Steps:
Start by painting your rolling pin. Paint the main “rolling” part with white paint, ensuring even coverage. Then, paint the handles of the rolling pin with red paint, creating a lovely color contrast reminiscent of fresh apples. Allow both painted sections to dry completely. Once dry, it’s time to add your lettering. Choose a fall-themed phrase or word like “Apple Orchard,” “Farm Fresh,” “Fall Harvest,” or simply “Autumn.” Carefully apply your chosen lettering onto the white-painted rolling section. If using vinyl decals, ensure they are smooth and bubble-free. If stenciling, secure the stencil with painter’s tape and dab paint lightly to prevent bleeding. For those with a steady hand, freehand painting offers a unique, personal touch.
Next, glue your chosen embellishment in the middle of the rolling pin, perhaps between two words of your lettering or as a central decorative element. A small apple cutout, a cluster of tiny berries, or some faux leaves would look wonderful here, reinforcing the apple theme. Finally, tie a festive ribbon around one of the handles or in a bow around the center of the rolling pin. The ribbon adds a charming decorative flourish and ties all the elements together. Your beautifully decorated apple rolling pin is now complete and ready to adorn your kitchen, tiered tray, or any nook that needs a touch of fall charm. It’s a subtle yet effective way to celebrate the season with a handmade touch!
Embrace the Autumn Season with DIY Apple Decor!
These Dollar Tree Fall apple home decor ideas from Rebecca Virginia DIY offer a fantastic opportunity to infuse your living space with the warmth and charm of autumn without straining your budget. Each project, from the realistic faux caramel apple to the rustic apple truck, the versatile apple garland, and the stylish decorative rolling pin, provides a unique way to celebrate the harvest season. Not only are these crafts easy and enjoyable to make, but they also allow for wonderful personalization, letting your unique style shine through. By utilizing affordable materials from Dollar Tree, you can achieve stunning results that look far more expensive than they actually are.
Embrace the joy of crafting and the satisfaction of transforming simple items into beautiful seasonal treasures. Whether you’re decorating a single centerpiece or revamping your entire home for autumn, these apple-themed projects are sure to bring smiles and compliments. So, grab your supplies, get creative, and let the spirit of fall blossom in your home with these delightful DIY decorations. Happy crafting!