
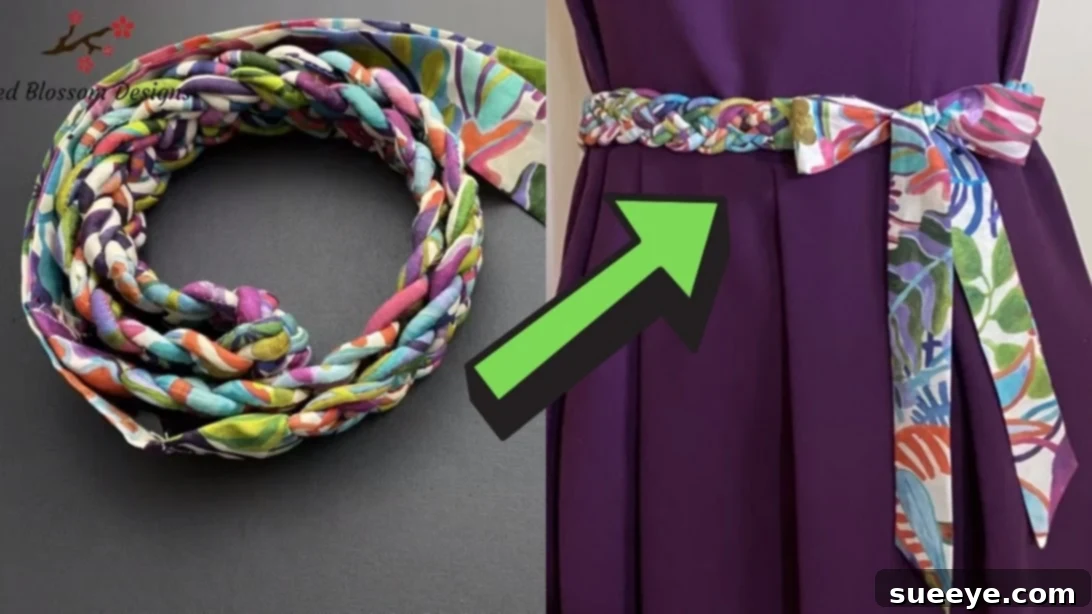
DIY Fabric Sash Belt: Craft Your Own Unique & Stylish Accessory
Are you looking to infuse your wardrobe with unique, handmade flair without breaking the bank? Imagine creating fashionable accessories that perfectly complement your favorite dresses, skirts, or long tops, tying your entire look together with a personal touch. This comprehensive guide will walk you through the process of crafting a stunning fabric sash belt, inspired by the creative vision of Red Blossom Designs. Not only is this project incredibly rewarding, but it also offers an excellent opportunity to repurpose leftover fabrics from previous sewing adventures, transforming scraps into a chic and functional accessory.
Whether you’re a seasoned crafter or a complete beginner to the world of sewing, this sash belt tutorial is designed to be easy to follow, providing clear, step-by-step instructions that ensure a beautiful outcome. By the end of this guide, you’ll have a gorgeous, custom-made fabric belt that adds a distinctive elegance to any outfit, showcasing your creativity and sustainable fashion sense. Get ready to dive into a fun and fulfilling DIY project that promises to elevate your style!
Essential Materials for Your Fabric Sash Belt Project
Before embarking on your sash belt crafting journey, gathering all the necessary materials is crucial. Having everything at hand will ensure a smooth and enjoyable process. Here’s a detailed list of what you’ll need, along with some tips for selection:
- Fabric: This is the star of your project! Opt for a medium-weight fabric that drapes well but also holds its shape. Cotton, linen blends, light denim, or even satin can work beautifully depending on the desired look. Consider using fabric scraps from old clothing or previous projects for a sustainable approach. You’ll need enough to cut eight strips, each roughly the length of your waist measurement plus some allowance, and about 1 inch wide for the core strips. Additionally, you’ll need smaller pieces for the ends.
- Strip of Paper: A simple, long strip of paper (like wrapping paper, kraft paper, or even several pieces of printer paper taped together) will serve as your initial waist template. It needs to be long enough to wrap around your waist comfortably.
- Scissors: A sharp pair of fabric scissors is essential for clean, precise cuts. If you’re using paper for the template, a separate pair of paper scissors is recommended to keep your fabric scissors sharp for fabric only.
- Measuring Tape/Ruler: For accurate measurements of your waist, fabric strips, and other components. Precision is key in sewing!
- Tape: Standard adhesive tape is useful for securing your paper template and temporarily holding fabric pieces.
- Yarn (Six-Strand): This will be used to give structure and body to your fabric strips. A six-strand yarn (like embroidery floss or a thin crafting yarn) is ideal as it’s strong enough to provide support without adding excessive bulk. Choose a color that won’t show through your chosen fabric.
- Elastic Bands: Small, durable elastic bands will be used to temporarily secure fabric strips during the plaiting process. Hair ties or small rubber bands work well.
- Paper Clip or Binder Clip: This tool will help you anchor your fabric strips while you’re braiding or plaiting them, making the process much easier and keeping your work organized. A small folder or piece of cardboard can also work as an anchor point.
- Sewing Machine (Optional, but Recommended): While some steps could potentially be hand-sewn, a sewing machine will make the process significantly faster, more precise, and more durable.
- Iron and Ironing Board: Crucial for pressing seams flat and giving your finished belt a professional, crisp appearance.
- Needle and Thread: For turning fabric strips right side out and for any hand-sewing details or securing parts. Matching thread color to your fabric is recommended.
Step-by-Step Guide: Crafting Your Elegant Fabric Sash Belt
Follow these detailed instructions to create your beautiful fabric sash belt. Take your time with each step, and don’t hesitate to re-read if anything is unclear. Precision and patience are your best allies in this project!
Step 1: Creating Your Waistline Template
Begin by taking a strip of paper. This will serve as a flexible template for your belt’s length. Wrap it gently around your natural waistline, ensuring it’s snug but not too tight. Mark the point where the paper overlaps and cut it precisely at this measurement. This ensures your belt will be custom-fitted to you. Next, fold this paper strip into four equal lengths. This helps in determining the optimal length for your core fabric strips. Once folded, add an additional piece of paper with the same length as one of the folds to the end of your original strip, securing it with tape. This extended paper strip will be your master guide for cutting your fabric strips, allowing for the plaiting process which naturally shortens the overall length.
Step 2: Preparing Your Fabric Strips
Now, it’s time to prepare the main components of your belt. Lay out your chosen fabric smoothly. Using your extended paper template from Step 1, cut eight identical strips of fabric. Each strip should have the exact length of your paper template and a consistent width of 1 inch. For accuracy, it’s helpful to mark your cutting lines with a fabric marker or tailor’s chalk before cutting. These eight strips will form the core of your plaited belt, so ensuring they are uniform in size will contribute to a neat and professional finish.
Step 3: Sewing and Turning the Fabric Tubes
Take two of your 1-inch fabric strips. Fold each strip in half lengthwise, with the right sides of the fabric facing each other. Press this fold firmly with a hot iron to create a crisp crease – this makes sewing much easier. Now, using your sewing machine, sew along the raw edge of each folded strip, maintaining a consistent seam allowance of 0.2 inches (approximately 1/4 inch or less). Ensure you backstitch at the beginning and end of your seam for added durability. After sewing, carefully cut one end of each strip diagonally, close to the seam but without cutting through the stitches. This reduces bulk at the corners when turning. To turn the strip right side out, attach a sturdy needle and thread to the diagonally cut end, then carefully push the needle through the tube, pulling the fabric right side out. This can be a bit fiddly, so take your time. Repeat this process for all eight fabric strips, transforming them into narrow fabric tubes.
Step 4: Inserting the Yarn for Structure
With your fabric tubes ready, it’s time to give them some body and prevent them from collapsing. Get your six-strand yarn. Using a large darning needle or a bodkin, carefully insert the yarn into one of the fabric tubes, pushing it all the way through until it reaches the other end. The yarn should sit snugly inside the tube, providing a firm but flexible core. Once the yarn is fully inserted, cut off any excess yarn on both ends, ensuring it doesn’t protrude from the fabric tube. Repeat this exact process for all eight of your fabric strips. This step is crucial for giving your sash belt a robust and well-defined structure, allowing it to hold the intricate plaited pattern beautifully.
Step 5: The Plaiting Process
This is where your sash belt truly begins to take shape! First, take two of your prepared fabric tubes and secure their ends together with an elastic band. Repeat this with another two tubes, and so on, until you have four pairs. Then, take all four pairs and tie them together at one end with a single, larger elastic band. Clip this elastic-bound end firmly to a stable surface, like a paper clip attached to a heavy folder or a clipboard. This acts as your anchor. Spread out the eight individual fabric tubes so they are separate and arranged in a sequence. For clarity, let’s number them 1 through 8 from right to left (or left to right, just be consistent). The plaiting pattern is as follows: take strip 1 (outermost right) and cross it over strip 3, moving towards the left. Then, take strip 8 (outermost left) and cross it over strip 6, moving towards the right. Now, you’ll cross the middle two strips. Continue this specific crossing pattern (outer right over its third neighbor, outer left over its third neighbor, then the new middle two) repeatedly until you reach the desired length of your plait, ensuring you maintain an even tension throughout for a consistent look. As you plait, the elastic bands might be pushed down; keep them low and separated. Once you’ve plaited the entire length, use elastic bands to temporarily hold both ends in place, securing your beautiful plait.
Step 6: Securing the Plait and Finishing the Center
Remove any additional paper from your original paper waist strip template. Measure 6 inches from one end of this template and cut it off. This 6-inch segment will help you mark the secure center of your plaited belt. Place this shorter paper strip directly onto the middle of your plaited fabric section. Mark the ends of this 6-inch paper strip onto your plaited fabric. Using a needle and matching thread, carefully and securely sew the individual fabric tubes together within this marked 6-inch section. This stitching should be tight and robust to prevent the plait from unraveling. Once this section is thoroughly secured, cut off any excess fabric tubes beyond your stitched area and carefully remove the paper strip. This central stitching ensures the stability and integrity of your plait.
Step 7: Preparing the End Tabs
To give your sash belt a clean and professional finish, you’ll create two small rectangular tabs for the ends. Cut two pieces of fabric, each measuring approximately 3.15 inches by 3.94 inches (roughly 8 cm by 10 cm). Fold each of these fabric rectangles in half, right sides together. Sew along the two longer raw edges and one shorter raw edge, leaving one shorter end open for turning. Trim the corners close to the seam allowance to reduce bulk, then carefully flip these fabric pieces right side out. Press them flat with an iron to create neat, crisp rectangles. These will neatly cap off the ends of your plaited belt, providing a base for the ties.
Step 8: Attaching the Ties and Final Touches
For the final step, you’ll create the long ties that allow you to fasten your sash belt. Cut two more pieces of fabric, each measuring 3.15 inches by 15.7 inches (approximately 8 cm by 40 cm). Similar to Step 3, fold each strip in half lengthwise, right sides together, and press firmly with an iron. At one end of each strip, cut a diagonal angle – this will create a decorative pointed end for your ties. Sew along the raw edges of each folded strip, leaving the straight end open for attachment to the belt. Use a 0.2-inch seam allowance. Turn these tie strips right side out and press them thoroughly with an iron to ensure they are flat and neat. Finally, take the straight, unsewn end of each tie strip and insert it into the open end of the rectangular tabs you created in Step 7. Align the raw edges, then carefully sew the ties securely to the ends of your plaited belt, sandwiching the raw ends of the plait within the rectangular tab and tie assembly. Reinforce these seams for durability. Once sewn, give your entire belt a final press with the iron, and your stunning fabric sash belt is complete!
Tips for Success and Customization
Crafting your own sash belt is a creative endeavor, and these tips will help you achieve the best results and encourage further personalization:
- Fabric Choice Matters: While cotton is beginner-friendly, don’t be afraid to experiment. Silks or satins can create a luxurious, formal belt, but they are more challenging to sew. Linen or chambray offers a casual, rustic charm. Consider patterned fabrics to make your belt a statement piece, or solid colors for versatility.
- Achieving Professional Seams: Always press your seams after sewing each step. This flattens the fabric, removes puckering, and gives your finished project a crisp, professional appearance. A tailor’s ham or seam roll can be helpful for pressing small tubes.
- Even Plaiting Tension: The key to a beautiful plaited belt is consistent tension. Try to pull each strand with the same force as you work. If you notice it getting uneven, unpick a section and redo it. Practice on scrap strips if you’re new to plaiting.
- Custom Sizing: This tutorial provides a custom fit based on your waist. However, you can adjust the length of the ties to be longer for more dramatic bows or shorter for a cleaner knot. Consider making a wider belt by starting with wider fabric strips if you prefer a bolder accessory.
- Embellish Your Belt: Once your belt is complete, you can add further embellishments! Think about small embroidered details, fabric paint, beads, or even small charms stitched onto the ties or the plaited section. This is your chance to truly make it unique.
- Durability and Care: For belts that will see frequent use, consider reinforcing the seams where the ties attach to the main plaited section. Hand-washing or a delicate machine cycle with cold water is generally recommended for handmade fabric accessories, especially if using delicate fabrics.
- Troubleshooting Turning Tubes: If you struggle to turn the narrow fabric tubes right side out, try using a safety pin attached to one end and pushing it through, or a loop turner tool designed for this purpose. A little patience goes a long way here.
The Benefits of Crafting Your Own Fabric Sash Belt
Beyond the satisfaction of a handmade item, creating your own fabric sash belt offers a multitude of advantages:
- Unmatched Personalization: Store-bought belts rarely offer the exact color, pattern, or texture you desire. By making your own, you have complete creative control, ensuring your belt perfectly matches your style and wardrobe.
- Sustainable Fashion Choice: This project is a fantastic way to practice eco-friendly fashion. By repurposing fabric scraps or old garments, you reduce textile waste and give new life to materials that might otherwise end up in a landfill.
- Cost-Effective Style: Fashion accessories can be surprisingly expensive. Crafting your own sash belt is a budget-friendly alternative, especially when utilizing fabrics you already have on hand.
- Skill Development: For beginners, this project is an excellent introduction to basic sewing techniques like measuring, cutting, pressing, straight stitching, and turning fabric. For more experienced sewers, it’s a quick and fun project to hone skills.
- Versatile Wardrobe Addition: A fabric sash belt is incredibly versatile. It can cinch the waist of a loose dress, add definition to a tunic, elevate a simple skirt-and-top combination, or even act as a decorative headband or bag tie.
- Unique Gift Idea: A handmade sash belt makes a thoughtful and personal gift for friends and family. Tailor the fabric choice to their style for an extra special touch.
- Mindful Crafting: Engaging in a DIY project like this provides a wonderful opportunity for mindfulness. The focus required for sewing and plaiting can be a relaxing and meditative experience.
Frequently Asked Questions About DIY Fabric Sash Belts
Here are some common questions you might have as you embark on your sash belt project:
- What type of fabric is best for a sash belt?
- Medium-weight fabrics like cotton, linen, chambray, or even light canvas work well as they offer a good balance of drape and structure. Avoid very thin, slippery fabrics like chiffon unless you are experienced, as they can be challenging to work with. Heavy fabrics might create too much bulk.
- Can I make the belt wider or narrower?
- Absolutely! To make a wider belt, simply start with wider fabric strips in Step 2. For example, if you want a 1.5-inch wide finished tube, you would cut your fabric strips to 3 inches wide before folding. Just ensure all eight strips are consistently sized. The plaiting technique remains the same.
- How do I clean my handmade fabric sash belt?
- The best cleaning method depends on your chosen fabric. For most cotton or linen belts, hand-washing in cold water with a mild detergent and then air-drying flat is recommended. If your fabric is machine washable, use a delicate cycle in a mesh laundry bag. Always press with a warm iron after drying to restore its crispness.
- What if I don’t have a sewing machine?
- While a sewing machine makes the process much faster and more durable, you can hand-sew the entire belt. Use a strong backstitch for all seams to ensure they hold up well. This will take significantly more time but is entirely possible for a determined crafter.
- How long does this project take?
- For a beginner, expect to spend 3-5 hours on this project, including cutting, sewing, plaiting, and finishing. Experienced sewers might complete it in 1-2 hours. Don’t rush; enjoying the process is part of the fun!
- Can I use fewer than eight strips for the plait?
- The specific plaiting pattern described (crossing outer over third neighbor, then middle two) relies on an even number of strands, typically eight for a fuller look. While you could technically adapt a plait for fewer strands (e.g., a four-strand braid), it would result in a very different look and feel, and the instructions would need significant modification. Sticking to eight strips will give you the intricate texture shown in the inspiration.
Conclusion: Embrace Your Creativity with a DIY Sash Belt
Crafting your very own fabric sash belt is more than just a sewing project; it’s an opportunity to express your unique style, engage in sustainable fashion, and develop valuable crafting skills. From carefully selecting your fabric to meticulously plaiting each strand, every step in this tutorial contributes to a beautiful, personalized accessory that will undoubtedly garner compliments.
Remember the joy of transforming simple materials into something elegant and functional, a testament to your creativity and patience. Whether you’re making it for yourself or as a thoughtful gift, this DIY fabric sash belt is a rewarding endeavor that adds a touch of bespoke charm to any ensemble. So, gather your materials, follow these steps, and prepare to flaunt your handmade masterpiece!
We encourage you to share your creations and inspire others. Happy crafting!