
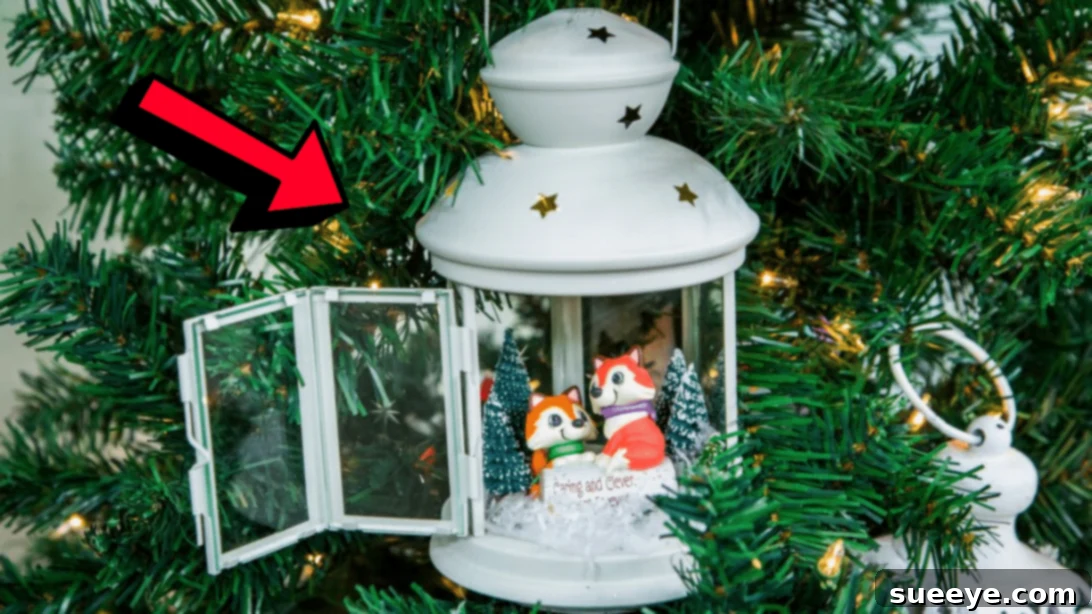
Christmas, for many, is the most enchanting time of the year. It’s a season brimming with joy, warmth, and the simple pleasure of transforming our homes into festive sanctuaries. From the comforting aroma of freshly baked treats to the twinkling lights of a beautifully adorned tree, every element contributes to that unique holiday magic. While store-bought decorations are lovely, there’s an undeniable charm and sincerity in handmade gifts and decor. The effort, love, and personal touch invested in a DIY project resonate deeply, making the resulting piece not just an item, but a cherished memory.
RELATED: How to Make Bottle Brush Trees for Your Holiday Crafts
Embracing this spirit of handcrafted beauty, I recently stumbled upon an absolutely captivating DIY project concept by the Hallmark Channel on YouTube. This idea immediately stole my heart! It promised an adorable and surprisingly simple craft that, once completed, would radiate a truly magical glow on any Christmas tree. The idea was to create a miniature winter wonderland enclosed within a lantern, illuminated by soft LED lights. The promise of such a charming piece, easy enough for anyone to tackle, yet delivering such a profound visual impact, was irresistible. This “Winter Wonder Lantern” isn’t just a decoration; it’s a tiny, luminous world waiting to be created, bringing a unique sparkle and narrative to your holiday display.
Gather Your Supplies: Essentials for Your Magical Winter Wonder Lantern
Before embarking on this delightful crafting journey, ensure you have all the necessary materials laid out. Having everything organized will make the process smooth, enjoyable, and efficient. Here’s a comprehensive list of what you’ll need to bring your enchanting winter scene to life:
- Lantern: This will serve as the captivating casing for your miniature winter wonderland. Choose a decorative lantern, perhaps one with a classic, vintage, or modern feel, depending on your aesthetic. Consider its size carefully; you’ll want one large enough to comfortably arrange your internal decorations while still being manageable to hang or display.
- Keepsake Ornaments: These small, charming ornaments will populate your winter scene. Think tiny deer, miniature houses, small sleds, or even little snowmen. Opt for pieces that evoke a sense of coziness and winter joy, and ensure they are appropriately scaled for your lantern.
- LED Battery-Powered Light String: The heart of your lantern’s magic! A string of warm white or cool white LED lights will illuminate your scene, creating a soft, inviting glow. Battery-powered options are ideal for cord-free display and easy integration into the design. Ensure the battery pack is compact enough to be concealed.
- Bottle Brush Trees: Essential for any winter forest scene, bottle brush trees come in various sizes and shades of green (or even white!). Select a few different heights to create depth and visual interest within your lantern. These will form the backdrop of your snowy landscape.
- Snow Batting: This soft, fluffy material will create a realistic, pillowy snow base for your scene. It’s easy to cut and shape, providing a wonderful foundation for your miniature trees and ornaments.
- Plastic Faux Snow: To add a touch of sparkle and texture, faux snow provides a loose, glistening layer over your batting, mimicking freshly fallen snow. This adds a delicate finish to your winter landscape.
- Sheet Styrofoam: A small piece of styrofoam is crucial for creating a level and stable base inside your lantern, especially for concealing the battery pack of your LED lights. It provides a firm foundation for securing your trees and ornaments.
- Chunky White Glitter: For that extra magical shimmer! A sprinkle of chunky white glitter will catch the light beautifully, making your snowy scene truly sparkle and enhancing the “wonder” aspect of your lantern.
- Hot Glue Gun and Glue Sticks: Your primary tool for securing all the elements within your lantern. A hot glue gun provides a quick and strong bond, essential for assembling your scene securely. Always exercise caution when using a hot glue gun.
- Green Floral Wire: Useful for any minor adjustments or for securing elements that might need a bit more stability than hot glue alone. Its green color helps it blend in with the trees.
- Wire Cutters: Necessary for cutting floral wire to the desired lengths.
- Scissors: For precisely cutting snow batting, styrofoam, and any other paper or fabric elements.
- Long Nose Pliers or Tweezers: These tools are incredibly helpful for positioning small ornaments and details within the confined space of the lantern, allowing for precise placement without disturbing other elements.
- Popsicle Stick: A simple yet effective tool for tucking, pressing, and maneuvering the snow batting and other materials into place, especially in tight corners.
With these materials at the ready, you’re perfectly poised to begin crafting your very own enchanting Winter Wonder Lantern, a piece that will undoubtedly become a cherished part of your holiday traditions.
Crafting Your Enchanting Winter Wonderland Lantern: A Step-by-Step Guide
Creating this magical winter scene inside a lantern is a surprisingly straightforward process, but the results are truly breathtaking. Follow these steps carefully to ensure your DIY Winter Wonder Lantern glows with festive charm.
Step 1: Preparing the Foundation and Battery Pack
Begin by organizing all your collected materials within easy reach. This initial preparation saves time and ensures a smooth crafting flow. Next, take your sheet styrofoam. Carefully measure and cut a piece that perfectly fits on top of your LED light string’s battery pack. The goal here is to create a level surface that will eventually be covered by snow batting, effectively concealing the battery pack and making it invisible within your winter scene. Use a dab of hot glue to securely attach this cut styrofoam piece onto the battery pack, ensuring it’s stable. Once the styrofoam is in place, you’ll prepare your snow base. Lay your snow batting flat, then place the base of your chosen lantern on top of it. Using scissors, carefully cut around the base of the lantern, creating a circular piece of batting that will fit snugly inside.
Step 2: Securing the Snowy Base
Now, gently place the precisely cut snow batting into the bottom of your lantern. Position it over the styrofoam-covered battery pack, ensuring it lies flat and covers the entire base. Apply hot glue strategically around the edges of the batting, pressing it down firmly to secure it in place. This creates a soft, pristine white base for your winter landscape. To achieve a seamless and professional finish, take your popsicle stick and use it to carefully tuck the edges of the batting around the styrofoam and against the inner walls of the lantern. This technique helps smooth out any bumps and ensures the snowy surface looks natural and undisturbed, providing a beautiful foundation for your decorative elements.
Step 3: Designing Your Enchanting Winter Scene
This is where your creativity truly shines! Select the bottle brush trees you wish to incorporate, varying their heights and shades for a more dynamic and realistic forest effect. Before applying any glue, take a moment to “dry fit” your scene. Arrange the trees and your chosen keepsake ornaments within the lantern, experimenting with different layouts until you find a composition that pleases you. Consider creating a focal point, perhaps with a slightly larger ornament, or arranging trees to mimic a small forest clearing. Once you’re satisfied with your design, begin securing each element with hot glue. Apply a small amount of glue to the base of each tree and ornament, pressing them firmly onto the snow batting until the glue sets. Work carefully and deliberately, building up your scene layer by layer.
Step 4: Adding the Final Touches and Illumination
With your trees and ornaments securely in place, it’s time to add the finishing touches that will truly bring your winter wonderland to life. Gently sprinkle a liberal amount of plastic faux snow over the entire scene. Use your fingers or a small spoon to distribute it evenly, ensuring it settles around the bases of the trees and ornaments, creating the appearance of freshly fallen snow. For an extra touch of magic, follow this with a delicate scattering of chunky white glitter. This will catch the light beautifully, adding a captivating sparkle to your lantern. Finally, once your miniature scene is complete, carefully hang your DIY Winter Wonder Lantern on your Christmas tree, a sturdy hook, or a mantelpiece. Wrap your LED light string around the exterior of the lantern, or if your design allows, gently weave a portion of the lights within the internal scene for an even more immersive glow. Turn on the battery-powered lights and step back to admire the magical, glowing lantern you’ve lovingly created, ready to spread festive cheer!
Tips for a Flawless Winter Wonder Lantern
To ensure your lantern project is not only beautiful but also a joy to create, consider these helpful tips:
- Scene Planning: Before gluing anything, always arrange your trees and ornaments. Take a picture with your phone to remember your favorite layout, then glue them in place. This prevents rework and ensures a pleasing composition.
- Hot Glue Safety: Hot glue sets quickly, so work efficiently but carefully. Always use a surface protector under your work area, and be mindful of your fingers to avoid burns. A silicone mat is ideal for easy cleanup.
- Battery Pack Access: While concealing the battery pack is key for aesthetics, ensure it remains accessible for turning the lights on/off and replacing batteries when needed. Design your snow batting and styrofoam so they can be gently lifted if necessary.
- Glitter Application: For a controlled sparkle, apply glitter over a tray or piece of paper. This allows you to easily collect and reuse any excess. You can also spray a light mist of adhesive spray before sprinkling glitter for better adherence.
- Personalization: Don’t hesitate to personalize your lantern. Add tiny bells, miniature bows, or even a tiny photo if it suits your theme. This is your winter wonderland, so make it uniquely yours!
- Choosing Your Lantern: Consider both the style and the opening mechanism. Some lanterns have doors, making it easier to arrange the scene, while others might require working through a smaller top opening.
Displaying Your Magical Creation
Once your DIY Winter Wonder Lantern is complete, its journey doesn’t end! There are numerous ways to display your enchanting creation to maximize its visual impact and share its charm throughout your home:
- On the Christmas Tree: As originally intended, hanging it on a prominent branch of your Christmas tree allows it to become a glowing focal point, intertwining seamlessly with your other festive ornaments. The soft glow will highlight the delicate scene within.
- Mantelpiece Masterpiece: Place your lantern as a centerpiece on your fireplace mantel, surrounded by garlands, additional battery-operated candles, or other winter-themed decor. It creates a cozy and inviting vignette.
- Shelf or Table Decor: A strategically placed lantern on a bookshelf, coffee table, or side table can bring a touch of unexpected magic to any room. It’s particularly effective in dimly lit corners where its glow can truly shine.
- Welcoming Entryway: Position it in your entryway or foyer to greet guests with a warm, festive glow right as they step into your home.
- Gifting with Love: These handmade lanterns make incredibly thoughtful and personalized gifts. Imagine presenting this unique piece to a loved one, knowing you created a miniature world just for them. It’s a gift that carries significant emotional value.
- Combine with Natural Elements: Enhance its charm by pairing it with natural elements like pinecones, sprigs of evergreen, or faux berries. This creates a cohesive and organic holiday display.
Crafting a DIY Winter Wonder Lantern is more than just a craft project; it’s an opportunity to infuse your home with personal charm and the undeniable spirit of the holidays. This simple yet profound creation stands as a testament to the beauty of handmade decorations, offering a warm, inviting glow and a miniature, magical world within its glass panes. Whether nestled amongst the branches of your Christmas tree, gracing a festive mantel, or offered as a heartfelt gift, this lantern will undoubtedly captivate hearts and spark conversations. Embrace the joy of creating, and let your unique winter wonderland shine brightly this season!
*All these images are credited to Hallmark Channel via YouTube. Give their channel a visit and subscribe for more inspiring DIY holiday ideas!
Your Enchanting Easy DIY Winter Wonder Lantern Awaits!