
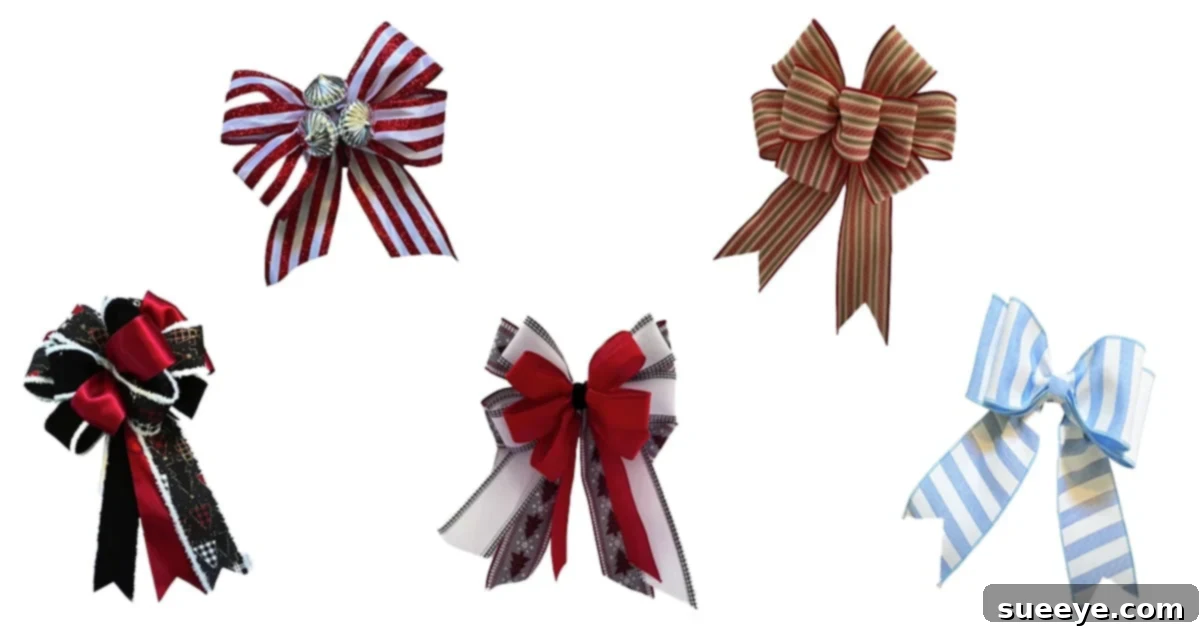
The ability to craft beautiful bows from ribbon is a wonderfully versatile skill, opening up a world of possibilities for gift wrapping, home decor, and festive celebrations. While premade bows offer convenience, learning how to make your own allows for unparalleled customization, enabling you to match specific colors, textures, and styles to any project. This comprehensive guide, inspired by the expert tutorials from Julie’s Wreath Boutique on YouTube, will walk you through creating five distinct ribbon bows. Whether you’re a beginner looking for an easy start or an experienced crafter seeking advanced techniques, you’ll find valuable insights here. Julie provides incredibly detailed, up-close instructions, making even the most intricate designs accessible. Get ready to transform simple lengths of ribbon into stunning decorative accents that will elevate your creations and add a personal touch to every special moment.
Why Learning DIY Bow Making is a Game Changer
There’s immense satisfaction in creating something with your own hands, and bow making is no exception. Beyond the joy of crafting, mastering this skill offers numerous practical benefits. You gain the freedom to select the exact ribbon that complements your vision, whether it’s a specific pattern for a birthday gift, a luxurious texture for a wedding favor, or a vibrant color for holiday decor. This eliminates the frustration of settling for limited store-bought options that might not perfectly match your aesthetic. Furthermore, making your own bows can be more cost-effective in the long run, especially if you frequently decorate or give gifts. With a few basic supplies and a bit of practice, you can produce high-quality, professional-looking bows that stand out, making every present or decoration feel truly unique and thoughtfully prepared. Julie’s tutorials are renowned for their clarity and simplicity, ensuring that anyone can pick up these techniques.
Essential Supplies for Crafting Stunning Ribbon Bows
Before diving into the creative process of bow making, it’s crucial to gather the right materials. The quality of your supplies directly impacts the final appearance and durability of your bows. For most of the techniques shared by Julie’s Wreath Boutique, wired ribbon is highly recommended. Its inherent structure allows bows to hold their shape beautifully, giving them a professional and lasting finish. Here’s a detailed look at the essential supplies you’ll need:
- 2.5″ Wired Ribbon: This width is a fantastic foundation for creating voluminous, eye-catching bows. Wired ribbon is key because the thin wire along its edges allows you to shape and mold the loops and tails precisely, ensuring your bow maintains its intended form. For larger bows, wreaths, or significant gifts, having at least 3 yards per color or pattern is a good starting point to ensure you have enough material for generous loops and elegant tails. Consider experimenting with various textures like burlap, satin, or even glitter-infused wired ribbons for different effects.
- 1.5″ Wired Ribbon: Complementing the wider ribbon, the 1.5-inch width is perfect for adding layers, creating smaller accent bows, or adding a contrasting element. Using different widths together creates visual interest and depth in your finished bow. Just like its wider counterpart, the wired edge is invaluable for shaping.
- 22 Gauge Floral Wire: This thin, flexible wire is indispensable for securely fastening your bow loops together. Its strength ensures the bow won’t unravel, yet it’s pliable enough to be twisted and hidden discreetly within the ribbon layers. It’s often used as an alternative or in conjunction with pipe cleaners.
- Pipe Cleaners (Chenille Stems): An excellent and easy-to-use alternative to floral wire, pipe cleaners offer a soft yet sturdy way to gather and secure the center of your bow. Their fuzzy texture helps grip the ribbon, providing a firm hold, and they are particularly beginner-friendly. They can also be easily shaped to attach your finished bow to gifts, wreaths, or other decor.
- Zip Ties: For larger, more complex, or multi-layered bows, zip ties provide an incredibly secure and robust fastening method. They are especially useful when working with multiple ribbons or when you need the bow to withstand outdoor elements or rough handling. Opt for smaller, clear zip ties if possible for less visibility.
- Hot Glue Gun and Glue Sticks: A hot glue gun is a versatile tool for securing ribbon ends, attaching embellishments, or reinforcing certain sections of your bow. It provides an instant, strong bond, making your crafting process much more efficient. Always use caution when working with hot glue.
Having these supplies on hand will equip you to tackle a wide array of bow-making projects, ensuring both ease of creation and professional results. Don’t be afraid to experiment with different ribbon combinations to discover your favorite styles!
The Easy Bow: A Perfect Start for Beginners
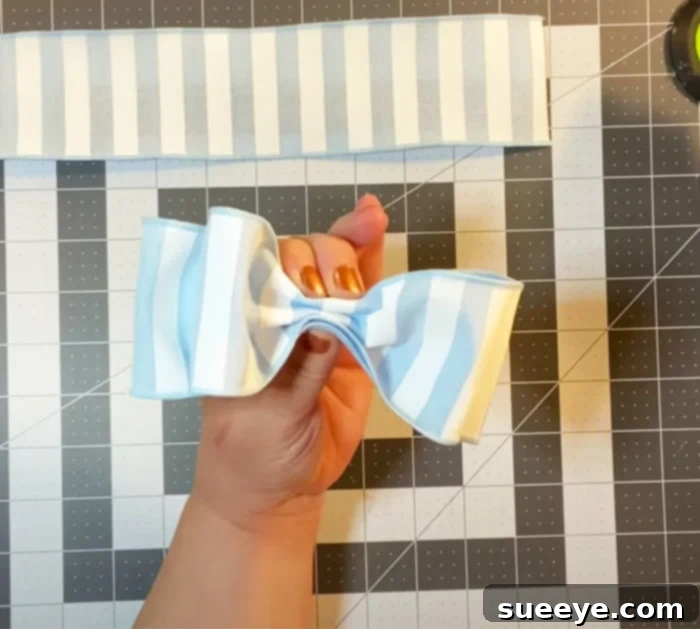
This “Easy Bow” technique is an ideal starting point for anyone new to bow making, offering quick and beautiful results without complex manipulations. It’s perfect for adorning gifts, small wreaths, or adding a charming touch to any package. The simplicity of this method doesn’t compromise on aesthetic appeal; it creates a classic, full-bodied bow with minimal effort. Here’s how to master this beginner-friendly design:
- Prepare Your Ribbon Strips: Begin by cutting your ribbon. You will need three distinct pieces. Cut two long strips of equal length – these will form your main loops. The length will depend on how large you want your loops to be, but ensure they are generous enough for a pleasing bow. Then, cut one shorter strip, which will serve as the tail of your bow. For instance, if your two long strips are 24 inches each, your shorter tail strip might be 12-16 inches.
- Form the Loops: Take one of the long ribbon strips. Bring the two ends of this strip together, overlapping them slightly to form a loop. Use a dab of hot glue to secure these ends together, creating a seamless circle of ribbon. Repeat this process with the second long ribbon strip, ensuring both loops are of the same size. The wired edges of the ribbon are invaluable here, as they allow you to shape the loops perfectly and hold that shape.
- Layer the Loops: Once your two loops are formed and the glue has dried, lay one loop flat on your work surface. Take the second loop and place it directly on top of the first, orienting it so that the overlapping points (where you glued the ends) are aligned. This creates a fuller base for your bow.
- Cinch the Center: This step is crucial for defining the bow’s shape. Pinch and gather the layered loops tightly in the very center. You want to create a neat, accordion-like fold that pulls the ribbon inward, forming the classic bow “knot” effect. Cinching firmly will give your bow structure and fullness.
- Attach the Tail: Take your shorter ribbon strip (the tail piece). Lay it flat on your work surface. Carefully place the cinched center of your layered loops onto the middle of this tail strip. Position it so that the tail ribbon runs underneath the loops, with equal lengths extending from each side.
- Secure with a Pipe Cleaner: While holding the cinched center and the tail in place, take a pipe cleaner. Wrap the pipe cleaner tightly around the very center, encircling both the cinched loops and the tail ribbon. Twist the ends of the pipe cleaner securely on the back of the bow to fasten everything together. Ensure it’s tight enough to hold the bow’s shape without deforming the ribbon.
- Final Shaping: Once secured, gently fluff and adjust your loops and tails. The wired ribbon will allow you to manipulate each loop to achieve the desired volume and symmetry. Trim the ends of your tail ribbon into a decorative “V” shape or a diagonal cut for a polished finish.
This simple technique yields a wonderfully elegant bow suitable for countless applications. It’s a fantastic starting point for building confidence in your bow-making journey.
The Mary Casey Bow: Elegant and Layered
The Mary Casey Bow technique, as showcased by Julie’s Wreath Boutique, offers a slightly more advanced but incredibly rewarding method for creating a voluminous, multi-looped bow with a sophisticated appearance. This style is characterized by its consistent loops and the unique twisting motion that ensures the “good side” of the ribbon is always facing outwards. It’s a fantastic choice for larger decorative pieces, festive wreaths, or when you desire a bow with significant presence. The key to this bow is careful layering and precise ribbon handling.
- Initial Loop and Gathering: Begin by taking your wired ribbon and forming one generous loop. The size of this initial loop will dictate the overall size of your bow, so choose wisely. Gather the ribbon firmly at the point where the loop meets the main ribbon spool. This gathered point will be the center of your bow.
- The Essential Twist: After forming each loop and bringing the ribbon back to the center, perform a crucial twist. Pinch the ribbon at the center point and rotate it 180 degrees. This twist serves a vital purpose: it ensures that as you create subsequent loops, the decorative, finished side of your ribbon is always facing outwards. Without this twist, the back side of the ribbon would show on alternating loops, diminishing the bow’s visual appeal.
- Creating Subsequent Loops: Continue to create additional loops, alternating sides (one to the left, one to the right) from the central gathered point. For each new loop, bring the ribbon back to the center and execute the 180-degree twist before extending the ribbon to form the next loop. While you can measure each loop precisely for perfect symmetry, many crafters develop an eye for consistency with practice. Aim for loops of roughly the same size to maintain balance in your bow.
- Building Volume: Keep repeating the looping and twisting process, stacking the loops on top of each other at the central gathering point. The more loops you add, the fuller and more luxurious your Mary Casey Bow will become. You might create anywhere from 4 to 8 loops on each side, depending on the desired density and the amount of ribbon you have.
- Securing the Bow: Once you are satisfied with the number and size of your loops, carefully secure the entire gathered center. A piece of 22 gauge floral wire or a sturdy pipe cleaner works best for this. Wrap it tightly around the pinched center several times, twisting the ends securely at the back of the bow. Trim any excess wire or pipe cleaner, leaving enough to attach the bow if needed.
- Adding Tails and Fluffing: Before cutting the ribbon from the spool, decide on the length of your tails. Create one or two long tails extending from the base of the bow. Cut the ends of the tails into a decorative “V” shape or a diagonal. Finally, gently pull and separate each loop, fluffing them out to create a full, round, and elegant shape. The wired edges of your ribbon will allow you to mold each loop perfectly, giving the bow its characteristic Mary Casey charm.
This technique, while requiring a bit more practice to perfect the twist and loop consistency, results in a truly impressive and professional-looking bow that can enhance any festive or decorative arrangement. For a full visual demonstration and further intricate details, make sure to refer to Julie’s Wreath Boutique on YouTube.
The Zip Tie Bow: Multi-Layered and Secure
The Zip Tie Bow technique is a fantastic method for creating robust, multi-layered bows, especially when you want to combine several different ribbons for a rich, textured effect. This approach is particularly effective for larger bows destined for wreaths, elaborate gifts, or outdoor decorations, as the zip tie provides an exceptionally secure fastening. The design often involves stacking layers of loops, each with a different ribbon, to build impressive depth and visual interest.
- Choose Your Ribbons: This bow truly shines when you incorporate 2-3 different wired ribbons. Consider varying widths (e.g., 2.5″ for the base, 1.5″ for the middle, and another 1.5″ for the top layer), colors, and patterns. A good strategy is to choose a wider, more dominant ribbon for the bottom layer and progressively narrower or contrasting ribbons for the upper layers.
- Form the First Layer of Loops (Base Ribbon): Start with your widest ribbon. Determine how large you want your bow to be. For instance, if you want a 6-inch loop, you’ll extend the ribbon 6 inches, then bring it back to the center. Create your first loop. Without cutting the ribbon, create a second loop of the exact same measurement on the opposite side, ensuring it is perpendicular to the first. Continue this process, making two loops on each side, creating a total of four loops for your base layer. Ensure all loops are gathered and held tightly in the center.
- Secure the First Layer: Once you have your four loops (two on each side), take a zip tie. Carefully thread the zip tie around the very center of your gathered loops, ensuring it encapsulates all the ribbon layers. Pull the zip tie tight, but not so tight that it distorts the loops excessively. This securely holds your first layer together.
- Repeat for Subsequent Layers: Now, take your second ribbon (perhaps a 1.5″ wide contrasting color). Repeat the entire process: create two loops on each side, ensuring they are slightly smaller in length than the previous layer to allow the bottom layer to show through. Gather them in the center and secure them with another zip tie. For an even grander bow, you can add a third layer using a different ribbon, again making the loops slightly smaller.
- Stack and Combine Layers: Once each ribbon layer has its own secured zip tie, you can stack them. Lay the largest base layer flat. Place the next smaller ribbon layer directly on top, aligning their centers. If you have a third layer, place that on top of the second.
- Final Securement and Fluffing: To combine all layers into one cohesive bow, you can use another zip tie to bind all the individual zip-tied centers together, or a sturdy piece of floral wire. Alternatively, you can use the tails of the zip ties to attach the bow to your desired object. Once all layers are securely stacked, carefully fluff and separate each loop from every layer. The wired edges will allow you to shape each loop to perfection, creating a magnificent, multi-dimensional bow. Add decorative tails by cutting appropriate lengths of your chosen ribbons and securing them at the back of the bow with hot glue or by tying them into the central zip tie.
The Zip Tie Bow is a powerhouse technique for creating impressive and durable bows that truly stand out, making it a favorite for elaborate decorative projects.
Julie’s Christmas Tree Accent Bow: Festive and Personalized
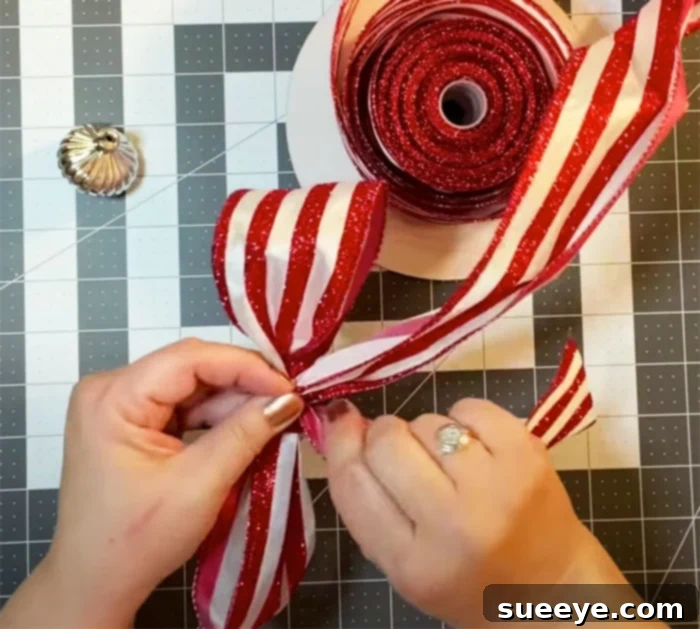
Julie’s Christmas Tree Accent Bow is a uniquely charming design specifically crafted to adorn holiday trees, wreaths, or festive garlands. What sets this bow apart is its structured elegance and the opportunity for personalized embellishment, often featuring small ornaments or decorations nestled in its center. This bow is less about free-form loops and more about precise measurements and creating a consistent, multi-layered look, often described using a numerical sequence like “(8x8x8x4)”. This notation, common in professional bow making, refers to the lengths of ribbon used to create the loops and tails.
- Understanding the Measurement System (e.g., 8x8x8x4): This numerical sequence represents different aspects of your bow’s construction, typically corresponding to loop sizes and tail lengths. For an “8x8x8x4” bow:
- The first ‘8’ might represent the length for the initial two loops (one on each side).
- The second ‘8’ might be for the next two loops, stacked on top.
- The third ‘8’ could be for a final set of loops or perhaps a specific tail length.
- The ‘4’ would then typically indicate a shorter, contrasting loop or a shorter tail, adding a varied dimension.
The exact interpretation can vary, but the core idea is to follow a consistent measurement strategy for each segment of your bow, ensuring symmetry and a balanced design. This bow is fundamentally “all about looping” with measured precision.
- Start with the Tail: Unlike some bows, this one often begins by establishing the tail. Measure and cut the length for your initial tail. This ensures the tail is integrated into the bow’s structure from the outset.
- Creating the Loops with Precision:
- Take your wired ribbon. Measure out the length for your first set of loops (e.g., the ‘8’ inches from our example). Form a loop of this length, bringing the ribbon back to the center.
- Perform a subtle twist at the center to ensure the right side of the ribbon faces outwards.
- Create a second loop of the same length on the opposite side, again twisting at the center. You now have two primary loops.
- Repeat this process for the subsequent measurements (e.g., the next ‘8’ inches). You’ll be layering loops of the same or slightly varying sizes, carefully stacked and held at the center. Each new set of loops contributes to the bow’s overall fullness.
- If your sequence includes a shorter measurement (e.g., the ‘4’ inches), create a final, smaller set of loops to add a touch of varied dimension. These smaller loops often sit atop the larger ones, creating a layered, dimensional effect.
- Securing the Bow: Once all your measured loops are formed and gathered neatly in the center, use a sturdy floral wire or a strong pipe cleaner to cinch them together tightly. Twist the wire/pipe cleaner securely at the back.
- Fluffing and Shaping: Gently separate and fluff each loop, utilizing the wired edges to shape them into a beautiful, symmetrical form. Ensure the tails are positioned elegantly.
- Adding the Accent: This is where the “Accent Bow” truly comes to life. In the open center created by your loops, you can hot-glue or wire in small ornaments, decorative berries, miniature pinecones, or other festive embellishments. This personalization makes each bow unique and perfectly suited to your Christmas tree theme.
Julie’s Christmas Tree Accent Bow is a testament to the beauty of structured bow making, offering a sophisticated and customizable option for your holiday decorations.
Pro Bow The Hand Bow: Achieving Professional Results with a Tool
For those who frequently make bows, especially complex, multi-layered, or perfectly symmetrical designs, investing in a specialized tool like the “Pro Bow The Hand” bow maker can be a game-changer. While not strictly necessary for basic bows, this professional stacked bow maker significantly streamlines the process, ensures consistency, and allows crafters to achieve results that are often difficult to replicate by hand alone. It’s particularly beneficial when working with multiple ribbons, creating large quantities of bows, or tackling intricate designs.
- Understanding the Tool: A Pro Bow The Hand tool typically consists of a base with various pegs or dowels. These pegs serve as guides around which you wrap and loop your ribbon. The adjustable nature of these pegs allows for immense flexibility in creating bows of different sizes and styles. It essentially acts as an extra set of hands, holding your ribbon securely while you concentrate on forming perfect loops.
- Benefits of Using a Pro Bow Maker:
- Consistency: It ensures that each loop is precisely the same size, resulting in perfectly symmetrical and professional-looking bows every time.
- Efficiency: The tool speeds up the bow-making process, especially for complex designs or when making multiple bows.
- Reduced Frustration: It eliminates the struggle of trying to hold multiple loops and ribbons securely by hand while simultaneously shaping them.
- Versatility: Pro Bow makers can handle a wide range of ribbon widths and materials, and they are adept at creating layered, stacked, and intricate designs that would be challenging to achieve freehand.
- Ergonomics: It reduces strain on your hands and fingers, making crafting more comfortable during longer sessions.
- How it Works (General Principle):
- You typically start by securing the end of your ribbon to a central peg.
- You then weave the ribbon around a pair of outer pegs to form a loop, bringing it back to the center.
- A twist is usually performed at the center (similar to the Mary Casey Bow) to ensure the good side of the ribbon is always visible.
- You repeat this process, building up layers of loops around the pegs, carefully stacking them.
- Once all loops are formed, you use a piece of floral wire or a pipe cleaner to cinch the entire bow tightly in the center, often utilizing a specific slot or guide on the tool.
- The finished bow is then carefully removed from the pegs and fluffed into its final shape.
- When to Consider Purchasing One: If you find yourself consistently struggling with hand-held bow techniques, if you need to produce a large quantity of bows for events or sales, or if you aspire to create complex, multi-layered bows with professional precision, a Pro Bow The Hand maker is a worthwhile investment. It truly elevates your bow-making capabilities.
While this specific technique requires a dedicated tool, the results are undeniable, offering a level of precision and ease that many crafters find invaluable for their more ambitious projects. If you do not have this bow maker, you can either skip this particular method and focus on the hand-tied options, or consider purchasing one online to expand your bow-making repertoire.
Elevate Your Craft: Mastering the Art of Ribbon Bows
In conclusion, the journey through these five distinct bow-making techniques—from the simplicity of the Easy Bow to the structured elegance of the Mary Casey and Accent Bows, and the professional precision offered by the Zip Tie and Pro Bow The Hand methods—demonstrates the incredible versatility and creativity inherent in working with ribbon. Each method, expertly taught by Julie’s Wreath Boutique, provides a unique pathway to crafting beautiful decorative accents for any occasion. Whether you’re aiming to attach personalized bows to your Christmas gifts, enhance holiday decor, or simply add a touch of handmade charm to everyday items, mastering these techniques will undoubtedly elevate your crafting game.
The fundamental principle across all bow making essentially revolves around creating and securing loops, but the variations in technique lead to vastly different and equally stunning results. By practicing these methods, you’ll not only improve your gift-wrapping prowess but also gain the confidence to create custom decorations that truly reflect your style and vision. Don’t be shy to experiment with different ribbon types, widths, and colors. The beauty of DIY bows lies in the endless possibilities for personalization and the immense satisfaction that comes from bringing a piece of ribbon to life. So grab your supplies, put on Julie’s tutorial, and start transforming simple ribbon into magnificent focal points for all your celebrations and creative projects.