
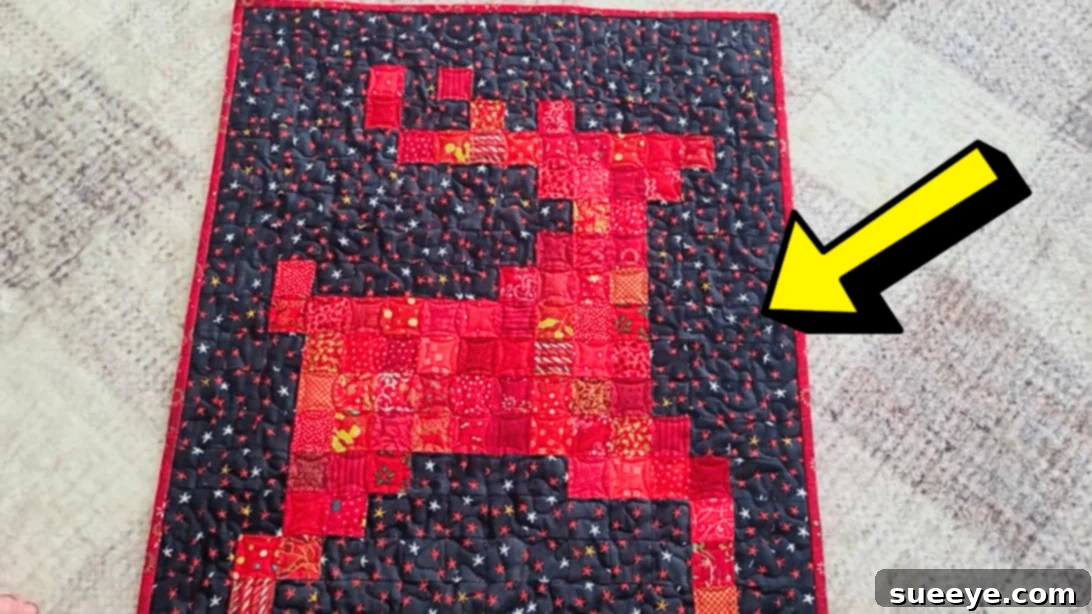
Embark on a delightful quilting journey with this enchanting reindeer quilt project, originally shared by MerryMabelMarket on YouTube. This charming design is poised to become a beloved project for every quilter, regardless of their experience level. Imagine a beautifully handcrafted wall-hanging quilt gracing your home throughout the holiday season, or perhaps becoming a cherished, bespoke gift for a loved one. What makes this project exceptionally appealing is its straightforward construction: it’s primarily composed of simple squares, making it incredibly accessible and fun to piece together. We are confident that even if this is your very first quilting endeavor, you’ll be able to create a flawless and heartwarming reindeer quilt.
Once you grasp the fundamental techniques involved in crafting this project, a world of creative possibilities opens up. You’ll be empowered to personalize your own unique version of this festive reindeer quilt. Feel absolutely free to experiment with a myriad of color combinations and fabric choices to match your personal aesthetic or the recipient’s style. Furthermore, the beauty of this pattern lies in its adaptability; you can easily adjust its size to create anything from a cozy mug rug to a larger throw quilt, or even a stunning bedspread. Simply adhere to the detailed instructions provided in the downloadable pattern and complement them with the visual guidance from the video tutorial for a seamless experience. We truly believe that adding this charming, handmade quilt to your holiday celebrations will infuse them with an extra layer of warmth, joy, and personalized cheer. Don’t hesitate—learn how to create this magical quilt now and give it a try!
Craft Your Own Festive Reindeer Quilt: An Easy DIY Guide
The holiday season is a time for warmth, joy, and creating beautiful memories. What better way to embody this spirit than by crafting a unique, handmade item that brightens your home or becomes a treasured gift? This easy reindeer quilt project is not just a sewing task; it’s an opportunity to infuse your personal touch into festive decor. Whether you’re a seasoned quilter looking for a quick and satisfying project or a beginner eager to dive into the world of fabric art, this tutorial offers a clear path to success. The simplistic block design, focusing on squares, eliminates complex curves and intricate piecing, making it an ideal entry point for novices while still offering a delightful outcome for experts.
Transforming simple fabric squares into a recognizable and adorable reindeer motif is an incredibly rewarding experience. This guide will walk you through every step, from selecting your materials to the final stitch, ensuring you have all the information needed to bring your reindeer quilt to life. Get ready to snip, stitch, and press your way to a stunning holiday masterpiece that will be admired for years to come.
Why This Reindeer Quilt Is Your Perfect Holiday Craft
There are countless reasons why this particular reindeer quilt design stands out as an exceptional choice for your next creative endeavor:
- Unleash Your Holiday Spirit: This quilt is the quintessential holiday decor piece. Its festive reindeer motif instantly evokes the magic and warmth of the season, making it perfect for adorning your walls, draping over furniture, or even using as a festive table runner.
- The Gift of Handmade Love: In a world of mass-produced items, a handmade gift carries unparalleled sentiment. A reindeer quilt crafted by your own hands is a thoughtful, personal present that speaks volumes about your care and effort. It’s a gift that creates lasting memories and becomes a cherished heirloom.
- Ideal for Quilting Beginners: If you’ve always wanted to try quilting but felt intimidated by intricate patterns, this project is designed for you. Its construction relies solely on cutting and piecing squares, a fundamental skill that builds confidence and provides a solid foundation for more complex quilting projects in the future.
- Customization at Your Fingertips: While the pattern provides a clear guide, it also encourages creativity. You have complete freedom to choose your fabric colors and prints, allowing you to create a reindeer quilt that perfectly matches your home’s aesthetic or the preferences of its lucky recipient. Think traditional reds and greens, snowy whites and blues, or even whimsical pastels!
- A Sense of Accomplishment: There’s immense satisfaction in seeing a project through from start to finish, especially when the result is as charming as this reindeer quilt. The process is enjoyable, and the finished product offers a tangible representation of your skill and dedication.
Essential Materials & Tools for Your Reindeer Quilt
Before you begin stitching, gathering all your necessary materials and tools is crucial for a smooth and enjoyable quilting experience. Having everything organized will allow you to focus on the creative process without interruption. Here’s a comprehensive list, with tips for selection:
- Reindeer Fabric: This will be the primary fabric for your reindeer design. Consider a solid brown or a subtle print that complements your background. High-quality cotton fabrics are recommended for quilting due to their ease of cutting, stitching, and durability. Ensure you have enough yardage as specified in the pattern for the 2-inch squares.
- Background Fabric: This fabric will form the “sky” or surrounding area for your reindeer. A contrasting color, such as white, cream, light blue, or even a subtle snowflake print, will make your reindeer stand out beautifully. Again, choose a good quality cotton that coordinates with your reindeer fabric.
- Marking Pen, Pencil, or Chalk: Essential for marking cutting lines or guide points on your fabric. A water-soluble fabric marker or tailor’s chalk is excellent as it disappears easily without leaving permanent marks.
- Quilter’s Ruler: A transparent acrylic ruler, preferably one with clear measurements and grid lines (e.g., 6.5 x 24 inches or smaller 2.5 x 2.5 inches), is indispensable for accurate cutting. Precision is key in quilting!
- Scissors or Rotary Cutter and Cutting Mat: While sharp fabric scissors will work, a rotary cutter combined with a self-healing cutting mat is highly recommended for quilters. It offers faster, more precise, and straighter cuts, especially when cutting multiple fabric layers or long strips. Choose a rotary cutter size (e.g., 45mm) that feels comfortable in your hand.
- Fabric Pins: Fine, sharp dressmaker pins are ideal for holding fabric pieces together before stitching. Consider glass-head pins as they won’t melt if accidentally ironed.
- Needle and Thread: You’ll need an all-purpose polyester or cotton thread that matches or blends with your fabric colors. A good quality thread prevents breakage and ensures strong seams. A sharp sewing machine needle (size 80/12 or 90/14) suitable for woven fabrics is also essential.
- Iron and Ironing Board: Crucial for pressing seams flat and setting stitches. A good steam iron will make this process much more efficient and will contribute significantly to the overall flatness and professional finish of your quilt.
- Sewing Machine: Any basic sewing machine capable of a straight stitch will be suitable. Ensure it’s in good working order and that you’re familiar with its basic operations, especially setting a consistent seam allowance.
- The Pattern: Don’t forget the heart of this project! Download the “Run, Run, Reindeer Pattern” from MerryMabelMarket. This digital file contains all the block layouts and cutting specifications you’ll need to accurately assemble your quilt. Ensure you print it at 100% scale to maintain correct sizing.
How to Make Your Charming Reindeer Quilt: A Step-by-Step Guide
With your materials ready, it’s time to bring your reindeer to life! Follow these detailed steps carefully for the best results.
Step 1: Pattern Preparation and Precise Fabric Cutting
The foundation of any successful quilt lies in accurate cutting. Begin by downloading and printing the “Run, Run, Reindeer” pattern. It’s vital to ensure your printer settings are at 100% scale, or “actual size,” to prevent any distortion in the block dimensions. Once printed, check a test square on the pattern with your ruler to confirm its accuracy. Next, take your main fabric (for the reindeer) and carefully cut it into 2-inch wide strips. For maximum precision, use your rotary cutter and ruler. After cutting the strips, cross-cut these strips into individual 2-inch squares. This consistency in size is paramount for your quilt blocks to fit together perfectly. Set these main squares aside, perhaps in a small container to keep them organized. Repeat the exact same cutting process with your background fabric, producing an equal number of 2-inch squares. Once all your squares are cut, it’s time for the most exciting part: arranging them according to your pattern to reveal the reindeer design.
Step 2: Assembling the Reindeer Quilt Rows with Precision
Now that your squares are perfectly cut and sorted, it’s time to bring your reindeer design to life. The beauty of this project lies in its grid-based pattern. Lay out all your cut squares on a flat surface, such as a design wall, a large table, or even the floor, following the visual guide provided in your downloaded pattern. Start from the bottom-most row of the pattern and work your way upwards, carefully placing each 2-inch square in its designated position. This step allows you to visualize the entire quilt top and ensures that every square is correctly oriented. Once a row is perfectly arranged, carefully pick up the squares for that row, keeping them in order. Pin them together, right sides facing, preparing for stitching. To maintain order, it’s helpful to stack the pinned rows and perhaps label them (e.g., “Row 1,” “Row 2”) if you’re making a larger quilt or anticipate taking a break. Now, take your pinned rows to the sewing machine. Using a consistent ¼-inch seam allowance, stitch the squares within each row together. Press the seams for each row open or to one side (consistently choose one method for the entire quilt for a flatter finish) before proceeding to the next step. After all your individual rows are stitched and pressed, reassemble them on your flat surface, ensuring they form the complete reindeer image. Now, you will begin stitching these rows to each other, again using a consistent ¼-inch seam allowance. When joining rows, pay special attention to nesting the seams where the blocks meet—this means alternating the direction of the pressed seams in adjacent rows so they “lock” together, reducing bulk and ensuring perfectly aligned points. Pin generously where the seams intersect to prevent shifting. Stitch slowly and steadily. Once all rows are joined, give your completed quilt top a final, thorough press. This step is critical for a smooth, flat finish. With this, your reindeer quilt top is complete and ready for the next stages of quilting!
Taking Your Reindeer Quilt Further: Quilting and Finishing Touches
Your beautiful reindeer quilt top is a significant achievement, but a quilt isn’t truly complete until it’s layered, quilted, and bound. These steps add durability, warmth, and a professional finish to your handmade creation.
Step 3: Layering and Quilting Your Project
The next stage involves creating a quilt sandwich. This consists of three layers: your reindeer quilt top, a layer of batting (which provides warmth and dimension), and a backing fabric. Choose a batting appropriate for your quilt’s intended use (e.g., cotton, polyester, or a blend). For the backing, you can use a single piece of fabric or piece together remnants that complement your quilt top. Lay the backing fabric face down, smooth and taut. Place the batting evenly over the backing, and then lay your reindeer quilt top, face up, on top of the batting. Carefully smooth out all layers to remove any wrinkles or puckers. Secure these layers together using basting pins, safety pins, or temporary spray adhesive. The quilting step, which involves stitching through all three layers, holds the quilt together and adds texture. For a beginner-friendly approach, you can opt for simple straight lines following the seams of your squares (“stitch in the ditch”), or choose basic meandering lines. If you prefer a simpler finish for a wall hanging, you could even tie the quilt using yarn or embroidery floss at key intersections. The quilting adds character and ensures your quilt will withstand time and use.
Step 4: The Final Flourish – Binding Your Quilt
Binding is the fabric strip that encases the raw edges of your quilt, providing a neat and durable finish. Cut strips of fabric (usually 2.5 inches wide) from a coordinating or contrasting fabric, and piece them together to form one long strip sufficient to go around the entire perimeter of your quilt. Press the binding strip in half lengthwise. Attach the binding to the front of your quilt, aligning raw edges, and stitch it down with a ¼-inch seam allowance, mitering the corners for a professional look. Then, fold the binding over to the back of the quilt and either machine stitch it down for speed or hand-stitch it for an invisible, heirloom quality finish. This final step protects the edges of your quilt and frames your beautiful work, bringing the entire project to a satisfying conclusion.
Tips for Success and Customizing Your Reindeer Quilt
To ensure your quilting experience is as enjoyable and successful as possible, consider these additional tips and ideas for personalization:
- Consistent Seam Allowance: The golden rule in quilting is a consistent ¼-inch seam allowance. Use a ¼-inch presser foot on your machine if you have one, or mark a guide on your machine’s needle plate. This consistency ensures all your squares and rows fit together perfectly.
- Pressing vs. Ironing: Remember that in quilting, we “press,” not “iron.” This means lifting and placing the iron down, rather than sliding it across the fabric. This prevents stretching and distortion of your fabric pieces.
- Fabric Choices: While cotton is standard, don’t be afraid to experiment with different shades and textures. Consider a metallic accent fabric for a touch of sparkle, or mix in some novelty holiday prints for the background. The key is to ensure the fabrics have a similar weight and care requirements.
- Scaling the Project: This block-based design is incredibly versatile. Want a smaller project? Make just a few reindeer blocks and turn them into a mug rug, a hot pad, or a decorative pillow cover. For a larger quilt, simply make more blocks and arrange them into multiple reindeer, or add sashing (strips of fabric) between the blocks and rows to increase the overall size.
- Embellishments: For an extra festive touch, consider adding small, fabric-safe embellishments after your quilt is complete. Perhaps a tiny bell on the reindeer’s neck, or a few embroidered snowflakes in the background. Ensure any additions are securely attached and won’t interfere with washing.
- Patience is a Virtue: Quilting is a meditative and creative process. Don’t rush! Enjoy each step, and don’t be afraid to unpick (use a seam ripper) if a seam isn’t quite right. Learning from mistakes is part of the journey.
Caring for Your Handmade Reindeer Quilt
To ensure your beautiful reindeer quilt remains vibrant and intact for many holiday seasons to come, proper care is essential. For most cotton quilts, machine washing on a gentle cycle with cold water and a mild detergent is appropriate. Avoid using bleach. Tumble dry on low heat or, ideally, lay flat to dry to prevent shrinkage and maintain shape. If you’ve used delicate embellishments, hand washing might be a safer option. Store your quilt folded or rolled in a clean, dry place away from direct sunlight to prevent fading.
*All these amazing images and the original tutorial are thanks to MerryMabelMarket via YouTube. We highly encourage you to visit her channel to see more inspiring quilting and sewing videos like this one!
Start Your Reindeer Quilt Adventure Today!
The journey of creating a handmade quilt is deeply rewarding. This easy reindeer quilt tutorial offers a fantastic opportunity to express your creativity, learn new skills, and craft something truly special. Whether it becomes a festive centerpiece in your home, a heartwarming gift for a loved one, or simply a testament to your growing quilting skills, this project promises joy and satisfaction. Don’t let hesitation hold you back; gather your fabrics, fire up your sewing machine, and embark on this wonderful holiday crafting adventure. The magic of making awaits!