
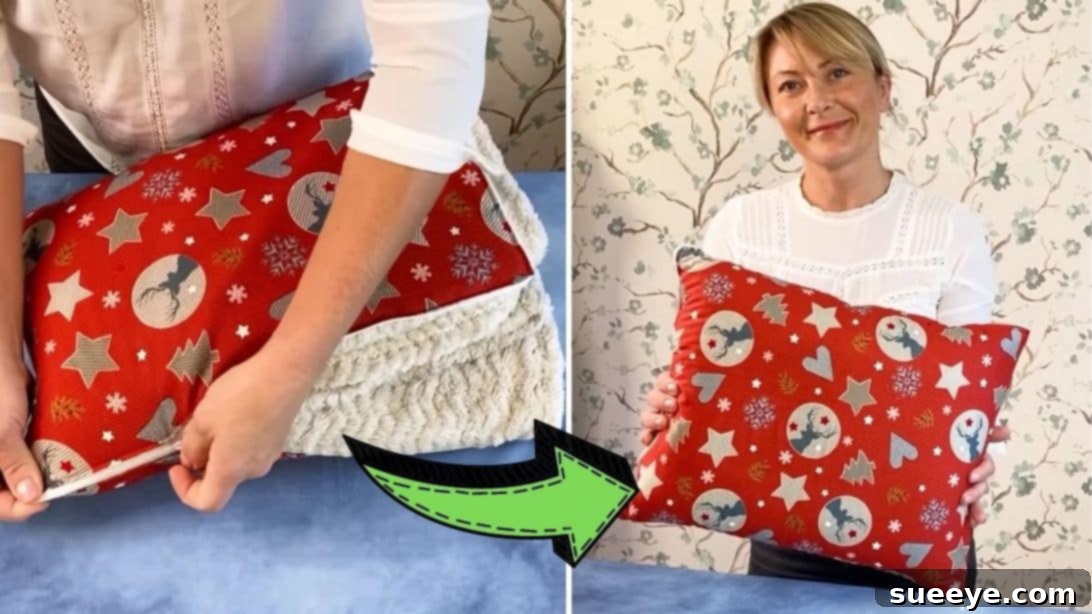
DIY Cushion Blanket: Transform Any Blanket into a Foldable Travel Pillow
Are you a travel enthusiast always looking for smart, space-saving solutions? Or perhaps you simply love multi-functional items that add comfort and practicality to your home? If so, you’re in for a treat! This comprehensive tutorial will guide you through the process of transforming any ordinary blanket into an ingenious foldable cushion. Imagine having a cozy blanket that effortlessly converts into a compact pillow – perfect for long journeys, camping trips, or simply tidying up your living space. Inspired by the creative insights of Estadistica Datos del Mundo on YouTube, we’ve refined and expanded this fantastic DIY project, making it easier than ever to create your own versatile 2-in-1 cushion blanket.
Why Create a Cushion Blanket? The Benefits of This Clever DIY Project
Beyond the simple joy of a DIY project, a cushion blanket offers a myriad of practical advantages that make it an essential addition to any home or travel kit:
- Ultimate Portability: When folded into a cushion, your blanket becomes incredibly compact and easy to carry. It fits snugly into luggage, backpacks, or even under a car seat without taking up excessive space. This makes it an invaluable companion for any type of travel, from long-haul flights to short road trips.
- Dual Functionality: Enjoy the warmth and comfort of a full-sized blanket when you need it, and then effortlessly convert it into a supportive cushion for sitting, napping, or back support. It’s perfect for airplane travel, bus rides, a spontaneous outdoor picnic, or simply an extra cushion for guests at home.
- Space-Saving Solution: Instead of having separate blankets and pillows cluttering your space, this innovative design combines both. It’s an excellent way to keep guest rooms tidy, organize camping gear, or simply reduce bulk in smaller living areas and apartments. Say goodbye to bulky linen closets!
- Personalized Comfort: Choose your favorite blanket – whether it’s a super-soft fleece, a warm quilt, a lightweight throw, or even an old sentimental piece – and turn it into a custom cushion. This means you’re guaranteed a familiar level of comfort and style wherever you go, tailored precisely to your preferences.
- Eco-Friendly Upcycling: Give new life to an old blanket that might otherwise be unused or discarded. This project is a wonderful way to upcycle textiles, reducing waste and creating something truly useful and cherished. It’s a sustainable choice that benefits both you and the environment.
- Stylish Home Decor: When folded, your cushion blanket can serve as an attractive decorative pillow on your sofa, armchair, or bed, blending seamlessly with your existing home decor. It’s a discreet yet functional item that adds both aesthetic appeal and practical value to any room.
This project is not just about sewing; it’s about crafting a smart solution that enhances comfort and convenience in your daily life. It’s an accessible and rewarding venture for sewers of all skill levels. Let’s gather our materials and dive into the transformation!
Materials You’ll Need:
- Your Favorite Blanket: The star of the show! Choose a blanket you love and want to transform. Its size will ultimately determine the final dimensions of your cushion. Make sure it’s washable and in good condition.
- Cotton Fabric: A durable, non-stretch fabric like medium-weight cotton is ideal for the cushion cover. It provides structure, holds its shape well, and is easy to work with. Ensure you have enough fabric to cut two pieces to the dimensions of your folded blanket.
- Zipper: A sturdy zipper, preferably a continuous coil zipper, that is long enough to span at least three sides of your intended cushion cover. This generous length will allow for easy insertion and removal of the blanket. A separating zipper could also work for a different aesthetic.
- Pins: Essential tools for holding fabric layers in place, ensuring precise cuts, accurate alignment, and straight seams during the sewing process.
- Marking Pen/Chalk: For transferring measurements onto fabric, making temporary guide lines for cutting, folding, and sewing. A fabric-specific marker that disappears with heat or water is highly recommended.
- Tape Measure: For accurate measurements of your blanket and fabric. Precision is absolutely key in sewing projects to ensure everything fits together perfectly.
- Scissors: A pair of sharp fabric scissors is crucial for clean, straight cuts, preventing frayed edges and making your work much easier and more enjoyable. Avoid using these scissors on paper!
- Cardboard (or a straight edge ruler): A stiff piece of cardboard, a long quilting ruler, or a tailor’s square is incredibly useful for creating crisp, straight folds and sharp lines when pressing and marking.
- Iron and Ironing Board: For pressing seams open or to one side and creating sharp creases. This step is often overlooked but gives your finished project a truly professional and polished look.
Step-by-Step Instructions: Creating Your Cushion Blanket
Step 1: Preparing Your Fabric and Blanket
Begin by taking your chosen blanket and folding it neatly and compactly into a rectangular shape. The size of this folded rectangle will be the exact dimensions of your future cushion. Experiment with different folds until you achieve a size and thickness that you find ideal for a cushion. Once you are happy with the fold, carefully measure its length and width using your tape measure. Write these measurements down accurately – they are critical for the next steps and will dictate the size of your fabric pieces.
Now, lay your cotton fabric flat and smooth out any wrinkles. Using your marking pen and tape measure, transfer the exact blanket measurements onto the fabric. You will need to cut two identical pieces of fabric to these precise dimensions, which will form the front and back panels of your cushion cover. With your fabric pieces accurately cut, it’s time to prepare the edges for sewing. Using the straight edge of a cardboard or a ruler as a guide, carefully fold and crease all four raw sides of each fabric piece inward by 1cm (or approximately 0.4 inches). This inward fold creates a clean, finished hem allowance that will enclose the raw edges. As you fold, press firmly with a hot iron to set these creases. This step is vital for creating sharp, professional-looking edges and making the subsequent sewing much easier.
For truly neat and professional-looking corners, you’ll want to create mitered corners. To do this, open up the folded fabric at each corner. You will clearly see where the two crease lines (from the 1cm inward folds) meet. Mark this intersection point with your pen. Then, carefully fold the corner diagonally at a perfect 90-degree angle, making sure the raw edges align neatly. Fold each side in again along your original 1cm crease lines, ensuring that their seams meet perfectly at the corner. Press these folded corners firmly with your iron to create sharp, crisp points. Repeat this precise process for all four corners on both of your fabric pieces. This technique prevents bulk and gives your cushion a tailored finish.
Next, take one of your prepared fabric pieces and fold it exactly in half across its width to find its midpoint. Mark this point with your pen. Open it up, then fold it lengthwise to find its other midpoint, marking that as well. Spread the fabric open again. You will now prepare the area where your zipper will be placed. Position your zipper along what will be the open sides of the fabric (typically one long side and two short sides if you’re making a “U” shaped opening). Mark the center point of the zipper’s length and align it with the midpoint mark you made on your fabric’s longer side. This initial marking helps ensure balanced zipper placement and a professional-looking finish.
Step 2: Attaching the Zipper and Final Sewing
With your fabric meticulously prepared, it’s time to integrate your blanket and securely attach the zipper. Spread your blanket open completely on a flat surface. Then, place one of your prepared cotton fabric pieces precisely on one corner of the blanket, aligning its edges. This fabric piece will eventually become the outer cover when the blanket is neatly folded inside.
Carefully open and separate the teeth of your zipper. This is a crucial step for achieving a clean, professional finish and making it easier to attach. Take one half of the zipper tape and align its midpoint mark with the midpoint you previously marked on the longer side of your fabric piece. Starting from this midpoint, meticulously place the zipper around the three open sides of your fabric, ensuring that the zipper teeth are facing inwards towards the blanket. Pin the zipper securely in place along the folded edges of your fabric. For extra security and precision before machine sewing, you can also baste it with a loose, temporary stitch by hand or machine. Repeat this precise placement process for the other half of the zipper tape, aligning it with the second fabric piece that will form the opposite side of the cushion cover.
Now, let’s address the zipper ends for a perfectly tidy finish. Go to the outer edge of your fabric where the zipper will start or end. From the midpoint mark you made on the fabric’s long side, measure out 1.5cm (approximately 0.6 inches) on each side. At these marked points, carefully fold both ends of the zipper tape inward towards the fabric’s edge, tucking them neatly under the fabric. This clever technique prevents the raw zipper ends from showing and creates a clean, enclosed finish that won’t unravel. Now move to the other end of the zipper, typically along a short side of the fabric. Find the midpoint on this side and measure 2cm (approximately 0.8 inches) on each side. Fold and tuck the zipper ends here in the same manner. The slightly different measurements on the ends (1.5cm vs. 2cm) allow for the zipper pull to operate smoothly and for a robust, neat closure, preventing the pull from getting stuck or escaping the track.
Once your zipper is perfectly pinned or basted in place, it’s time to sew! Using your sewing machine, carefully sew all around the edges where the zipper tape meets the fabric. We highly recommend using a zipper foot on your sewing machine for the best results, as it allows you to stitch as close to the zipper teeth as possible without accidentally stitching over them. Sew slowly and carefully, removing pins as you go. After sewing the zipper to both fabric pieces, ensure it’s securely attached. Next, attach the zipper clasp, making sure it slides smoothly along the entire track. Trim any excess zipper tape, tucking the cut ends securely within your stitching to prevent fraying. Finally, complete all remaining seams, sewing the two fabric pieces together around the blanket. You can finish sewing either by hand for a more delicate touch and control, or by machine for speed and enhanced durability. Ensure all seams are strong, neat, and well-reinforced, especially at the corners, for a long-lasting cushion blanket.
Tips for a Perfect Finish on Your Cushion Blanket
Achieving a professional-looking finish is within reach with a few key sewing practices. Keep these tips in mind as you work:
- Accurate Measurements Are Non-Negotiable: Double-check all your measurements before cutting any fabric. Even small discrepancies can significantly affect the final fit and appearance of your cushion cover, making it ill-fitting or difficult to zip. “Measure twice, cut once” is a golden rule here.
- Pressing is Your Best Friend: Don’t skip the ironing steps! Pressing seams open or to one side and creating crisp, sharp creases makes an enormous difference in the professional look of your finished project. It helps fabric lie flat, makes subsequent stitching easier, and eliminates puckering.
- Choose the Right Zipper Type: A nylon coil zipper is often more forgiving and easier to sew neatly than a metal one, especially for beginners. Ensure it’s long enough to provide a generous opening for comfortably inserting and removing the folded blanket without struggle.
- Always Test Your Stitches: Before sewing on your final project, always take a moment to test your stitch length and tension on a scrap piece of the same fabric. This ensures your machine is set correctly for your materials and prevents unraveling or broken stitches.
- Use Quality Thread: A strong, all-purpose polyester thread is usually sufficient for this project, providing durability and resistance to wear and tear for regular use and washing. Match the thread color to your fabric for a seamless look.
- Patience with Corners: Mitered corners can be tricky initially. Take your time, pin thoroughly, and don’t hesitate to unpick and redo them if they’re not perfect. The effort will be worth it for the crisp, clean aesthetic they provide.
- Finish Raw Edges: If your fabric frays easily, consider finishing the raw edges of your cushion cover pieces with a serger or a zigzag stitch before assembling. This prevents fraying over time and keeps your cushion looking neat internally.
Customization Ideas for Your 2-in-1 Cushion Blanket
Once you’ve mastered the basic technique, feel free to get creative and personalize your cushion blanket to reflect your style and needs:
- Explore Diverse Fabric Choices: While cotton is recommended for its durability, experiment with different cotton prints, patterns, or even a more durable canvas or upholstery fabric for the cushion cover. Consider water-resistant fabric for outdoor use or a luxurious velvet for an elegant touch.
- Add a Convenient Carrying Handle: Sew a sturdy fabric loop or strap to one side of the cushion for easier carrying. This is especially useful for travel, allowing you to easily grab and go. You can match it to your cushion fabric or use a contrasting color for a design element.
- Incorporate Smart Pockets: Integrate a small zippered or patch pocket on the outside of the cushion cover. This can be perfect for holding small essentials like a phone, earbuds, a book, or travel documents when you’re on the move, keeping them secure and easily accessible.
- Personalize with Embroidery or Appliqué: Elevate your cushion’s aesthetics with custom embroidery, an appliqué design, or even fabric paint. This allows you to add a unique, personalized touch, making your cushion truly one-of-a-kind or a thoughtful gift.
- Experiment with Different Sizes: Adapt the measurements to create various sizes, from a small, compact travel pillow ideal for neck support, to a larger floor cushion for casual seating at home. Just remember to choose a blanket that comfortably fits your desired dimensions for a smooth conversion.
- Add Piping or Trim: For an extra touch of sophistication, sew decorative piping or trim along the edges of your cushion cover before attaching the zipper. This can define the shape and add a pop of color or texture.
Your New 2-in-1 Cushion Blanket: Ready for Adventure!
Congratulations! You’ve successfully completed your very own 2-in-1 cushion blanket. This innovative project not only provides a cozy blanket for warmth and comfort but also cleverly transforms into a practical, space-saving cushion, perfect for any adventure or simply enhancing comfort at home. Whether you’re planning your next big trip, seeking smart storage solutions, or simply enjoying the satisfaction of a handmade item, this versatile creation is sure to become a favorite. We hope this detailed tutorial has empowered you to create a functional and stylish item that will bring joy and utility for years to come. Enjoy your new, multi-functional creation – a testament to your creativity and skill!