
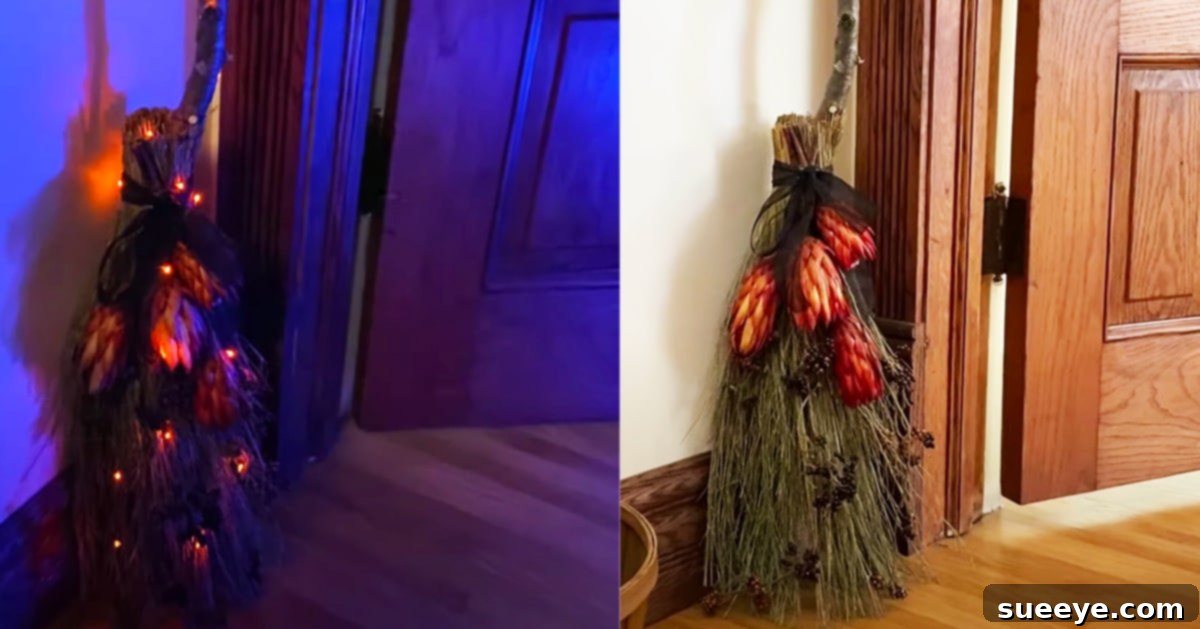
Create Enchanting Halloween Magic: Your Own DIY Witch Broom Tutorial
The enchanting spirit of Halloween and the cozy vibes of fall beckon us to infuse our homes with seasonal charm. While store shelves overflow with decor, there’s an unparalleled joy and satisfaction in crafting your own unique pieces. For those seeking inspiration and easy-to-follow guides, Christopher Hiedeman on YouTube stands out as a beacon of creativity, offering some of the best festive and seasonal DIY tutorials available online. Christopher has a remarkable talent for transforming everyday materials into captivating decorations that often rival their expensive store-bought counterparts, all while keeping costs impressively low.
Among his treasure trove of brilliant ideas, his current Halloween and Fall decor concepts are truly inspiring, sparking an immediate desire to try them all. One particular project that truly captures the essence of the spooky season and our creative spirit is his DIY witch broom. What makes this craft so appealing is Christopher’s clever combination of natural elements sourced from the outdoors with a few readily available purchased items. The result is a stunning, authentic-looking witch broom that surprisingly simple to assemble, making the process much easier than many might initially imagine.
This tutorial isn’t just about making a broom; it’s a fantastic foundation for boundless creativity. The basic steps are straightforward, allowing you to easily customize your witch broom to perfectly match your personal aesthetic and existing decor. Whether you envision a rustic, elegant, whimsical, or intensely spooky design, this project provides the perfect canvas. Furthermore, once completed, this charming DIY witch broom serves as a versatile decorative accent. It’s a wonderful addition to entryways, hallways, cozy nooks, or any space that could benefit from a touch of Halloween magic, instantly elevating your seasonal display with handmade charm.
Why Craft Your Own Witch Broom for Halloween?
In an age of mass-produced decorations, the allure of a homemade witch broom is undeniable. Beyond the significant cost savings, crafting your own Halloween decor offers a unique sense of accomplishment and a personal touch that store-bought items simply cannot replicate. A DIY witch broom allows you to imbue your decorations with character and a story, reflecting your individual style and creative spirit. It’s an opportunity to engage in a fun, hands-on activity, whether solo or with family, creating lasting memories along with beautiful decor. Plus, when you make something yourself, you control the quality of materials and the final aesthetic, ensuring it perfectly fits your vision for the ultimate spooky season ambiance.
Choosing natural materials, as Christopher Hiedeman masterfully demonstrates, adds an authentic, earthy feel to your Halloween decor. This approach not only makes the project budget-friendly but also connects your seasonal decorations with the natural world, perfectly aligning with the autumn harvest themes. Imagine the satisfaction of greeting trick-or-treaters with a handmade witch broom leaning against your porch, or having it as a whimsical focal point in your living room – it truly sets a magical tone for the entire Halloween season.
Essential Materials for Your Enchanting DIY Witch Broom
The beauty of Christopher Hiedeman’s approach lies in its simplicity and accessibility. Gathering your materials is the first exciting step towards bringing your witch broom to life. Here’s a detailed look at what you’ll need, along with tips for selection:
- Branch (Sourced from Outdoors): This is the backbone of your witch broom. Look for a sturdy branch, approximately 3 to 5 feet long, depending on your desired broom height. The branch should be relatively straight but can have interesting natural curves or knots for character. Ensure it’s dry and clean; if freshly picked, allow it to dry thoroughly for a few days to prevent shrinking or warping. A thickness comparable to a broomstick handle is ideal for comfortable handling and a realistic look.
- Grass/Floral (Craft Grass or Natural Alternatives): For the broom’s bristles, craft grass, often found in floral or craft stores, provides a consistent and abundant supply. Alternatively, you can use dried tall grasses, raffia, straw, or even natural floral elements like dried hydrangeas or corn husks for a more organic texture. Aim for a generous amount that will create a full, bushy base for your broom. Consider mixing different textures or shades of green and brown for added depth.
- Twine (Natural Jute or Hemp): Twine is crucial for securing the grass to the branch and for adding decorative accents. Natural jute or hemp twine offers a rustic, earthy look that perfectly complements the natural materials. Choose a strong, durable twine that can withstand tight knots and hold your broom’s components firmly in place. A roll of at least 50-100 feet should be sufficient, allowing for multiple wraps and decorative tying.
- Orange Wire String Lights (Battery Operated): These lights add a magical, glow-in-the-dark element to your witch broom, making it truly captivating, especially in the evening. Opt for battery-operated wire string lights, as they are flexible, easy to wrap, and don’t require an outlet, allowing for versatile placement of your broom. Orange lights are perfect for Halloween, but you could also consider warm white or purple for a different effect. Ensure the battery pack is small and discreet enough to be hidden.
- Black Cat Door Decor (Optional, for Complementary Display): While not directly part of the broom itself, a black cat door decor piece can be a fantastic companion element for your overall Halloween display. This could be a silhouette, a small hanging sign, or even a plush cat figurine placed near your broom to enhance the witchy theme and create a cohesive scene.
- Witch Cloak (With Brooch Clasp – Optional, for Display): Similar to the black cat decor, a witch cloak, perhaps draped over a chair or a mannequin near your broom, can further immerse your space in the Halloween spirit. A cloak with a brooch clasp offers an authentic touch and allows for various display methods, suggesting a witch might have just stepped away from her flying contraption.
- Victorian Vintage (Witch) Boots (Optional, for Display): A pair of Victorian vintage-style boots, positioned near the broom, can brilliantly complete the narrative of a witch’s arrival or departure. These boots, with their classic, often somewhat eerie aesthetic, serve as an excellent prop to add depth and character to your Halloween tableau, inviting guests to imagine the stories behind your decor.
Remember, the “optional” items are perfect for creating an entire themed vignette around your DIY witch broom, transforming a simple decoration into an immersive Halloween display.
Step-by-Step Guide to Crafting Your Personalized Witch Broom
Now that you have all your materials, let’s dive into the magical process of assembling your very own DIY witch broom. Follow these detailed steps for a spellbinding result:
Step 1: Preparing Your Broom’s Bristles
First, take your chosen grass or floral material. Depending on how long and full you envision your broom’s bristles, begin to trim off sections to your preferred size. Consider the overall balance with your branch – shorter bristles for a compact broom, longer ones for a more dramatic, sweeping effect. Lay the trimmed grass out evenly, ensuring the ends are aligned to create a uniform base for your broom head. This initial preparation is key to achieving a neat and tidy broom appearance. For full visual guidance and intricate details on achieving the perfect trim and bundle, be sure to watch the comprehensive Christopher Hiedeman tutorial on YouTube. His video demonstrates the precise techniques for handling the grass and preparing it for attachment.
Step 2: Bundling the Grass with Twine
Once your grass is trimmed and ready, take a generous length of twine. Gather the trimmed grass firmly into a tight bundle. Then, wrap the twine around the top section of the grass bundle, just below where the branch will be inserted. Tie a secure knot, ensuring the grass is held together tightly. Continue to wrap the twine multiple times around the bundle, moving downwards slightly, and then back up, creating a strong, condensed “collar” for the broom head. This step is crucial for keeping the grass collected and compact, preventing it from splaying out prematurely. Ensure your knots are secure, but also aesthetically pleasing, as the twine will be a visible part of the broom’s rustic charm.
Step 3: Integrating the Branch Handle
Next, carefully insert the thicker end of your chosen branch into the center of the bundled grass. Push it down firmly, ensuring it penetrates deep enough into the bundle to be stable. The twine you just wrapped should help hold the grass around the branch. Adjust the grass around the branch so that it evenly distributes on all sides, creating a full and balanced broom head. You may need to gently manipulate the individual strands of grass to achieve a symmetrical look. Once satisfied with the placement, take another length of twine and wrap it tightly around the point where the branch meets the grass. Use several strong wraps and secure knots to bind the grass even more firmly to the branch, reinforcing the broom’s structure and preventing any wobbling.
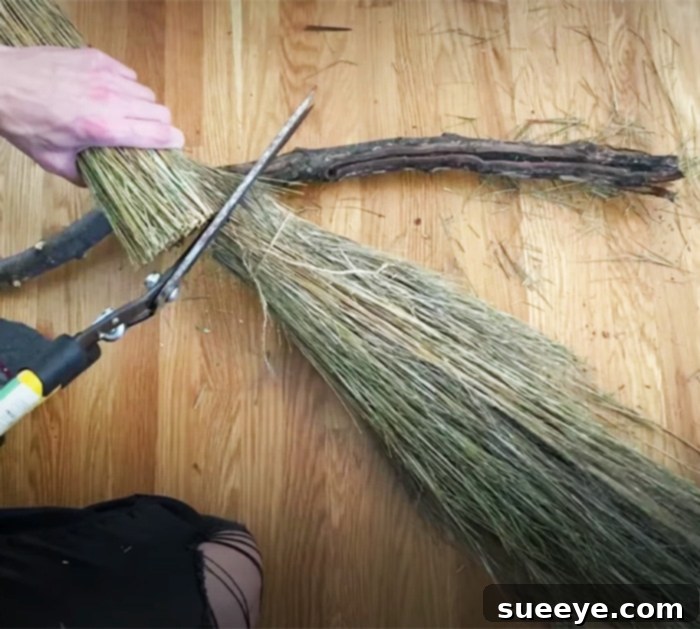
Step 4: Decorating with Ribbons, Florals, and Embellishments
Now comes the fun part – personalizing your witch broom with festive decorations! Gather your ribbons, additional floral elements (such as dried flowers, artificial leaves, or small spooky elements like plastic spiders or bats), and any other decorative embellishments you’ve chosen. Begin by wrapping ribbons around the twine-bound section of the broom, allowing some ends to trail for a whimsical effect. Weave in floral accents among the grass bristles, securing them with small pieces of twine or floral wire if necessary. This is where your creativity truly shines; consider a color scheme that complements your overall Halloween decor. Use your twine to hold everything tightly and securely in place, making sure all decorations are firmly attached to withstand indoor or outdoor display.
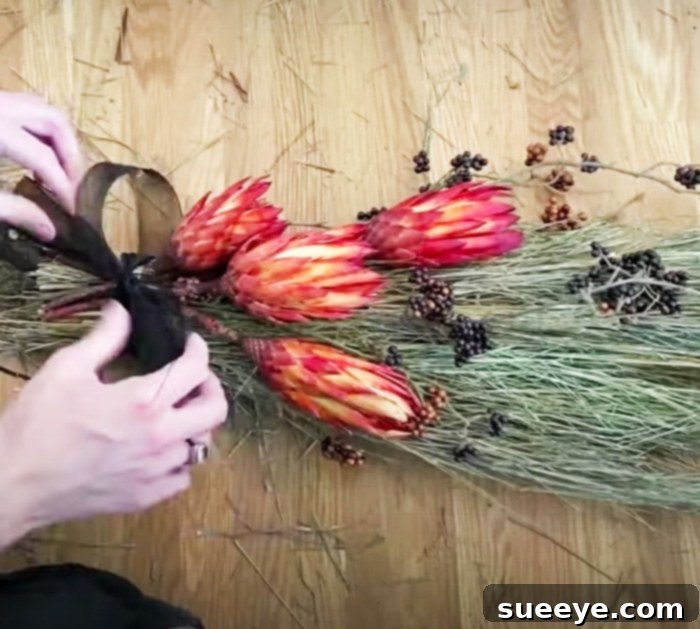
Step 5: Adding a Magical Glow with String Lights
To give your witch broom an extra touch of enchantment, carefully wrap the orange wire string lights around the broom. Begin at the base of the branch, just above the bristles, and gently weave the wire lights down through the grass and around the decorative elements. Ensure the battery pack is tucked away discreetly, perhaps secured to the branch with a small piece of twine or hidden within the dense grass bristles. The flexibility of wire string lights makes them perfect for this. When illuminated, these lights will cast a warm, spooky glow, making your witch broom truly stand out, especially as dusk settles.
Customizing Your Witch Broom: Unleash Your Inner Alchemist!
While the basic tutorial provides an excellent framework, the real magic of this DIY project lies in its endless customization possibilities. Your witch broom can be as traditional or as avant-garde as you desire. Consider different color palettes: deep purples and greens for a mystical forest witch, silvers and whites for an ethereal frost witch, or even vibrant neons for a modern, whimsical take. Experiment with various embellishments:
- Textural Elements: Incorporate burlap, lace, tattered fabric scraps, or even faux spiderwebs for added texture and aged appeal.
- Natural Accents: Pinecones, dried berries, small gourds, or autumn leaves can be wired onto the broom for a rustic, harvest-themed look.
- Spooky Charms: Hang miniature skulls, tiny potion bottles, faux raven feathers, or intricate charms from the branch or ribbons.
- Painted Details: Lightly spray paint the tips of the grass black or silver for an aged effect, or add glow-in-the-dark paint accents for an extra spooky surprise.
- Fabric Wraps: Instead of just twine, wrap sections of the branch with strips of fabric – think distressed cheesecloth or velvet for a luxurious touch.
Each customization adds a layer of personality, making your witch broom a truly unique reflection of your Halloween style. Don’t be afraid to mix and match materials and textures to create a truly one-of-a-kind piece that tells its own spooky story.
Displaying Your Enchanting Creation: Where Will Your Witch Fly Next?
Once your DIY witch broom is complete, deciding where to display it is part of the fun! This versatile piece can transform any corner of your home into a captivating Halloween scene, suitable for both indoor and outdoor settings. Here are some inspiring ideas:
- Grand Entrance: Lean your witch broom against your front door or porch railing. This is an excellent spot to greet guests and trick-or-treaters with an immediate touch of Halloween charm. If placing outdoors, ensure any delicate embellishments are weather-resistant or consider bringing it inside during inclement weather. Complement it with a “Black Cat Door Decor” nearby for a classic spooky welcome.
- Enchanted Entryway: Position the broom in your foyer or entryway, perhaps standing upright in a decorative urn or leaning elegantly against a wall. This creates an inviting, festive atmosphere as soon as people step inside.
- Witch’s Corner: Dedicate a small nook in your living room or hallway to a witch-themed display. Place your broom as the centerpiece, then add complementary elements like a draped “Witch Cloak” over a nearby chair, a vintage-style hat, and those “Victorian Vintage Boots” placed artfully at the broom’s base. This creates a cohesive and immersive narrative.
- Fireplace Mantel Magic: For a more subtle yet impactful display, lay the broom horizontally across a long mantelpiece, allowing the bristles and lights to spill over the edge. Add small pumpkins, faux spiderwebs, and other spooky accents around it.
- Garden or Yard Accent: If your broom is sturdy and weather-proofed, place it among your garden shrubs or near a pathway. The orange string lights will cast a magical glow, guiding visitors and adding an eerie ambiance to your outdoor space.
The key is to integrate your DIY witch broom into a larger Halloween narrative, allowing it to be more than just a decoration, but a piece of a story that unfolds throughout your home. The addition of subtle lighting from the string lights will make it particularly captivating during the evening hours, enhancing the magical allure of the spooky season.
Embrace the Magic of DIY Halloween Decor
Ultimately, this DIY witch broom project, inspired by the creative genius of Christopher Hiedeman, is more than just a craft; it’s an invitation to embrace the spirit of Halloween with creativity and personal flair. The satisfaction of transforming simple materials into such a charming and impactful decoration is truly rewarding. It’s a wonderful way to save money, engage in a fun activity, and most importantly, infuse your home with unique character that store-bought items simply cannot replicate.
Whether you’re looking to enhance your entryway, add a touch of whimsy to a hallway, or create a full-blown witch’s lair, this customizable witch broom is an amazing addition to your fall and Halloween decor. So gather your materials, watch Christopher Hiedeman’s full tutorial for extra tips and visual guidance, and prepare to conjure up some delightful Halloween magic. Happy crafting, and may your spooky season be filled with handmade charm and enchanting discoveries!