
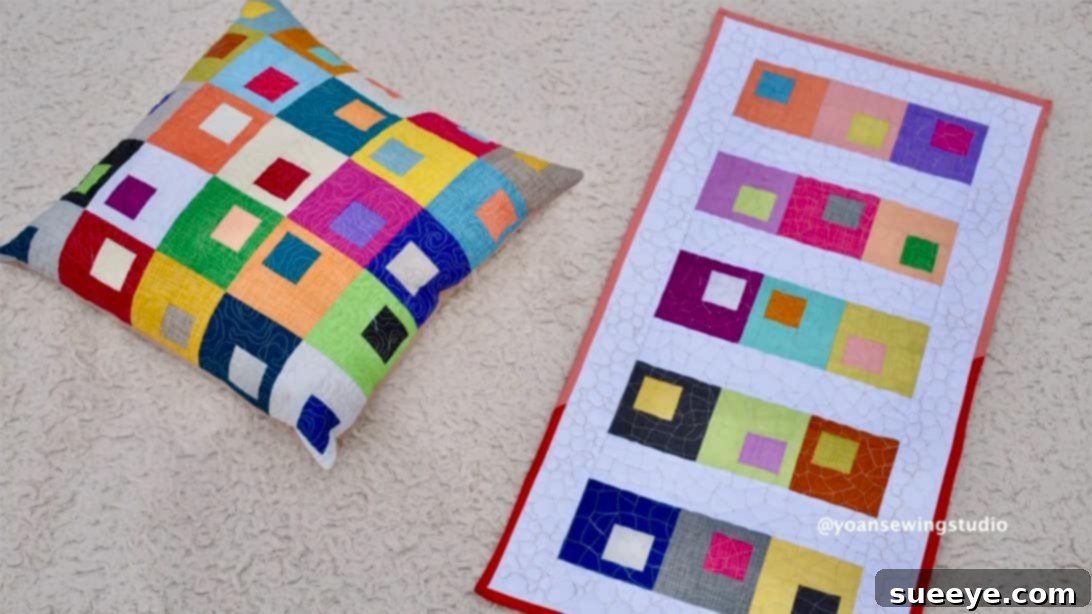
Master the Art of Quilting: Easy Square-in-a-Square Pillow and Table Runner Tutorial
Embark on a delightful quilting journey with these incredibly captivating Square-in-a-Square projects! As soon as I discovered the brilliant designs by Yoan Sewing Studio, I knew I had to share this creative gem with fellow sewing enthusiasts. These unique pillow and table runner quilts are more than just functional items; they are vibrant, playful, and modern decorative pieces that will instantly infuse personality and color into any living space. Whether adorning a cozy couch or gracing a dining table, these eye-catching creations are guaranteed to spark conversation and admiration.
What makes these projects truly special is their surprisingly straightforward nature. Despite their intricate appearance, both the Square-in-a-Square pillow and table runner are designed to be quick and easy to make, making them perfect for quilters of all skill levels – from confident beginners to seasoned experts looking for a speedy and satisfying make. This comprehensive guide will walk you through each step of the process, providing clear and concise instructions to help you bring these stunning designs to life. For those who prefer visual learning, remember you can always refer to the detailed video tutorial by Yoan Sewing Studio for an in-depth explanation of every technique. Get ready to unleash your creativity and enjoy the rewarding process of crafting beautiful, handmade quilts!
Essential Materials for Your Quilt Project
Gathering all your materials before you begin ensures a smooth and enjoyable crafting experience. For these charming Square-in-a-Square quilt projects, you’ll need a selection of high-quality quilting cottons and standard sewing notions. Choosing vibrant, contrasting fabrics will truly make your patchwork pop and bring out the dynamic “square-in-a-square” effect.
For the patchwork (common to both pillow and table runner):
- 40 pieces of Charm Pack (5″ squares): These pre-cut squares are a fantastic time-saver and offer a wonderful variety of coordinating fabrics. Alternatively, you can cut your own 5-inch squares from your favorite fabric scraps or yardage.
For the Square-in-a-Square Pillow:
- 18″ x 18″ pillow insert: Choose a comfortable and supportive insert that will maintain the pillow’s shape.
- 1/3 yard cotton quilting fabric for the back piece: This will form the main back panel of your pillow cover.
- 1 piece of 20″ x 20″ batting: Essential for giving your quilt top a soft, padded feel and for adding dimension during the quilting process.
- 1 piece of 20″ x 20″ backing fabric: This fabric will be layered beneath the batting to complete your quilt sandwich.
- 1 all-purpose zipper at least 18″ long: A durable zipper ensures your pillow cover is easy to remove for washing. Ensure it’s slightly longer than the side of your pillow for easier installation.
- 1 piece of 18″ x 7″ for top backing: This fabric strip will be used to create the top portion of your zipper enclosure.
- 1 piece of 18″ x 11″ for bottom backing: This larger strip forms the bottom portion of the zipper enclosure, ensuring a neat and professional finish.
For the Square-in-a-Square Table Runner:
- 1/3 yard of background fabric (white or off-white recommended): A solid, neutral background fabric helps the vibrant patchwork stand out.
- 1 piece of 17″ x 32″ batting: Provides structure and a soft feel for your table runner.
- 1 piece of 17″ x 32″ backing fabric: The fabric for the underside of your table runner.
- 3x binding strips: These strips, typically 2.5 inches wide and cut on the bias or crossgrain, are used to finish the edges of your table runner for a polished look. You may need to cut these from coordinating fabric.
Step-by-Step Quilting Instructions: Crafting Your Projects
Follow these detailed steps carefully to construct your beautiful Square-in-a-Square pillow and table runner. Precision in cutting and sewing is key in quilting for perfectly matched seams and a professional finish. Take your time with each stage, and don’t hesitate to refer to the video tutorial if any step requires further clarification.
Step 1: Preparing Your Charm Packs for Patchwork
To begin, select two contrasting charm pack squares. Lay one directly on top of the other, ensuring their edges are perfectly aligned. Using a ruler and a rotary cutter, measure 2 inches from one edge of the stacked squares and make a precise cut. This creates your first strip. Next, measure another 2 inches from your *previous* cutting line and make a second cut. After these two cuts, you will be left with three distinct strips from your stacked charm packs: two strips that are 2 inches wide, and one strip that is 1 inch wide. Accuracy here is paramount for the overall design, so use a sharp rotary blade and a non-slip ruler.
Step 2: Rotating and Repeating Cuts for Block Elements
Now, set aside the first and third strips you just cut. Take the remaining stacked strip (the one that was originally in the middle) and rotate it 90 degrees. You’ll now repeat the cutting process, measuring 2 inches from the edge, cutting, and then another 2 inches from the last cut. This process further subdivides your fabric into smaller, essential components for the Square-in-a-Square block. At the end of this step, you will have various pieces which we can label for clarity: two ‘A’ pieces (2″ x 5″), one ‘B’ piece (1″ x 5″), two ‘C’ pieces (2″ x 2″), two ‘D’ pieces (2″ x 2″), and two ‘E’ pieces (2″ x 1″). Keep these organized.
Step 3: Assembling Your Unique Square-in-a-Square Blocks
This is where the magic of the “square-in-a-square” design truly comes to life. Carefully separate the fabric pieces from the first charm pack from those of the second. The key design element involves swapping the center squares (the ‘C’ and ‘D’ pieces) between the two sets of contrasting fabrics. This swap creates the distinct, vibrant “square-in-a-square” effect. Next, it’s time to sew! Using a precise 1/4″ seam allowance, begin by sewing fabric C and fabric D together, right sides facing. Press the seams open or to one side—consistency in pressing helps your blocks lie flat. Continue by sewing the remaining pieces (E, A, and B) around this central unit, always maintaining that accurate 1/4″ seam allowance. Once the block is assembled, carefully trim any excess fabric and square up your block to a perfect 4″ x 4″. Repeat this entire process for all remaining charm packs until you have a total of 40 completed Square-in-a-Square blocks. Consistency in sizing is vital for a seamless final quilt.
Step 4: Designing and Assembling the Pillow Cover Top
With your 40 individual blocks ready, it’s time to create the pillow cover top. Arrange 25 of your finished 4″ x 4″ blocks into a 5-row by 5-column grid. This is your chance to get creative! Experiment with rotating the blocks in different directions to form interesting patterns and visual movement across your pillow. Once you are completely satisfied with your design layout, begin sewing the blocks together one row at a time. After each row is sewn, press the seams towards one side. An important quilting trick here is to press the seams of adjacent rows in *opposite* directions. This nesting technique helps the seams interlock perfectly when you join the rows together, resulting in crisp, flat intersections. Finally, sew all five rows together to complete your stunning pillow cover top.
Step 5: Layering and Quilting the Pillow Top
Now, transform your pieced top into a soft, textured quilt sandwich. Lay your backing fabric flat, right side down. Smooth out any wrinkles. Next, place the batting evenly on top of the backing. Finally, center your pieced pillow top on the batting, right side up. Secure these three layers together using basting pins, safety pins, or temporary spray adhesive. This prevents shifting during the quilting process. With your layers basted, it’s time to quilt! You can choose any quilting design you desire—whether it’s simple straight lines, a charming crosshatch pattern, or intricate free-motion quilting. Let your creativity guide you. Once quilted, carefully trim the excess batting and backing fabric, squaring up your finished quilted panel to a precise 18″ x 18″. This meticulous trimming ensures your pillow cover fits your insert perfectly.
Step 6: Installing the Zipper for a Professional Finish
A well-installed zipper adds a professional touch to your pillow cover, making it easy to remove for cleaning. First, take the 18″ x 7″ top backing piece and the 18″ x 11″ bottom backing piece. Finish one long raw edge of each piece using either a zig-zag stitch or a serger to prevent fraying. Next, lay the finished edge of the 18″ x 7″ top backing piece right side up, then place the right side of the zipper tape along this edge. Secure with pins and sew in place with a 1/4″ seam allowance. Press the fabric away from the zipper and topstitch along the fabric edge for a neat finish. Repeat this process for the 18″ x 11″ bottom backing piece, aligning its finished edge with the other side of the zipper tape. Once both pieces are attached, press and topstitch again. Finally, trim any excess zipper tape, ensuring it’s flush with the fabric edges.
Step 7: Assembling the Pillow Cover
With your quilted front panel and zipper-backed piece ready, it’s time to bring your pillow cover together. Lay your quilted front piece right side up on your work surface. Now, take your back piece (with the zipper installed) and lay it right side down on top of the front piece, aligning all raw edges. Crucially, make sure to unzip the zipper halfway before you sew. This step is vital, as it allows you to turn the pillow cover right side out later. Secure the layers together with sewing clips or pins all around the perimeter. Using a 3/8″ seam allowance, sew all four sides together. After sewing, carefully clip all four corners, cutting diagonally across the corner seam allowance without cutting through your stitches. This reduces bulk and ensures sharp corners when turned. Finally, finish all raw edges inside the pillow cover with a zig-zag stitch or a serger to prevent fraying and ensure durability.
Step 8: Final Touches: Turning and Inserting the Pillow
Now comes the satisfying moment of seeing your pillow cover take shape! Through the halfway unzipped zipper opening, carefully turn the fabric inside out, gently pushing out the corners. A point-turner, a chopstick, or even a blunt pencil can be used to poke out the corners, ensuring they are as sharp and crisp as possible. Once the cover is fully turned, insert your 18″ x 18″ pillow insert. Gently maneuver the insert into all four corners of the cover, ensuring it fills the space evenly. Zip up your beautiful new Square-in-a-Square quilted pillow, and admire your handiwork!
Step 9: Preparing Blocks and Background for the Table Runner
Now, let’s turn our attention to the elegant table runner using your remaining Square-in-a-Square blocks. You should have 15 blocks left from your original 40. For the background elements that will frame your vibrant blocks, cut 6 pieces of 11″ x 2.5″ strips and 2 pieces of 30″ x 2.5″ strips from your chosen background fabric (preferably white or off-white). Measure and cut these accurately, as precision is critical for seamless joins in quilting.
Step 10: Assembling the Table Runner Top
Lay out your 15 Square-in-a-Square blocks and your background strips in a pleasing pattern. A common arrangement for this design involves 3 rows of 5 blocks, with background strips separating and framing the block rows. Start by sewing each row of five blocks together, right sides facing, using a 1/4″ seam allowance. Press the seams towards one side for each row. Once your three rows of blocks are assembled, sew the background fabric strips to these rows. For example, a 30″ x 2.5″ strip might frame the top and bottom of the entire block section, while the 11″ x 2.5″ strips act as sashing between the block rows. Carefully align all edges, pin securely, and sew with a consistent 1/4″ seam allowance. Press all seams after each join to maintain a flat and professional quilt top.
Step 11: Layering, Quilting, and Binding the Table Runner
Similar to the pillow, prepare your table runner for quilting. Lay your 17″ x 32″ backing fabric right side down, followed by your 17″ x 32″ batting, and finally your pieced table runner top, right side up. Baste all three layers securely to prevent any shifting during the quilting process. Choose a quilting design that complements your patchwork—whether it’s simple parallel lines, a decorative meandering pattern, or following the lines of your “squares.” Once your table runner is beautifully quilted, it’s time for the final, finishing touch: binding. Binding creates a clean, durable edge for your quilt. Prepare your 3 binding strips by sewing them end-to-end to create one long strip. Attach the binding to the raw edges of your table runner using your preferred binding method (e.g., a double-fold binding machine-sewn to the front and hand-stitched to the back for a traditional finish, or machine-stitched all around for efficiency). This step gives your table runner a polished, professional look and feel, ready to grace your home.
Embrace Your Creativity with Quilting
Congratulations on completing your stunning Square-in-a-Square quilted pillow and table runner! You’ve not only created beautiful, functional pieces of home decor but also honed your quilting skills with precision cutting, careful piecing, and thoughtful finishing. These projects are a testament to the joy of handmade craftsmanship, adding a personal touch and vibrant energy to any room.
The beauty of quilting lies in its versatility. Feel free to experiment with different color palettes, fabric textures, and quilting designs to truly make these patterns your own. Perhaps you’ll try a monochromatic scheme for a subtle elegance, or a riot of bright colors for an even more playful look. These foundational skills can now be applied to countless other quilting adventures. We hope this tutorial has inspired you to continue exploring the wonderful world of sewing and patchwork.
Happy sewing and enjoy your beautifully handcrafted creations!