
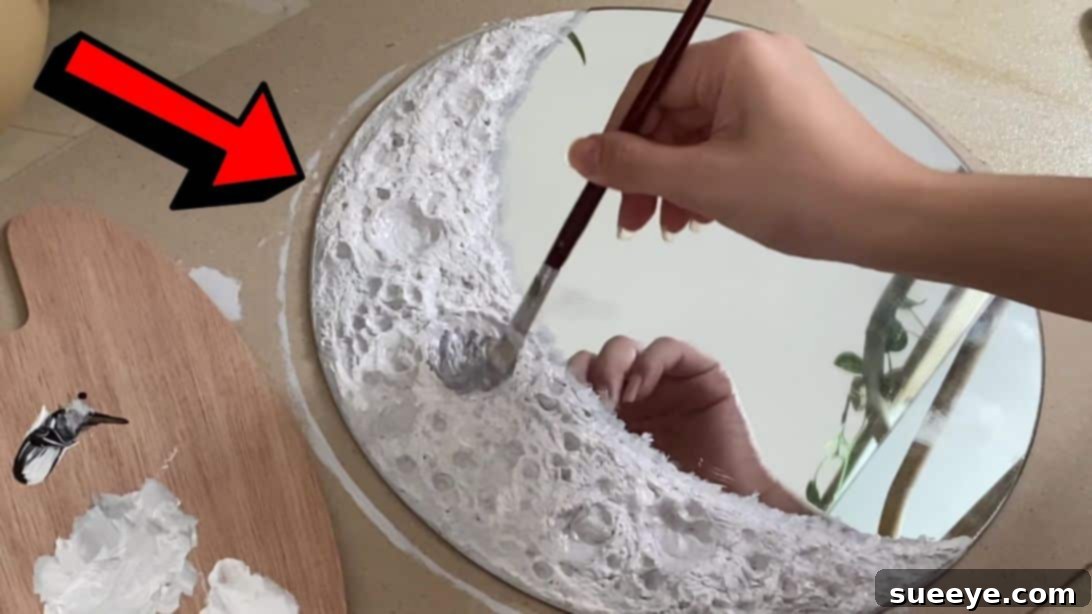
DIY Crescent Moon Mirror: Craft Your Own Celestial Masterpiece
Have you ever found yourself searching endlessly for that perfect piece of decor, only to realize it either doesn’t exist or comes with an exorbitant price tag? That’s precisely the experience many of us share when it comes to unique celestial-themed accents like a beautiful **moon mirror**. The allure of lunar decor, with its serene charm and mystical elegance, is undeniable. Yet, finding a mirror that perfectly captures that ethereal glow, a **crescent moon mirror** that truly speaks to your aesthetic, can be a daunting task. The good news? You don’t have to break the bank or compromise on your vision. What if I told you that you could create a stunning, high-end looking **homemade moon mirror** yourself, using surprisingly simple and affordable materials?
My own quest for the ideal **DIY moon mirror** came to a delightful end when I stumbled upon an incredibly brilliant tutorial by COLLEEN CHAN on YouTube. Her ingenious approach immediately sparked my creativity, and I knew instantly that this was the **easy DIY mirror project** I had been waiting for. With a surge of inspiration, I made a quick trip to my local dollar store, gathering all the necessary supplies. The entire process was not only enjoyable but also incredibly rewarding. The finished mirror exceeded all my expectations – it’s so beautifully crafted that it’s nearly impossible to tell it’s a **handmade mirror**, a true testament to the power of **Dollar Store DIY**. This guide will walk you through every step, enabling you to bring your own celestial vision to life and add a touch of unique, **lunar mirror decor** to your home.
Why DIY Your Own Celestial Mirror?
Embracing a **DIY moon mirror project** offers a multitude of benefits beyond just saving money. Firstly, it provides an unparalleled opportunity for **personalization**. Unlike mass-produced items, your handmade mirror will be uniquely yours, reflecting your personal style and creativity. You get to choose the exact shades, textures, and finishes that complement your existing decor. Secondly, it’s incredibly **budget-friendly**. By utilizing materials readily available at craft stores or even dollar stores, you can achieve a sophisticated, high-end look without the hefty price tag often associated with specialized decor. This makes it an ideal **budget-friendly decor** solution. Lastly, there’s immense satisfaction in creating something beautiful with your own hands. The sense of accomplishment that comes from transforming simple supplies into a captivating piece of **unique wall decor** is truly priceless. It’s more than just a mirror; it’s a piece of art created by you.
Materials for Your DIY Moon Mirror
One of the best aspects of this project is the accessibility and affordability of the materials. You likely have some of these lying around, and the rest are easily found at your nearest craft or dollar store. Here’s what you’ll need to craft your stunning **air dry clay mirror**:
- Plain Round Mirror: This forms the base of your project. Choose a size that fits your intended space. A simple, frameless mirror works best for a seamless look, allowing the moon design to be the focal point.
- Air Dry Clay: The star of the show! Air dry clay is perfect for this project as it’s easy to work with, requires no baking, and hardens overnight. It allows you to sculpt intricate textures reminiscent of the moon’s surface, offering excellent workability.
- An Old Toothbrush: This isn’t for cleaning! It’s a fantastic, low-cost tool for creating the unique, cratered texture on your clay, mimicking the rugged and uneven surface of the moon authentically.
- White Acrylic Paint: Serves as a versatile base color and is essential for mixing to achieve various shades of grey, providing a realistic lunar look. It also helps in brightening colors if needed.
- Silver Acrylic Paint: Crucial for highlighting the craters and adding depth and dimension. This paint gives your moon a subtle, shimmering quality that catches the light beautifully, enhancing the illusion of moonlight.
- Black Acrylic Paint: Used sparingly for creating darker shades of grey and adding necessary contrast, which further enhances the visual realism and three-dimensionality of the moon’s surface.
- Paintbrush: A small to medium-sized brush will be ideal for applying paint precisely and blending colors effectively, especially when working on detailed areas and edges.
- A Round Object (Optional, for marking): Such as a plate, a lid, or even the bubble wrap from your mirror packaging. This helps you accurately mark out the initial crescent shape, ensuring symmetry and proper proportion.
Step-by-Step Guide: Crafting Your Crescent Moon Mirror
Follow these detailed instructions to transform your plain mirror into a celestial work of art. Take your time with each step, and enjoy the creative process of making your very own **homemade moon decor**!
Step 1: Precisely Marking the Crescent Shape
The foundation of your **crescent moon mirror** lies in accurately defining its shape. Begin by placing your plain round mirror on a flat, protected surface – consider laying down newspaper or a craft mat. Next, take a second round object – this could be a plate, a lid, or as ingeniously suggested by Colleen Chan, even the bubble wrap that often accompanies new mirrors. Position this guiding round object gently on top of your mirror. The key here is to create the distinctive crescent silhouette. To achieve this, carefully arrange the smaller round object so that its edge overlaps the mirror’s surface, leaving a significant, curved space at one side. This overlapping section will form the desired arc of your moon. As you visualize the shape, try to imagine how the moon would partially obscure the sun. Once you’re satisfied with the placement and the graceful curve of your crescent, use a small piece of air dry clay to lightly mark the outline along the edge of your guiding object. These subtle marks will serve as your essential guide for applying the clay in the next step, ensuring a perfectly proportioned lunar shape for your **celestial mirror decor**.
Step 2: Applying and Texturing the Air Dry Clay
With your crescent outline established, it’s time to bring the moon’s surface to life using **air dry clay**. Take a generous amount of clay and begin to apply it along the marked crescent shape directly onto your mirror. Spread the clay evenly using your fingers or the back of a small spoon to create a consistent thickness – aim for about 0.5 to 1 cm (0.2 to 0.4 inches) for a robust yet detailed surface. The end of an old toothbrush is your secret weapon here. Use it to gently spread and sculpt the clay, ensuring it adheres well to the mirror’s surface while meticulously following your marked guidelines. As you work, remember that the clay needs to remain somewhat moist and pliable for the next crucial step: creating the distinctive lunar craters.
While the clay is still wet and workable, use the bristles or the blunt end of the toothbrush, or even your fingertip, to create varied **crater textures**. Employ gentle circular motions, pressing down lightly in some areas and more firmly in others, to form depressions of random sizes and depths. Don’t aim for geometric perfection; the moon’s surface is irregular and uniquely beautiful, so embrace the randomness and organic nature of your design. Focus on creating a natural, authentic look, mimicking the rugged lunar landscape. Once you’ve achieved your desired texture, it’s critical to allow the clay to dry thoroughly. This process typically takes overnight, or even longer depending on humidity levels and the thickness of your clay. Ensure it’s in a well-ventilated area away from direct heat to prevent premature cracking. The clay must be completely hardened and dry before proceeding to the painting stage to ensure durability and a smooth finish.
Step 3: Painting and Adding Depth to Your Lunar Surface
Once your **air dry clay** is completely dry and hardened, it’s time to add color and realism to your **homemade moon mirror**. Begin by preparing your primary lunar base color. Mix a generous amount of white acrylic paint with a small touch of black acrylic paint. Start with a very small amount of black and gradually add more, stirring thoroughly, until you achieve a medium to dark grey shade that you envision for the moon’s surface. Remember, it’s always easier to darken paint than to lighten it. With your paintbrush, carefully apply this mixed grey paint all over the dried clay surface, ensuring complete and even coverage. Pay close attention to the edges where the clay meets the mirror; paint these areas neatly to create a seamless blend, making it appear as though the moon is naturally emerging from the mirror itself, rather than simply being attached.
Allow this base coat of grey paint to dry completely. This is a crucial step for preventing colors from muddling or blending unintentionally in the next phase. Once the grey layer is dry, it’s time to add the magical touch of depth and dimension. Take your silver acrylic paint. Using a small brush, a dry brush technique, or even just the tip of your finger, very lightly dab or brush the silver paint inside and around the raised edges of the craters you sculpted earlier. The goal is to subtly highlight these depressions, creating a gentle metallic sheen that catches the light and mimics the reflective quality of the moon’s surface. This technique adds incredible realism and transforms a simple clay texture into a dynamic, multi-dimensional lunar landscape. Finally, let the silver paint dry fully. Once everything is completely dry and set, your stunning **DIY crescent moon mirror** is ready to be admired and hung in its new celestial spot!
Tips for a Flawless DIY Moon Mirror
To ensure your **DIY moon mirror** project is as successful and enjoyable as possible, consider these helpful tips:
- Work in Sections: If you’re working with a large mirror or find the clay drying too quickly, apply and texture the clay in smaller, manageable sections. This gives you more control over the drying time and texturing process.
- Keep Clay Moist: Have a small bowl of water nearby to slightly dampen your fingers if the clay starts to become stiff or unworkable while shaping the craters. This helps maintain pliability.
- Ventilation is Key: Ensure your clay dries in a well-ventilated area away from direct sunlight or harsh drafts. This helps prevent moisture from getting trapped, ensures even drying, and can significantly reduce the risk of cracks forming.
- Patience with Drying: Resist the urge to rush the drying process for both the clay and the paint. Fully dried layers ensure maximum durability, better paint adhesion, and a professional, long-lasting finish.
- Test Paint Colors: Before applying paint directly to your mirror, test your grey mixture on a scrap piece of paper or extra clay. This allows you to adjust the black-to-white ratio until you achieve your desired lunar shade.
- Blend Edges Carefully: When painting the edges where the clay meets the mirror, use light, sweeping strokes to create a soft, natural transition rather than a stark, abrupt line. This enhances the high-end appearance.
- Clean Mirror Surface: Before applying clay, ensure the mirror surface is completely clean and free of dust or oils to ensure proper adhesion.
Customization Ideas for Your Celestial Mirror
While the classic grey and silver moon mirror is stunning, don’t hesitate to personalize your **celestial mirror** further. Here are a few ideas to spark your creativity and make your **lunar mirror decor** truly unique:
- Color Variations: Instead of traditional grey, consider subtle hints of blue, lavender, or even a deep indigo in your base paint for a more mystical, twilight, or alien moon effect. You could also experiment with gold or bronze paint for the craters instead of silver for a warmer, antique, or golden moon look.
- Embellishments: Once the mirror is completely dry, you could add small, self-adhesive stars, tiny glitter specks, or delicate crystals around the clay edge or even sparsely on the mirror itself for a twinkling galaxy effect. Be mindful not to overdo it, maintaining elegance.
- Different Mirror Shapes: While a round mirror is ideal for a classic moon look, you could adapt this technique to square, oval, or even abstractly shaped mirrors, creating a unique “moon rising” art piece, a partial lunar phase, or abstract celestial art.
- Gloss or Matte Finish: Apply a clear protective sealant (available in matte or gloss finishes) over the painted clay to protect it from dust, moisture, and wear, and to enhance its longevity. A matte finish will give a raw, natural moon surface, while a gloss finish will add a subtle sheen and vibrancy to the colors.
- Moon Phase Series: Create several smaller mirrors, each depicting a different phase of the moon (new, crescent, half, gibbous, full) for a dynamic wall display.
Caring for Your Handmade Moon Mirror
To ensure your beautiful **handmade moon mirror** remains a cherished piece of **unique wall decor** for years to come, a little care goes a long way. When cleaning the mirror surface, use a soft, lint-free cloth and a gentle, ammonia-free glass cleaner, carefully avoiding direct contact with the clay portion. For the clay itself, a soft, dry brush or a light dusting cloth is usually sufficient to remove any dust that might accumulate in the textures. Avoid harsh chemical cleaners, abrasive cloths, or excessive moisture on the clay, especially if it hasn’t been sealed, as this could potentially damage the paint layers or the clay structure over time. Always handle the mirror carefully when moving, cleaning, or hanging to prevent chipping or breaking the delicate clay elements you’ve meticulously crafted. With proper care, your **DIY crescent moon mirror** will continue to enchant for many years.
Conclusion: Your Very Own Piece of the Cosmos
Creating your own **DIY crescent moon mirror** is more than just a craft project; it’s an opportunity to infuse your living space with personalized beauty and a touch of cosmic wonder. From the moment I discovered COLLEEN CHAN’s inspiring tutorial, to the satisfying process of sculpting and painting, every step of making this **homemade moon decor** was a joy. The end result is a mirror that looks far more expensive than its actual cost, a testament to clever design and hands-on creativity. It effortlessly transforms any room, adding an elegant, mystical focal point that is truly captivating. Whether you’re an experienced DIY enthusiast or a beginner looking for a rewarding and impactful project, this detailed guide provides all you need to create a stunning piece of **celestial mirror decor** that will surely garner compliments.
Don’t hesitate to embark on this simple yet impactful **easy DIY mirror project**. Gather your supplies, unleash your inner artist, and prepare to be amazed by the beautiful **lunar mirror** you can create with your own hands. We encourage you to share your creations and inspire others to add a little piece of the cosmos to their homes, showcasing the incredible potential of **Dollar Store DIY** and air dry clay!