
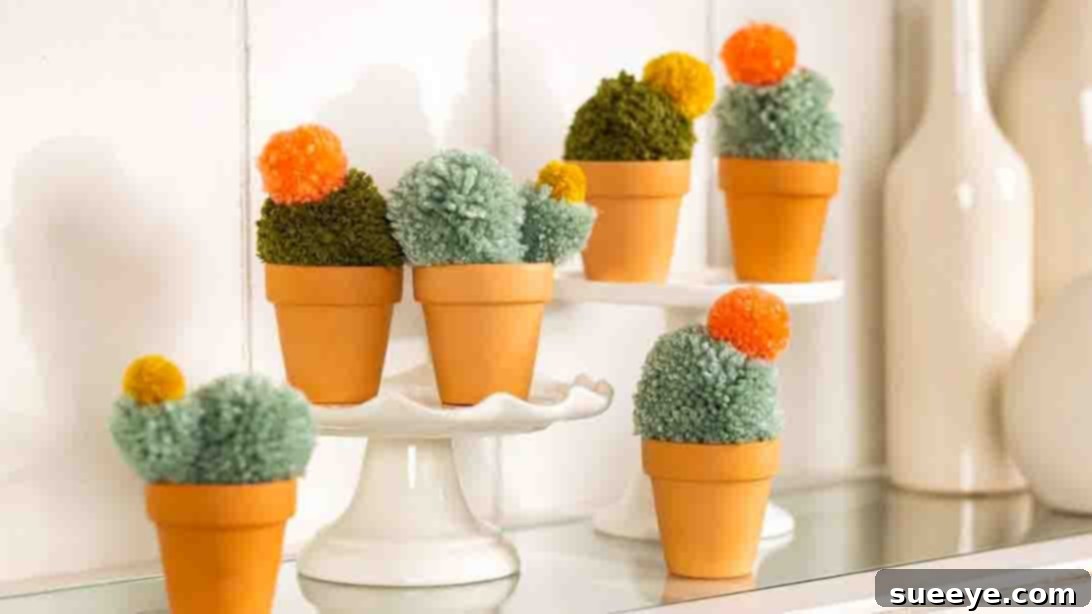
Craft Your Own Evergreen Oasis: The Easy DIY Pom-Pom Cactus Tutorial
Are you searching for a delightful weekend project that adds a unique touch to your living space? Look no further! This adorable DIY pom-pom cactus craft offers a charming way to infuse your home with vibrant, custom-colored “greenery” without the commitment of real plants. Perfect for anyone who loves creative expression or wants to brighten their decor with a maintenance-free botanical accent, this project is both simple and incredibly rewarding. Whether you have a green thumb or find it challenging to keep houseplants alive, these soft, fuzzy cacti are an ideal solution. Inspired by the fantastic tutorial from Chalk Couture on Youtube, we’ll guide you through each step to create your very own collection of charming desert-inspired decor. Gather your materials, invite some friends, and get ready to craft a fabulous accent that will surely bring a smile to your face!
Essential Materials for Your Pom-Pom Cactus Project:
Before diving into the fun, ensure you have all the necessary supplies readily available. Most of these items can be found at your local craft store or even around your home.
- Sharp Fabric Scissors: Using sharp scissors specifically designed for fabric will make cutting through multiple strands of yarn much easier and result in cleaner, fluffier pom-poms. Avoid using dull scissors, as they can fray the yarn and make the shaping process more challenging.
- 2 1/2″ Terracotta Pot: This classic pot size is perfect for miniature cacti, providing a rustic and authentic look. You can also experiment with different sizes or types of pots, such as ceramic, plastic, or even small decorative containers, to match your personal style. Remember to clean the pot thoroughly before use.
- Hot Glue Gun and Glue Sticks: A hot glue gun is essential for securely attaching your finished pom-poms to the pot and for joining multiple pom-poms together. Always exercise caution when using a hot glue gun to avoid burns. A low-temperature gun can be a safer option for beginners.
- Hair Comb: This seemingly simple tool is surprisingly effective for fluffing out your pom-poms and achieving that perfect, dense, and uniform texture. It helps to separate the yarn strands and reveal their full volume after trimming. Any standard comb with fine to medium teeth will work well.
- Two Skeins of Yarn (in Your Choice of Colors): The heart of your pom-pom cactus! Choose green shades for a traditional look, or get creative with vibrant pinks, blues, or yellows for a whimsical desert garden. Consider yarn weight and texture; a medium-weight acrylic yarn (like worsted weight) is generally easiest to work with for fluffy results. Having two skeins allows for variation, such as a main cactus body and a smaller “flower” or arm.
Optional Materials for Customization: To add even more character to your pom-pom cacti, consider incorporating small pebbles or decorative stones to cover the glue in the pot, felt scraps for crafting intricate flowers, or even acrylic paints to personalize your terracotta pots. These additions can elevate your craft from simple to truly stunning.
Step-by-Step Instructions: Crafting Your Pom-Pom Cactus
Now that you have all your materials, let’s embark on the fun journey of creating these adorable faux plants. Take your time with each step, and don’t be afraid to personalize your creation!
Step 1: Forming the Yarn Bundle for Your Pom-Pom Base
The foundation of every great pom-pom is a well-wrapped yarn bundle. This initial step requires a bit of patience and precision to ensure a full and shapely pom-pom.
- Prepare Your Tying String: Begin by cutting a 15-inch (approximately 38 cm) piece of yarn. This piece will be used to tie the center of your pom-pom, so choose a color that matches your main pom-pom yarn for a seamless look.
- Position the Tying String: Carefully slip this 15-inch yarn piece lengthwise between your middle finger and ring finger. Ensure an equal length of yarn hangs down on both sides of your fingers. Then, take the tail ends of this string and tuck them securely between your thumb and forefinger on the same hand. This holds the tying string in place while you wrap the main yarn.
- Begin Wrapping the Main Yarn: Take the main skein of yarn (the one you’ll use for the cactus body) and start wrapping it around your four fingers (index, middle, ring, and pinky). Wrap the yarn approximately 200 times for a large, dense pom-pom. The more times you wrap, the denser and fuller your pom-pom will be. For smaller pom-poms, such as those you might use for “cactus flowers” or arms, aim for around 50 wraps. Maintain a consistent, moderate tension as you wrap – not too loose, or the pom-pom will be flimsy; not too tight, or it will be hard to remove from your fingers.
- Secure the Bundle: Once you’ve completed your wrapping, cut the tail end of the main yarn. Now, carefully retrieve the ends of the 15-inch tying yarn that you initially tucked between your fingers. Bring these two ends together and tie a tight half-knot around the very middle of the yarn bundle you’ve created. Pull the knot as snugly as possible; this is crucial for the pom-pom’s structure and preventing it from falling apart.
Step 2: Shaping and Trimming Your Fuzzy Cactus Body
This is where your yarn bundle truly transforms into a fluffy pom-pom. The key to a perfect pom-pom lies in the cutting and trimming.
- Remove and Secure: Gently slide the yarn bundle off your fingers, being careful not to let it unravel. Immediately finish tying the loose ends of your 15-inch string into a very secure, double-tight full knot. This ensures the center of your pom-pom is firmly bound, preventing any strands from escaping. Leave these long tying strings intact for now, as they can be helpful for handling.
- Cut the Loops: Hold the bundle firmly by the center knot, with all the loops of yarn extending upwards and downwards. Take your sharp fabric scissors and carefully cut through all the loops on both sides of the bundle. You’ll see the distinct loops begin to open up and transform into individual yarn strands, instantly creating a fluffy, shaggy ball. Take your time to ensure all loops are cut.
- Initial Trim and Fluff: Now comes the fun part – shaping your cactus! Your goal is to trim the pom-pom into a dense, round, or slightly oval shape, resembling a cactus body. Start by trimming away any long, uneven strands. Don’t be afraid to be assertive with your scissors. As you trim, use your hair comb to fluff out the pom-pom. Comb through the yarn repeatedly to reveal more strands that need trimming, allowing you to achieve an even, uniform shape and maximum fullness. Think of it like giving your pom-pom a haircut – trim a little, fluff a little, then trim some more.
- Repeat for Variety: To create a more realistic cactus plant, you’ll want pom-poms of different sizes. Repeat Steps 1 and 2, adjusting the number of yarn wraps (e.g., 50 wraps for smaller pom-poms) to create smaller pom-poms that can serve as “arms,” “buds,” or “flowers” for your main cactus body. Ensure they are well-trimmed and fluffy.
Step 3: Assembling Your Desert Masterpiece
With your pom-poms crafted and trimmed to perfection, it’s time to bring your faux cactus to life by assembling it in its pot.
- Prepare the Pot: If desired, clean your terracotta pot or add a layer of decorative pebbles or faux soil at the bottom to give your cactus a realistic base. This can also help to elevate the pom-pom slightly if you want it to sit higher in the pot.
- Secure the Main Cactus Body: Take your largest, main pom-pom. Apply a generous amount of hot glue to the bottom center inside the terracotta pot. Quickly but carefully press the main pom-pom firmly into the glue, holding it in place for several seconds until the glue sets. You can use the long tying strings from Step 2 to help position and hold the pom-pom while the glue dries, then trim them off later if they are visible. At this stage, you can also perform any final trimming adjustments to the pom-pom for a perfect fit and shape.
- Add Secondary Pom-Poms or Flowers: To create the classic cactus shape with “arms” or “flowers,” take one of your smaller pom-poms. Using your fingers, gently create a small divot or indentation in the larger, main pom-pom where you want to attach the smaller piece. Apply a dab of hot glue into this divot, then quickly press the smaller pom-pom onto the glue, holding it firmly until it adheres. You can also use felt cutouts for more elaborate flowers. Repeat this process for any additional “arms” or decorative elements you wish to add.
- Final Touches and Display: Once all your pom-poms are securely glued, inspect your creation. Trim any stray yarn strands, and fluff out your pom-poms one last time with your hair comb for maximum impact. If you didn’t add pebbles earlier, consider doing so now to cover any visible glue around the base of the pom-pom in the pot, giving it a polished and professional finish.
Your DIY pom-pom cactus is now complete! It’s ready to add a touch of handcrafted charm and perpetual greenery to any corner of your home.
Why Choose DIY Pom-Pom Cacti? The Benefits of Faux Greenery
Beyond being a fun craft, creating your own pom-pom cacti offers a multitude of advantages that make them a fantastic addition to any home:
- Zero Maintenance: Forget watering schedules, sunlight requirements, or pest control. These “plants” require absolutely no care, making them perfect for busy individuals, frequent travelers, or those who simply lack a green thumb.
- Allergy-Friendly: For individuals with plant allergies or sensitivities, faux plants are a wonderful alternative, allowing them to enjoy the aesthetics of greenery without any allergic reactions.
- Endless Customization: The creative possibilities are limitless! You can choose any yarn color, texture, and size to perfectly match your existing decor or create a whimsical, colorful collection. Experiment with different pot styles, add felt flowers, or even small beads for unique accents.
- Safe for Pets and Children: Unlike some real cacti that can be sharp or toxic if ingested, pom-pom cacti are completely safe for homes with curious pets and small children. They offer all the visual appeal without any of the hazards.
- Therapeutic Crafting Experience: Engaging in DIY projects like this can be incredibly relaxing and therapeutic. The repetitive motion of wrapping yarn and the satisfaction of seeing your creation come to life can be a great stress reliever.
- Budget-Friendly Decor: Yarn and terracotta pots are relatively inexpensive, making this an affordable way to add charming decorative elements to your home compared to purchasing high-end real or artificial plants.
- Perfect Handmade Gifts: These adorable pom-pom cacti make thoughtful and personalized gifts for friends, family, or teachers. They’re unique, heartfelt, and sure to be cherished.
Creative Variations and Tips for Success
Once you’ve mastered the basic technique, feel free to explore different ways to customize your pom-pom cacti:
- Vary Yarn Textures: Use chunky yarn for a more robust cactus, or fluffy, specialty yarns for a softer look. Mixing different shades of green can also add depth.
- Painted Pots: Don’t limit yourself to plain terracotta! Paint your pots with acrylic paints to match your room’s color scheme, or try abstract designs, stripes, or polka dots.
- Felt Flowers and Spines: Cut small flower shapes from felt and glue them onto your pom-pom cacti for a burst of color. You can also carefully glue small pieces of white felt or yarn as “spines” for added realism.
- “Soil” Options: Instead of leaving the glue exposed, cover the base of your pom-pom with decorative pebbles, small river stones, artificial moss, or even brown crinkled paper to mimic soil.
- Miniature Gardens: Create a collection of various-sized pom-pom cacti and arrange them together in a larger tray or planter for a charming indoor “desert garden.”
- Practice Makes Perfect: Don’t get discouraged if your first pom-pom isn’t perfectly round. With a little practice, your trimming skills will improve, and you’ll achieve perfectly shaped cacti.
- Use Sharp Scissors: This cannot be stressed enough. Sharp scissors make a significant difference in achieving clean cuts and fluffy pom-poms.
- Don’t Be Afraid to Trim: It might feel counterintuitive to cut so much yarn, but aggressive trimming is key to a dense, round, and professional-looking pom-pom. Keep trimming and fluffing until you’re happy with the shape.
Conclusion: Your New Favorite DIY Decor
Crafting these easy DIY pom-pom cacti is a wonderfully satisfying project that blends creativity with practical home decor. In just a few simple steps, you can transform skeins of yarn into charming, maintenance-free accents that bring a touch of playful nature into any room. They’re a fantastic alternative to real plants, offering endless customization possibilities and a therapeutic crafting experience. Whether you’re looking for a fun activity to do with friends, a unique handmade gift, or simply a way to add some cheer to your home, these adorable pom-pom cacti are an absolute delight.
So, why wait? Grab your yarn, fire up your glue gun, and start creating your own fuzzy desert oasis today. Share your creations and inspire others with your vibrant, no-fuss greenery!