
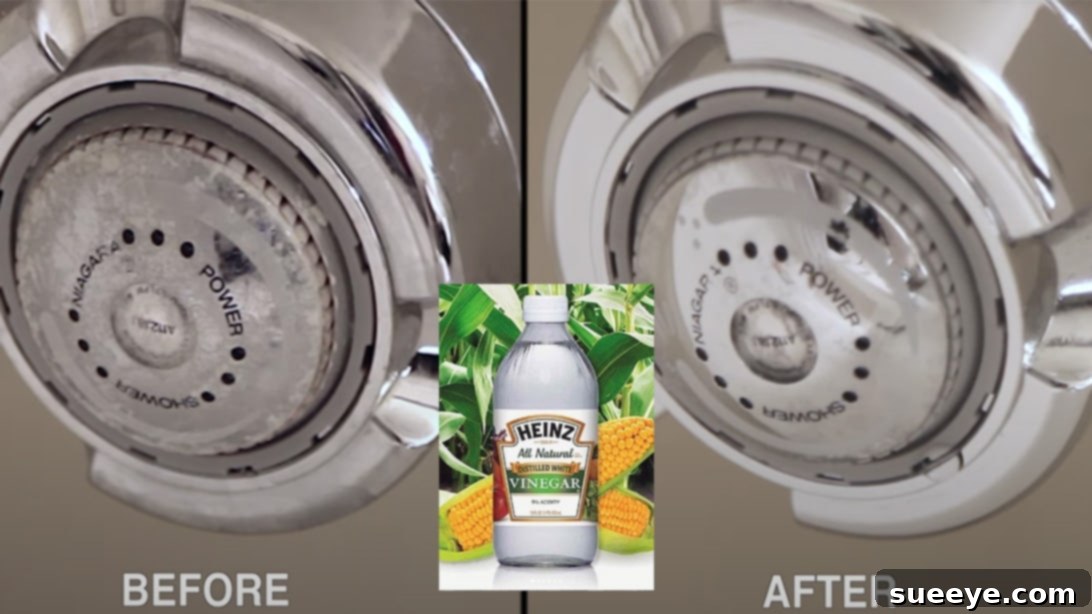
Effortlessly Clean Your Shower Head with Vinegar: A Complete DIY Guide
There’s nothing quite as unpleasant as stepping into the shower, anticipating a refreshing stream of water, only to be met with a weak, sputtering spray from a visibly grimy shower head. Just imagine: unsightly mineral deposits, lurking mold, and accumulated dirt, all mixing with the water that’s supposed to cleanse you. It’s a rather unsettling thought, isn’t it? While the market is flooded with various chemical cleaning agents specifically designed for shower heads, many of us seek a simpler, more natural, and equally effective solution using items readily available in our own homes.
Indeed, you don’t need harsh chemicals or expensive specialized cleaners to achieve a sparkling clean shower head. The secret weapon often lies hidden in your kitchen cabinet: distilled white vinegar. This versatile household staple is not only incredibly effective at dissolving mineral buildup and killing germs, but it’s also environmentally friendly and budget-conscious. If you’ve ever wondered how to reclaim a pristine shower experience without much effort, you’re in the right place. Inspired by practical home hacks, such as those shared by eHow on YouTube, we’re here to provide a detailed, step-by-step guide to cleaning your dirty shower head quickly, effectively, and with minimal fuss, using the power of vinegar.
Why Your Shower Head Gets Dirty (And Why It Matters)
Before diving into the cleaning process, it’s helpful to understand what causes your shower head to become grimy in the first place. The main culprits are:
- Hard Water Minerals: Most homes have hard water, which contains high levels of dissolved minerals like calcium and magnesium. When water evaporates, these minerals are left behind, forming stubborn white or off-white deposits known as limescale. This buildup can clog the nozzles, reduce water pressure, and make your shower head look unsightly.
- Soap Scum: A combination of hard water minerals and soap residue creates soap scum, a sticky film that can accumulate on surfaces, including your shower head.
- Mold and Mildew: The warm, moist environment of a bathroom is an ideal breeding ground for mold and mildew. These fungi can grow on and inside your shower head, appearing as black, pink, or green stains, and can even release spores into the air, potentially affecting air quality.
- Bacteria and Biofilm: Over time, a biofilm—a sticky layer of microorganisms—can develop inside the shower head, hosting various bacteria. While most are harmless, some can be a concern, making regular cleaning crucial for hygiene.
Ignoring these issues doesn’t just impact the aesthetics of your bathroom; it can significantly reduce water pressure, make your showers less enjoyable, and potentially harbor unhealthy microbes. A clean shower head ensures a powerful, consistent spray and contributes to a healthier, more hygienic bathroom environment.
Materials for Your DIY Shower Head Cleaning
Gathering your supplies is the first simple step. You likely already have most, if not all, of these items on hand.
- Distilled White Vinegar: This is the star of our cleaning hack. Its acetic acid content is highly effective at dissolving mineral deposits and acting as a natural disinfectant.
- A Mug or Small Bowl: Used to hold the Ziploc bag upright and steady while you pour the vinegar.
- A Ziploc Bag (or any sturdy plastic bag): A gallon-sized bag works best for most shower heads, providing enough space for soaking. Ensure it’s leak-proof.
- A Rubber Band (or twist tie): Essential for securing the bag tightly around your shower head, preventing spills and ensuring full immersion.
- An Old Toothbrush (or a small scrub brush): Perfect for dislodging any stubborn grime or residue after the soaking process.
- Paper Towels or a Clean Cloth: For wiping down and polishing the shower head after cleaning.
Step-by-Step Instructions for a Sparkling Shower Head
Follow these easy steps to transform your grimy shower head into a clean, efficient one.
Step 1: Prepare Your Vinegar Solution
Start by preparing your soaking solution. Place the Ziploc bag inside a mug or a small bowl; this will help keep the bag open and stable while you pour. Carefully fill the bag with distilled white vinegar, ensuring it’s about halfway full or enough to completely submerge the shower head’s nozzles. For heavily soiled shower heads, you can use full-strength vinegar. If you prefer, or if your shower head has a delicate finish (though vinegar is generally safe for most common finishes like chrome, stainless steel, and plastic), you can dilute the vinegar with an equal part of water.
Step 2: Secure the Bag Around Your Shower Head
Now, carefully take the bag filled with vinegar and position it over your shower head. The goal is to fully immerse the nozzles and any grimy areas within the vinegar solution. Once the shower head is submerged, gently pull the opening of the bag upwards and tightly secure it around the neck or base of the shower arm using a strong rubber band. Ensure the bag is snug and there are no gaps from which the vinegar could leak. Double-check that all the clogged holes and affected areas are completely immersed in the vinegar.
Step 3: Allow It to Soak
Once the bag is securely fastened, it’s time to let the vinegar work its magic. The soaking time will depend on the severity of the grime and mineral buildup. For a moderately dirty shower head, allow it to soak for at least 30 minutes to an hour. If you’re dealing with extensive limescale, mold, or a shower head that hasn’t been cleaned in a long time, consider leaving the bag on for several hours, or even overnight. The longer it soaks, the more effectively the vinegar will dissolve the hardened deposits. During this time, you can go about your other tasks or simply relax.
Step 4: Scrub and Rinse Away the Residue
After the designated soaking time, carefully remove the rubber band and the bag of vinegar from the shower head. You should immediately notice an improvement, with many of the mineral deposits already dissolved or loosened. Now, take your old toothbrush and gently but firmly scrub the nozzles and the entire surface of the shower head. Pay close attention to any remaining stubborn grime, particularly inside the tiny holes where water emerges. The bristles of the toothbrush are perfect for getting into these crevices and dislodging any leftover debris. You may see small pieces of limescale flaking off, which is a sign the vinegar has done its job.
Step 5: Flush and Final Wipe Down
Once you’ve thoroughly scrubbed, turn on your shower to its hottest setting and let the water run for a few minutes. This is crucial for flushing out any loosened mineral fragments, mold spores, and residual vinegar from inside the shower head. You might observe some initial sputtering or discolored water, which is normal as the debris clears. Continue running the water until it flows cleanly and smoothly. Finally, take a clean paper towel or a soft cloth and wipe down the exterior of the shower head to remove any remaining water spots, giving it a sparkling finish. This ensures it’s completely clean and ready for use.
Enjoy Your Restored Shower Experience!
And there you have it! Following this incredibly simple yet effective procedure, you can confidently step into your shower knowing your shower head is pristinely clean, free from dirt, grime, and unhealthy buildup. You’ll immediately notice the difference: improved water pressure, a more consistent spray, and a much more hygienic showering experience. No more worries about showering with dirty water or feeling embarrassed when guests use your bathroom.
Tips for Maintaining a Clean Shower Head
To keep your shower head in top condition and prevent heavy buildup from returning, consider these preventative measures:
- Regular Maintenance: Aim to clean your shower head with vinegar at least once a month, or more frequently if you live in an area with very hard water. Regular, shorter soaks are much easier than tackling years of grime.
- Quick Wipe-Downs: After each shower, a quick wipe of the shower head with a dry cloth can help prevent water spots and mineral deposits from forming.
- Keep the Bathroom Ventilated: Good ventilation reduces humidity, which in turn inhibits the growth of mold and mildew. Use an exhaust fan during and after showers, or open a window.
- Consider a Water Softener: If hard water is a persistent issue in your home, investing in a whole-house water softener can significantly reduce mineral buildup not just in your shower head, but throughout your plumbing system and on other fixtures.
- Shower Head Filters: Some shower heads come with built-in filters that can trap sediments and reduce chlorine. While not a substitute for cleaning, they can help extend the time between deep cleans.
The Eco-Friendly Power of Vinegar
Beyond its effectiveness, choosing vinegar as your primary cleaning agent offers several benefits:
- Non-Toxic: Unlike many commercial cleaners that contain harsh chemicals, vinegar is a natural and non-toxic substance. This makes it safer for your family, pets, and the environment.
- Cost-Effective: White distilled vinegar is incredibly inexpensive and available at almost any grocery store, making it a budget-friendly alternative to specialized cleaners.
- Versatile: Vinegar isn’t just for shower heads! It can be used for cleaning windows, countertops, descaling coffee makers, and much more, making it a powerful all-purpose cleaner for your home.
You’ll be amazed at the transformation and how a little vinegar can make such a significant difference. Don’t keep this amazing hack to yourself! Share it with your friends and family, and encourage them to try it. Discovering what they thought of the results can be a fun conversation starter. This simple, effective cleaning method truly never fails to impress!