
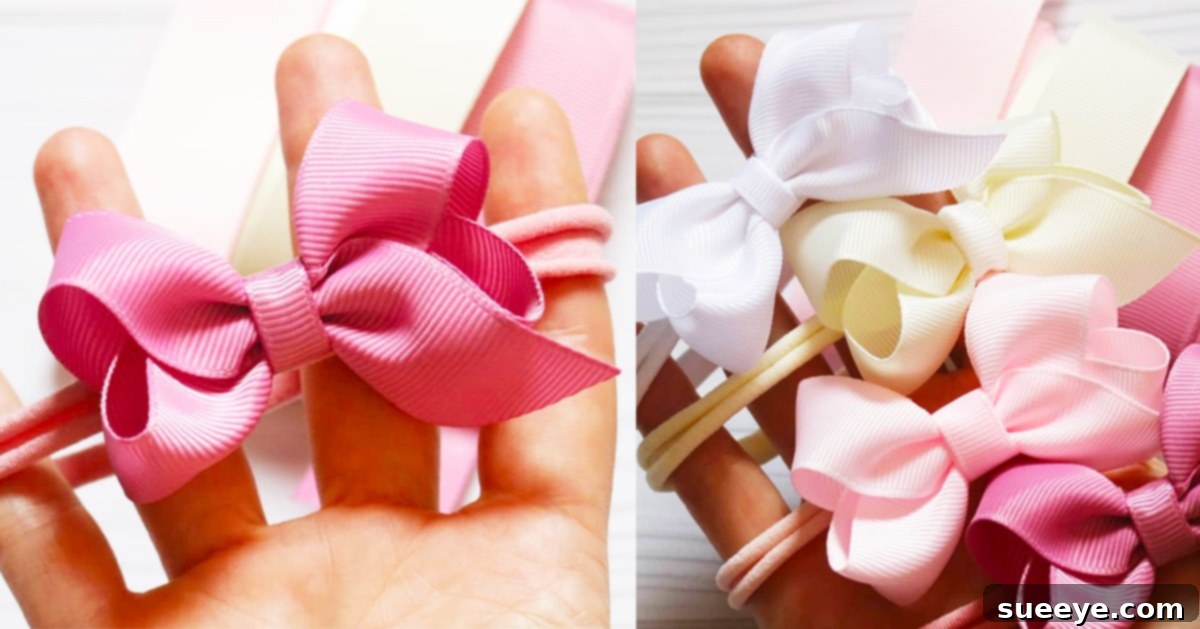
Master the Art of DIY Ribbon Bows: A Comprehensive Guide for Stunning Creations
Ribbon bows, with their timeless charm and versatile appeal, are far more than just simple embellishments. They are expressions of creativity, adding a touch of elegance, playfulness, or sophistication to countless items. While crafting a perfect bow might seem daunting at first glance, especially when aiming for that crisp, symmetrical look, it’s a skill that is surprisingly accessible and incredibly rewarding to master. This comprehensive guide, inspired by excellent tutorials like Svetlana Zolotareva’s detailed demonstration on YouTube, will walk you through the process, transforming you into a proficient bow maker in no time.
From a young age, the allure of bows captivated many, often starting with the desire to adorn hair with a personalized touch. The satisfaction of matching a vibrant bow to an outfit, or creating a unique accessory that truly reflects one’s style, is immense. But the utility of a well-made ribbon bow extends far beyond hair accessories. Imagine custom-made bows gracing baby headbands, adding flair to clothing, embellishing gift packages, enhancing home decor, or even becoming a focal point in various craft projects. The possibilities are truly endless, limited only by your imagination and the vast array of ribbons available.
Learning how to craft these delightful creations empowers you to personalize gifts, elevate everyday items, and even venture into selling your handmade goods. It’s a therapeutic and enjoyable craft that yields beautiful results, allowing you to infuse your personality into every piece. This guide aims to demystify the process, ensuring that even beginners can follow along with ease, building confidence with each loop and fold. Let’s gather our materials and embark on this creative journey together, turning simple ribbons into stunning works of art.
Why Craft Your Own Ribbon Bows? The Benefits of DIY
Before diving into the mechanics of bow making, it’s worth considering the numerous advantages of creating your own ribbon bows:
- Unleash Creativity & Personalization: Store-bought bows often lack the unique touch you desire. DIY bows allow for endless customization in terms of color, pattern, size, material, and embellishments, ensuring your creation perfectly matches your vision or outfit.
- Cost-Effective Crafting: Buying pre-made bows, especially high-quality ones, can quickly add up. Crafting your own is generally much more economical, allowing you to produce multiple bows for the price of one or two store-bought alternatives.
- Therapeutic and Relaxing Hobby: The repetitive motions of cutting, folding, and sewing can be incredibly meditative and stress-reducing. It’s a wonderful way to unwind and engage in a productive, creative activity.
- Versatile Applications: Once you master the basic technique, you’ll find that ribbon bows can enhance almost anything. From fashion accessories to home decor and gift wrapping, the applications are boundless.
- Skill Development: Learning to make bows hones fine motor skills, teaches basic sewing techniques, and encourages precision and attention to detail – valuable skills applicable to many other crafts.
- Sustainable Option: By choosing to craft your own, you can thoughtfully select materials, potentially reusing ribbons or opting for eco-friendly options, contributing to a more sustainable lifestyle.
Choosing the Right Ribbons: The Foundation of a Beautiful Bow
The type of ribbon you choose significantly impacts the final look and feel of your bow. Consider these factors when making your selection:
- Material Matters:
- Grosgrain Ribbon: Often preferred for hair bows due to its sturdy, ribbed texture that holds its shape well. It’s durable and comes in a vast array of colors and patterns.
- Satin Ribbon: Offers a luxurious, smooth, and shiny finish. It drapes beautifully and is excellent for elegant bows on gifts, clothing, or delicate accessories. It can be a bit more slippery to work with.
- Organza/Sheer Ribbon: Creates light, airy, and ethereal bows, perfect for weddings, baby showers, or delicate embellishments.
- Velvet Ribbon: Adds a rich, opulent texture, ideal for sophisticated bows during holidays or for statement pieces.
- Wired Ribbon: Features a thin wire along its edges, making it incredibly easy to shape and hold voluminous loops. Great for wreaths and larger decorative bows.
- Width and Length: The desired size of your bow dictates the ribbon’s width and length. Wider ribbons create larger, fuller bows, while narrower ribbons are suitable for smaller, delicate accents. Always err on the side of cutting a bit more length than you think you’ll need; it’s easier to trim excess than to add more.
- Color and Pattern: Let your creativity shine! Choose colors that complement your project or outfit. Patterns can add personality – from polka dots and stripes to floral designs and novelty prints.
Materials: Gather Your Crafting Essentials
Having all your tools ready before you begin will make the bow-making process smooth and enjoyable. Here’s a detailed look at the essentials:
- Hot Glue Gun: Indispensable for securing various elements quickly and firmly. Opt for a dual-temperature gun for versatility; low temp for delicate materials, high temp for stronger bonds. Always use caution to avoid burns.
- Ribbons: As discussed above, select your desired type, width, and length. Having a variety on hand allows for experimentation.
- Needle and Thread: A sharp sewing needle and strong, coordinating thread (polyester all-purpose thread works well) are crucial for gathering and securing the bow’s center, ensuring durability beyond glue alone.
- Hair Tie or Hair Clip: Depending on the bow’s intended use, have your chosen attachment ready – be it an elastic hair tie, an alligator clip, a French barrette, or a headband.
- Sharp Scissors: Dedicated fabric scissors will give you clean, crisp cuts, preventing frayed edges and ensuring professional-looking results. Avoid using them on paper.
- Lighter: Used for heat-sealing the raw edges of most synthetic ribbons to prevent fraying. Handle with extreme care and away from flammable materials.
- Fabric Pins: Essential for holding ribbon loops in place while you form the bow and prepare for sewing, ensuring symmetry and precision.
- Optional but Recommended:
- Measuring Tape or Ruler: For precise ribbon cutting and loop sizing.
- Fray Check or Clear Nail Polish: An alternative to a lighter for sealing ribbon ends, especially for delicate fabrics or if you prefer not to use heat.
- Non-Stick Mat: Protects your work surface from hot glue.
Step-by-Step Guide: Crafting Your Perfect Ribbon Bow
Now that you have your materials, let’s dive into the exciting part – creating your beautiful ribbon bow. We’ll break down the process into easy-to-follow steps, guiding you towards a stunning finished product. For a visual companion, remember to refer to Svetlana Zolotareva’s excellent tutorial on YouTube, which offers clear demonstrations of the folding and shaping techniques.
Step 1: Preparation – Cutting and Sealing Your Ribbon
First, unroll your chosen ribbon and determine the desired length. The length will depend on the size of the bow you wish to create; larger bows naturally require more ribbon. A good starting point for a medium-sized bow might be 18-24 inches (45-60 cm), but adjust as needed. Use your sharp scissors to make a clean, straight cut. Immediately after cutting, it’s crucial to seal the raw ends to prevent fraying, which is especially common with grosgrain and satin ribbons. Gently and quickly pass the cut edges through the flame of a lighter. The heat will melt the synthetic fibers slightly, creating a sealed edge. Be swift to avoid burning or discoloring the ribbon. If you prefer not to use a lighter, a small dab of Fray Check or clear nail polish can also effectively seal the ends, though it requires drying time.
Step 2: Forming the Bow Loops – The Art of Folding and Pinning
This is where the magic happens, and closely watching a visual guide like Svetlana Zolotareva’s tutorial becomes invaluable. The core trick to a simple ribbon bow lies in precise folding and securing the loops. Begin by folding one end of the ribbon towards the center, creating the first loop. Adjust its size to your preference, ensuring it’s symmetrical. Once satisfied, use a fabric pin to secure this fold in place. Repeat this process on the opposite side, bringing the other end of the ribbon towards the center to form a second, equally sized loop. Overlap the ribbon ends in the center, creating an ‘X’ shape or a multi-looped structure. The goal is to achieve a pleasing, balanced shape with two main loops (or more, depending on your desired complexity) and two tails. Use several pins to firmly hold all the layers and folds in the desired bow shape. Precision in this step ensures a symmetrical and professional-looking bow.
Step 3: Securing the Center with Needle and Thread
Once your bow is perfectly shaped and securely pinned, it’s time to reinforce it with a needle and thread. While hot glue is great for attaching embellishments and accessories, a few stitches through the center of the bow provide superior durability and shape retention. Thread your needle with a strong, matching thread. Starting from the back of the bow, pass the needle through all layers of ribbon at the exact center. You can use a simple running stitch or a gathering stitch. Stitch back and forth a few times, pulling the thread taut to cinch the center of the bow, creating a nice, gathered effect. Wrap the thread tightly around the cinched center several times before tying it off with a secure knot at the back. This gathering creates the classic bow shape and ensures all layers stay together, even with vigorous use.
Step 4: Creating the Center Wrap
To give your bow a polished and finished look, you’ll want to cover the thread-wrapped center. Cut a small piece of ribbon, typically about 1/2 to 1 inch wide and a few inches long, in a color that matches or contrasts attractively with your main bow. Apply a small dot of hot glue to the back center of the bow and attach one end of this small ribbon piece. Carefully wrap the ribbon piece tightly around the gathered center of your bow, ensuring it covers all the stitches and raw edges. Overlap the ends slightly at the back, trim any excess, and secure the final end with another small dot of hot glue. This creates a clean, professional finish.
Step 5: Attaching Your Accessory and Finishing Touches
The final step is to attach your chosen backing. If you’re making a hair bow, apply a generous amount of hot glue to the back of the bow, making sure it adheres to both the main bow structure and the center wrap. Press your hair tie, alligator clip, or barrette firmly onto the glue. Hold it in place for a few moments to allow the glue to set and create a strong bond. Ensure the clip or tie is oriented correctly for how it will be worn. For other craft projects, this is the point where you might glue the bow directly onto a gift box, a headband, or a piece of clothing.
Once the glue has dried, take a moment to fluff and shape your bow. Trim the tails to your desired length and style; a diagonal cut or a V-cut adds a professional touch. Re-seal any newly cut ends with a lighter or Fray Check. Inspect your bow for any loose threads or excess glue, cleaning them up for a pristine finish. Your beautiful, handmade ribbon bow is now complete!
Beyond the Basics: Exploring Advanced Techniques and Variations
Once you’ve mastered the fundamental technique of creating a simple ribbon bow, a whole world of possibilities opens up. Don’t be afraid to experiment and elevate your bow-making skills:
- Layered Bows: Combine different widths, colors, or textures of ribbon to create multi-layered bows for added depth and visual interest. For instance, a wider grosgrain base with a narrower satin ribbon layered on top.
- Stacked Bows: Make several bows of varying sizes and stack them on top of each other, securing them through the center. This creates a very full and luxurious look.
- Embellishments: Add rhinestones, pearls, buttons, charms, or small fabric flowers to the center of your bow for extra sparkle and personality.
- Different Tail Styles: Experiment with fishtail cuts, swallowtail cuts, or longer, flowing tails for varied aesthetics.
- Loopy Bows: Instead of just two loops, create bows with four, six, or even more loops for increased volume and dimension. This usually involves more ribbon and careful pinning.
- Ribbon Roses: While not a traditional “bow,” learning to fashion ribbon roses can complement your bow creations beautifully.
Creative Applications: Where Can Your Handmade Bows Go?
The versatility of DIY ribbon bows means they can enhance almost any project or occasion. Here are just a few ideas to spark your imagination:
- Hair Accessories: The most popular use! Create barrettes, headbands, hair ties, or even clip-on bows for ponytails.
- Gift Wrapping: Elevate any gift with a custom-made bow that perfectly matches the paper or the recipient’s personality.
- Home Decor: Adorn wreaths, garlands, curtains, throw pillows, or even picture frames with elegant bows. Seasonal bows can instantly transform a space.
- Clothing & Accessories: Attach bows to dresses, blouses, hats, bags, or shoes for a personalized fashion statement.
- Baby & Children’s Items: Perfect for baby headbands, embellishing onesies, decorating nursery items, or as sweet accents on baby shower gifts.
- Pet Accessories: Make adorable bows for pet collars or grooming accessories.
- Wedding & Party Favors: Custom bows can add a refined touch to wedding invitations, party decor, or small guest favors.
- Scrapbooking & Card Making: Miniature bows add a delightful three-dimensional element to paper crafts.
Troubleshooting Common Ribbon Bow Challenges
Even seasoned crafters encounter hiccups. Here are some common issues and how to address them:
- Fraying Edges: Ensure you are always sealing your ribbon ends immediately after cutting, especially for synthetic ribbons. If fraying occurs after the fact, a small dab of Fray Check can often save it.
- Uneven Loops: This is often a matter of careful measuring and pinning. Take your time in Step 2, using a ruler if necessary, and use plenty of pins to hold the loops precisely before stitching.
- Bow Lacks Volume/Shape: If your bow looks flat, try using a stiffer ribbon (like grosgrain or wired ribbon). For fabric bows, a light spray starch can help them hold their shape. Ensure you gather the center tightly enough during the sewing stage.
- Glue Showing: Use hot glue sparingly. Apply small dots to secure components, and always cover the main glue points with the center wrap or another embellishment for a clean finish.
- Bow Falling Apart: Relying solely on hot glue for the main structure of the bow can lead to it unraveling. The needle and thread step is critical for a durable bow that withstands wear and tear.
Your Creative Journey Begins Here!
Learning how to make a simple ribbon bow is a truly rewarding endeavor that opens up a world of creative possibilities. What might start as a quest for the perfect hair accessory can quickly evolve into a passion for crafting personalized embellishments for every aspect of your life. The satisfaction of transforming a simple length of ribbon into a beautiful, structured bow with your own hands is immense.
Whether you’re creating bows for your daughter’s cheerleading squad, adding a bespoke touch to a special gift, or simply indulging in a relaxing craft, the techniques you’ve learned here provide a solid foundation. Don’t be afraid to experiment with different ribbon types, colors, and styles. Each bow you make is a testament to your growing skill and unique artistic vision. So, gather your materials, watch that helpful tutorial by Svetlana Zolotareva again if needed, and let your imagination soar. Happy crafting!