
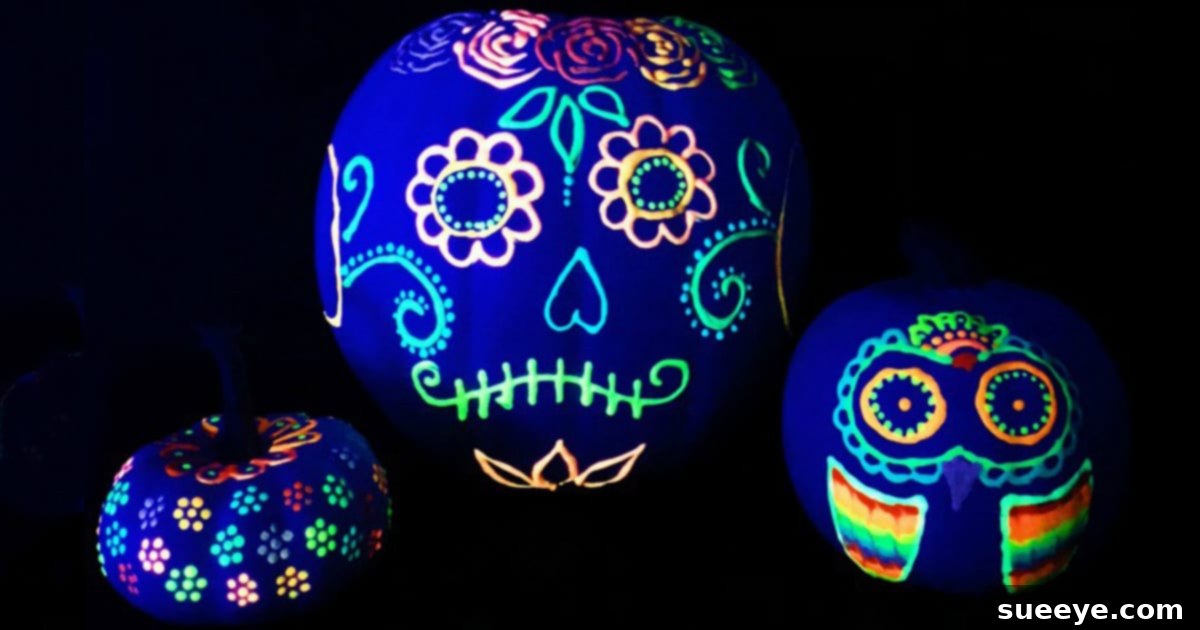
Illuminate Your Halloween: The Ultimate Guide to Glow-in-the-Dark Pumpkins
As the crisp autumn air settles and leaves begin to change, the excitement for Halloween truly begins. Among the many cherished traditions, pumpkin decorating stands out as a quintessential part of the season. However, traditional carving often leads to messy clean-up and rapid decay, limiting the lifespan of your festive creations. What if there was a way to capture the spooky spirit, unleash your creativity, and enjoy your pumpkin masterpieces for weeks, not just days? Enter the enchanting world of glow-in-the-dark pumpkin painting!
This innovative approach offers a fantastic alternative to carving, allowing you to adorn your pumpkins with captivating designs that radiate an ethereal glow after dusk. Imagine your porch, garden, or indoor display coming alive with luminous patterns once the sun sets, creating an unforgettable spectacle for trick-or-treaters and guests alike. This comprehensive guide will walk you through everything you need to know to create your own mesmerizing glow-in-the-dark pumpkins, from selecting the right materials to perfecting your artistic vision.
Why Choose Glow-in-the-Dark Pumpkins?
The allure of glow-in-the-dark pumpkins extends far beyond their luminous charm. This decorating method offers a multitude of benefits, making it an increasingly popular choice for Halloween enthusiasts:
- Longevity Without Rot: Unlike carved pumpkins that quickly succumb to decay, painted pumpkins can last for weeks, even months, giving you ample time to enjoy your festive decor throughout the entire autumn season.
- Mess-Free Fun: Say goodbye to sticky pumpkin guts and sharp tools. Painting is a cleaner and safer activity, particularly when involving children.
- Kid-Friendly Activity: With no sharp knives required, glow-in-the-dark pumpkin painting is an ideal project for families. Kids can safely express their creativity, making it a wonderful bonding experience.
- Day and Night Appeal: Your designs will look fantastic during the day, showcasing vibrant colors and intricate patterns. But the real magic happens at night when they transform into glowing beacons of Halloween spirit.
- Unleash Creativity: The possibilities are endless! From spooky ghosts and creepy crawlies to elegant sugar skulls and abstract swirls, glow paint allows for incredible artistic freedom.
- Unique Aesthetic: Stand out from the crowd with pumpkins that literally glow with personality. They offer a unique visual element that traditional carved pumpkins simply can’t match.
Essential Materials for Your Glowing Creations
Before you dive into painting, gathering the right supplies is crucial. Here’s a checklist of what you’ll need to transform ordinary pumpkins into extraordinary glowing works of art:
- Pumpkins: Select pumpkins of various sizes and shapes. Look for smooth, clean surfaces, as these are easier to paint. White or lighter-colored pumpkins can make glow paint appear even brighter.
- Glow-in-the-Dark Paint: This is the star of the show! High-quality acrylic glow-in-the-dark paint is readily available at craft stores. Consider different colors if you want varied glowing effects. Brands like Tulip often offer excellent options for craft projects.
- Paintbrushes: A variety of sizes will be beneficial. You’ll want larger brushes for base coats and broad strokes, and smaller, finer brushes for detailed work and intricate designs.
- Pencils: For sketching out your designs directly onto the pumpkin before painting.
- Cleaning Supplies: Rags or paper towels for wiping brushes and cleaning up any spills.
- Drop Cloth or Newspaper: To protect your work surface from paint splatters.
- Optional Materials:
- White Base Coat Paint: Applying a white or light-colored primer before the glow paint can significantly enhance its luminosity.
- Stencils: If you prefer guided designs or want to achieve precise shapes and lettering.
- Sponges: For creating textured effects or applying paint evenly over large areas.
- Clear Sealer/Varnish: A sealant protects your painted designs from the elements, ensuring they last longer, especially if displayed outdoors.
- Non-Glow Acrylic Paints: For adding details and vibrant colors that are visible during the day, complementing the glow-in-the-dark elements.
- Glitter or Embellishments: For extra sparkle and daytime appeal.
Step-by-Step Guide: How to Paint Glow-in-the-Dark Pumpkins
Ready to get started? Follow these simple steps to bring your glowing pumpkin visions to life:
Step 1: Prepare Your Pumpkins
Begin by thoroughly cleaning your pumpkins. Wipe away any dirt, dust, or debris with a damp cloth. Ensure they are completely dry before you start painting, as moisture can prevent the paint from adhering properly. A clean, dry surface is key to a smooth finish.
Step 2: Plan Your Design
This is where your imagination comes into play! Decide on your theme and design. You can freehand draw directly onto the pumpkin with a pencil, use stencils for intricate patterns, or find inspiration from online galleries. Popular ideas include spooky faces, spiderwebs, bats, stars, abstract swirls, or the beautifully ornate sugar skull designs, which are perfect for a Day of the Dead celebration theme.
Step 3: Apply a Base Coat (Optional but Recommended)
For maximum glow, apply one or two coats of white or a very light-colored acrylic paint as a base. This primer layer creates a neutral canvas that allows the glow-in-the-dark paint to shine more brightly, as glow paints are often somewhat translucent. Let each coat dry completely before proceeding.
Step 4: Apply the Glow-in-the-Dark Paint
Now for the magic! Using your chosen paintbrushes, carefully apply the glow-in-the-dark paint according to your design. Remember these crucial tips:
- Layering is Key: Glow-in-the-dark paint often requires multiple thin layers to achieve an intense glow. Apply one layer, let it dry completely (this can take 20-30 minutes), and then add subsequent layers. Three to four coats are usually sufficient for a vibrant glow.
- Even Application: Try to apply the paint as evenly as possible for a consistent glow.
- Patience is a Virtue: Rushing the drying process between coats can lead to smudging or peeling.
Step 5: Add Details and Daytime Colors (Optional)
Once your glow-in-the-dark paint is dry, you can add non-glowing acrylic paints to enhance your design for daytime viewing. This is great for adding vibrant colors, outlines, or additional decorative elements that complement the glowing areas. Consider adding glitter or other embellishments for extra flair.
Step 6: Seal Your Creation (Recommended for Durability)
If your pumpkins will be displayed outdoors or if you want them to last even longer, apply a clear acrylic sealant or varnish once all the paint layers are completely dry. A sealant will protect your artwork from moisture, dirt, and wear, preserving its beauty for the entire season. Choose a matte, satin, or glossy finish based on your preference.
Step 7: Charge and Display!
The final, most exciting step! For your pumpkins to glow, they need to be “charged” by light. Expose them to a bright light source for at least 15-30 minutes. This can be direct sunlight, a bright incandescent bulb, or even a UV blacklight for an extra powerful and rapid charge. Once charged, turn off the lights and watch your pumpkins come to life!
Creative Design Ideas and Themes
Need some inspiration? Here are a few popular and unique ideas to get your creative juices flowing:
- Sugar Skulls (Dia de los Muertos): A truly beautiful and intricate theme. Design elaborate patterns with dots, swirls, flowers, and geometric shapes. The glow paint can highlight the eyes, teeth, or central motifs, creating a hauntingly elegant display perfect for both Halloween and Day of the Dead celebrations. As mentioned in the original inspiration, this is a fantastic starting point for a truly unique pumpkin.
- Spooky Silhouettes: Paint silhouettes of bats, ghosts, witches, spiders, or haunted houses. When they glow, these shapes will pop dramatically against the darkness.
- Celestial Wonders: Create a starry night sky, crescent moons, or even a swirling galaxy effect. Use different glow colors for constellations.
- Monster Eyes: Simple yet effective. Paint large, watchful eyes that glow in the dark, giving your pumpkins a mischievous or eerie personality.
- Abstract Patterns: Don’t feel limited by traditional Halloween imagery. Experiment with geometric patterns, polka dots, stripes, or free-form swirls for a modern and artistic look.
- Messages and Sayings: Paint “Boo!”, “Happy Halloween!”, or other spooky phrases in glowing letters.
- Friendly Faces: For younger children, create friendly glowing monsters or silly faces.
Tips for Best Results and Lasting Glow
To ensure your glow-in-the-dark pumpkins are the talk of the neighborhood, consider these expert tips:
- Invest in Quality Paint: Better quality glow paint will offer a brighter, longer-lasting glow with fewer coats.
- Thorough Charging: The longer and brighter the light source, the more intense and prolonged the glow will be. A UV blacklight is excellent for a quick and powerful charge.
- Work in a Ventilated Area: Especially when using spray sealants, ensure good air circulation.
- Clean Brushes Promptly: Wash your brushes immediately after use with soap and water to prevent the paint from drying and ruining them.
- Experiment with Colors: While traditional green glow is common, many glow paints come in other hues like blue, orange, or even purple, adding depth to your designs.
- Consider Lighting Placement: Position your glowing pumpkins where they will be easily seen after dark. Combine them with other ambient lighting for a truly magical display.
- Involve the Family: Make it a collective craft project! Assign different tasks or pumpkins to each family member for a fun, collaborative experience.
Beyond Carving: The Advantages of Painted Pumpkins
Choosing to paint rather than carve your pumpkins offers distinct advantages:
- Safety First: Eliminating the need for sharp tools makes this activity much safer, especially for children and those with limited dexterity.
- Extended Lifespan: Without a carved opening, pumpkins remain intact for a much longer period, allowing you to enjoy your decorations for weeks or even months.
- Versatility: Painted pumpkins can be displayed in more locations without worrying about pests or rapid decomposition. They are suitable for both indoor and outdoor settings.
- Creativity Unleashed: Painting allows for intricate details and vibrant color schemes that are often difficult or impossible to achieve with carving.
- Less Waste: You don’t scoop out the pulp, which means less waste and a simpler cleanup process.
This fall, step away from the carving knife and embrace the luminous charm of glow-in-the-dark pumpkin painting. It’s a rewarding, creative, and family-friendly way to usher in the Halloween season, creating truly unique decorations that captivate both day and night. Gather your paints, select your pumpkins, and get ready to create some glowing magic that will delight everyone who sees them!
For a detailed visual guide and additional insights, here is a helpful article and video tutorial:
Discover the step-by-step instructions and inspiring photos in this article.
You can also find a fantastic YouTube video tutorial accompanying these instructions to guide you through the process visually. Happy painting!