
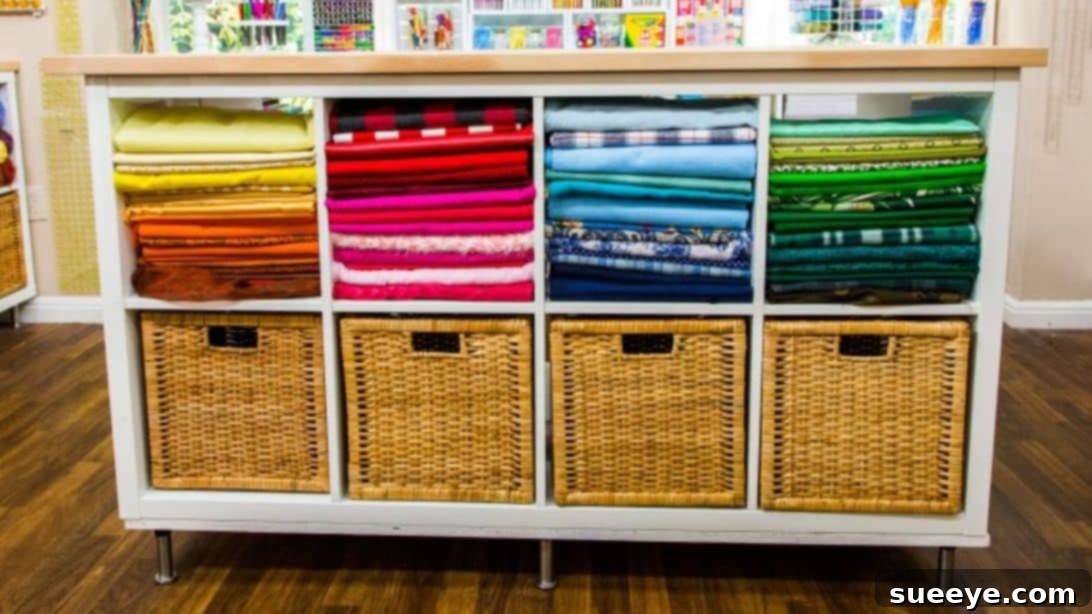
Transform Your Craft Space: Build a DIY Repurposed Bookcase Crafting Table
Declutter Your Creativity: Introducing Your New Multi-Purpose Crafting Hub
Are you a passionate crafter constantly battling with overflowing supplies, limited workspace, and the endless search for that one elusive tool? If your creative sanctuary feels more like a storage unit, it’s time for a revolutionary solution. Imagine a dedicated space where every ribbon, bead, and brush has its rightful place, and where you have ample room to spread out your projects. This dream can become a reality with a smart, multi-purpose crafting table and integrated shelving unit.
Inspired by an ingenious DIY project from the Hallmark Channel, this guide will walk you through creating a versatile craft station by repurposing pre-assembled bookcases. This project is not just about building a table; it’s about reclaiming your creative freedom. It serves as both an expansive work surface for all your crafting endeavors and an efficient organizer for every material and supply you own. Best of all, it’s designed to be incredibly easy and convenient to make, utilizing pre-cut and pre-assembled components to save you time and effort.
Say goodbye to cluttered countertops and hello to an organized, inspiring workspace that truly supports your artistic passions. Let’s dive into how you can build this incredible crafting table and transform your home today!
Why Repurpose? The Sustainable & Smart Choice for Crafters
In an age where sustainability and smart living are paramount, repurposing existing furniture is not only eco-friendly but also incredibly budget-savvy. Choosing to transform readily available items like bookcases into a functional crafting table offers numerous advantages over buying new, specialized furniture. Firstly, it significantly reduces waste by giving old items a new lease on life, contributing positively to the environment.
Secondly, repurposing often allows for greater customization. While the base structure is pre-made, you have complete creative control over the finishes – from paint colors and decorative accents to the choice of the tabletop material. This means your new crafting table won’t just be functional; it will be a unique reflection of your personal style and perfectly complement your home decor. The process of building it yourself also instills a sense of pride and accomplishment, knowing you’ve created something beautiful and useful with your own hands.
Furthermore, this specific project utilizes bookcases, which inherently offer integrated storage. This dual functionality is a game-changer for crafters, providing immediate solutions for organizing a myriad of supplies without needing additional storage units. By leveraging the existing structure of the bookcases, you’re building a robust and practical piece of furniture that’s designed to withstand the demands of a busy crafting lifestyle. It’s an intelligent investment in your hobby and your home.
Essential Materials for Your Ultimate Crafting Table
One of the beauties of this DIY project lies in its simplicity and the accessibility of its materials. You won’t need specialized tools or hard-to-find components. Most items can be sourced from your local hardware store or furniture retailer, making this a project you can start almost immediately. We’ve curated a list of essential materials, focusing on pre-assembled and pre-cut options to streamline the building process. Remember, quality materials will ensure your crafting table is sturdy, durable, and ready to handle years of creative work.
Before you begin, consider the aesthetic you want for your crafting space. The plywood base and butcher block can be painted or stained to match your existing decor, or you can choose a vibrant color to make your crafting table a statement piece. Don’t be afraid to personalize your materials!
- 1 Plywood Sheet: This will serve as the sturdy base for your entire crafting station. Opt for a good quality, furniture-grade plywood. While it can be pre-painted, you also have the option to paint or stain it to your desired color and finish after purchase, allowing for full customization.
- 9 Adjustable Table Legs: These legs are crucial for providing stable support for your entire structure and allowing you to set the table at your preferred ergonomic height. The adjustability is a key feature, as it enables you to fine-tune the height for comfortable sitting or standing while crafting.
- 2 Pre-Assembled Bookcases: The core of this repurposed project! Choose two identical bookcases that are sturdy and provide the storage capacity you need. Their pre-assembled nature means less work for you, directly contributing to the project’s ease. Consider their dimensions carefully to ensure they fit your available space and support the butcher block adequately.
- 1 Butcher Block Countertop: This will form your primary work surface. A butcher block is an excellent choice due to its durability, smooth finish, and aesthetic appeal. Ensure it is pre-cut to your desired size, providing a generous and comfortable area for all your crafting activities.
- Power Drill: An indispensable tool for efficiently driving screws and ensuring secure attachments. Make sure your drill battery is charged and you have the appropriate bits.
- ½-inch Screws: These will be used to secure the various components together, ensuring a strong and stable structure. Have a good supply on hand, as you’ll need them for multiple connections.
Step-by-Step Guide: How to Build Your Dream Craft Table
Building your new crafting table is a straightforward process, designed to be accessible even for beginner DIY enthusiasts. Follow these detailed steps to construct a robust and functional workspace that will inspire countless creative projects. Safety is always paramount, so ensure you have a clear workspace and use appropriate protective gear when operating power tools.
Step 1: Assembling the Foundation and Bookcase Integration
The first step involves creating a solid and level foundation for your crafting table, followed by securely integrating the bookcases that will serve as both supports and storage. Take your time with alignment to ensure a professional finish.
- Prepare the Plywood Base: Begin by laying your chosen plywood sheet flat on a clean, level surface. If you plan to paint or stain the base, now is the ideal time to do so before attaching the legs. Allow ample drying time for any finishes.
- Attach the Adjustable Legs: Locate the leg attachment points (often pre-drilled or marked) underneath the plywood base. Using your power drill and the ½-inch screws, securely attach the leg mounting plates. Once the plates are in place, screw the adjustable table legs into their respective mounts. Distribute the nine legs strategically: one at each corner, one in the middle of each long side, and one in the center of the plywood for maximum stability.
- Position and Secure the Bookcases: Carefully stand the plywood base upright on its newly attached legs. Now, gently lift and place your two pre-assembled bookcases on top of the base. Take extra care to line them up nicely and evenly. Position them towards the ends of the base, leaving a central space for legroom if you plan to sit at the table. Once perfectly aligned, use your power drill to attach screws through the bottom of the bookcases and into the plywood base. This crucial step ensures the bookcases are firmly anchored and will not shift during use, providing solid support for your tabletop.
Step 2: Attaching the Butcher Block and Personalizing Your Space
With the base and bookcases securely in place, the final structural step is to add your work surface. This is where your crafting table truly comes to life. After assembly, the fun part begins: decorating and organizing!
- Install the Butcher Block Countertop: Carefully lift your pre-cut butcher block and lay it directly on top of the two secured bookcases. Ensure it is perfectly centered and aligned with the edges of the bookcases and the overall base. Take a moment to step back and check from all angles to confirm optimal positioning.
- Secure the Work Surface: Once satisfied with the alignment, use your power drill to attach the butcher block to the bookcases. This is best done by drilling upwards through the top shelves or support structures of the bookcases and into the underside of the butcher block. Use appropriate length screws (e.g., 1.5-inch to 2-inch, depending on butcher block thickness) to ensure a strong hold without penetrating through the top surface. Secure it at multiple points along both bookcases for maximum stability, creating a seamless and robust work surface.
- Decorate and Organize: Your DIY crafting table is now structurally complete! This is where you can unleash your inner interior designer. Paint the table base or bookcase exteriors if you haven’t already, or add decorative elements like stencils, decals, or contact paper for a unique touch. Most importantly, start filling the shelves! Incorporate a variety of baskets, clear containers, drawers, and compartment organizers to neatly store all your craft supplies. Group similar items together, label shelves, and create zones for different types of crafts to ensure everything is easily accessible and your workspace remains tidy.
Maximizing Your Crafting Table’s Potential: Organization & Customization
A crafting table is more than just a surface; it’s the heart of your creative process. To truly maximize its potential, smart organization and thoughtful customization are key. The integrated shelving from the repurposed bookcases offers an excellent starting point, but with a few extra touches, you can transform it into an incredibly efficient and inspiring hub.
Optimal Organization Strategies:
- Categorize and Contain: Group like items together (e.g., all paints, all fabrics, all beads). Use clear bins and jars so you can easily see what’s inside without rummaging. Baskets add a touch of aesthetics while concealing clutter.
- Vertical Storage: Utilize the full height of your bookcase shelves. Add shelf dividers or stackable containers to make the most of vertical space. Consider adding pegboards to the sides of the bookcases or above the table for hanging tools.
- Label Everything: Clear labels on bins, drawers, and shelves will save you immense time searching for supplies.
- Create Zones: Dedicate specific areas of your table or shelves to different types of crafts. For example, one side for sewing, another for papercrafts, and the middle for active projects.
Customization Ideas to Reflect Your Style:
- Lighting: Install under-shelf LED strip lights or a clamp-on task lamp to illuminate your work surface and shelves, making it easier to see intricate details.
- Personalized Finish: Beyond paint, consider adding vinyl decals, stencils, or even a protective glass or acrylic top to your butcher block for a personalized touch and added durability.
- Mobility: For greater flexibility, consider adding heavy-duty locking casters to the base legs. This allows you to easily move your crafting table around your room or even to different spaces as needed.
- Drawer Inserts: If your bookcases allow, adding custom drawer inserts can create hidden storage for smaller items, keeping your workspace looking clean and minimal.
Benefits of a Dedicated Crafting Space
Having a dedicated crafting table like this multi-purpose unit goes far beyond mere organization. It fosters a healthier, more productive, and enjoyable creative lifestyle. When your supplies are organized and your workspace is clear, you experience:
- Increased Productivity: No more wasting time searching for tools or materials. Everything is at your fingertips, allowing you to dive straight into your projects.
- Enhanced Creativity: An organized and aesthetically pleasing space reduces mental clutter, freeing up your mind to focus solely on creative ideas and execution.
- Reduced Stress: The chaos of a messy craft area can be overwhelming. A tidy space promotes calm and makes crafting a more relaxing and enjoyable experience.
- Easy Cleanup: With designated spots for everything, tidying up after a crafting session becomes a quick and simple task, encouraging you to finish one project and start another without hesitation.
- Protection for Supplies: Proper storage protects your valuable craft materials from damage, dust, and loss, extending their lifespan and ensuring they are ready for use.
Final Thoughts: Unleash Your Creativity!
Creating this DIY repurposed bookcase crafting table is an incredibly rewarding project that yields a highly functional and beautiful piece of furniture. It’s an ideal solution for anyone struggling with craft room organization or simply seeking a more inspiring workspace. The ease of assembly, combined with the immense storage capabilities and ample work surface, makes this project a must-try for crafters of all levels.
So, gather your materials, follow these simple steps, and embark on your journey to a more organized and productive crafting life. Once completed, you’ll wonder how you ever managed without such a dedicated and custom-built space. Get ready to unleash your creativity in a whole new way!
This comprehensive guide was inspired by the innovative DIY project from Hallmark Channel on YouTube. We extend our sincere thanks for their creative vision and inspiration, which sparked this detailed tutorial. We encourage you to visit their channel for more fantastic project ideas and subscribe to their content for continuous DIY inspiration!