
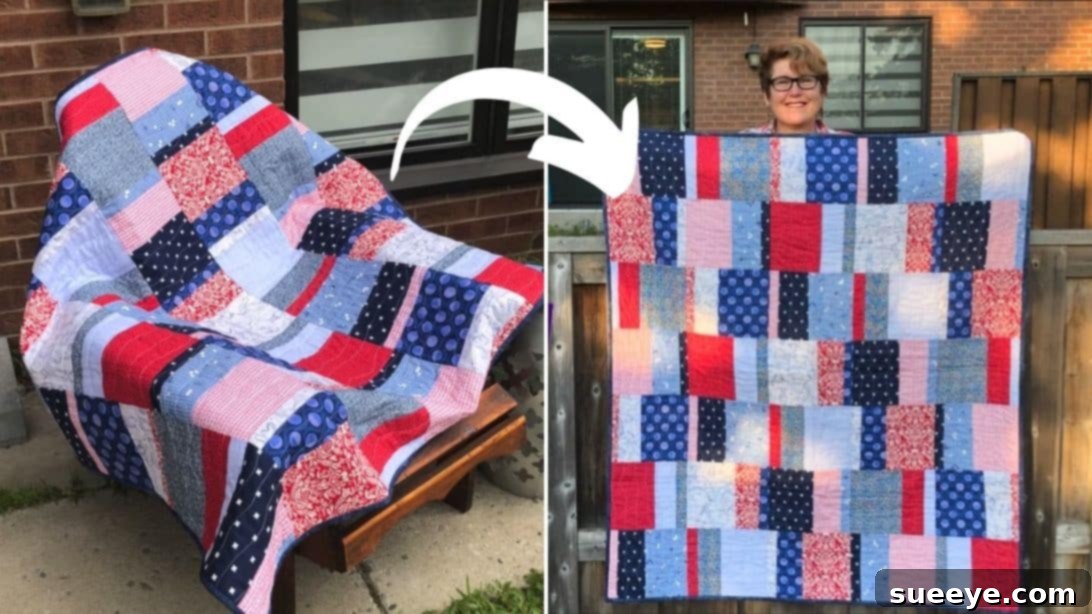
Fast & Easy Beginner Quilt Pattern: Master Fat Quarters for Stunning Results
Are you looking for a rewarding, yet simple, quilting project that yields beautiful results? Look no further! This comprehensive guide will walk you through creating a gorgeous, beginner-friendly quilt using just nine fat quarters. Adapted from the brilliant tutorial by Just Get it Done Quilts, this pattern is designed to be fast, fun, and incredibly satisfying. We’ve elaborated on every step, offering clear instructions and helpful tips to ensure your first (or next!) quilting adventure is a resounding success. Get ready to transform a small stack of fabric into a stunning heirloom!
Fat quarters are a quilter’s best friend, offering a diverse palette of pre-cut fabrics that are perfect for smaller projects and for building a cohesive color story without purchasing large yardages. In this pattern, the magic happens with careful fabric selection and a clever “slice and swap” technique that creates a dynamic, visually appealing design. The final product, with its harmonious blend of colors, will look far more complex than the simple steps you’ll follow. So, gather your materials, clear your workspace, and let’s embark on this exciting quilting journey together!
Why Fat Quarters Are Perfect for Beginner Quilters
Fat quarters are pre-cut pieces of fabric, typically measuring 18 by 22 inches (approximately 45 x 55 cm). They are incredibly popular among quilters for several reasons, especially for those just starting out. Their manageable size means less bulk to handle, making cutting and sewing easier. They also offer an excellent way to acquire a variety of coordinating fabrics without the expense of buying full yards. For this specific pattern, using fat quarters simplifies the initial fabric preparation and allows you to focus more on the creative arrangement and sewing techniques.
The beauty of working with fat quarters lies in their versatility. You can often find them in curated bundles, making fabric selection a breeze. For this particular project, the specific instruction to choose three analogous colors across three different saturations is key. Analogous colors (colors next to each other on the color wheel, like blue, blue-green, and green) create a harmonious and calming effect. Varying their saturation (intensity of color) adds depth and visual interest without making the quilt feel too busy. This thoughtful approach to fabric selection is a secret weapon for achieving a professional-looking finish with minimal effort, even for a beginner quilt project.
Materials You’ll Need: Building Your Quilt Toolkit
Before you begin, ensure you have all the necessary components. Careful preparation is key to a smooth and enjoyable quilting experience. Here’s a detailed list of what you’ll need for your fat quarter quilt:
- 9 Fat Quarters: The heart of your quilt! As specified, select three distinct analogous colors. Within each color family, choose three different saturations (e.g., a dark shade, a medium tone, and a light tint of blue or green). This creates a beautiful gradient effect in your quilt blocks. Crucially, avoid directional fabrics; patterns with a clear “up” or “down” can be tricky for beginners to align perfectly, and non-directional prints offer more flexibility and forgiveness in a beginner quilt pattern.
- Fabric for Backing: You’ll need approximately 3 yards (or enough to create a piece about 45×60 inches for a throw-sized quilt, depending on your final top dimensions). Choose a fabric that complements your fat quarter selection, either a solid that matches one of your main colors or a subtle print that won’t distract from the quilt top.
- Batting: This is the crucial middle layer of your quilt, providing warmth, texture, and structure. Look for a batting material (e.g., cotton, polyester, or a blend) that measures slightly larger than your quilt top and backing fabric – aim for at least 3-4 inches larger on all sides to allow for shrinkage and shifting during the quilting process.
- 5 x 2.5-inch Width of Fabric (WOF) Strips for Binding: These strips will finish the edges of your quilt, giving it a polished and professional look. WOF means cutting the strip from selvage to selvage, which is typically 42-44 inches wide. You’ll sew these strips together end-to-end to create one long continuous strip for binding your quilt.
- Coordinating Thread: Choose a high-quality 100% cotton thread that matches or blends well with your fabric colors. A neutral gray or beige often works well as it disappears into many fabric tones.
Essential Quilting Tools: Equipping Your Workspace for Success
Beyond the primary materials, having the right tools will make your quilting journey significantly easier and more precise, especially when tackling a beginner quilt project:
- Sewing Machine: A reliable machine with a quarter-inch foot (or the ability to easily maintain a consistent quarter-inch seam allowance) is absolutely essential for accurate piecing.
- Rotary Cutter: This tool makes precise, straight cuts quickly and efficiently. Always use a sharp blade for clean cuts.
- Self-Healing Cutting Mat: Protects your workspace and provides a stable, non-slip surface for rotary cutting.
- Quilting Rulers: Clear acrylic rulers (e.g., a 6×24-inch for long cuts and a smaller square ruler like an 8.5×8.5-inch for squaring up blocks) are invaluable for accurate measuring and cutting.
- Iron and Ironing Board: Proper pressing is just as important as sewing in quilting. It helps seams lay flat, eliminates bulk, and ensures your blocks remain square.
- Fabric Scissors: For any quick snips, trimming threads, or cutting batting.
- Pins or Fabric Clips: To hold fabric pieces securely together before sewing, preventing shifting and ensuring accurate alignment.
- Seam Ripper: Every quilter, beginner or experienced, needs one! Don’t be afraid to use it for perfect results. It’s a tool for precision, not failure.
Step-by-Step Instructions: Crafting Your Fast and Easy Beginner Quilt
Step 1: Preparing and Grouping Your Fabrics for the Quilt Top
Begin by meticulously pressing each of your nine fat quarters flat. This crucial step removes any creases, wrinkles, and pre-shrinks the fabric, ensuring accurate cutting and block construction. Once pressed, lay out your fabrics on a flat surface to visualize your chosen color scheme. Arrange them into three distinct rows: place the three darkest fat quarters on the top row, the three medium-toned fabrics in the middle row, and the three lightest ones on the bottom. This visual gradient will be the foundation of your quilt’s overall design, creating a harmonious flow of color.
Next, combine the fabrics into three distinct groups, which we’ll refer to as Group A, Group B, and Group C. To maximize the dynamic effect of the “slice and swap” technique, ensure each group contains one dark, one medium, and one light fabric. For example, if you have three analogous color sets (e.g., Dark Blue, Medium Blue, Light Blue; Dark Green, Medium Green, Light Green; Dark Teal, Medium Teal, Light Teal), you could form Group A with Dark Blue, Medium Green, Light Teal. Group B with Dark Green, Medium Teal, Light Blue. And Group C with Dark Teal, Medium Blue, Light Green. The key is to have a diverse range of values and colors within each group’s stack for the subsequent cutting and swapping steps, ensuring each resulting block has interesting contrasts.
Step 2: Precision Cutting the Initial Rectangles for Each Group
Now, let’s move to the cutting stage for one of your prepared groups (e.g., Group A). Layer the three fat quarters within this group, from darkest to lightest, ensuring all edges are perfectly aligned. You will be cutting specific dimensions to create the “slice and swap” blocks. From each of the three fat quarters in your stack, you need to yield four rectangles that measure 10.75 inches by 8 inches. The most efficient way to achieve this from a standard 18×22-inch fat quarter is as follows:
First, square up your fat quarter if needed. Then, lay the fat quarter with the 22-inch side horizontal. Cut two strips, each 10.75 inches wide, from this 22-inch length (10.75 + 10.75 = 21.5 inches, leaving approximately 0.5 inches of selvage/trim). You will now have two fabric strips, each measuring 10.75 inches by 18 inches. Next, take each of these 10.75 x 18-inch strips and cut it in half, making two 10.75 x 8-inch rectangles (with 2 inches remaining from the 18-inch length, which can be discarded or used for scraps). After repeating this for all three fat quarters in the group, you should have a total of twelve 10.75 x 8-inch rectangles for each group (four from each of the three fat quarters). Repeat this cutting process for Group B and Group C. Careful measurement and sharp tools are essential for precise cuts in this beginner quilt tutorial.
Step 3: Stacking for the “Slice and Swap” Technique
Once you have cut all your rectangles from Group A, Group B, and Group C, you will have three separate piles of fabric. Each pile will consist of twelve rectangles. It’s crucial that within each stack, the rectangles are arranged in a specific sequence: dark, medium, and light. This means the top rectangle in the stack should be the darkest, followed by the medium, then the lightest, and this sequence should repeat throughout the twelve rectangles. Maintain this dark-medium-light order for all twelve rectangles in each stack. This meticulous arrangement is vital for achieving the cascading color effect and ensuring a balanced design in your finished quilt blocks. Double-check your stacks to ensure the correct dark-medium-light progression is preserved before moving on.
Step 4: The First “Slice and Swap” Transformation
Take one of your organized stacks of twelve rectangles (e.g., Group A). Place the stack on your cutting mat, ensuring all edges are perfectly aligned. Using your ruler and a sharp rotary cutter, make a single cut 1.75 inches from the left side, running parallel to the edge, through all twelve layers of fabric. This precise cut creates a narrow strip and a wider main section for each rectangle in the stack. Carefully take the top layer (the narrow 1.75-inch strip) from the left side and gently move it to the very bottom of the entire stack. This simple “slice and swap” maneuver instantly reorders the strips within each individual set of three fabrics, creating a new color combination and design element. Repeat this exact process for Group B and Group C, ensuring consistency across all groups to maintain the integrity of your quilt design.
Step 5: Stitching the First Seams of Your Quilt Blocks
Now, it’s time to bring your fabric pieces together. From each manipulated stack, take one left piece (the 1.75-inch strip) and one right piece (the wider section). Align them with right sides together, ensuring the raw edges are perfectly matched. Using your sewing machine, stitch them together with a consistent quarter-inch seam allowance. This seam allowance is standard in quilting and is critical for your blocks to come out the correct size and for your quilt to lie flat. After stitching, press the seam allowance towards the right side (the wider piece). Pressing is not just about making things flat; it “sets” your stitches, helps reduce bulk, and ensures your block lays perfectly square. Always press rather than iron, lifting and placing the iron to avoid stretching the fabric.
Step 6: The Second “Slice and Swap” for Enhanced Design
Return to your partially stitched blocks from Group A. Stack them again in their original dark-medium-light order, making sure the colors align as they were before the first swap. This ensures the next cut affects the same relative positions within each three-piece set, deepening the intricate pattern. Now, make another precise cut, this time 4.25 inches from the left side (of the combined, original width of the stitched pieces), parallel to the edge, through all twelve pieces. Similar to Step 4, carefully take the top layer (this new 4.25-inch section) from the left side and place it at the very bottom of the entire stack. This second “slice and swap” further rearranges the fabric strips, creating an even more intricate and dynamic block design from your fat quarters. Repeat this process meticulously for Group B and Group C.
Step 7: Completing the Quilt Block Stitching
Following the same method as Step 5, stitch the newly separated left piece and right piece from each block, right sides together, using a quarter-inch seam allowance. Once stitched, press the seam allowance towards the right side again. At this point, you will have completed all your individual quilt blocks, each showcasing a unique and captivating arrangement of your chosen fat quarter fabrics. Take a moment to admire your blocks – you’ve successfully created complex-looking designs with simple cuts and swaps, a fantastic achievement for a beginner quilt project!
Step 8: Arranging Your Quilt Blocks for the Final Layout
Now comes the exciting part of seeing your quilt come to life! Lay out all your completed quilt blocks on a large flat surface – a design wall, the floor, or a large table work best. Begin arranging them according to your desired aesthetic. A recommended layout for this pattern is to create a visual flow: place the blocks with the largest dark fabric pieces in the top row, the blocks with prominent medium tones in the middle row, and the blocks featuring the lightest sections in the bottom row. This creates a pleasing ombre or gradient effect across the quilt, enhancing the harmonious color scheme you established with your fat quarters. Experiment with different arrangements until you find a layout that truly speaks to you and maximizes the visual impact of your chosen fabrics.
Step 9: Assembling Your Quilt Top from Rows
Once you are satisfied with your block arrangement, it’s time to sew them into your quilt top. The suggested layout for this beginner quilt uses 7 rows with 5 blocks on each row. This means you will need 35 blocks in total. If you have created more blocks (e.g., if the original instruction implies 4 segments per FQ, leading to more than 35 blocks), you’ll have one or more blocks left over, which can be saved for another project or used as a label on the back of your quilt. Carefully pick up the blocks from the first row, keeping them in order. Stitch the 5 blocks in that row together, right sides facing, using your consistent quarter-inch seam allowance. Press the seams for the first row in one direction (e.g., to the left). For the second row, press the seams in the opposite direction (e.g., to the right). This technique, known as “nesting seams,” helps the points align perfectly when you join the rows, reducing bulk and creating flatter seams. Repeat this for all 7 rows.
Once all your rows are stitched and pressed, it’s time to join them. Place Row 1 and Row 2 right sides together, carefully aligning the nested seams. Pin generously at each seam intersection to prevent shifting. Stitch along the entire length of the row, maintaining your quarter-inch seam allowance. Press this long seam open or to one side, depending on which way creates less bulk. Continue joining the remaining rows until your entire quilt top is assembled. Take a step back and admire your beautiful creation – a testament to your growing quilting skills!
Finishing Your Beginner Quilt: Batting, Backing, and Binding
Creating the quilt top is a major accomplishment, but a quilt isn’t truly finished until it’s quilted and bound. These final steps turn your beautiful pieced top into a functional and durable textile. Don’t skip these crucial stages; they add to the beauty and longevity of your handmade quilt.
Quilting the Layers: Bringing Your Quilt Sandwich Together
First, prepare your “quilt sandwich.” Lay your backing fabric wrong side up on a clean, flat surface, smoothing out all wrinkles. Secure it with painter’s tape or safety pins around the edges to keep it taut. Next, carefully center your batting on top of the backing. Ensure it lays flat and is free of lumps. Finally, place your completed quilt top right side up on the batting, again smoothing it perfectly from the center outwards. This three-layer “quilt sandwich” needs to be basted together securely to prevent shifting during quilting. You can use safety pins (placed every 4-6 inches), spray basting adhesive, or hand basting stitches to hold all three layers firmly in place.
Now, it’s time to quilt! The quilting stitches go through all three layers, holding them together and adding texture and durability to your quilt. You can do this on your home sewing machine using simple straight lines (either by following your seam lines, known as “stitch-in-the-ditch,” or by creating parallel lines), free-motion meandering patterns, or even a basic grid. Start from the center and work your way out to avoid trapping fabric. If machine quilting feels daunting, consider hand quilting for a traditional look or sending your quilt to a professional longarmer who specializes in quilting larger projects.
Applying the Binding: The Perfect Finishing Touch
Once your quilt is fully quilted, it’s time to trim and bind. Carefully trim the edges of your quilt square, removing any excess batting and backing, ensuring all sides are straight and even. Prepare your 2.5-inch WOF binding strips by sewing them together end-to-end at a 45-degree angle. This creates less bulk at the seam intersections and a smoother bind. Press the seams open and then press the entire continuous strip in half lengthwise, wrong sides together. This creates a neat, folded edge for your binding.
Attach this folded binding strip to the raw edges of your quilt. You can machine stitch it to the front of the quilt, aligning the raw edges of the binding with the raw edges of the quilt. Then, fold the binding over to the back and either hand stitch it for an invisible finish or machine stitch it down from the front. This step encases all the raw edges, giving your quilt a clean, professional, and durable finish.
Essential Quilting Tips for Beginners to Ensure Success
- Master Your Quarter-Inch Seam Allowance: A consistent 1/4-inch seam allowance is the cornerstone of accurate quilting. Practice on scraps until it becomes second nature; even a slight variation can cause your blocks to be the wrong size.
- Press, Don’t Iron: As mentioned, pressing (lifting and placing the iron firmly) helps set seams and keeps your fabric from stretching out of shape. Ironing (gliding the iron) can distort your fabric, leading to wavy seams and uneven blocks.
- Invest in Quality Materials: Good quality 100% cotton fabric, strong thread, and appropriate batting will make a significant difference in the finished look, drape, and longevity of your quilt. Cheaper materials can fray easily or not hold up as well over time.
- Trim Accurately and Often: Take your time with the rotary cutter and ruler. Precise initial cuts lead to precise piecing. Regularly square up your blocks and quilt top if needed to maintain accuracy.
- Pin Generously and Strategically: Especially when joining rows or long seams, pins help prevent fabric from shifting. Use them at every seam intersection and regularly along the length of the fabric.
- Embrace the Seam Ripper: Mistakes happen to everyone! It’s better to unpick a seam and re-sew it correctly than to leave an error that will bother you every time you look at your beautiful quilt.
- Take Breaks and Enjoy the Process: Quilting is a journey, not a race. Take breaks when you feel frustrated, be patient with yourself, and savor the creative process. The joy is in the making as much as in the finished product.
Caring for Your Handmade Fat Quarter Quilt
Once your beautiful quilt is complete, proper care will ensure it lasts for years to come. For the first wash, especially with new fabrics, it’s highly recommended to use a color-catcher sheet (like Shout Color Catcher) to prevent any potential dye bleeding that could stain lighter fabrics. Wash your quilt on a gentle cycle with cold water and a mild, fragrance-free detergent. Tumble dry on low heat or, ideally, lay flat to dry to minimize shrinkage and preserve the quilt’s shape and integrity. Avoid harsh chemicals, bleach, or fabric softeners, as these can damage the fibers and batting over time. With proper care, your handmade fat quarter quilt will provide comfort and beauty for generations, becoming a cherished heirloom.
Conclusion: Your Journey to a Beautiful, Handmade Quilt
Congratulations! You’ve just learned how to create a stunning, fast, and easy beginner quilt using fat quarters. This project is a testament to how simple techniques, combined with thoughtful fabric selection and precise execution, can produce truly remarkable results. The satisfaction of seeing your carefully chosen fat quarters transform into a cozy, personal work of art is unparalleled. Whether this is your very first quilt or a delightful addition to your growing collection, we hope you’ve enjoyed every step of this creative process and feel empowered by your new quilting skills.
Remember, quilting is a skill that grows with practice and patience. Don’t be afraid to experiment with different fabric combinations, colors, and even slight variations to the pattern once you’ve mastered the basics. Share your finished quilt with friends and family, display it proudly, and most importantly, cherish the beautiful item you’ve created with your own hands. The journey of making a quilt is just as rewarding as the destination. Happy quilting!