
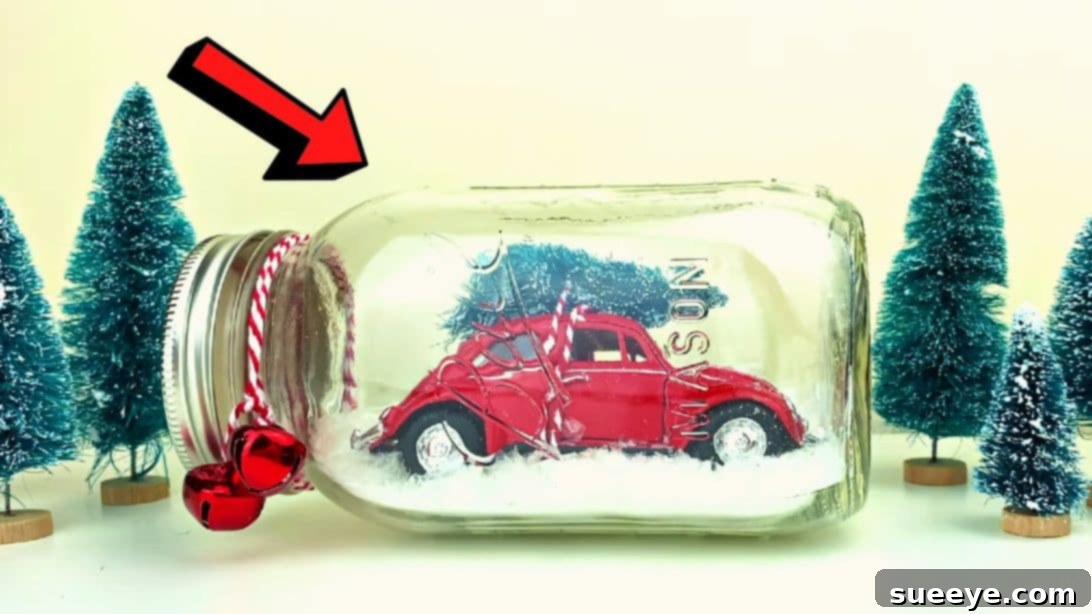
Easy DIY Mason Jar Snow Globe: A Heartwarming, Last-Minute Gift Idea
Discover the joy of creating a truly special, budget-friendly gift that radiates warmth and thoughtfulness. This enchanting DIY project transforms a simple mason jar into a miniature winter wonderland, perfect for spreading cheer during the holidays or as a unique present any time of the year. Inspired by the brilliant tutorial from LemonittoDIY on YouTube, this craft is incredibly easy to make using materials you likely already have around your home or can acquire affordably from a dollar store. Whether you’re looking for a heartfelt gift for a loved one, a charming piece of seasonal decor, or even a delightful item to sell, this mason jar snow globe is sure to captivate. Dive into this detailed guide and prepare to be inspired by the magic of handmade gifting.
Why Choose a DIY Snow Globe? The Charm of Handmade Gifts
In a world often filled with mass-produced items, a handmade gift stands out as a beacon of personal touch and sincere effort. A DIY Mason Jar Snow Globe isn’t just a craft; it’s a tiny, tangible representation of care. Here’s why it’s such a fantastic project:
- Budget-Friendly: Utilizing a recycled mason jar and inexpensive craft supplies means you can create a high-quality gift without breaking the bank. It’s a testament that thoughtfulness doesn’t have to come with a hefty price tag.
- Highly Customizable: While this tutorial focuses on a charming winter scene, the possibilities for personalization are endless. You can adapt the theme, figurines, and colors to suit any recipient, occasion, or personal memory, making each snow globe uniquely special.
- Eco-Conscious Crafting: Repurposing an old mason jar contributes to sustainable living by giving a new life to items that might otherwise be discarded. It’s a small step towards a greener planet, wrapped in a beautiful package.
- Therapeutic and Rewarding: The process of crafting can be incredibly relaxing and fulfilling. There’s immense satisfaction in seeing your vision come to life, knowing you’ve created something beautiful with your own hands.
- Last-Minute Savior: If you’re short on time but still want to give something meaningful, this project can be assembled relatively quickly once you have your materials, making it an ideal last-minute gift solution.
- Versatile Gifting: Perfect for Christmas, birthdays, anniversaries, teacher appreciation, hostess gifts, or simply as a “thinking of you” gesture. It’s also a wonderful item to feature at craft fairs or sell online.
Embark on this creative journey and craft a gift that will warm hearts and be cherished for years to come.
Essential Materials for Your Enchanting Snow Globe
Gathering your materials is the first exciting step in bringing your miniature winter scene to life. Most of these items are readily available at craft stores, dollar stores, or even around your home. Here’s what you’ll need, along with some tips for selection:
- Mason Jar: The star of our show! An empty, clean mason jar with a lid is essential. Standard pint or quart sizes work best, allowing enough space for your scene without making it too bulky. Ensure it’s thoroughly cleaned and dried before use. Any glass jar with a sealable lid can be repurposed.
- A Mini Christmas Tree: Opt for a small, artificial bottle-brush tree that fits comfortably inside your chosen jar. These come in various shades of green, sometimes with frosted tips, adding to the winter aesthetic. Consider different sizes to match the scale of your car.
- A Mini Vintage Car: A classic red vintage car carrying a tree is the iconic image for this particular snow globe. Look for small toy cars or decorative miniatures that can fit through the jar’s opening. Other figurines, like miniature animals, houses, or even a small sled, can be used for different themes.
- Red and White Twine: This classic color combination evokes a festive, rustic charm. Baker’s twine is perfect for this, but any thin, durable string will work. You might also consider natural jute twine for a more rustic look or metallic thread for extra sparkle.
- Craft Bells: Small jingle bells, typically silver or gold, add a delightful auditory and visual element. Choose bells that are proportionate to the size of your jar and twine. They bring a touch of whimsy and festive spirit.
- Scissors: A basic pair of sharp craft scissors will be needed for cutting twine and any adjustments to the mini tree.
- Artificial Snow: Fluffy polyester snow, glitter snow, or even fine white craft sand can create the perfect snowy landscape inside your jar. You can find these at most craft stores, especially during the holiday season. For a more “magical” effect, consider mixing in a touch of iridescent glitter.
Optional Materials for Enhanced Customization:
- Strong Adhesive (e.g., E6000 or hot glue): While this tutorial doesn’t explicitly call for glue, a dab of strong, clear adhesive can help secure the car to the bottom of the jar if you want to prevent it from shifting. Make sure it’s waterproof if your snow globe will ever contain liquid (though this version is dry).
- Ribbon or Fabric Scraps: To decorate the outside of the jar’s lid or neck for an extra festive touch.
- Small Tags: For personalized messages, gift tags, or care instructions.
- Extra Glitter: For a more sparkling snow effect inside the jar.
Step-by-Step Guide to Crafting Your Mason Jar Snow Globe
Now that you have all your materials, let’s bring your charming winter scene to life! Follow these simple steps carefully for a beautiful and sturdy snow globe.
Step 1: Assembling Your Miniature Scene
The first step involves preparing your mini Christmas tree and securing it to the vintage car. Precision here will ensure your scene looks neat and well-composed inside the jar.
- Prepare the Mini Christmas Tree: Carefully cut off the base of your mini Christmas tree. Most mini trees have a small wooden or plastic stand that won’t be needed for this project. Once the base is removed, you might expose a wire. Gently fold any exposed wire upward and tuck it securely inside the tree’s branches, ensuring it’s hidden and won’t scratch the jar or snag the twine. Finally, gently shape the bottom of the tree to ensure it sits nicely without a visible wire protrusion.
- Position the Tree on the Car: Place the prepared mini Christmas tree horizontally on top of the roof of your mini vintage car. Envision how you want it to look – perhaps slightly angled, mimicking a car bringing home its freshly cut tree. Ensure it’s centered and stable before tying.
- Tie the Tree and Car Together: Take your red and white twine. Begin by wrapping it around the tree and car, threading it through the car doors if possible, or wrapping it securely underneath the car’s body. The goal is to bind the tree firmly to the car’s roof. Make several wraps to ensure stability. Once you’re satisfied with the secureness, tie a tight double knot underneath the car. This placement hides the knot and prevents it from being seen once the scene is inside the jar. Trim any excess twine, leaving enough tail to ensure the knot remains secure.
Step 2: The Snow Globe Transformation
With your miniature scene ready, it’s time to bring the “snow globe” aspect to life by adding the festive touches and the magical snow.
- Decorate the Jar’s Neck: Take a fresh length of red and white twine. Carefully tie it around the neck of your mason jar. Wrap it twice for a fuller, more decorative look, making sure it’s snug but not overly tight.
- Add Craft Bells: Before knotting the twine completely, insert one or two small craft bells onto the tails of the twine. Position them aesthetically on the front or side of the jar’s neck. Once the bells are in place, tie the twine tightly into a bow or a secure knot. Trim any long excess tails of the twine for a neat finish. This adds a charming jingle and a pop of festive color to your snow globe’s exterior.
- Fill the Jar with Artificial Snow: Now for the fun part! Carefully open your artificial snow package. Gently pour a generous amount of snow into the bottom of the mason jar. The amount can vary based on your preference, but aim for enough to create a nice, visible layer on the base of your scene. Too little, and it might look sparse; too much, and it might obscure your car.
- Distribute the Snow Evenly: Hold the jar horizontally or at a slight angle and gently shake it a little bit. This helps to spread the artificial snow nicely and evenly across the bottom surface of the jar, creating a smooth, wintry landscape for your scene.
- Insert the Car with the Tree: Carefully, and with a steady hand, insert your assembled mini car with the Christmas tree into the jar. Guide it through the opening and gently lower it into the bed of artificial snow. Take your time to position it nicely, ensuring the car is upright and the tree faces forward or in your desired direction. You can use tweezers or a thin stick to adjust its position if needed, without disturbing the snow too much.
- Close the Lid: Once your scene is perfectly positioned, securely close the lid of the mason jar. Ensure it’s twisted on tightly to keep the snow and scene contained. Your beautiful, handmade mason jar snow globe is now complete!
Creative Variations and Personalization Ideas
The beauty of a DIY project lies in its potential for personalization. While the vintage car and Christmas tree theme is timeless, don’t hesitate to let your creativity soar and adapt this design to suit different tastes or occasions. Here are a few ideas to inspire you:
- Seasonal Themes:
- Autumn Harvest: Use miniature pumpkins, fall leaves, or a tiny scarecrow. Fill with brown or orange craft sand instead of snow.
- Spring Meadow: Add small artificial flowers, a miniature bunny, or tiny bird figurines. Use green moss or fine sand for the base.
- Beach Getaway: Incorporate tiny seashells, a miniature deck chair, or a small boat. Fill with fine white sand.
- Event-Specific Globes:
- Birthday: Use tiny party hats, balloons, or a miniature cake.
- Travel Memory: A tiny landmark figurine from a memorable trip or a personalized photo cut-out of a vacation spot.
- Baby Shower: A miniature baby bottle, a tiny pair of booties, or a small stork figurine.
- Personalized Figurines: Instead of a car, consider miniature figurines representing the recipient’s hobbies or interests – a tiny camera for a photographer, a small book for a reader, or a miniature musical instrument.
- Color Schemes: Experiment with different colored twine, ribbons, or even colored artificial snow (if available) to match specific decor or preferences.
- Photo Inclusion: Print a small, laminated photo of a loved one or a pet and incorporate it into the scene. Ensure the photo is protected from any potential moisture if you deviate to a liquid snow globe, though this tutorial is for a dry one.
These variations ensure that your handmade snow globe can be a thoughtful, unique gift for anyone, anytime, making it a truly versatile craft.
Tips for Gifting and Displaying Your Handmade Treasure
Once your DIY Mason Jar Snow Globe is complete, consider these tips to enhance its presentation and ensure it’s enjoyed to the fullest:
- Gift Packaging: Present your snow globe in a rustic gift box tied with a coordinating ribbon. You could also attach a small, handwritten tag with a personalized message or a short story about the scene you created.
- Care Instructions: Since this is a dry snow globe, it requires minimal care. Advise the recipient to keep it out of direct prolonged sunlight to prevent any fading of the contents and to gently dust the outside as needed.
- Display Ideas: Suggest display locations such as a mantelpiece, a bookshelf, a desk, or a bedside table. It can serve as a charming standalone decoration or be part of a larger festive display.
The Joy of Handmade Gifts
Crafting this DIY Mason Jar Snow Globe is more than just following a set of instructions; it’s about pouring your heart into a creation that will bring joy to others. The time and effort you invest in making something by hand imbues it with an emotional value that no store-bought item can replicate. It’s a tangible expression of love, appreciation, or simply a thoughtful gesture that stands out. We hope this comprehensive guide inspires you to embrace the rewarding world of DIY crafting. Happy making!
*A special thank you to LemonittoDIY via YouTube for sharing the original inspiration and all images used here. If you enjoyed this video tutorial, we highly recommend visiting and subscribing to her channel for more creative and helpful DIY projects!