
Creative No-Sew Ways to Upcycle Your Old T-Shirts: Sustainable DIY Projects for Everyone
In a world of fast-moving fashion trends, it’s incredibly common to find ourselves with a growing collection of old t-shirts that no longer fit our style or simply lie forgotten in the back of our closets. Instead of letting them gather dust or contributing to textile waste, why not give them a new lease on life? Upcycling old clothes is not only an eco-conscious choice but also a fantastic way to unleash your creativity and save money. You might be surprised at the array of practical and stylish items you can create from what you already own.
Many people shy away from DIY projects involving fabric, assuming they require advanced sewing skills. However, the good news is that transforming your old t-shirts can be incredibly simple and completely sewing-free! We’ve discovered some truly ingenious methods, inspired by the creative minds at HackingLife on YouTube, that will help you repurpose those beloved old tees into functional and fashionable pieces for your home and wardrobe. These projects are perfect for beginners, requiring minimal tools and offering instant gratification. Get ready to turn your textile waste into wonderful creations that are both unique and sustainable.
Embrace Sustainability: Transform Your Old T-Shirts with These No-Sew Methods
The beauty of these projects lies in their simplicity and the minimal effort required to achieve impressive results. Each idea allows you to customize and personalize your items, making them truly one-of-a-kind. Say goodbye to clutter and hello to clever repurposing with these three fantastic no-sew t-shirt upcycling ideas.
#1 Cozy No-Sew T-Shirt Pillow Cases
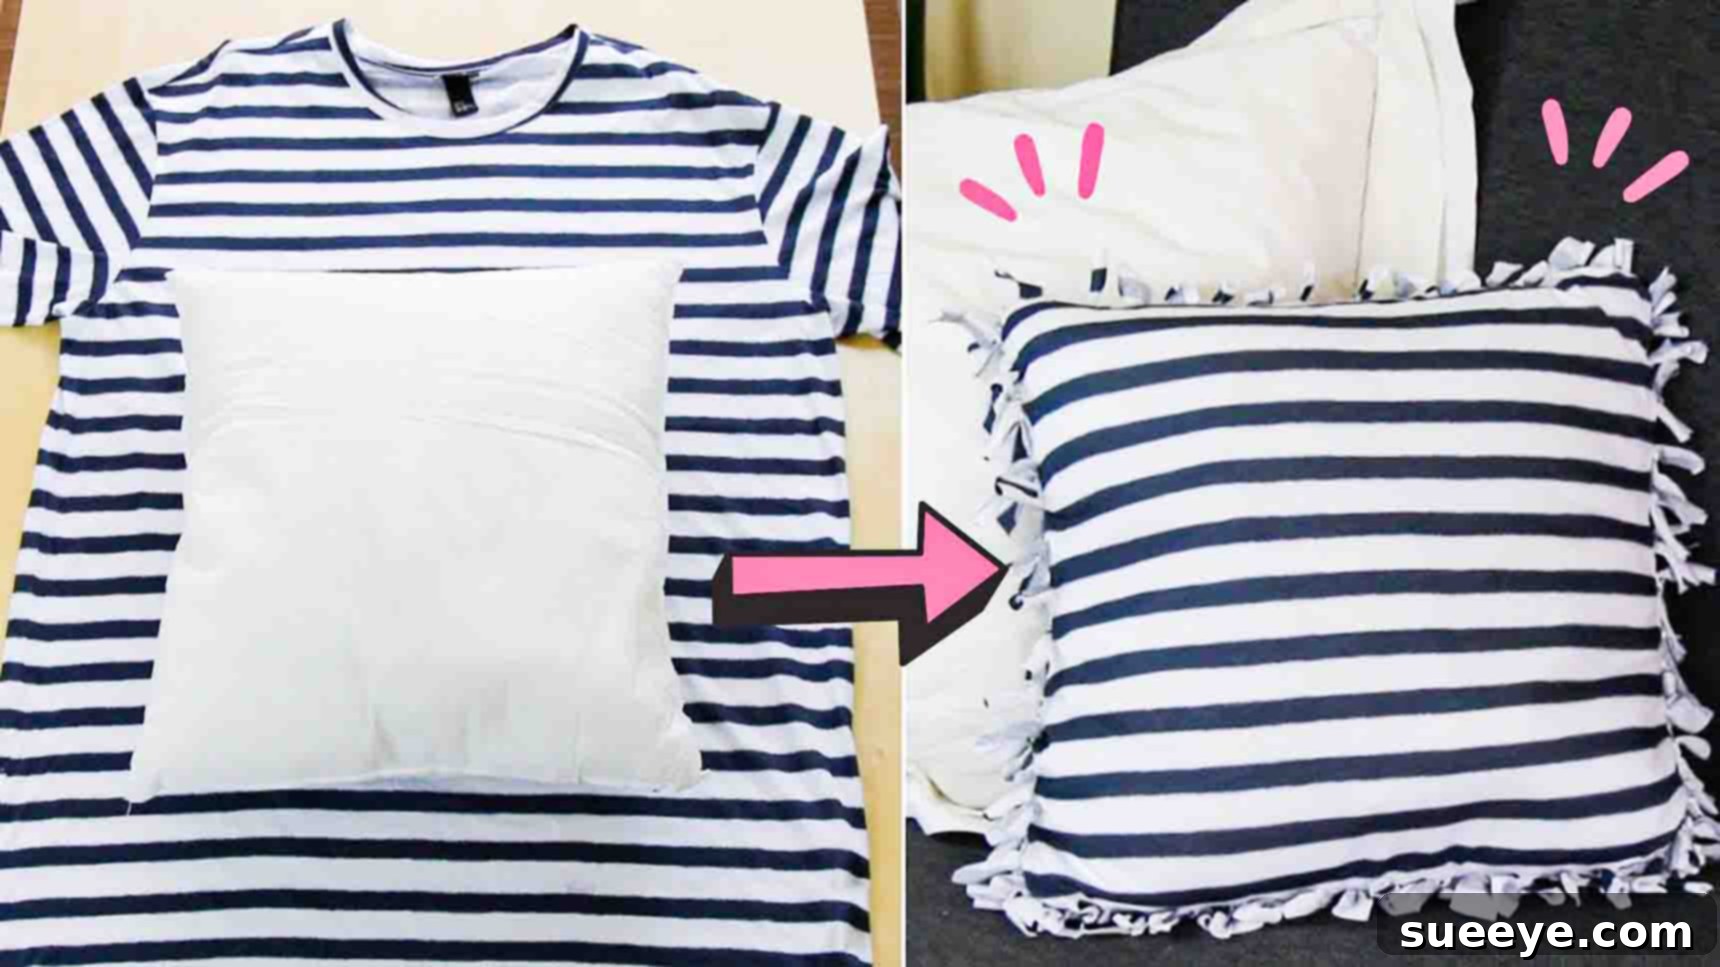
Give your living space an instant refresh or add a personal touch to your bedroom decor with custom-made pillowcases fashioned from your old t-shirts. This project is a fantastic way to utilize soft, comfortable fabric that might otherwise go to waste. Imagine transforming a favorite band tee or a shirt with sentimental value into a cozy cushion cover! It’s an effortless way to introduce new textures and colors into your home décor, or even to create unique, heartfelt gifts for friends and family.
What You’ll Need:
- An old t-shirt (preferably a soft, stretchy one for maximum comfort)
- A pair of sharp fabric scissors
- A throw pillow insert (or an existing pillow you wish to cover)
- A measuring tape or ruler (optional, but helpful for precision)
Step-by-Step Guide to Your DIY Pillow Case:
- Prepare Your Fabric: Lay your chosen t-shirt flat and smooth it out to remove any wrinkles. For the best results, consider washing and drying the t-shirt beforehand.
- Measure and Cut the Main Panels: Carefully place your throw pillow insert on top of the t-shirt. Using the pillow’s dimensions as a guide, cut out two rectangular or square pieces of fabric. It’s crucial to leave an extra 8cm (approximately 3 inches) seam allowance around all four sides of the pillow’s shape. This allowance is vital for creating the fringe that will be tied together. Ensure both fabric pieces are identical in size.
- Create the Fringe: With both fabric pieces stacked neatly on top of each other, begin cutting strips around all the edges. Each strip should be approximately 8cm (3 inches) long and about 1-2 cm (0.5-0.75 inches) wide. Make sure your cuts are consistent in length and width for a neat finish. Avoid cutting into the main body of the pillow shape; these strips should originate from the 8cm allowance you added.
- Start Tying: Align the two fringed fabric pieces, right sides facing outwards (or whichever side you want to be visible). Take a strip from the top fabric layer and the corresponding strip from the bottom fabric layer. Tie them together securely with a simple double knot. Work your way around the entire perimeter of the pillow, tying every single pair of strips. The tighter and more consistent your knots, the more durable and polished your pillowcase will be.
- Insert Your Pillow: Once you’ve tied about three-quarters of the way around, gently insert your throw pillow into the opening. This will allow you to see how the fabric stretches and fits.
- Complete the Tying: Finish tying the remaining strips, making sure the pillow is fully enclosed and snug within its new cover.
And just like that, your personalized, no-sew t-shirt pillowcase is complete! This method is not only practical but also offers a wonderful opportunity to reuse fabric and add unique character to your home decor. Experiment with different t-shirt colors and patterns to create a truly eclectic collection.
#2 Eco-Friendly No-Sew T-Shirt Tote Bag
In an age where sustainability is paramount, reducing our reliance on single-use plastic bags is more important than ever. What better way to contribute to a greener planet than by creating your very own reusable tote bag from an old t-shirt? This project is incredibly simple, requires only two items, and results in a sturdy, personalized bag perfect for groceries, books, or everyday essentials. It’s a fantastic way to give a beloved t-shirt a second life, transforming it into a practical accessory that reflects your unique style.
What You’ll Need:
- An old t-shirt (a thicker cotton or jersey blend works best for durability)
- Sharp fabric scissors
Step-by-Step Guide to Your DIY Tote Bag:
- Prepare the T-Shirt: Lay your t-shirt flat on a clean, hard surface and smooth out any wrinkles. For the best outcome, choose a t-shirt that’s free from major holes or tears, especially in the body of the shirt.
- Remove the Bottom Hem: Carefully cut off the bottom hem of the t-shirt. This typically creates a clean, straight edge. Set this fabric strip aside, as it will be used later to secure the bottom of your bag.
- Shape the Bag and Create Handles: Next, cut off the neckline and both sleeves of the t-shirt. When cutting the sleeves, you’re essentially creating the openings for your arms, which will become the handles of your tote bag. Try to make these cuts symmetrical and smooth to ensure comfortable handles. The exact shape and depth of the cuts will determine the style of your bag’s handles.
- Prepare for Tying: Flip the t-shirt inside out. This step is crucial because all the tying and knotting will happen on the inside, ensuring a clean and finished look for the exterior of your tote bag.
- Create the Bottom Closure: At the new bottom edge of the t-shirt, you’ll now create a fringe, similar to the pillowcase method. Cut vertical strips about 5-7 cm (2-3 inches) long and about 1-2 cm (0.5-0.75 inches) wide, all along the bottom edge.
- Tie the Bottom: Take corresponding strips from the front and back layers of the t-shirt and tie them together with secure double knots. Work your way across the entire bottom edge, ensuring all strips are tied. This creates the base of your tote bag. For extra security, you can even use the fabric strip you cut from the hem earlier to weave through these tied knots or to create a secondary tie, reinforcing the bag’s bottom.
- Final Flip: Once all the knots are secure, turn the t-shirt right side out.
Voilà! You now have a unique, reusable tote bag, perfect for all your carrying needs. This project is not only functional but also a statement of your commitment to reducing waste and embracing creative, practical DIY solutions. It’s a fantastic way to give a favorite graphic tee a new lease on life as a stylish accessory.
#3 Fashionable No-Sew T-Shirt Bracelets
Who knew an old t-shirt could be transformed into a chic piece of jewelry? This project allows you to create customizable, colorful bracelets that are perfect for stacking, sharing with friends, or simply adding a pop of color to any outfit. It’s an excellent way to use up smaller scraps of t-shirt fabric and dive into the world of handmade accessories without needing any special tools or intricate skills. These bracelets make wonderful personalized gifts and are incredibly fun to make, offering endless possibilities for color combinations and designs.
What You’ll Need:
- A few old t-shirts in different colors or patterns (for variety)
- Sharp fabric scissors
- Strong fabric glue (or a hot glue gun for quick drying)
- A couple of small magnets (these will serve as your clasp)
Step-by-Step Guide to Your DIY T-Shirt Bracelets:
- Prepare Your Fabric Strips: Lay your chosen t-shirts flat and smooth. From each t-shirt, cut several long, continuous strips of fabric. Aim for strips that are approximately 1.5-2 cm (0.5-0.75 inches) wide. The length will depend on your desired bracelet length, plus extra for braiding and tying. For a typical bracelet, strips around 60-70 cm (24-28 inches) are a good starting point, as they will shorten considerably during braiding. If you want a multi-colored bracelet, cut strips from two or three different t-shirts.
- Gather and Secure for Braiding: Take three of your fabric strips (either all the same color or a mix of colors for a variegated look). Align them at one end and tie them together securely with a simple overhand knot. You can also use a small dab of fabric glue to secure this initial knot, ensuring it doesn’t unravel as you braid.
- Start Braiding: Begin creating a simple three-strand braid with your fabric strips. Keep the tension consistent as you braid to ensure an even and neat appearance. Braid until you reach a length that will comfortably fit around your wrist, leaving a few inches unbraided at the end for securing the clasp. Remember that the magnets and covering will add a little extra length.
- Secure the Braid: Once you’ve reached your desired braided length, tie off the end with another secure overhand knot. Trim any excess unbraided fabric, leaving just enough to work with for attaching the magnets.
- Attach the Magnets: Take one of your small magnets and apply a generous amount of strong fabric glue to one side. Press this glued side firmly onto one end of your braided bracelet, ensuring it’s flush with the fabric. Hold it in place for a few moments to allow the glue to start setting. Repeat this process with the second magnet on the other end of the bracelet. Allow the glue to dry completely according to the manufacturer’s instructions.
- Cover the Magnets (Optional but Recommended): For a neater finish and increased comfort against the skin, cut two small, circular or square pieces of t-shirt fabric that are slightly larger than your magnets. Apply glue to the magnet and the exposed fabric around it, then carefully press the small fabric piece over the magnet. This hides the magnet and gives your bracelet a more polished, professional look.
You can make several of these bracelets in various colors and wear them stacked for a bohemian chic look, or create matching sets for friends. These fabric bracelets are not only a stylish accessory but also a testament to the endless possibilities of creative upcycling. They are lightweight, comfortable, and a fantastic way to transform old textiles into wearable art.
Transform Your Wardrobe, Transform Your Impact: The Power of T-Shirt Upcycling
These three no-sew projects—the cozy pillowcase, the practical tote bag, and the stylish bracelet—demonstrate just how easy and rewarding it can be to upcycle your old t-shirts. Beyond the simple joy of creating something new with your own hands, these projects carry significant benefits for both your wallet and the environment. By choosing to repurpose rather than discard, you actively participate in reducing textile waste, conserving resources, and minimizing your carbon footprint. Each upcycled item is a small step towards a more sustainable lifestyle.
Whether you’re looking to refresh your home decor, find an eco-friendly alternative to plastic bags, or simply want to craft a unique accessory, these t-shirt transformations offer accessible and enjoyable solutions. They require minimal supplies, are beginner-friendly, and provide endless opportunities for personalization. So, before you consider throwing out those worn-out tees, remember the creative potential they hold. Gather your scissors, unleash your imagination, and start giving your old t-shirts a fabulous new life today!