
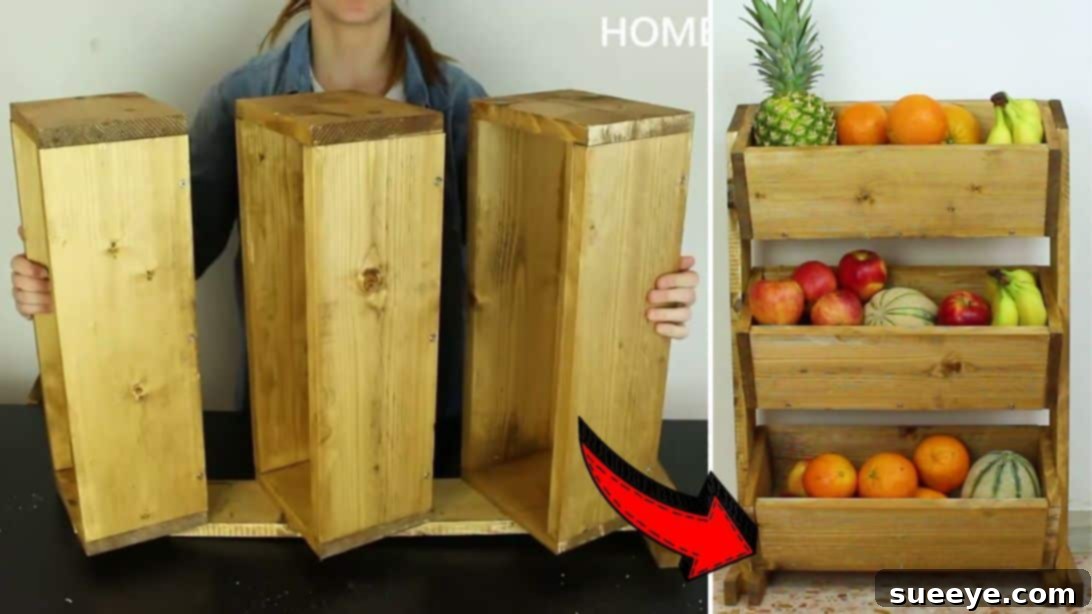
Are your kitchen countertops constantly cluttered with fruits and vegetables spilling out of small baskets or simply scattered around? It’s a common dilemma in many homes, leading to wasted space and an uninviting culinary environment. Imagine a solution that not only tackles this disorganization but also adds a touch of rustic charm and elegance to your kitchen. This comprehensive guide will show you how to construct a beautiful and highly functional **DIY market-style wooden fruit holder**. Far more spacious and aesthetically pleasing than your average fruit bowl, this holder is designed to optimize space while keeping your produce fresh and easily accessible.
Building your own fruit holder is a rewarding project that offers several advantages over store-bought alternatives. You get to customize its dimensions to perfectly fit your space, choose the wood type and finish that matches your decor, and enjoy the satisfaction of creating something practical with your own hands. This design, inspired by traditional market displays, ensures excellent air circulation for your fruits and vegetables, helping them stay fresh longer. If you’re ready to transform your kitchen’s organization and embrace a charming DIY project, follow this easy step-by-step tutorial. For a visual walkthrough, you can also reference the excellent video tutorial by Homedit on YouTube, which complements these detailed instructions.
Why Build Your Own Market-Style Fruit Holder?
There are numerous compelling reasons to undertake this DIY project:
- Superior Organization: Say goodbye to countertop chaos. This multi-tiered design allows you to neatly arrange a large quantity of fruits and vegetables, keeping your kitchen tidy and functional.
- Enhanced Freshness: The open, tiered structure promotes optimal airflow around your produce, which is crucial for preventing premature spoilage and extending the shelf life of your fruits and vegetables compared to enclosed baskets.
- Space Efficiency: Unlike bulky, awkwardly shaped fruit bowls that consume valuable counter space, this vertical design makes the most of your available area. It’s compact yet incredibly capacious.
- Aesthetic Appeal: A market-style wooden holder adds a warm, rustic, and inviting touch to any kitchen decor. It transforms your produce display into a stylish focal point rather than just a storage solution.
- Customization: Build it to your exact specifications! You can adjust the dimensions, the number of shelves, and the finish to perfectly match your kitchen’s style and your family’s needs.
- Cost-Effective: Often, building a quality wooden fruit holder yourself can be more economical than purchasing a similar high-quality, specialty item from a retailer.
- Sense of Accomplishment: There’s immense satisfaction in creating a functional and beautiful item for your home with your own hands.
Materials You’ll Need
Before you begin, gather all your materials and tools. Preparation is key to a smooth and efficient woodworking project. We recommend opting for a durable yet workable wood like pine, poplar, or even a reclaimed wood for an extra rustic touch. Ensure your lumber is straight and free of major defects.
- 9 pieces of lumber @ 15cm (5.9″) x 45cm (17.7″), for the shelves. These pieces will form the base of your individual fruit trays.
- 6 pieces of lumber @ 15cm (5.9″) x 19cm (7.4″), for the sides of the shelves. These will create the retaining walls for each shelf, preventing fruit from rolling off.
- 2 pieces of lumber @ 10cm (3.9″) x 80cm (31.4″), for the stand/main supports. These longer pieces will form the backbone of your market stand, holding the shelves in place.
- 4 pieces of lumber @ 4cm (1.5″) x 20cm (7.8″), for the feet. These provide stability and slightly elevate the entire structure, protecting your floors and making it easier to clean underneath.
- Electric Drill and Wood Screws: Essential for securely joining the wooden components. Choose screws appropriate for wood, typically around 1.5-2 inches in length.
- Miter Saw (or Circular Saw/Hand Saw): For precise, angled cuts, especially for the stand pieces. A miter saw offers the best accuracy.
- Pencil and Measuring Tape: For accurate marking and measuring all cuts and assembly points. “Measure twice, cut once!”
- Wood Stain or Paint: To protect the wood, enhance its natural grain, and match your kitchen’s aesthetic.
- Safety Glasses and Work Gloves: Always prioritize safety when working with power tools and wood.
- Sanding Paper (various grits) or Orbital Sander: To smooth rough edges and prepare the wood for staining.
- Wood Glue: For extra strong joints, though optional, it greatly enhances durability.
- Clamps: To hold pieces together securely while drilling or gluing.
Directions: Building Your DIY Market-Style Fruit Holder
Follow these detailed steps carefully to construct your sturdy and stylish fruit holder. Take your time, ensure accuracy in each step, and always prioritize safety.
Step 1: Assembling the Shelf Units
Begin by constructing the individual shelf units that will hold your produce. For each of the three shelves, you will need three shelf lumber pieces and two side lumber pieces.
- Grab three of the 15cm x 45cm shelf lumber pieces. Lay two of these pieces flat on your workbench, standing on their long 15cm sides. These will form the upright supports for the third piece.
- Place the third 15cm x 45cm lumber piece horizontally on top of the two upright pieces, ensuring it is perfectly aligned with their top edges. This will create a sturdy, box-like structure for the base of your shelf. Use clamps to hold them firmly in place for stability.
- Before attaching with screws, it’s crucial to pre-drill pilot holes. This prevents the wood from splitting, especially near the edges, and makes driving the screws much easier. Drill two pilot holes through the top piece into each of the upright pieces.
- Once pilot holes are drilled, attach the wood screws to securely fasten the three shelf pieces together.
- Next, take two of the 15cm x 19cm side lumber pieces. Position these at each end of the newly formed shelf unit, standing upright. These pieces will create the short walls of your fruit tray. Ensure they are flush with the edges of the shelf base.
- Pre-drill pilot holes through the side pieces into the ends of the shelf base, then attach with screws. Optionally, apply a thin bead of wood glue before screwing for an even stronger joint.
- Repeat this entire process to assemble the remaining two shelf units. You should now have three identical, sturdy shelf boxes.
Step 2: Preparing the Main Stand Supports
Now, let’s prepare the main vertical stand pieces that will hold your shelves.
- Take the two longer 10cm x 80cm lumber pieces designated for the stand. These will form the diagonal supports that give the fruit holder its characteristic market-style appearance.
- Lay one of the assembled shelf units flat on your workbench. Carefully position one of the stand lumber pieces diagonally on the side of this shelf unit. The goal is to mark where the stand piece needs to be cut to sit flush against the shelf’s bottom and top edge, creating an angled cut.
- Align the stand piece so that its bottom edge extends slightly past the bottom of the shelf, allowing for the feet to be attached later. The top of the stand piece should ideally align with the top edge of your highest shelf.
- Using your pencil, mark the precise angles where the stand piece meets the top and bottom of the shelf unit. These marks will guide your cuts.
- Carefully cut along these marked lines using your miter saw for precision. Make sure your cuts are clean and accurate.
- Repeat this marking and cutting process for the second stand lumber piece, ensuring both stand pieces are identical in length and angle.
- Before proceeding, take the time to lightly sand all cut edges and surfaces of the stand pieces and the assembled shelves. This will remove any splinters, rough patches, and prepare the wood for a smooth finish.
Step 3: Staining and Finishing the Wood
Applying a finish to your wood protects it and enhances its beauty.
- Choose your desired wood stain or paint. For a classic market look, a rich wood stain is often preferred, but a vibrant paint color can also add a modern touch.
- In a well-ventilated area, apply your chosen wood stain or paint to all of the wood pieces you have cut and assembled: the three shelf units, the two stand pieces, and the four smaller pieces for the feet. Follow the manufacturer’s instructions for application. Use a brush or rag, applying thin, even coats.
- Allow all pieces to dry completely according to the stain/paint manufacturer’s recommendations. This might take several hours or even overnight. If desired, apply a second coat for deeper color and protection, allowing it to dry thoroughly between coats.
- Once the stain or paint is dry, you might consider applying a clear protective topcoat (like polyurethane or lacquer) for added durability and moisture resistance, especially since this item will hold fresh produce. Allow this topcoat to dry completely as well.
Step 4: Attaching the Feet and Final Assembly
With your wood pieces now beautifully finished, it’s time for the final assembly.
- Take the four smaller lumber pieces (4cm x 20cm) designated for the feet. These will provide stability and elevation.
- On the bottom of one of the main stand pieces (the straighter, lower edge once installed), position two of the feet pieces. Attach one foot piece to the front and one to the back, ensuring they are evenly spaced and flush with the bottom edge. Pre-drill pilot holes and use screws to secure them firmly. Repeat this for the second main stand piece. These feet will act as the base for your entire fruit holder.
- Now, it’s time to install the shelf units onto the main stand pieces. Lay one of the main stand pieces flat on your workbench, with the feet pointing downwards.
- Carefully position your first shelf unit. It’s recommended to place the lowest shelf first, ensuring it sits securely on the angled stand piece. The video suggests maintaining approximately 27cm (10.6″) of vertical spacing between each shelf. This spacing is crucial for easily accessing your produce and allowing air circulation.
- Once you have determined the exact placement for the first shelf, pre-drill pilot holes through the side of the shelf unit into the main stand piece. Use at least two screws per side for a strong attachment. Repeat this for the other side of the stand piece, ensuring the shelf is level.
- Continue by attaching the second and third shelf units, maintaining the 27cm (10.6″) spacing between them. Always double-check your measurements and use a level to ensure each shelf is perfectly horizontal before securing it.
- With all three shelves attached to both main stand pieces, your DIY market-style wooden fruit holder is complete! Double-check all screws to ensure they are tight and secure.
Customization Ideas for Your Fruit Holder
The beauty of DIY is the freedom to personalize. Here are some ideas to make your fruit holder truly unique:
- Size Adjustments: Easily modify the lengths of the lumber pieces to create a larger or smaller fruit holder to perfectly fit your kitchen space. You could even make a taller version with four or more shelves!
- Color and Finish: Experiment with different paint colors (e.g., a distressed white for farmhouse style, a bold accent color for modern kitchens) or stains (dark walnut, light oak, grey wash) to match your existing decor.
- Add Casters: Install small swivel casters to the feet for a mobile fruit cart, making it easy to move for cleaning or repositioning.
- Labeling: Attach small chalkboards or wooden tags to each shelf to label different types of produce.
- Basket Liners: For softer fruits, consider placing fabric liners or woven baskets inside each wooden shelf for added protection and a softer aesthetic.
- Decorative Elements: Incorporate stenciled designs, wood burning, or decorative handles on the sides for extra flair.
Maintenance Tips for Your Wooden Fruit Holder
To keep your beautiful fruit holder looking its best and serving you for years to come:
- Regular Cleaning: Wipe down the shelves regularly with a damp cloth to remove any fruit residue or dust. Avoid harsh chemical cleaners, especially on stained or painted surfaces.
- Prevent Moisture Buildup: While the open design helps, always ensure fruits are dry before placing them on the shelves to prevent moisture damage to the wood.
- Reapply Finish: Every few years, or as needed, consider lightly sanding and reapplying a fresh coat of stain, paint, or protective sealant to refresh its appearance and protection.
- Check for Loose Screws: Periodically inspect the joints and tighten any screws that may have come loose over time.
Safety First: Important Woodworking Reminders
Always prioritize safety when working with tools:
- Wear Safety Gear: Always use safety glasses to protect your eyes from flying debris and wood dust. Gloves can protect your hands.
- Read Tool Manuals: Familiarize yourself with your power tools before operating them.
- Secure Workpiece: Use clamps to firmly hold lumber in place while cutting or drilling to prevent slippage.
- Proper Ventilation: If staining or painting, ensure you are in a well-ventilated area to avoid inhaling fumes.
- Unplug Tools: Always unplug power tools when changing blades, bits, or making adjustments.
Congratulations! You’ve successfully built a functional and charming **DIY market-style wooden fruit holder**. This project not only enhances your kitchen’s organization but also adds a personalized touch that reflects your craftsmanship. Enjoy the newfound order and the fresh, accessible produce that this elegant storage solution brings to your home. Share your creation with friends and family, and inspire them to embark on their own DIY journey!
*All image credit belongs to Homedit via YouTube. Follow and subscribe to their channel for more inspiring DIY projects and tutorials!