
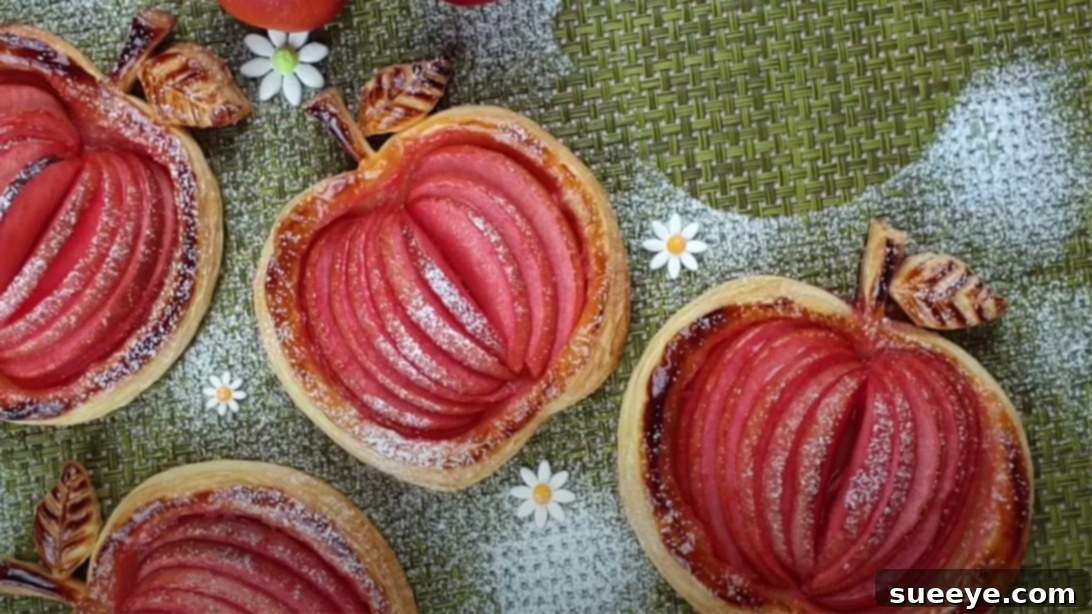
Crispy Apple-Shaped Mini Apple Pie: A Unique & Delicious Homemade Treat
Embark on a delightful baking adventure with this truly unique mini apple pie recipe, celebrated for its adorable apple shape and irresistibly crispy texture. Inspired by the creative genius of Boone Bake on YouTube, this recipe transforms a classic dessert into a charming, bite-sized masterpiece. Whether you’re a seasoned baker or just starting out, our comprehensive guide will help you create these beautiful and delicious pies that are sure to impress.
This isn’t just another apple pie recipe; it’s an experience. The carefully crafted dough yields a remarkably flaky crust, while the sweet, spiced apple filling bursts with flavor. The distinctive apple shape adds a whimsical touch, making these mini pies perfect for special occasions, desserts, or simply a cozy treat any day of the week. Prepare to satisfy your cravings with a homemade baked good that’s as pleasing to the eye as it is to the palate.
The Essential Ingredients for Your Crispy Mini Apple Pies
Crafting the perfect mini apple pie requires a precise selection of ingredients, ensuring both a flaky crust and a flavorful filling. Here’s a detailed breakdown of what you’ll need:
For the Flaky Pastry Dough:
- Cake Flour: 3.8 ounces (110 g) – Contributes to the tender texture of the pastry.
- Bread Flour (or All-Purpose Flour): 3.8 ounces (110 g) bread flour, or 7.7 ounces (220 g) all-purpose flour total (if not using separate cake and bread flour). Bread flour adds strength for a flaky lamination, while all-purpose is a good, readily available alternative.
- Unsalted Butter (for dough): 3.3 ounces (95 g) – Crucial for creating layers. Must be very cold and cut into cubes.
- Cold Water: 3.4 ounces (97 g) – Essential for binding the dough without overdeveloping gluten, keeping it tender.
- Salt: 0.10 ounces (3 g) – Enhances flavor and balances sweetness.
- Sugar (for dough): 0.17 ounces (5 g) – Adds a touch of sweetness and helps with browning.
For the Apple Filling:
- Unsalted Butter (for filling): 2.1 ounces (60 g) – Adds richness and helps cook down the apples.
- Medium Apples: 2 medium apples – We recommend firm, tart varieties like Granny Smith or Honeycrisp for best texture and flavor balance.
- Sugar (for filling): 1 ounce (30 g) – Sweetens the apples to perfection.
- Lemon Juice: 0.7 ounce (15-20 ml) – Brightens the apple flavor and prevents browning.
- Cinnamon Powder: To taste – The quintessential apple pie spice. Adjust according to your preference.
- Rum: 0.35 ounce (10 ml) – Optional, but highly recommended for adding depth and warmth to the filling.
For the Egg Wash & Final Touch:
- Unsalted Butter (for layering): 0.7 ounces (20 g) – Used between dough folds to enhance flakiness.
- Egg Yolk: 1 large – For a beautiful, golden-brown crust.
- Milk: 0.17 ounce (5 ml) – Mixed with egg yolk to create a smoother egg wash.
Step-by-Step Directions: Crafting Your Mini Apple Pies
Follow these detailed instructions carefully to achieve the perfect crispy, apple-shaped mini pies.
Phase 1: Preparing the Dough (Lamination Process)
- Initial Preparations: Before you begin, ensure all your ingredients are measured out and ready. Preheat your oven to 205 degrees Celsius (approximately 400 degrees Fahrenheit). Cut the 3.3 ounces (95g) of unsalted butter into small cubes and place them back in the fridge to keep them very cold. Similarly, pour salt and sugar into the 3.4 ounces (97g) of very cold water and refrigerate until needed. Maintaining cold temperatures for butter and water is paramount for a flaky pastry.
- Mixing the Dough: In a large mixing bowl, combine the cake flour and bread flour (or the full amount of all-purpose flour if using). Whisk them together until thoroughly combined. Add the cubed, very cold butter to the flour mixture. Using your fingertips or a pastry blender, quickly work the butter into the flour until it resembles coarse crumbs with some pea-sized pieces of butter remaining. Avoid overmixing.
- Adding Liquids & Initial Knead: Pour the cold water mixture (with dissolved sugar and salt) into the flour-butter mixture. Mix roughly with a spatula or your hands until a shaggy, loose dough forms. Do not overmix or knead extensively at this stage.
- First Rest & Roll: Transfer the loose dough onto a piece of plastic wrap or cellophane. Gently bring the dough together, pressing it into a flat disc. Cover it completely with the plastic wrap and use a rolling pin to gently stretch it out. The goal is to start the lamination process. Place the wrapped dough in the fridge to rest for 30 minutes. This allows the gluten to relax and the butter to firm up.
- Incorporating More Butter & Folding: After the first rest, retrieve the dough. On a lightly floured surface, stretch the dough some more using a rolling pin, aiming for a diagonal square or rectangular shape. Take 0.7 ounces (20g) of softened but still cool unsalted butter, slice it thinly, and spread it evenly over two-thirds of the diagonal dough square. Fold the dough into thirds, like a letter: fold one unbuttered side over the middle, then fold the remaining buttered side over that. This creates layers.
- Second Rest & Fold: Cover the folded dough again with plastic wrap and return it to the fridge to rest for at least an hour. This crucial resting period allows the butter layers to firm up and the gluten to relax, preventing the dough from tearing during subsequent rolling. Repeat the rolling, buttering (with the remaining 0.7 ounces / 20g unsalted butter, softened), and folding process one more time. After the final fold, cover the dough and let it rest in the fridge for another hour. In total, you’ll perform this folding and resting process multiple times to build up the hundreds of flaky layers.
Phase 2: Preparing the Apple Filling
- Slicing the Apples: While the dough rests, prepare your apple filling. Wash and core the 2 medium apples. You can peel them if preferred, but leaving the skin on can add a beautiful red hue to the filling. Slice the apples into thin pieces, about 4 to 5 mm thick.
- Flavoring the Apples: Place the apple slices in a microwave-safe bowl. Sprinkle sugar generously over the apples, followed by as much cinnamon powder as you like. Pour in the lemon juice and add the 0.35 ounces (10ml) of rum (if using) and 2.1 ounces (60g) of unsalted butter.
- Microwave Cooking: Cover the bowl with plastic wrap, leaving a small vent. Microwave on high for 7 to 8 minutes, or until the apples are tender but still hold their shape. The goal is for the apples to soften and release their juices, and if you left the peels on, for the red color to seep out into the liquid, creating a beautiful rosy syrup.
- Cooling the Filling: Once cooked, remove the plastic wrap and let the apple filling cool completely to room temperature for at least 5 hours. This step is important to prevent the warm filling from melting the pastry dough during assembly. You can even prepare this a day ahead and store it in the refrigerator.
Phase 3: Assembly and Baking
- Final Dough Preparation & Shaping Guide: Retrieve your well-rested dough from the fridge. Lightly flour your work surface and roll out the dough to a uniform thickness of approximately 3 mm. For the apple shape, you can either freehand draw an apple on a piece of transparent film paper (like a stencil) or find a template online. Cut out the apple shape from the film paper. (The original instructions mention “Remove the drawing mark with nail polish remover and wash it in running water,” which is likely a remnant from a specific crafting step unrelated to food safety or standard baking, and can be disregarded for food preparation.)
- Cutting the Dough: Place your apple stencil over the rolled-out dough and carefully cut out individual apple shapes using a sharp knife or pastry wheel. Arrange these apple-shaped dough pieces on a baking tray lined with parchment paper.
- Preparing for Filling: For each apple dough shape, firmly press down the center, leaving a 1 cm border around the edges. This creates a well for the filling and helps form the “crust” of the mini pie. Use a fork to poke several holes in the pressed center to allow steam to escape during baking, preventing a soggy bottom.
- Adding the Filling: Take some of the beautiful red juice from your cooled apple filling and, if desired, mix it with a small amount of apple jam for extra body and shine. Apply this mixture generously to the pressed center of each apple-shaped dough. Then, arrange several slices of your cooked apple filling on top of the jam base.
- Egg Wash Application: In a small bowl, whisk together the egg yolk with the 0.17 ounces (5ml) of milk to create a smooth egg wash. Gently brush this mixture all over the dough, including the edges. This will give your mini pies a gorgeous golden-brown and shiny finish.
- Baking Your Mini Pies: Place the baking tray with your assembled mini pies into the preheated oven at 195 degrees Celsius (385 degrees Fahrenheit). Bake for approximately 15 minutes, or until the crust is golden brown and the filling is bubbling slightly. Keep an eye on them towards the end of the baking time, as oven temperatures can vary.
- Cooling and Enjoying: Once baked, carefully remove the mini pies from the oven and let them cool on the baking tray for a few minutes before transferring them to a wire rack to cool completely. The cooling process allows the filling to set and the crust to become even crispier.
Tips for the Perfect Crispy Mini Apple Pie
- Keep Everything Cold: This is the golden rule for flaky pastry. Cold butter and cold water prevent the butter from melting into the flour too soon, creating those distinct layers. Work quickly when handling the dough.
- Don’t Overwork the Dough: Overworking the dough develops too much gluten, leading to a tough, rather than flaky, crust. Mix until just combined.
- Resting is Essential: The multiple resting periods in the fridge are non-negotiable. They allow the gluten to relax and the butter to firm up, making the dough easier to roll and ensuring a delicate texture.
- Apple Choice Matters: Use firm, slightly tart apples that hold their shape well when cooked. Granny Smith, Honeycrisp, Braeburn, or Fuji are excellent choices.
- Customize Your Spices: While cinnamon is classic, feel free to add a pinch of nutmeg, allspice, or cardamom to your apple filling for a unique flavor profile.
- Serving Suggestions: These mini pies are delightful on their own, but they also pair wonderfully with a scoop of vanilla bean ice cream, a dollop of whipped cream, or a drizzle of caramel sauce.
Why This Apple-Shaped Mini Pie Recipe Stands Out
This recipe offers more than just a delicious dessert; it provides a unique baking experience that combines visual appeal with exceptional taste. The charming apple shape makes these pies incredibly appealing, perfect for gifting, holiday gatherings, or simply bringing a smile to anyone’s face. The meticulous lamination process results in a remarkably crispy and flaky crust that truly elevates the texture, while the perfectly spiced apple filling strikes a wonderful balance of sweetness and tang.
Furthermore, by following Boone Bake’s inventive approach, you’re not just baking; you’re creating a memorable treat that showcases craftsmanship and attention to detail. It’s a recipe that invites creativity and promises a rewarding outcome, transforming simple ingredients into an extraordinary dessert.
Conclusion: Bake, Share, and Savor!
You now have all the knowledge and steps needed to create your own batch of crispy, apple-shaped mini apple pies. This recipe, while requiring a bit of patience with the dough, rewards you with an utterly delightful and impressive dessert. There’s immense satisfaction in pulling these golden, flaky creations from the oven, knowing you’ve crafted something truly special.
So, gather your ingredients, set aside some time for this culinary adventure, and prepare to fill your home with the comforting aroma of baked apples and warm spices. Enjoy every single bite of your homemade mini apple pies, and don’t forget to share your creations with loved ones. Happy baking!