
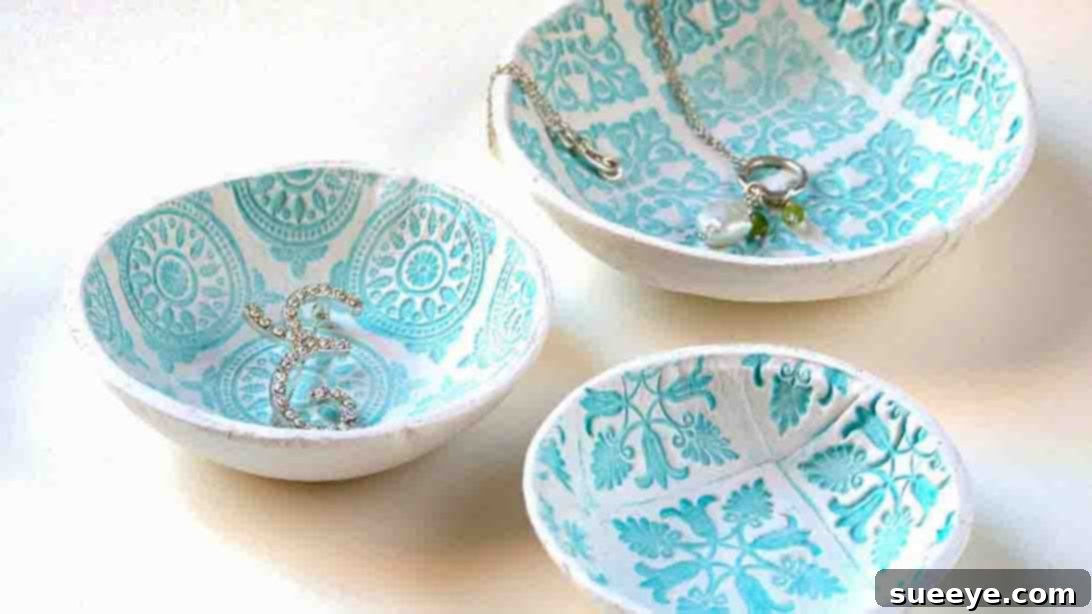
Craft Your Own Stunning Air-Dry Stamped Clay Bowls: The Ultimate DIY Guide
Are you eager to infuse your living space with a touch of handmade charm and personalized elegance? This comprehensive guide will inspire you to create beautiful, functional air-dry stamped clay bowls, perfect for adding a unique flair to your home. Whether you’re looking for an ideal organizer for your cherished trinkets, a stylish holder for your everyday jewelry, or a thoughtful, personalized gift, these bowls are the answer. This project is not only incredibly rewarding but also surprisingly easy to master, making it a perfect weekend activity for crafters of all skill levels. We’re taking inspiration from the fantastic tutorial by Gathering Beauty on Youtube, expanding on the steps to ensure you achieve flawless results. Get ready to explore your artistic side, experiment with various stamps and colors, and craft exquisite pieces that truly reflect your personal style. Let’s dive into the world of air-dry clay and transform simple materials into works of art!
Why You’ll Love Crafting Stamped Air-Dry Clay Bowls
Beyond the simple joy of creating something with your hands, making stamped air-dry clay bowls offers a multitude of benefits, transforming your crafting session into a truly valuable experience:
- Unique Home Decor: Mass-produced items often lack character. Your handmade bowls, however, will be truly one-of-a-kind, reflecting your artistic vision and adding a personal touch that elevates any room. They are perfect for bringing warmth and individuality to shelves, tables, or mantels.
- Perfect Organizers: These versatile bowls serve as excellent catch-alls for all those small items that tend to clutter surfaces. Use them to neatly store rings, earrings, watches, keys, loose change, paper clips, or even wrapped candies. Their compact size makes them ideal for bedside tables, bathroom vanities, office desks, or entryway consoles.
- Thoughtful, Personalized Gifts: A gift crafted with your own hands carries immense sentimental value. Imagine gifting a friend a custom-stamped bowl, tailored to their style and preferences. It’s a thoughtful present for birthdays, holidays, housewarmings, or as a token of appreciation that will be cherished far more than a store-bought item.
- Relaxing and Creative Outlet: The process of working with clay is wonderfully tactile and therapeutic. Kneading, rolling, and stamping can be a meditative experience, allowing you to unwind, de-stress, and channel your creativity into a tangible form. It’s a fantastic way to escape the digital world and engage in a calming, hands-on activity.
- Beginner-Friendly Craft: Air-dry clay is incredibly forgiving and easy to work with, making this project accessible even if you’re new to crafting. There’s no need for specialized equipment like a kiln, simplifying the process and allowing you to focus purely on design and execution.
- Cost-Effective Customization: Compared to purchasing artisan bowls or personalized decor, making your own is significantly more economical. With just a few basic, reusable materials, you can create multiple unique pieces, making it an affordable way to refresh your decor or build a collection of handmade gifts.
Getting to Know Air-Dry Clay: Your Versatile Crafting Medium
Air-dry clay is a fantastic material for a wide array of DIY projects, primarily because it hardens naturally when exposed to air, eliminating the need for baking or firing. It’s a popular choice for crafters due to its ease of use and versatility. Here’s what makes it so suitable for your stamped bowls:
- No Kiln Required: This is its biggest advantage. Simply sculpt, let it dry, and your piece will harden. This accessibility opens up a world of crafting possibilities without needing professional equipment.
- User-Friendly: Air-dry clay is soft and pliable straight out of its packaging, making it easy to knead, roll, and shape. It responds well to various sculpting tools and techniques, including stamping.
- Variety of Colors: While white clay is often chosen for its clean canvas for inks and paints, air-dry clay is available in several natural tones like terracotta, gray, or even pigmented colors. White offers the best contrast for your stamped designs.
- Drying Process: The hardening process typically takes 24 to 72 hours, depending on the thickness of your piece, humidity levels, and ambient temperature. Patience during this stage is crucial to prevent cracking.
- Post-Drying Options: Once completely dry, air-dry clay can be sanded, painted, varnished, or sealed, allowing for extensive customization and protection.
- Storage: To ensure your clay remains workable, always keep unused portions tightly sealed in an airtight container or heavy-duty plastic wrap. If it starts to stiffen, a small amount of water can often revive it.
Essential Materials for Crafting Your Stamped Clay Bowls
Before you embark on your creative journey, it’s essential to gather all your materials. Having everything at hand will make the process seamless and more enjoyable. Here’s a detailed breakdown of what you’ll need and some tips for selection:
- White Air-Dry Clay: This is your primary material. Opt for a good quality brand that is known for its smooth texture and minimal shrinkage. White clay provides a perfect neutral background for your colorful ink designs, making them stand out beautifully. A 1-2 lb (0.5-1 kg) pack should be enough for several small to medium-sized bowls.
- Assorted Stamps: This is where your bowls will gain their unique character.
- Rubber or Clear Silicone Stamps: These are available in countless patterns—floral, geometric, abstract, alphabet letters, or whimsical motifs. Choose stamps with good depth and detail for clear impressions.
- Natural Elements & Found Objects: Don’t limit yourself! Leaves, textured fabric, lace, small cookie cutters, bottle caps, or even textured rolling pins can create stunning, organic impressions.
- Ink Pad: Select a pigment-based ink pad in a color that complements your desired aesthetic. Pigment inks offer vibrant, opaque results and adhere well to air-dry clay. Popular choices include classic black, metallic gold, silver, or rich jewel tones. Consider having a few colors to mix and match.
- A Set of Small Glass Bowls: These will serve as your molds. Look for glass bowls with smooth, rounded bases in various sizes to create a diverse collection of trinket dishes. Clean and thoroughly dry them before use to prevent the clay from sticking.
- Acrylic Rolling Pin: An acrylic rolling pin is highly recommended because its smooth, non-porous surface prevents the clay from sticking and is easy to clean. If an acrylic one isn’t available, a smooth glass bottle or a PVC pipe can serve as an alternative.
- Silicone Mat or Non-Stick Work Surface: Essential for preventing the clay from sticking to your table and for easy cleanup. A large piece of parchment paper or wax paper can also work in a pinch.
- Craft Knife or X-Acto Knife: A sharp craft knife is crucial for cleanly cutting the clay into precise circles. Always exercise caution and cut on a protected surface.
- Fine-Grit Sandpaper: After your bowls are dry, fine-grit sandpaper (e.g., 220-400 grit) will be used to smooth any rough edges or imperfections, giving your finished pieces a professional, polished look.
- Optional: Clear Sealant: (e.g., Mod Podge, acrylic spray sealer, craft varnish). Highly recommended for enhancing durability, providing a degree of moisture resistance, and protecting your stamped designs. Choose a matte, satin, or glossy finish based on your preference.
- Optional: Acrylic Paints and Brushes: For adding accent colors, painting the rims, or creating additional decorative details after the clay has dried.
- Optional: Small Felt Pads: To stick to the bottom of your finished bowls, protecting your furniture surfaces from scratches.
Step-by-Step Guide: Crafting Your Stamped Clay Bowls
Step 1: Preparing and Stamping Your Clay for Design
The first stage involves getting your clay ready and imprinting your beautiful designs.
- Knead the Clay Thoroughly: Take a sizable chunk of your air-dry clay. Begin kneading it vigorously on your silicone mat for several minutes. This process makes the clay soft, pliable, and removes any air bubbles, which helps prevent cracking during drying. You want the clay to feel smooth and consistent, similar to well-worked dough.
- Roll Out the Clay Evenly: Once the clay is pliable, use your acrylic rolling pin to roll it out. Aim for a consistent thickness of approximately three to four millimeters (about 1/8 to 3/16 of an inch). An even thickness is vital for uniform drying and a sturdy final product. Avoid rolling it too thin, which can make it fragile, or too thick, which prolongs drying time and increases the risk of cracks. Rotate the clay and roll from different directions to achieve an even sheet.
- Prepare Your Stamps with Ink: Gently tap your chosen stamp onto the ink pad. Ensure the entire surface of the stamp that will make contact with the clay is uniformly coated with ink. Avoid pressing too hard into the ink pad, as this can overload the stamp with ink, leading to blurry or smudged impressions.
- Stamp Your Unique Design: Carefully position the inked stamp onto the rolled-out clay. Apply firm, even pressure directly downwards to ensure a crisp and complete impression. Lift the stamp straight up to prevent any smudging. Continue stamping across the clay, creating your desired pattern. You can create a repeating motif, a random scattering, or a central focal point. Take your time, re-ink as needed, and be mindful not to smudge adjacent designs. Feel free to experiment with multiple stamps or colors on different sections of your clay sheet.
Step 2: Shaping Your Clay into Bowls and the Drying Process
With your clay beautifully stamped, the next phase involves forming it into the bowl shape and ensuring it dries properly.
- Cut Out the Clay Circle: Select one of your small glass bowls and place it upside down directly on top of your stamped clay. Position it carefully to center a desirable portion of your design within the circle. Using your craft knife, meticulously cut around the base of the glass bowl, applying steady pressure to achieve a clean, smooth clay circle. Once cut, remove the glass bowl.
- Carefully Peel and Position: Gently lift the freshly cut clay circle from your silicone mat. Handle it with extreme care to avoid stretching or distorting the shape or smudging the intricate stamped design.
- Mold the Clay into a Bowl: Invert the same glass bowl, so it’s now right-side up. Carefully place your clay circle into the glass bowl, ensuring the stamped side is facing upwards, against the inner surface of the glass mold. Gently press the clay down, starting from the center and working your way outwards, coaxing it to conform perfectly to the bowl’s curves. Rotate the glass bowl and continue to lightly press the clay, ensuring it sits snugly and smoothly, eliminating any trapped air pockets between the clay and the glass.
- Initial Drying Phase (First 24 Hours): Allow the clay to dry within its glass mold for approximately twenty-four hours. Place it in a well-ventilated area, away from direct sunlight, heating vents, or drafty windows, as rapid drying can lead to cracks. During this period, the clay will begin to firm up and slightly contract, which will aid in its removal from the mold.
- Gently Release from the Mold: After the initial 24 hours, the clay should feel firm but still slightly pliable. Carefully wiggle the clay piece within the glass bowl. You might need to gently flex the glass bowl or use a thin, dull knife to carefully separate the clay from the edges until the clay bowl pops out. Be patient and gentle, as the clay is still somewhat fragile at this stage.
- Final Drying Phase (Additional 24-48 Hours): Once released, turn your newly formed clay bowl upside down and place it on your silicone mat or a wire rack. This position allows air to circulate freely around all surfaces, promoting thorough and even drying. Let it dry for another twenty-four to forty-eight hours, or even longer if it still feels cool or damp to the touch. It is crucial that the clay is completely dry and hardened before proceeding. A fully cured piece will feel lightweight and solid, with no cool spots.
Step 3: Refining Your Bowls with Finishing Touches and Sealing
Once your clay bowls are fully dry and hard, it’s time to perfect their appearance and ensure their longevity.
- Sand for Smoothness: Carefully inspect the edges and surfaces of your completely dry clay bowl. Use fine-grit sandpaper (220-400 grit) to gently sand away any rough spots, sharp edges, or minor imperfections. This step is essential for achieving a professional, smooth finish that is pleasant to the touch. Work slowly and with a light hand, especially around the stamped areas.
- Clean Off Dust: After sanding, use a dry cloth or a soft brush to gently wipe away any clay dust. Ensure the surface is clean before applying any sealants or paints.
- Apply a Clear Sealant (Highly Recommended): For enhanced durability, increased moisture resistance, and to protect your beautiful stamped design, apply a clear sealant. Products like Mod Podge (available in matte or gloss), clear acrylic spray sealer, or craft varnish are excellent choices. Follow the manufacturer’s instructions for application, typically involving 2-3 thin coats, allowing each coat to dry completely before applying the next. Sealing will help protect your bowl from minor spills and make it more robust for everyday use. If you intend for your bowl to hold wrapped food items, opt for a food-safe sealant.
- Add Optional Embellishments:
- Paint Accents: If desired, use acrylic paints and fine brushes to highlight specific elements of your stamped design, paint the rim of the bowl a contrasting color, or add a solid color to the underside.
- Metallic Details: For a touch of luxury, apply gold or silver leafing to the rim or specific stamped elements.
- Felt Pads: To protect your furniture from scratches, attach small, self-adhesive felt pads to the very bottom of your finished bowl.
Expert Tips for Crafting Perfect Stamped Clay Bowls
To ensure your crafting journey is as smooth and successful as possible, keep these valuable tips in mind:
- Work Efficiently with Clay: Air-dry clay begins to harden when exposed to air. Work on manageable sections at a time, and always keep any unused clay tightly sealed in an airtight container or plastic wrap to prevent premature drying. If your clay starts to stiffen while you’re working, a light mist of water or quick kneading can often revive it.
- Maintain Even Pressure: Consistency is key. Whether you’re rolling out the clay or pressing your stamps, apply even pressure across the surface. This ensures uniform thickness in your bowl and produces clear, crisp stamp impressions without distortions.
- Embrace Uniqueness: Remember that handmade items inherently carry a unique charm. Don’t obsess over achieving absolute perfection; instead, celebrate the small, distinctive characteristics that make each of your bowls truly one-of-a-kind. These imperfections often add character!
- Patience is a Virtue (Especially with Drying): Resist the temptation to speed up the drying process using fans, ovens, or heaters. Rapid drying can lead to uneven shrinkage and unsightly cracks. Allow your bowls to air-dry naturally in a stable, well-ventilated environment.
- Experiment with Designs: Don’t be afraid to mix and match different stamp patterns, ink colors, or even layering techniques. Try pressing natural objects like small leaves or textured fabrics into the clay for unique, organic patterns. The more you experiment, the more diverse your creations will be.
- Clean Your Tools Immediately: To prolong the life of your crafting tools, wash your rolling pin, craft knife, and stamps with water immediately after use. This prevents clay from hardening on them and preserves their quality. Ensure ink pads are properly closed to prevent them from drying out.
- Consider Your Environment: In highly humid climates, air-dry clay will naturally take longer to dry. Conversely, in very dry conditions, it might dry too quickly, increasing the risk of cracking. Adjust your drying times and conditions as needed to achieve optimal results.
Creative Variations: Expanding Your Air-Dry Clay Crafting Horizons
Once you’ve mastered the basic stamped clay bowl, you’ll discover that air-dry clay offers endless possibilities for further creative exploration. Let your imagination guide you to new projects and designs:
- Diverse Shapes and Sizes: Don’t limit yourself to round bowls. Experiment with oval, square, or irregular shapes. Use larger bowls as molds for decorative fruit dishes or smaller, flatter pieces for unique coasters, key trays, or decorative wall hangings. Cookie cutters can create perfectly shaped mini-dishes.
- Custom Clay Colors: While white clay is excellent for contrasting ink, you can also mix a small amount of acrylic paint into your white clay before kneading it to create custom pastel or vibrant clay colors. Ensure the paint is thoroughly integrated for an even hue.
- Textural Impressions Without Ink: Explore creating impressions using only texture. Press intricate lace, natural leaves, embossed rolling pins, or even the knurled edges of coins directly into the clay for a subtle yet captivating tactile finish.
- Multi-Layer Stamping: Add depth to your designs by layering stamps or using two different ink colors on the same stamp. For example, stamp a base pattern in a light color, then overlay a smaller, more detailed stamp in a darker, contrasting color.
- Hand-Painted Embellishments: After your stamped bowls are dry and sanded, use fine brushes and acrylic paints to add intricate hand-painted details, outline your stamped patterns, or apply a wash of color over the entire surface for an antique effect.
- Decorative Mobiles and Ornaments: Create smaller stamped clay shapes (e.g., stars, moons, circles), poke a small hole in them before drying, and string them together to make beautiful decorative mobiles, garland, or unique holiday ornaments.
- Coasters and Trays: Roll out slightly thicker pieces of clay and stamp them to create personalized coasters. For small planters, craft a slightly larger, flatter stamped piece to serve as a decorative drainage tray, protecting your surfaces and adding aesthetic appeal.
Care and Maintenance for Your Handmade Clay Bowls
To ensure your beautiful air-dry stamped clay bowls remain vibrant and intact for years to come, proper care and maintenance are crucial. Remember that these are typically decorative or light-use items and are not generally designed for direct food contact or prolonged water exposure unless specifically sealed with food-safe and waterproof materials.
- Gentle Cleaning: Regularly dust your bowls with a soft, dry cloth, a feather duster, or a soft-bristled brush. If a deeper clean is needed, gently wipe them with a slightly damp (not wet) cloth. Avoid saturating the clay with water, especially if it hasn’t been thoroughly sealed, as this can cause softening or damage. Do not use harsh chemical cleaners or abrasive sponges.
- Avoid Water Immersion: Air-dry clay is not inherently waterproof. Even with a sealant, prolonged exposure to water, such as soaking or dishwashing, can compromise the clay’s integrity or cause the sealant to degrade. Never put your air-dry clay bowls in a dishwasher or microwave.
- Mind Extreme Temperatures: Keep your bowls away from direct, prolonged sunlight, as this can cause the colors of the ink or any paint to fade over time. Similarly, avoid placing them in areas of extreme heat or cold, as rapid temperature fluctuations can stress the clay.
- Handle with Care: While air-dry clay, once fully cured and sealed, is reasonably durable for its intended use, it can still break if dropped or subjected to heavy impact. Handle your handmade bowls with the same care you would any delicate decorative item.
- Proper Storage: When not in use or during moving, store your bowls in a safe place where they won’t be easily knocked over, crushed, or exposed to moisture. Wrapping them in soft tissue paper or bubble wrap is ideal for protection.
DIY Air-Dry Stamped Clay Bowls Tutorial: Your Creative Journey Awaits!
Embarking on the journey of crafting these beautiful air-dry stamped clay bowls is truly a rewarding experience. It’s a wonderful blend of artistic expression, mindful creation, and practical utility. From the simple satisfaction of kneading the clay to the joy of seeing your unique stamped designs come to life, every step is infused with creative pleasure. These bowls offer an exceptional way to personalize your home decor, organize your small essentials with elegance, and create heartfelt, bespoke gifts that will be cherished for years. We sincerely hope this detailed guide has equipped you with the confidence and inspiration to begin your own clay crafting adventure. Don’t hesitate to experiment with different patterns, vibrant colors, and unique finishing touches to make each bowl a true reflection of your personality. Share your wonderful creations with the world, inspire fellow crafters, and most importantly, revel in the delightful process of bringing beauty and functionality into existence, one perfectly stamped clay bowl at a time!