
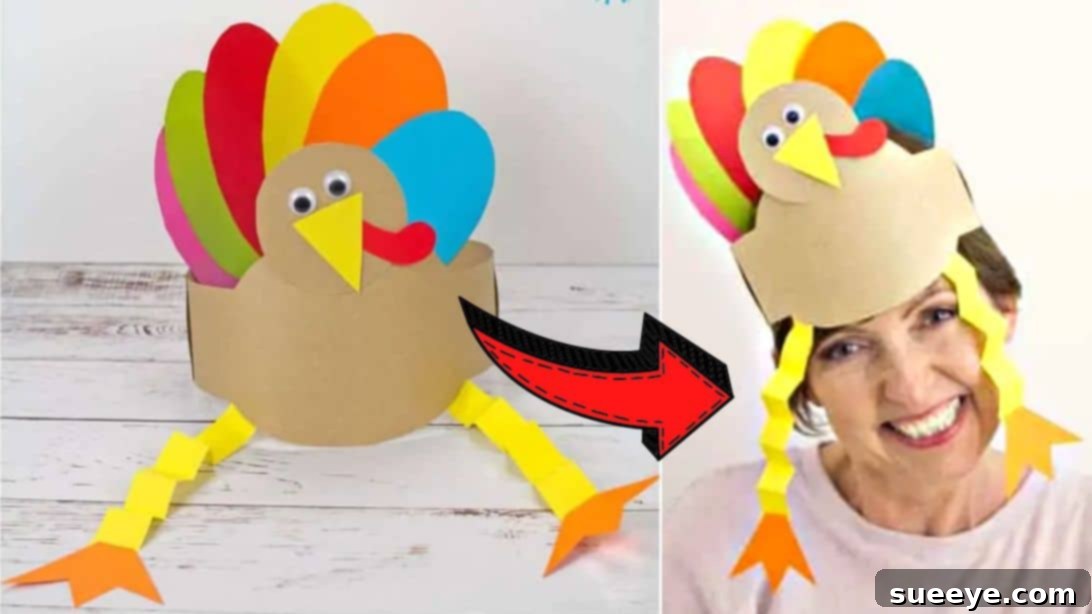
Gobble Up the Fun: Easy DIY Paper Thanksgiving Turkey Hats for the Whole Family
As the aroma of pumpkin pie and roasted turkey begins to fill the air, signaling the joyous arrival of Thanksgiving, what better way to amplify the festive spirit than with a creative, engaging, and utterly adorable craft project? This year, ditch the store-bought decor and gather your loved ones to create something truly special: charming DIY paper Thanksgiving turkey hats! These delightful hats are not just a fun accessory for your holiday feast; they’re a wonderful opportunity for family bonding, sparking creativity, and making cherished memories.
Crafting these festive turkey hats is surprisingly simple, requiring only a few basic materials that you likely already have tucked away in your craft drawer. If not, a quick trip to your local dollar store or craft supply shop will provide everything you need without breaking the bank. This project is perfect for crafters of all ages, from young children (with a little adult assistance, of course!) to seasoned DIY enthusiasts. To ensure a smooth and enjoyable crafting experience, we highly recommend watching the comprehensive video tutorial by Kids Craft Room on YouTube. Their clear instructions will guide you through each step, making this project an absolute breeze. Get ready to add a personal touch of handmade charm to your Thanksgiving celebration!
Gather Your Gobble-Worthy Supplies
Before diving into the creative process, ensure you have all your materials ready. Having everything laid out will make the crafting experience smoother and more enjoyable. Most of these items are standard craft supplies, easily found and often reusable for future projects.
- Cardstock: Choose a variety of festive colors. Think classic turkey browns, vibrant reds, oranges, yellows, and even some greens for the tail feathers. Cardstock is preferred over regular paper for its durability, ensuring your hats stand up to all the Thanksgiving excitement.
- Scissors: A good pair of sharp scissors is essential for clean cuts, especially when dealing with multiple layers of cardstock. For younger crafters, safety scissors are recommended, with adult supervision for trickier cuts.
- Stapler: A reliable stapler will be your best friend for securely attaching pieces like the headband and tail feathers. Ensure you have extra staples on hand.
- Craft Glue: Standard liquid craft glue works perfectly for adhering the smaller details. If you prefer a faster-drying option, a glue stick can also be used for certain parts, though liquid glue generally provides a stronger bond.
- Googly Eyes (Optional but Highly Recommended): These add an irresistible touch of whimsy and personality to your turkey’s face, making the hats even more adorable. If you don’t have googly eyes, you can easily draw them on with a marker or cut circles from white and black cardstock.
- Turkey Hat Template: This is the secret to perfectly shaped turkey hat components! You’ll need to download and print this essential template. Click here to download the printable template from Kids Craft Room. Having the template ensures accuracy and saves time on freehand drawing.
Step-by-Step Guide: Crafting Your Festive Turkey Hat
Now that you have all your supplies, let’s embark on the fun journey of bringing your paper turkey hat to life! Follow these detailed instructions carefully for the best results, remembering that creativity and a little patience go a long way.
Step 1: Preparing the Base and Tail Feathers
The first step involves setting up the fundamental structure of your turkey hat, including the headband and the vibrant tail feathers that give our turkey its distinctive charm.
- Download and Print: Begin by downloading and printing out the turkey hat template. Make sure it prints at the correct scale to ensure the pieces fit together properly.
- Trace and Cut: Carefully trace each template piece onto your chosen colors of cardstock. Precision here will lead to a more polished final product. Once traced, meticulously cut out all the pieces. For the headband, you’ll have two long strips.
- Form the Headband: Take the two headband pieces and loop them together to form a circular band that will fit comfortably around the wearer’s head. Overlap the ends slightly, then securely fasten them in place using your stapler. You might want to test the size on the intended wearer at this point, adjusting for a snug but comfortable fit. Set the completed headband aside.
- Create Vibrant Tail Feathers: For the turkey’s magnificent tail, stack multiple colors of cardstock together. This saves time and ensures uniformity when cutting. Place the tail feather template on top of your stacked cardstock. You can either trace the shape and then cut through the layers, or if your scissors are strong enough, cut directly through the stack using the template as a guide. Aim for a generous number of feathers to create a full, impressive tail.
- Assemble the Tail Fan: Arrange your colorful tail feathers in a fan-like pattern, overlapping them slightly to create a beautiful, layered effect. Once you’re happy with the arrangement, staple them together securely at the bottom where they converge.
- Attach Tail to Headband: Carefully adhere the assembled tail feathers to the inside back of the turkey hat’s headband using craft glue. Apply a generous amount of glue to the base of the feathers and press firmly against the headband, holding it in place until the glue begins to set. This forms the back half of your hat.
Step 2: Adding the Turkey’s Head and Legs
With the headband and tail complete, it’s time to give our turkey some character by adding its distinctive head and playful legs.
- Create the Turkey’s Face: Using the template, trace and cut out the snood (the red fleshy growth under the beak) and the beak itself from appropriate colored cardstock (red for the snood, yellow or orange for the beak).
- Assemble the Head: Glue the snood onto the turkey head piece, then glue the beak on top of the snood. Now, for that extra touch of cuteness, adhere your googly eyes above the beak. If you’re drawing the eyes, do so now with a marker. Allow the glue to dry completely before handling the head further.
- Prepare the Legs: Trace and cut out the turkey legs and feet from your template onto a suitable color of cardstock (e.g., orange or yellow). To give the legs a fun, dynamic appearance, fold them into an accordion style. This adds a delightful bounce and dimension.
- Attach Feet to Legs: Securely glue the turkey feet pieces onto each end of the accordion-folded legs.
- Attach Head to Headband: Once the glue on the turkey’s face is dry, carefully adhere the turkey head piece to the front of the headband. Position it centrally and ensure it stands upright. Hold it firmly until the glue sets.
- Attach Legs to Headband: Finally, glue the accordion-folded legs onto the lower inside of the hat’s front, positioning them so they appear to be dangling playfully from the turkey’s body. Refer to the video tutorial for the exact placement to achieve the desired effect.
And there you have it! Your adorable DIY paper Thanksgiving turkey hat is complete. Now you’re ready to don your festive headwear and celebrate Thanksgiving in style, spreading cheer and perhaps a few giggles wherever you go.
The Joys and Benefits of Crafting Thanksgiving Turkey Hats
Engaging in craft projects like making these turkey hats offers a wealth of benefits beyond just creating a festive accessory. It’s an enriching activity for both children and adults, fostering development and strengthening bonds.
- Boosts Fine Motor Skills: Cutting, gluing, and assembling small pieces are excellent exercises for developing and refining fine motor skills, which are crucial for writing and other daily tasks.
- Encourages Creativity and Imagination: While following a template, there’s ample room for personal expression. Choosing colors, adding extra embellishments, or even drawing unique expressions on the turkey’s face allows crafters to let their imagination soar.
- Promotes Family Bonding: Crafting together is a fantastic way to spend quality time as a family. It encourages teamwork, communication, and shared laughter, creating lasting memories.
- Teaches Patience and Following Instructions: Completing a multi-step project requires patience and the ability to follow directions, valuable skills that extend far beyond the craft table.
- Provides a Sense of Accomplishment: There’s immense satisfaction in seeing a project through from start to finish, especially when the end result is something as charming and wearable as these turkey hats.
- Reduces Screen Time: In an increasingly digital world, hands-on activities like crafting offer a refreshing alternative to screens, encouraging tactile learning and imaginative play.
- Affordable Holiday Fun: Using readily available and inexpensive materials makes this a budget-friendly activity for holiday entertainment.
Creative Customization Ideas for Your Turkey Hats
While the template provides a fantastic foundation, don’t hesitate to unleash your inner artist and customize your turkey hats! Here are a few ideas to get your creative juices flowing:
- Sparkle and Shine: Add glitter to the tail feathers or glue tiny sequins to the turkey’s body for an extra dazzling effect.
- Feather Frenzy: Incorporate actual craft feathers alongside your paper feathers for added texture and realism.
- Personalized Touch: Write each family member’s name on their hat, or even add fun phrases like “Happy Turkey Day!”
- Size it Up or Down: Adjust the print scale of the template to create hats for different age groups, from tiny toddler hats to larger adult versions.
- Unique Embellishments: Use pom-poms for the turkey’s snood or add pipe cleaners for extra wobbly legs. The possibilities are endless!
- Patterned Paper: Instead of solid cardstock, try using patterned scrapbook paper for the tail feathers or even the turkey’s body for a unique look.
Where to Show Off Your Festive Turkey Hats
Once your magnificent turkey hats are complete, you’ll want to flaunt them! Here are some perfect occasions and places to wear or display your handmade creations:
- Thanksgiving Dinner Table: The most obvious choice! Imagine your entire family sitting around the dinner table, each sporting a unique, handmade turkey hat. It’s a fantastic photo opportunity!
- Holiday Photo Shoots: Elevate your family holiday photos with these quirky props. They’ll add personality and a touch of handmade charm to your annual pictures.
- School Thanksgiving Plays or Pageants: If your child is participating in a school play or presentation about Thanksgiving, these hats make perfect, easy-to-create costume pieces.
- Classroom Activities: Teachers can incorporate this craft into their Thanksgiving lesson plans, allowing students to create and wear their hats during classroom celebrations.
- Community Events: Wear them to local Thanksgiving parades, charity events, or fall festivals to spread holiday cheer.
- Festive Home Decor: Even if not worn, these hats can be placed on mantelpieces, shelves, or as centerpieces to add a whimsical touch to your holiday decorations.
No matter where you choose to wear or display them, these DIY paper Thanksgiving turkey hats are guaranteed to bring smiles and warmth to your holiday season.
Embrace the Spirit of Thanksgiving Through Craft
Creating these easy DIY paper Thanksgiving turkey hats is more than just a craft; it’s an invitation to slow down, connect with family, and infuse your holiday celebrations with a personal touch. The satisfaction of wearing something you’ve made yourself, especially when shared with loved ones, is truly priceless. From selecting vibrant cardstock to carefully gluing on googly eyes, every step is an opportunity for laughter, learning, and creativity.
We extend our sincere gratitude to Kids Craft Room via YouTube for providing such a wonderful, clear tutorial and for all the inspiring images used in this guide. Their dedication to making crafting accessible and fun for families shines through in every project. If you enjoyed creating these turkey hats, we highly encourage you to visit their channel and subscribe for a wealth of other fantastic DIY ideas that are perfect for kids and the young at heart.
So, this Thanksgiving, don’t just celebrate; create! Gather your materials, watch the video, and embark on a memorable crafting adventure. These handmade turkey hats are sure to become a beloved part of your family’s holiday traditions for years to come. Wishing you and your family a very Happy Thanksgiving filled with joy, gratitude, and plenty of festive gobbling!