
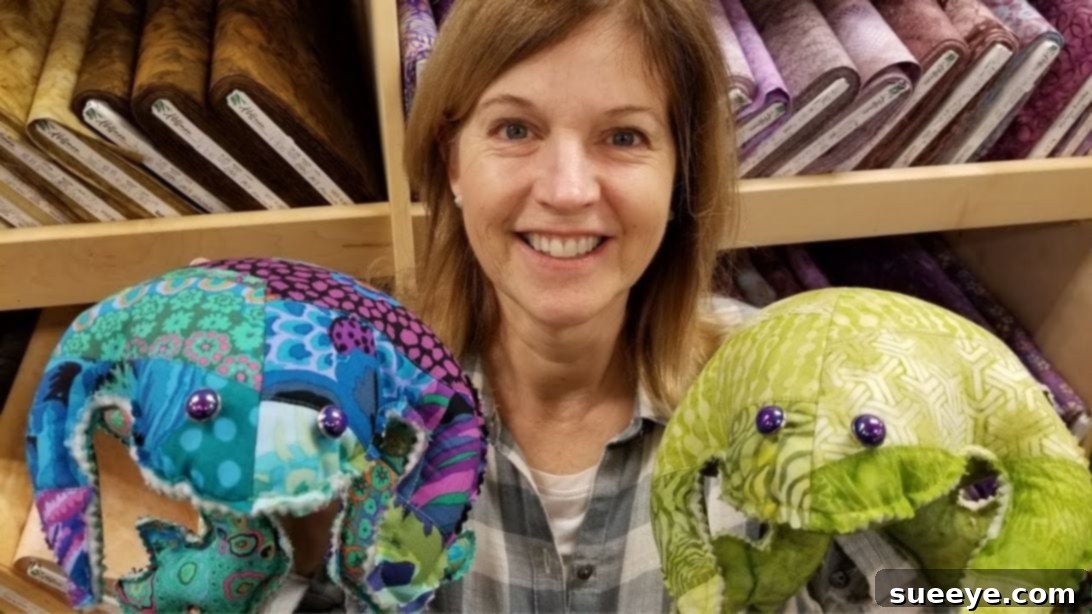
Unleash your creativity and put those beautiful fabric scraps to good use with this delightful scrappy frog sewing project! Inspired by the fantastic Jordan Fabrics tutorial on YouTube, this project is not only an excellent way to practice and refine your sewing skills but also results in an irresistibly charming frog. Whether you’re a seasoned quilter looking for a quick make or a beginner eager to dive into the world of fabric crafts, this tutorial will guide you through each simple step. You only need a few fabric scraps or strips to bring your very own scrappy frog to life. Follow along with our detailed instructions below to discover just how easy and rewarding this sewing adventure can be.
Essential Materials for Your Scrappy Frog
Gathering your materials is the first exciting step in any sewing project. For this adorable scrappy frog, you’ll find that many of the items are likely already in your stash, especially if you love quilting! We’ve broken down exactly what you’ll need to ensure a smooth and enjoyable crafting experience. Remember, the beauty of a “scrappy” project lies in its ability to utilize smaller pieces of fabric, making it a fantastic stash-buster.
- Fabric Scraps for the Frog Top: You’ll need enough fabric to create an 18×21-inch rectangle. This can be achieved in a few ways:
- 20 pieces of 5×5-inch charm squares.
- 9 pieces of 2½x21-inch fabric strips.
- Various other fabric scraps or offcuts that can be pieced together to form the required rectangle.
- Tip: Choose a variety of colors and patterns for a truly “scrappy” and vibrant look. Quilting cotton is ideal for its ease of use and durability.
- 1 Fat Quarter for Quilting Frog Top: This fabric will serve as the backing for your patchwork top, allowing you to quilt it with batting for added texture and stability. Select a coordinating or contrasting fabric to enhance your design.
- 1 Fat Quarter for Frog Bottom: This piece will form the underside of your frog. A solid color or a subtle print often works best, but feel free to experiment with bold patterns if that suits your style.
- 18×21-inch Batting Rectangle: Essential for giving your frog top a soft, quilted feel and some structure. Cotton or polyester batting will work wonderfully.
- 32-ounce Bag of Poly-Pellets: These small plastic pellets provide weight and a pleasant, squishy feel to your finished frog, making it perfect as a pincushion, doorstop, or simply a lovable desk companion. You can also use traditional poly-fill stuffing if you prefer a lighter, softer toy, but pellets give it a unique tactile quality.
- Buttons for the Eyes: Two small to medium-sized buttons will bring your frog to life. Black or dark-colored buttons are classic, but feel free to choose colors that add personality. Ensure they are securely sewn for safety, especially if the frog is for a child.
- Digital Pattern Download: To ensure accurate sizing and shaping, you will need the specific frog pattern. Click here to download and print the pattern before you begin. Make sure to print it at 100% scale to maintain the intended dimensions.
Once you have all your materials neatly organized, you’re ready to embark on the creative journey of sewing your very own scrappy frog!
Step-by-Step Directions to Sew Your Scrappy Frog
Now that you have all your materials ready, let’s dive into the sewing process. This tutorial is broken down into clear, manageable steps to ensure your success. Take your time, enjoy each stitch, and watch as your fabric pieces transform into an adorable, weighted frog.
Step 1: Preparing Your Fabric & Cutting the Pattern Pieces
The first stage involves creating the unique patchwork design for your frog’s top and then precisely cutting out all the necessary fabric shapes. This foundational step is crucial for the overall success and appearance of your finished project.
- Create the Patchwork for the Frog Top:
- Begin by selecting your chosen fabric pieces, whether they are charm squares, strips, or irregular scraps. The goal is to piece these together to form a rectangle that is at least 18×21 inches.
- Lay out your pieces to visualize your design. Once satisfied, start sewing them together with a consistent ¼-inch seam allowance. Work in rows or blocks, carefully nesting your seams where pieces meet to reduce bulk and ensure a flat finish.
- After sewing each section, take it to your ironing board. Use a hot iron with steam to press your seams flat. You can press seams open or to one side, whichever you prefer, but consistency is key for a smooth surface. Ensure the entire patchwork piece measures at least 18×21 inches.
- Quilt the Frog Top:
- Place your 18×21-inch batting rectangle smoothly on a flat surface.
- Next, lay the fat quarter designated for the frog top’s *backing* right side down on top of the batting.
- Finally, place your newly created patchwork piece right side up on top of the backing fabric. You now have a three-layer “quilt sandwich” for the frog’s top: patchwork (top), backing fat quarter (middle), and batting (bottom).
- Secure these layers together using basting pins, safety pins, or temporary spray adhesive, ensuring there are no wrinkles or shifting.
- Using your sewing machine, quilt these layers together. A simple method is to “stitch in the ditch” along the seam lines of your patchwork, creating a subtle texture and securing all layers. Alternatively, you can free-motion quilt or sew parallel lines across the patchwork.
- Once quilted, give the piece another good steam press to ensure it’s perfectly flat and ready for cutting. Set this quilted top piece aside.
- Cut the Frog Pattern Pieces:
- Carefully print and precut your digital frog pattern pieces. Double-check that they are printed at 100% scale.
- Take the largest pattern piece for the frog’s top. Lay it directly on top of your prepared and quilted patchwork fabric. Position it thoughtfully to showcase your favorite fabric combinations and patterns. Pin the pattern piece securely in place to prevent any movement.
- Using sharp fabric scissors, meticulously cut around the edges of the pattern piece. Precision here will ensure your frog has a neat shape. Set the cut quilted top piece aside.
- Now, retrieve the fat quarter designated for the frog’s bottom. Fold it in half, ensuring the fold is perfectly straight and aligned.
- Place the bottom pattern piece on top of the folded fabric, aligning the pattern’s “fold line” precisely with the fabric’s fold. Pin it securely.
- Cut around the edges of the pattern piece. When unfolded, you should have a symmetrical bottom piece for your frog.
Step 2: Assembling Your Frog & Finishing Touches
With all your fabric pieces neatly cut, it’s time to bring your frog to life by assembling its body, adding the stuffing, and completing the charming details.
- Sew the Frog Body:
- Take your quilted frog top piece and the unquilted frog bottom piece. Place them together with their right sides facing each other, carefully aligning all the edges. Pin them securely all around the perimeter to prevent any shifting while sewing.
- Using a sewing machine, start stitching around the entire frog shape with a precise ¼-inch seam allowance. It’s crucial to leave an opening of about 2-3 inches along one of the straighter edges (e.g., the bottom or a side) for turning the frog right side out and for filling it later.
- Remember to back-tack at the beginning and end of your stitching line where you start and stop, and also at both ends of the opening you leave. This reinforces the seams and prevents them from unraveling when you turn and stuff the frog.
- Once sewn, carefully trim the seam allowance around the curves, cutting small V-shaped notches or clips into the curves (without cutting through your stitches). This helps the curves lie smoothly when the frog is turned right side out.
- Turn & Stuff Your Frog:
- Reach through the opening you left and gently turn your entire frog piece right side out. Use a blunt tool, like a chopstick or a turning tool, to carefully push out all the seams and curves, ensuring a well-defined shape. Be gentle to avoid poking through the fabric.
- Once turned, give your frog a good press with an iron to flatten the seams and refine its shape.
- Now, it’s time to fill your frog with the poly-pellets. Through the opening, gradually pour or spoon the pellets into the frog. Distribute them evenly, pushing them into the legs, head, and body. You want your frog to feel pleasantly weighted and squishy, but not overly stiff. A 32-ounce bag usually provides a good amount of weight for a frog of this size.
- If you prefer a softer, lighter frog, you can mix the poly-pellets with some traditional polyester fiberfill, or use fiberfill exclusively.
- Close the Opening & Add Eyes:
- Once filled to your liking, carefully fold in the raw edges of the opening to match the sewn seam line. Pin the opening closed neatly.
- Using a needle and coordinating thread, hand-stitch the opening closed. A ladder stitch (also known as a invisible stitch or blind stitch) is perfect for this, as it creates a seamless finish that blends beautifully with the rest of the frog’s body. Secure your stitches with a knot at the end.
- As an optional finishing touch, you can trim around the edges of the frog with pinking shears. This creates a decorative zig-zag edge and can help prevent fraying if your fabric is prone to it, though it’s less critical after the edges are sewn and turned.
- Finally, sew the buttons for the eyes. Position them symmetrically on the frog’s head, trying out a few spots before permanently stitching them. Use strong thread and make several passes through each button to ensure they are firmly attached, especially if the frog will be handled frequently or given to children (in which case, consider embroidered eyes for safety).
Tips for a Perfect Scrappy Frog
To make your scrappy frog project even more enjoyable and ensure the best possible outcome, consider these additional tips and tricks:
- Fabric Choice Matters: While quilting cotton is recommended for its stability and ease of sewing, don’t be afraid to mix in other lightweight woven fabrics for texture. However, avoid stretchy knits for this project, as they can distort the frog’s shape.
- Seam Allowance Consistency: A precise ¼-inch seam allowance is crucial, especially when piecing your patchwork. Using a quarter-inch foot on your sewing machine can be incredibly helpful for maintaining accuracy.
- Pressing is Key: Don’t underestimate the power of a good iron! Pressing your seams after each sewing step helps your patchwork lie flat, reduces bulk, and results in a much more professional-looking finished product.
- Alternative Stuffing: If poly-pellets aren’t readily available or you prefer a different feel, you can experiment. Crushed walnut shells or rice can provide weight, but ensure they are sealed tightly to prevent moisture issues. For a purely soft frog, standard polyester fiberfill is an excellent choice.
- Customization Ideas:
- Embroidered Details: Instead of buttons, consider embroidering the eyes with French knots or satin stitch for a softer, child-safe option. You can also embroider a small mouth or blushing cheeks.
- Appliqué Accents: Add small felt or fabric appliqué shapes like lily pads, flowers, or a crown to give your frog extra character.
- Scented Fillings: Mix dried lavender or cedar chips with your pellets or fiberfill for a wonderfully fragrant frog that can also act as a sachet.
- Safety First (for children’s toys): If your frog is intended for a child, ensure all embellishments like buttons are securely attached and cannot be pulled off. For very young children, embroidered features are always safer than small buttons.
- Troubleshooting Curves: When sewing curves, slow down your machine and use shorter stitch lengths. This gives you more control and helps create smoother curves. Clipping or notching the seam allowance (as mentioned in Step 2) is vital for neat turning.
Why You’ll Love This Scrappy Frog Project
This simple scrappy frog sewing tutorial offers more than just a cute finished product. It’s a fantastic project for numerous reasons:
- Perfect for Beginners: The steps are straightforward, making it an ideal entry point for those new to sewing or quilting. You’ll practice essential skills like piecing, quilting, sewing curves, and hand-stitching.
- Excellent Stash Buster: Finally, a wonderful excuse to use up those smaller, cherished fabric scraps you’ve been hoarding! It’s satisfying to see them transformed into something new and functional.
- Versatile Use: Your finished frog can serve many purposes. It makes an adorable pincushion, a cute paperweight, a charming decorative accent for any room, or even a soft, weighted toy for older children.
- Thoughtful Gift Idea: Handcrafted items always make the most personal gifts. A scrappy frog is a unique present for friends, family, or fellow crafters.
- Sustainable Crafting: By utilizing fabric remnants, you’re engaging in a more eco-friendly approach to crafting, reducing waste and giving new life to forgotten textiles.
Conclusion: Your Adorable Scrappy Frog Awaits!
Congratulations! You’ve just learned how to create a charming, weighted scrappy frog that’s bursting with personality. This project, lovingly inspired by the expertise of Jordan Fabrics, proves that even the smallest fabric scraps can be transformed into something truly special. We hope you found this tutorial clear, easy to follow, and incredibly satisfying.
Whether your frog ends up holding pins on your sewing table, brightening a bookshelf, or simply bringing a smile to your face, it’s a testament to your growing sewing skills and creative spirit. Don’t hesitate to experiment with different fabric combinations, eye styles, and even small embellishments to make each frog uniquely yours.
We encourage you to share your finished scrappy frogs with the crafting community! And for more inspiring sewing and quilting projects, be sure to follow and subscribe to the Jordan Fabrics channel on YouTube. Happy sewing!
*All image credit belongs to Jordan Fabrics via YouTube. Follow and subscribe to her channel for more inspiring projects!