
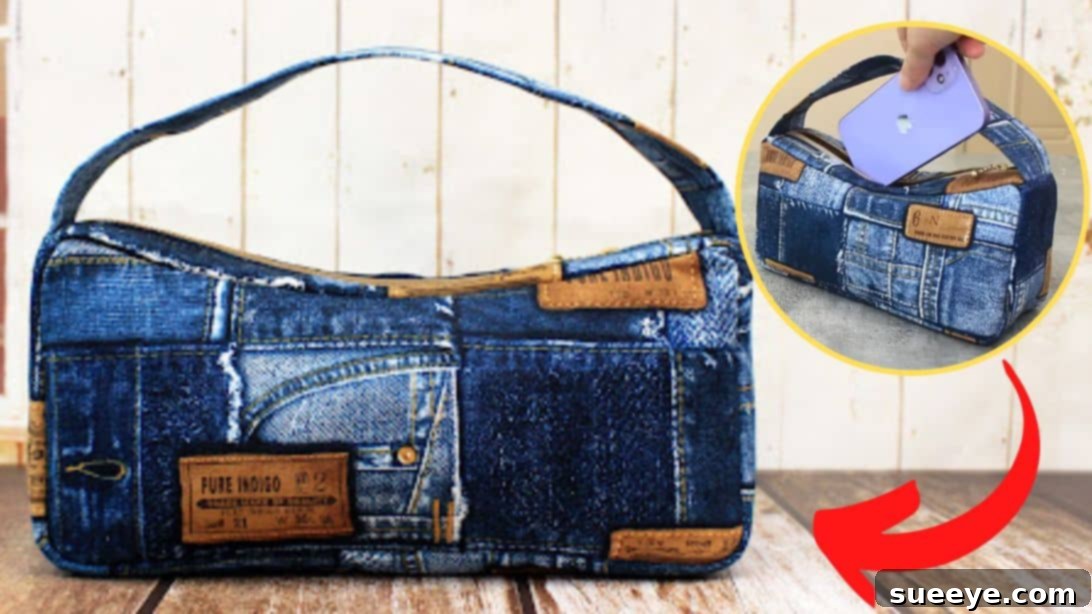
Are you looking for a creative way to repurpose old denim jeans, or perhaps you’ve stumbled upon some charming denim-printed fabric and need inspiration for your next sewing project? Look no further! This comprehensive guide will walk you through crafting a stylish and practical denim pouch bag perfect for organizing small accessories, carrying your phone, or simply adding a touch of handmade charm to your day. Inspired by the excellent video tutorial from sewingtimes on YouTube, we’ll delve into every detail, from material selection to the final stitch, ensuring your DIY denim pouch is both beautiful and durable.
Master the Art of Denim Pouch Making: An Easy Sewing Tutorial
Denim, a timeless and robust fabric, is an ideal choice for crafting accessories due to its durability and classic appeal. Upcycling old jeans not only gives new life to discarded items but also contributes to sustainable fashion practices. This tutorial is designed for sewers of all skill levels, offering clear, step-by-step instructions that elaborate on the techniques shown in the original video. Get ready to transform your fabric scraps into a functional and fashionable denim pouch bag!
Why Sew Your Own Denim Pouch Bag?
Creating your own denim pouch bag offers a multitude of benefits beyond just having a new accessory. Here are compelling reasons to embark on this rewarding DIY journey:
- Sustainable Fashion: By repurposing old denim jeans, you contribute to reducing textile waste and extending the life cycle of materials. It’s an eco-friendly way to refresh your wardrobe.
- Unleash Creativity: A handmade pouch allows for complete customization. Choose your favorite denim shades, add unique embellishments, or experiment with contrasting lining fabrics to reflect your personal style.
- Practicality & Organization: These pouches are incredibly versatile. They can hold anything from makeup and toiletries to charging cables, stationery, or even serve as a compact clutch for a night out. Keep your essentials organized and easily accessible.
- Budget-Friendly: Crafting a pouch from materials you already own (like old jeans) is significantly more cost-effective than buying a new bag.
- Skill Development: This project is an excellent way to practice fundamental sewing techniques such as zipper installation, working with interfacing, and creating clean finishes with bias tape. It builds confidence for more complex projects.
- Unique Gift Idea: A handmade denim pouch makes a thoughtful and personal gift for friends and family. Show them you care with something crafted with your own hands.
Materials You’ll Need for Your DIY Denim Pouch
Before diving into the sewing process, gathering all your materials is crucial. Precision in cutting and selecting the right fabrics will significantly impact the final look and durability of your denim pouch. Refer to the specific measurements below to ensure you have enough fabric.
Fabric Choices: Outer, Lining, and Interfacing
The choice of fabric will define the aesthetic and feel of your pouch. Denim, whether new or upcycled, forms the robust exterior, while a complementary lining adds a polished finish.
Outer Fabric (Denim or sturdy cotton):
- 2 pieces: 10¾ x 5¾ inches (These will be the main front and back panels of your pouch.)
- 2 pieces: 10¾ x 1¾ inches (These strips are for the zipper tabs, providing a neat finish around the zipper.)
- 1 piece: 4¾ x 19½ inches (This longer strip forms the side and bottom band of the pouch, creating its three-dimensional structure.)
- 1 piece: 4¾ x 12⅝ inches (This shorter strip completes the bottom band, connecting to the longer piece and providing the pouch’s base.)
Lining Fabric (Cotton or light canvas):
The lining protects the interior of your pouch and provides a clean finish. Choose a fabric that complements your denim or adds a pop of color.
- 2 pieces: 10¾ x 5¾ inches (Matching the outer main panels, these form the interior of your pouch.)
- 2 pieces: 10¾ x 1¾ inches (For the lining of the zipper tabs, ensuring a neat interior zipper finish.)
- 1 piece: 4¾ x 19½ inches (This piece lines the longer side/bottom band of the pouch.)
Mid-weight Woven Fusible Interfacing:
Interfacing is essential for providing structure, body, and durability to your pouch. It prevents the fabric from stretching and helps the pouch maintain its shape over time.
- 2 pieces: 10¾ x 5¾ inches (For the main outer panels, adding stability.)
- 2 pieces: 10¾ x 1¾ inches (For the outer zipper tabs, ensuring a crisp look.)
- 1 piece: 4¾ x 19½ inches (To reinforce the longer side/bottom band.)
- 1 piece: 4¾ x 12⅝ inches (To reinforce the shorter bottom band piece.)
Essential Sewing Tools & Notions
Having the right tools makes any sewing project smoother and more enjoyable. Ensure you have these items ready:
- 1 piece: 10 inches zipper (A standard plastic or metal zipper will work; choose a color that complements your fabric.)
- 1 piece: 1⅝ x 63¼ inches bias tape (This will be used to neatly finish the interior seams, providing a professional look and preventing fraying.)
- Iron: Indispensable for pressing seams open or flat, creating crisp edges, and fusing interfacing.
- Fabric clips and pins: For holding fabric layers together securely before sewing. Clips are especially useful for thicker fabrics like denim.
- Marking pen/chalk: For accurately drawing patterns and marking stitching lines on your fabric.
- Scissors or rotary cutter and a cutting mat: For precise and efficient cutting of fabric pieces. A rotary cutter is highly recommended for straight lines.
- Sewing machine: Equipped with a denim needle if working with heavy denim, and appropriate thread (polyester all-purpose thread is usually sufficient).
Step-by-Step Guide: Crafting Your Denim Pouch Bag
Now that you have all your materials, let’s begin the exciting process of constructing your denim pouch bag. Follow these detailed steps carefully for the best results.
Preparation: Cutting Your Fabric Pieces with Precision
The foundation of any successful sewing project lies in precise cutting. This initial step involves preparing all your fabric components for assembly.
- Pattern Drafting and Cutting: The original video tutorial by sewingtimes provides exact shapes and measurements for each part of the bag. Begin by drawing these patterns onto your mid-weight woven fusible interfacing pieces. The interfacing will not only serve as a guide for cutting your main fabrics but also add crucial stability to your pouch. Once drawn, meticulously cut out the interfacing pieces.
- Transferring Patterns: Use your precisely cut interfacing pieces as templates to cut your outer denim fabric and lining fabric accordingly. This ensures all corresponding pieces are identical in size and shape.
- Fusing Interfacing: Carefully follow the manufacturer’s instructions to fuse the interfacing pieces to the wrong side of your outer denim fabric pieces. This step is critical for giving your denim pouch its structure and preventing it from becoming flimsy. Press firmly with an iron to ensure a strong bond.
- Initial Seaming: With the interfacing now fused, sew the outer fabric pieces and their corresponding lining pieces together along their edges. A ¼-inch seam allowance is typically used for this initial step. This pre-sewing helps to stabilize the fabric and prepare it for the main construction. Repeat this for all relevant pieces where outer and lining fabric will be combined or stabilized before main assembly.
- Zipper Assembly: Take the two smaller outer fabric strips (10¾ x 1¾ inches) designated for the zipper. Place one strip right-side-down onto one side of your 10-inch zipper, aligning their raw edges. Stitch them together using a zipper foot. Repeat this for the other zipper strip on the opposite side of the zipper. Once sewn, press the fabric away from the zipper teeth and topstitch close to the zipper on both sides. This creates a neat and professional zipper opening.
- Handle Placement: If your design includes a handle integrated into the zipper assembly (as often seen in this style of pouch), lay the main handle piece (or the long side piece that acts as a handle) right side up. Position the newly assembled zipper strip on top of it, ensuring the shorter sides of the zipper strip align perfectly with the shorter sides of the handle piece. Sew them together, incorporating the handle into the zipper panel, ensuring clean alignment.
Assembling the Pouch: Zipper and Main Body Construction
This stage brings all your carefully prepared pieces together to form the three-dimensional pouch.
- Layering the Base: Take the lining fabric base (one of the 4¾ x 19½ inch pieces) and lay it with its wrong side facing up. Place the assembled zipper panel (from step 6 above) on top of the lining fabric base, ensuring the lining sides are facing together. Then, position the corresponding outer fabric base piece (the 4¾ x 19½ inch denim piece) on top, with its right side facing down. This creates a fabric “sandwich” with the zipper panel in the middle.
- Sewing the Shorter Sides: Carefully sew these layers together along their shorter sides. Use a precise 3/8-inch seam allowance. Critically, leave a small gap of approximately 3/8 inches unsewn at each end of these shorter edges. These small gaps are essential for turning the pouch right side out later.
- Notching the Corners: To ensure neat, sharp corners when the pouch is turned, carefully notch the corners into a box shape. This involves trimming a small triangular piece from the seam allowance at each corner. Be careful not to cut through your stitching. This reduces bulk and allows the fabric to lie flat.
- Turning and Topstitching: Gently turn the entire piece right side out through the gaps you left. Use a pointy tool (like a chopstick or turning tool) to carefully push out the corners, making them as crisp as possible. Once turned, press the edges flat with an iron. Then, sew all around the sides with a ¼-inch seam allowance. This step closes the turning gaps, secures the layers, and gives the pouch a crisp, finished edge. Trim any stray threads or frayed edges as needed to maintain a clean appearance.
- Attaching Body Pieces: Take the remaining main body pieces (the 10¾ x 5¾ inch panels for both outer and lining). Attach these to each side of the pouch. Ensure proper alignment and use clips or pins to hold them in place. Stitch them securely, following the seam allowances outlined in the video tutorial (typically ¼-inch to 3/8-inch).
- Finishing with Bias Tape: The final step involves neatly finishing all the inner seams of your pouch. Take your long piece of bias tape (1⅝ x 63¼ inches). Starting at an inconspicuous spot, fold the bias tape over the raw edges of the interior seams and stitch it in place. This encapsulates all raw edges, prevents fraying, and gives your pouch a professional, clean interior finish. Work slowly and carefully, especially around curves, to ensure the bias tape lies flat and smooth. And just like that, your beautiful, handmade denim pouch bag is complete!
Tips for Sewing with Denim
Working with denim can be slightly different from lighter fabrics. Here are some tips to ensure a smooth sewing experience and a professional-looking finish for your denim pouch:
- Use the Right Needle: Denim is a thick, tightly woven fabric. Always use a denim-specific needle (often labeled “jeans” or “denim”) on your sewing machine. These needles are sharper and stronger, designed to penetrate thick layers without breaking or skipping stitches.
- Strong Thread: While all-purpose polyester thread usually works, a heavier-duty polyester thread can be beneficial for extra strength, especially for topstitching or seams that will endure a lot of stress.
- Adjust Stitch Length: A slightly longer stitch length (around 3.0-3.5mm) is often recommended for denim. Shorter stitches can sometimes get lost in the fabric and make seams look puckered.
- Pressing is Key: Denim can be bulky. Pressing seams open or to one side with a hot iron and steam will help flatten them, reduce bulk, and make subsequent sewing steps easier and neater.
- Reduce Bulk at Seams: When sewing multiple layers of denim, consider trimming the seam allowances down, or grading them (trimming each layer to a different width) to reduce bulk, especially in corners and curves.
- Use a Walking Foot: A walking foot (or even feed foot) attachment for your sewing machine can be incredibly helpful when sewing with denim. It helps feed multiple layers of thick fabric through the machine evenly, preventing shifting and puckering.
- Go Slow: Don’t rush when sewing denim, especially over thick seams or multiple layers. Let the machine do the work, guiding the fabric steadily.
Personalize Your Denim Pouch Bag
The beauty of DIY projects lies in the ability to infuse your personal style. Here are some ideas to make your denim pouch truly unique:
- Embroidery or Appliqué: Before assembling, add some hand embroidery, machine embroidery, or fabric appliqué to the main denim panels. Floral designs, monograms, or geometric patterns can add a personalized touch.
- Patches and Pins: Iron-on patches, fabric paint, or decorative enamel pins can instantly transform a plain denim pouch into a statement piece.
- Contrasting Fabrics: Experiment with contrasting colors or patterns for the lining fabric or even for some of the outer panels (e.g., using a different wash of denim or a patterned cotton for the bottom band).
- Decorative Zipper Pulls: Replace the standard zipper pull with a charming charm, a leather tassel, or a piece of ribbon to add a stylish flair.
- Rivets or Studs: For a more edgy look, add decorative metal rivets or studs to the outer denim fabric, especially along the seams or corners.
- Stenciling or Fabric Paint: Use stencils and fabric paint to create unique designs or patterns on your denim.
Frequently Asked Questions (FAQ) about Denim Pouch Sewing
Here are answers to some common questions that arise when sewing a denim pouch bag:
What type of denim is best for this project?
Medium-weight denim from old jeans (like classic blue jeans) is ideal. It’s durable but not too stiff to sew. Lighter denim might need additional interfacing for structure, while very heavy denim can be challenging to sew through multiple layers.
Can I use other fabrics instead of denim?
Absolutely! This pattern can be adapted for other sturdy fabrics like canvas, duck cloth, corduroy, or even heavy twill. Just ensure they are durable enough to hold their shape and withstand daily use. You might need to adjust the interfacing weight based on your fabric choice.
How can I make my pouch water-resistant?
To add water resistance, you can use a water-resistant fabric for the lining (e.g., PUL fabric or a laminated cotton). Alternatively, you can apply a fabric protector spray to the finished outer denim fabric.
What if my zipper is too long?
If your zipper is longer than 10 inches, you can easily shorten it. Simply sew a new stopper (a few stitches back and forth) at the desired length, then cut off the excess zipper tape about ½ inch past your new stopper. Be sure to do this before attaching the zipper to your fabric to ensure it doesn’t unravel.
How do I ensure my corners are sharp?
The key to sharp corners is precise stitching, trimming the seam allowances (notching the corners), and using a tool to gently push out the corners from the inside after turning. A chopstick or a specific turning tool works well. Be gentle to avoid pushing through the fabric.
Conclusion
Congratulations on completing your denim pouch bag! You’ve not only created a practical and stylish accessory but also mastered several essential sewing techniques and contributed to sustainable crafting. This project, while seemingly simple, offers immense satisfaction and a unique, handmade item that reflects your effort and creativity. Remember to explore the original tutorial by sewingtimes on YouTube for visual guidance and further inspiration. We encourage you to follow and subscribe to her channel for more fantastic sewing projects.
Now that you’ve experienced the joy of upcycling denim, don’t stop here! This project is a fantastic stepping stone for more complex bag making or other denim crafts. Share your beautiful creations with friends and family, and inspire others to embrace the rewarding world of DIY sewing.
*All image credit belongs to sewingtimes via YouTube. Follow and subscribe to her channel for more!