
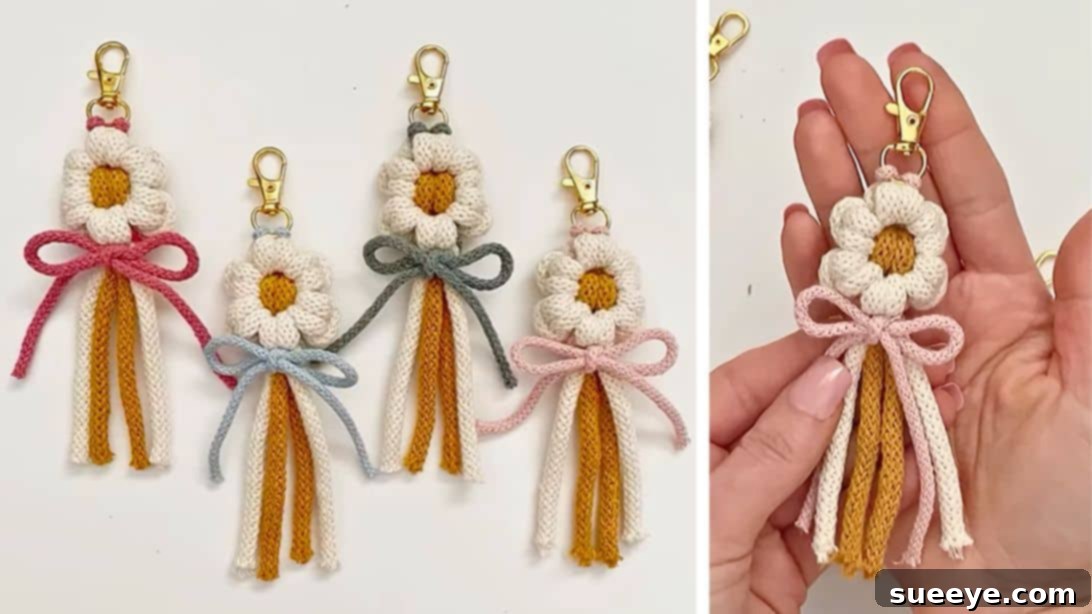
Craft Your Charm: The Easy Macrame Daisy Keychain Tutorial
Embark on a delightful creative journey with macrame, an ancient art form that’s experiencing a vibrant modern resurgence. Whether you’re a seasoned crafter or just dipping your toes into the world of handmade goods, the macrame daisy keychain offers a perfect blend of simplicity, charm, and rewarding results. This adorable project, inspired by the wonderful tutorial from Soulful Notions, is not only quick to create but also incredibly versatile. In just a few minutes, you can craft a beautiful accessory that can be customized to suit any style, making it an ideal gift for friends and loved ones, or a fantastic item to add to your handmade collection for sale.
The beauty of the macrame daisy keychain lies in its accessibility. Requiring only a few basic materials and some fundamental knotting techniques, it’s a project that builds confidence and produces immediate satisfaction. Imagine crafting these lovely daisies in a spectrum of colors, each one a tiny testament to your creativity. You can further personalize them by adding beaded names, initials, or small charms, transforming a simple keychain into a cherished keepsake. Once you master the basic steps, you’ll find yourself able to produce these intricate-looking keychains in mere minutes, making them perfect for batch production for craft fairs or thoughtful last-minute gifts.
Why Macrame? Unlocking the Joy of Knotting
Macrame, the art of knotting cords to create intricate patterns, is more than just a craft; it’s a meditative practice that offers a wonderful escape from daily stresses. The rhythmic motion of tying knots can be incredibly soothing, fostering a sense of calm and focus. It’s a craft that requires minimal tools – often just your hands, some cord, and a sturdy surface to work on – making it highly approachable for beginners. Unlike knitting or crocheting, which involve needles or hooks, macrame relies solely on the manipulation of cords, allowing for a more tactile and intuitive creative experience.
Starting with small projects like keychains is an excellent way to learn foundational macrame knots without feeling overwhelmed. These smaller pieces allow you to practice tension control, learn knot sequences, and experiment with colors and textures before tackling larger, more complex projects like wall hangings or plant hangers. The immediate gratification of completing a beautiful item in a short amount of time is a powerful motivator, encouraging you to explore more of what macrame has to offer. It’s a craft that empowers you to turn simple lengths of cord into functional art.
The Allure of the Daisy: A Timeless Design
The daisy, with its classic petals and cheerful demeanor, is a timeless symbol of innocence, purity, and new beginnings. Translating this beloved flower into a macrame keychain creates an accessory that is both charming and universally appealing. This particular design captures the delicate essence of a daisy, making it a delightful addition to any set of keys, a stylish bag charm, or even a decorative accent for backpacks and purses.
Its natural, organic feel makes it a popular choice, particularly for those who appreciate handmade items with a touch of whimsy. The versatility of the daisy design also means it can adapt to various aesthetics – from rustic and bohemian to bright and contemporary, simply by changing the color of your cords. This project celebrates the beauty of nature reimagined through the art of knotting, resulting in a miniature work of art that brightens up everyday essentials.
Gathering Your Creative Arsenal: Essential Materials
Before you begin knotting your charming daisy keychain, gathering the right materials is crucial for a smooth and enjoyable crafting experience. The beauty of this project lies in its simplicity, requiring only a few key components. High-quality cords and a reliable clasp will ensure your finished keychain is not only beautiful but also durable enough for daily use.
- 11 mm Swivel Clasp Keychain: This forms the foundational loop for your keychain and allows it to attach easily to keys, bags, or other items. Opt for a sturdy clasp made from a durable metal to ensure longevity. The swivel feature is particularly useful as it prevents tangles and allows your keychain to move freely.
- 5 mm Braided Cord in Natural – 30 inches long: This will be your primary cord for forming the daisy petals. Braided cords are excellent for macrame as they offer a smooth, consistent texture and are less prone to fraying compared to twisted cords. The natural color provides a classic, versatile base that complements any accent color you choose for the center.
- 5 mm Braided Cord in Mustard – 13 inches long: This shorter length of 5mm cord will typically be used for the distinct center of your daisy, providing a lovely contrast and visual pop. Mustard yellow is a popular choice for daisies, mimicking the natural golden hue of the flower’s center, but feel free to experiment with other colors like bright yellow, orange, or even a contrasting shade like brown or black for a unique look.
- 3 mm Braided Cord in Any Color – 20 inches long: This thinner cord often serves as the structural core or an accent within the daisy design, allowing for finer details and different knotting techniques. Its smaller diameter makes it ideal for more intricate work or for creating loops and secure bindings. Choose a color that either complements or contrasts beautifully with your main daisy colors.
Beyond these listed materials, it’s always helpful to have a sharp pair of scissors for clean cuts, a measuring tape to ensure accurate cord lengths, and a surface where you can secure your work (like a macrame board with pins, a clipboard, or even just tape on a table) to maintain tension and ease of knotting.
Mastering the Knots: Step-by-Step Guide to Your Daisy Keychain
Creating your macrame daisy keychain is a methodical and enjoyable process. Each step builds upon the last, gradually bringing your floral design to life. Pay close attention to tension and consistency in your knots for the best results. Don’t be afraid to take your time, and remember that practice makes perfect!
Step 1: Setting the Foundation
Begin by taking your 3 mm cord, which will serve as the initial anchor for your keychain. Fold this cord precisely in half, ensuring both ends are even. Locate the loop of your 11 mm swivel clasp keychain and thread the folded cord’s loop through it. Once the loop is through, open it up and pull the two loose ends of the 3 mm cord completely through this loop. Pull firmly to secure the cord to the keychain with what is essentially a modified Lark’s Head knot or a simple loop attachment, ensuring it is snug against the metal clasp.
Step 2: Securing Your Workspace
For stability and ease of knotting, it’s highly recommended to secure your keychain to your work surface. Use strong masking tape or painter’s tape to firmly attach the metal clasp of the keychain to your table or macrame board. This prevents your project from shifting as you tie knots, allowing you to maintain consistent tension and focus on the intricate work.
Step 3: Creating the Initial Crossover
Now, focus on the two loose ends of your 3 mm cord. Take the left cord and cross it over to the right side. Then, take the right cord and cross it over the left, creating a small “X” or crossover shape directly beneath the keychain clasp. This crossover forms the basis for the first decorative knot that will hold the natural cord in place.
Step 4: Incorporating the Natural Cord
Take your 30-inch natural 5 mm cord and fold it in half. Position this folded cord so that its loop is placed *behind* the small crossover you just created with the 3 mm cords. Bring the loop up and over the top of the crossover. Then, take the two loose ends of the natural cord and pull them down through the loop you just brought over. Gently tighten the initial crossover formed by the 3 mm cords, and then pull the natural cord’s loop tightly upwards, securing it firmly around the 3 mm cords.
Step 5: Forming the First Petal (Left Side)
Identify the left part of the 3 mm cord; this will now act as your “filler cord” or “core cord.” You will be tying a series of Lark’s Head knots over this filler cord to create the first petal segment. Take one of the natural cords. Pass it *behind* the 3 mm filler cord. Then, bring the end of the natural cord *over* the filler cord and pull it through the loop you’ve created. Pull this knot firmly upwards towards the center. Repeat this action on the same side, but this time, ensure you pass the end of the natural cord *under* the filler cord, completing a full Lark’s Head knot or a double half hitch, ensuring symmetry and a neat appearance.
Step 6: Mirroring the First Petal (Right Side)
Repeat the exact knotting process from Step 5 on the right side. Use the right portion of the 3 mm cord as your filler cord and the other natural cord. Execute the same Lark’s Head knot sequence (passing behind then over, then repeating with behind then under) to create a symmetrical petal segment that mirrors the left side. Ensure both sides are tightened consistently to create a balanced look.
Step 7: Introducing the Daisy’s Center
Carefully move the two 3 mm cords out of the way for a moment. Now, take the two natural cords and cross them over each other, forming another “X” shape. Take your 13-inch mustard 5 mm cord and fold it in half. Position this folded mustard cord so its loop is placed *behind* the crisscrossed natural cords. Bring the loop over the top, then pull the two loose ends of the mustard cord through the loop. Pull the natural cords tightly around the mustard cord to secure it, creating the distinct central element of your daisy.
Step 8: Completing the Petal Structure
With the mustard cord now integrated, repeat the knotting sequence from Step 5 and Step 6. You will use the two mustard cords as your new working cords and the natural cords (that crisscrossed) as your filler cords. This step essentially creates the second layer of petals, framing the mustard center. Ensure your knots are even and your tension is consistent on both sides to maintain the daisy’s symmetrical shape.
Step 9: Securing with the 3 mm Cords
Bring the two 3 mm cords back into play. Crisscross them over each other, creating an “X” shape directly below the mustard center and the natural petal sections. Now, take the left natural cord and pass it *over* these two crisscrossed 3 mm cords, pulling its end through the loop created. Repeat this action with the right natural cord. Pull the 3 mm cords firmly outwards to tighten and secure this section, pulling all the cords together and cinching the daisy shape.
Step 10: Final Knot and Finish
Take the 3 mm cord, gather all four remaining cords (two natural, two mustard) together, and pass the 3 mm cord *behind* all of them. Pull it tightly to create a snug bind. Then, bring the 3 mm cord to the front and tie a regular, tight knot around all the cords. You can then trim the excess cords to your desired length. For a decorative finish, you can either create a small, neat bow with the 3 mm cord or tie another simple knot and trim closely, ensuring it’s secure. You can also unravel the braided ends for a tassel effect.
Personalization and Customization Ideas
The true charm of handmade macrame lies in its endless possibilities for personalization. Your daisy keychain is a canvas waiting for your unique touch. Here are some ideas to make each piece truly special:
- Vibrant Color Palettes: Experiment beyond natural and mustard. Create daisies with petals in pastel pinks and centers in mint green for a soft look, or go bold with bright fuchsia and electric blue. Variegated cords can add subtle transitions, while ombré effects can create a stunning visual flow.
- Beaded Accents: Elevate your keychains by incorporating beads. Wooden beads add a rustic touch, while acrylic or glass beads can introduce sparkle and color. Letter beads are perfect for spelling out names, initials, or meaningful words, making them incredibly popular for gifts. Simply thread the beads onto the cords before tying certain knots, or secure them at the very end.
- Charming Additions: Small metal or enamel charms can be easily attached to the keychain clasp or integrated into the cord work. Think of tiny leaves, bumblebees, or even zodiac signs to complement the daisy theme or reflect the recipient’s personality.
- Texture Play: While braided cords offer a smooth finish, try experimenting with different cord materials like twisted cotton rope for a more textured, bohemian feel, or even jute for a rustic appeal. The different textures can significantly alter the overall aesthetic.
- Size Variations: Adjust the length and thickness of your cords to create larger or smaller daisy keychains. A miniature daisy could be a delicate bag charm, while a larger one could make a statement piece.
Turning Your Craft into a Business: Selling Macrame Keychains
Handmade macrame keychains are not just fun to make; they also have excellent potential as a small business venture. Their affordability, quick production time, and broad appeal make them a fantastic product to sell.
- Market Appeal: Keychains are practical, everyday items that people are always looking for. Their small size makes them impulse buys and perfect for gifting. The unique, handmade quality of a macrame daisy sets it apart from mass-produced alternatives.
- Pricing Strategy: Calculate your material costs, the time you invest (even if it’s quick, your skill has value!), and then add a reasonable profit margin. Research what similar handmade keychains are selling for online and at local craft markets to price competitively.
- Presentation Matters: Thoughtful packaging can significantly enhance perceived value. Consider small, eco-friendly bags, custom tags with your brand name, or even a simple ribbon. Good branding helps your products stand out and builds a memorable experience for customers.
- Where to Sell: Online platforms like Etsy, Shopify, or even local social media marketplaces (Facebook, Instagram) are great starting points. Don’t underestimate the power of local craft fairs, farmers’ markets, or pop-up shops, where customers can see and touch your beautiful creations firsthand.
- Captivating Photography: High-quality product photos are essential for online sales. Use natural light, simple backgrounds, and showcase your keychains from various angles, highlighting their texture, color, and unique design.
Caring for Your Macrame Keychain
To ensure your beautiful macrame daisy keychain remains vibrant and lasts for a long time, a little care goes a long way. Cotton cords can sometimes attract dust or get a little grubby with everyday use. If your keychain needs a refresh, gently spot clean it with a mild soap and cold water. Avoid harsh chemicals or machine washing, as this can damage the knots and fray the cords. Lay it flat to dry completely to maintain its shape. Regular checks for any loose knots and gentle tightening can also extend its life and keep it looking its best.
Embrace Your Inner Maker
The easy macrame daisy keychain is more than just a craft project; it’s an invitation to explore your creativity, develop new skills, and produce something genuinely delightful with your own hands. From the satisfying rhythm of tying knots to the joy of seeing your finished daisy bloom, this project offers a rewarding experience for crafters of all levels. Whether you’re making them for yourself, as heartfelt gifts for friends, or as a charming addition to your handmade business, these adorable keychains are sure to bring a smile. So gather your cords, clear your workspace, and embark on this wonderful macrame adventure. The possibilities for color, personalization, and artistic expression are endless. Happy knotting!