
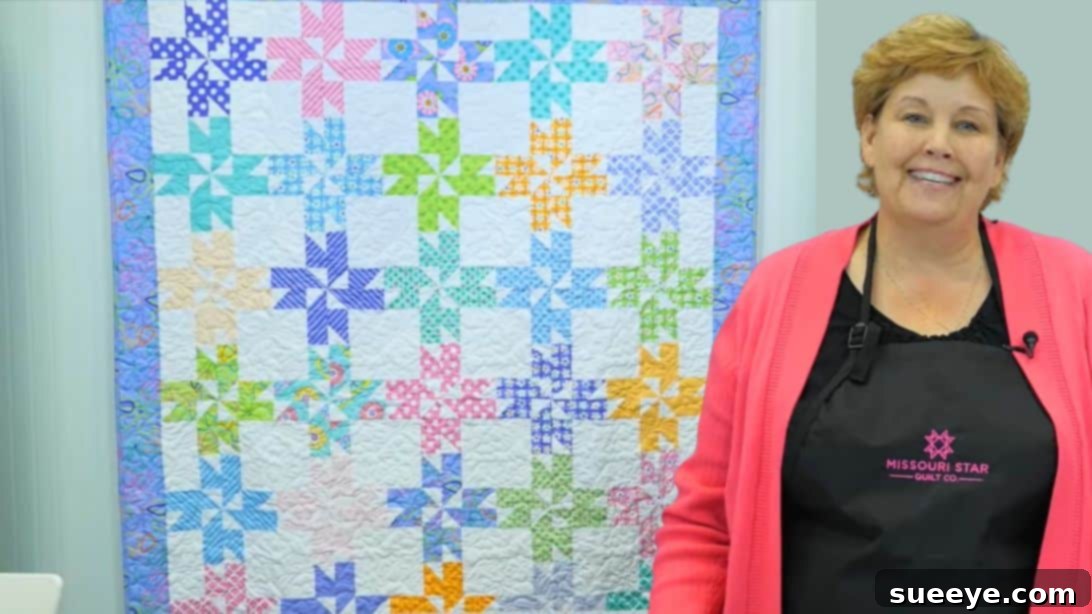
If you’re a passionate quilter or looking to embark on a new, exciting fabric adventure, the Surprise Pinwheels Quilt, brought to life by the beloved Jenny Doan of Missouri Star, is an absolute must-add to your crafting list. This isn’t just any ordinary pinwheel pattern; it’s a breathtaking design that truly lives up to its name, offering a delightful visual twist that captivates the eye. From a distance, the intricate arrangement of fabric pieces cleverly mimics the delicate petals of a blooming flower or the mesmerizing points of a twinkling star, creating a truly unique and dynamic aesthetic for any space. Its charm lies in its deceptive simplicity and stunning final appearance, making it a highly rewarding project for quilters of all experience levels.
This particular quilt design stands out for its clever construction, transforming simple fabric strips into a complex-looking yet surprisingly easy-to-assemble block. If you’ve previously explored patterns like the “Sweet Stars Quilt,” you’ll find a comforting familiarity in the block construction techniques employed here, building on foundational quilting skills. The beauty of this pattern is that it primarily utilizes readily available quilting essentials: vibrant 2 1/2-inch fabric strips, often found in convenient jelly rolls, and coordinating yardage for the background, borders, and backing. This makes fabric selection a joy, allowing for endless creative possibilities, whether you prefer a cohesive color palette or a riot of diverse patterns. Get ready to immerse yourself in a project that promises not only a beautiful finished quilt but also a deeply enjoyable and fulfilling crafting journey.
The instructions provided by Jenny Doan are renowned for their clarity and accessibility, ensuring that even those new to quilting can follow along with confidence and achieve professional-looking results. She masterfully breaks down each step into manageable segments, demystifying the process and empowering you to create stunning pieces. This tutorial offers a fantastic opportunity to hone your precision cutting, accurate piecing, and careful pressing skills—all fundamental techniques that will serve you well in future quilting endeavors. So, grab your rotary cutter, sewing machine, and a selection of beautiful fabrics, because you’re about to discover the sheer delight of bringing this enchanting Surprise Pinwheels Quilt to life. Let’s dive into the full instructions below and make some quilting magic!
RELATED QUILT INSPIRATION & TUTORIALS:
- Discover the Disappearing Double Pinwheel Quilt with Jenny Doan
- Learn to make a charming Twisting Pinwheel Heart Wall Hanging
- Explore the simplicity of an Easy Paper Pinwheel Quilt Block Tutorial
- Create your own elegant Pinwheel Charms Table Runner
Essential Materials for Your Surprise Pinwheels Quilt
Gathering your materials is the first exciting step in any quilting project. For this beautiful Surprise Pinwheels Quilt, you’ll need the following fabric quantities. Remember, precise measurements are key to a successful outcome, so ensure your fabrics are cut accurately.
- 1 Roll of 2 1/2″ Strips (Jelly Roll or similar): This will be the colorful heart of your pinwheels. Jelly rolls offer a fantastic variety of coordinating fabrics, eliminating the need for extensive fabric selection. If you don’t have a jelly roll, you can cut your own 2 1/2-inch strips from fat quarters or yardage, ensuring you have enough contrasting colors and patterns to create visual interest.
- 4 3/4 Yards of Background Fabric: The background fabric provides the canvas against which your vibrant pinwheels will truly pop. Choosing a solid, light-colored fabric like white, cream, or a soft gray often works best to highlight the intricate pinwheel design. However, don’t be afraid to experiment with subtle prints if they complement your strip fabrics without overwhelming them.
- 1 1/2 Yards of Border Fabric: The border fabric frames your quilt top, giving it a polished and finished look. You can choose a fabric that perfectly matches one of your jelly roll strips, or opt for a contrasting color that adds another layer of visual appeal. Consider how the border will interact with the pinwheel blocks and the background.
- 5 3/4 Yards of Backing Fabric: The backing fabric is just as important as the front, providing comfort and stability to your quilt. This measurement accounts for typical quilt dimensions and allows for sufficient overhang when basting. You can choose a single wide-back fabric or piece together standard width fabrics for a creative back design.
Before you begin cutting, it’s often a good practice to pre-wash and press your fabrics. This helps to prevent potential shrinkage and dye bleeding after the quilt is finished, ensuring your hard work stands the test of time. A well-pressed fabric also makes for more accurate cutting and piecing.
Step-by-Step Guide: Crafting Your Surprise Pinwheels Quilt
Follow these detailed instructions to create the captivating Surprise Pinwheels Quilt block. Precision and careful pressing are your best friends throughout this process!
Step 1: Precision Cutting for Your Quilt Block
Accuracy in cutting is paramount for beautiful quilting. Take one of your 2 1/2-inch fabric strips – the ones from your jelly roll or self-cut strips – and prepare it for trimming. Using a rotary cutter, a self-healing mat, and a quilting ruler, carefully cut the strip into specific lengths. From each 2 1/2-inch strip, you will need to cut:
- Four (4) pieces that measure 4 inches long. These will form the shorter units of your pinwheel components.
- Four (4) pieces that measure 6 inches long. These will be the longer units, completing the pinwheel elements.
Next, turn your attention to your chosen background fabric. From this fabric, you will need to cut:
- Four (4) pieces that are 4 inches by 4 inches (4″ squares). These squares will serve as central elements for piecing.
- Eight (8) pieces that are 2 1/2 inches by 2 1/2 inches (2 1/2″ squares). These smaller squares will be used to create the angled edges of your pinwheel units, adding to the “surprise” effect.
Repeat this cutting process for all the desired number of blocks you intend to create for your quilt top. Organizing your cut pieces into stacks or small containers for each block will help immensely in keeping your workspace tidy and efficient as you move to the next stage.
Step 2: Constructing the Angled Strip Units
Now, let’s begin to assemble the unique components of your pinwheel. Gather the four 4-inch long 2 1/2-inch strips and the four 6-inch long 2 1/2-inch strips you just cut from your colorful fabric. Also, retrieve the eight 2 1/2-inch background squares.
- Take one of the 2 1/2-inch background squares. Fold it in half diagonally and press lightly to create a crease, or use a fabric marker to draw a diagonal line from one corner to the opposite corner. This line will be your sewing guide.
- Place one of these prepared background squares onto one end of a 4-inch colored strip. Ensure the square is placed right sides together with the strip, aligning two edges. The diagonal line you marked should run from the corner closest to the strip’s edge to the opposite corner, pointing inwards.
- Sew directly along this marked diagonal line. After sewing, carefully trim the excess fabric, leaving a 1/4-inch seam allowance. You can use a ruler to ensure accuracy.
- Flip the background fabric corner open and press the seam towards the darker fabric (the colored strip). This creates a neat angled edge on your 4-inch unit.
- Repeat this exact process for all four 4-inch strips, ensuring that all the “short” angled background pieces are oriented in the same direction on each strip.
- Now, repeat the same steps for the four 6-inch colored strips, attaching the remaining four 2 1/2-inch background squares to one end of each. Again, make sure all the “long” angled background pieces are oriented consistently.
This step is crucial for creating the distinctive angled edges that define the pinwheel shape. Take your time to ensure precise sewing and pressing. The image below provides a visual reference for how these units should look at this stage.
Step 3: Assembling the Central 4-inch Units
With your angled strip units ready, let’s now integrate them with the 4-inch background squares to form a foundational part of your quilt block. This step combines the colorful strips with the background for a striking visual contrast.
- Take one of the four 4-inch background squares. This square will serve as a base for your piecing.
- Select one of the 4-inch units you created in Step 2 (the shorter angled strips). Place this 4-inch unit on top of the 4-inch background square, aligning the raw edge of the background fabric of the 4-inch unit with one edge of the 4-inch background square. The goal is to have the colored portion of the 4-inch unit positioned directly beside the main background square, with the small white triangle from the previous step facing away from the seam line.
- Ensure that the pieces are right sides together. Pin along the edge you intend to sew to keep the fabrics from shifting.
- Sew them together with a consistent 1/4-inch seam allowance. This precise seam allowance is vital for the overall accuracy of your finished block.
- After sewing, gently press the seam open or towards the darker fabric (the colored strip side). Pressing neatly helps the block lie flat and prevents bulk, contributing to a professional finish.
- Repeat this process for all four of the 4-inch units and the four 4-inch background squares, creating four identical pieced units. These units will form a significant portion of your surprise pinwheel block.
Step 4: Integrating the Longer 6-inch Units
Now it’s time to bring in the longer angled units and attach them to the units you just created. This step further defines the pinwheel’s structure.
- Take one of the pieced units you made in Step 3 (consisting of the 4-inch background square and the 4-inch colored unit).
- Select one of the 6-inch units you prepared in Step 2 (the longer angled strips).
- Position the 6-inch unit beside the pieced unit, ensuring that the white triangle portion of the 6-inch unit aligns next to the colored fabric of the 4-inch unit. This strategic placement is what creates the “surprise” pinwheel effect when multiple blocks are joined. The colored strip of the 6-inch unit should align with the unsewn side of the 4-inch background square, creating a continuous line of background fabric.
- Pin the pieces together, ensuring precise alignment along the seam.
- Sew them together using a 1/4-inch seam allowance.
- Press the seam open or towards the darker fabric, just as before.
- Repeat this process for the remaining blocks until you have four complete units for your single pinwheel block. At this point, you should have four distinct, but not yet joined, segments that will come together to form the intricate pinwheel.
Step 5: Final Assembly of the Surprise Pinwheel Block
This is where the magic happens! You’ll now arrange and sew your four completed units into the final surprise pinwheel block. This step truly reveals the captivating pattern.
- Lay out your four units on a flat surface, such as your design wall or cutting mat. The key here is the orientation of each unit. Arrange them exactly as depicted in the reference photo below. You’ll notice that the colored sections will appear to “spin” around a central point, while the background fabric forms intricate patterns that give the illusion of stars or flowers. Pay close attention to how the white triangles and colored strips align to form the pinwheel.
- Once you are satisfied with the arrangement, take the two top units and sew them together along their adjacent long edge, right sides together, using a 1/4-inch seam allowance. Press the seam open or to one side (often pressing to one side and alternating directions in rows helps nest seams later).
- Next, take the two bottom units and sew them together in the same manner. Press the seam.
- You now have two larger rows. Align these two rows, right sides together, making sure to carefully match up all the seams where the units join. Pin generously at these intersection points to ensure everything stays aligned, preventing “point chopping.”
- Sew the two rows together with a 1/4-inch seam allowance.
- Finally, press this last seam open or in a consistent direction to complete your Surprise Pinwheels block.
Take a step back and admire your finished block! You’ll see the stunning pinwheel effect, with its hidden star or flower elements, come beautifully to life. Repeat these five steps for each block you wish to create, then join your completed blocks into rows and your rows into a complete quilt top. Don’t forget to add your border fabric for a polished finish, and then proceed with basting, quilting, and binding to complete your heirloom-quality quilt.
Expert Tips for a Flawless Surprise Pinwheels Quilt
Achieving a beautiful and professional-looking quilt involves a few key practices that can significantly impact your final result. Here are some expert tips to guide you through making your Surprise Pinwheels Quilt:
- Precision is Paramount: In quilting, accuracy in cutting and sewing is everything. Use a sharp rotary blade, a quality quilting ruler, and a self-healing mat. When sewing, maintain a consistent 1/4-inch seam allowance. A quarter-inch foot for your sewing machine can be incredibly helpful. Even a slight deviation can throw off your block measurements and make piecing blocks together challenging.
- Pressing Matters: Don’t underestimate the power of proper pressing. Pressing seams correctly helps blocks lie flat, reduces bulk, and ensures accurate sizing. Generally, pressing seams open or to the darker fabric is a good rule of thumb, but sometimes pressing to one side and then alternating directions between rows can help “nest” seams, creating flatter junctions when joining blocks.
- Chain Piecing for Efficiency: To save time and thread, utilize chain piecing when sewing multiple identical units. Instead of cutting threads after each unit, feed the next unit directly under the needle. This is especially useful in Step 2 when creating multiple angled strip units.
- Test Your Seam Allowance: Before starting on your actual project, sew a few test strips together, trim, and measure. This helps ensure your 1/4-inch seam allowance is truly accurate on your machine.
- Pin Generously: When joining pieces, especially at points where seams meet, use pins generously. Pinning helps to align fabrics and prevent shifting, ensuring your points match up beautifully and your overall block remains square.
- Square Up Your Blocks: After each block is fully assembled, use a square-up ruler to trim it to its final desired size. This ensures all your blocks are uniform, making the final quilt top assembly much easier and more accurate.
- Fabric Selection: While jelly rolls offer convenience, consider the contrast between your colorful strips and your background fabric. High contrast will make the pinwheel design pop, while subtle differences can create a more subdued, elegant effect.
- Patience and Enjoyment: Quilting is a journey, not a race. Take your time, enjoy the process, and don’t be afraid to unpick (frog-stitch!) if something isn’t quite right. Every stitch is a step towards a beautiful creation.
Personalizing Your Surprise Pinwheels Quilt: Variations and Ideas
One of the joys of quilting is the ability to infuse your personal style into every project. The Surprise Pinwheels Quilt, while stunning in its original form, also offers ample opportunities for creative customization. Here are some ideas to make your quilt uniquely yours:
- Color Palette Exploration: While jelly rolls provide a curated selection, you can choose your own 2 1/2-inch strips. Opt for a vibrant rainbow, a soothing monochromatic scheme, or a sophisticated two-color combination. Experiment with seasonal themes using specific holiday fabrics, or create a gender-neutral quilt with earthy tones. The background fabric choice also plays a huge role; a dark background will make bright colors glow, while a light background offers a crisp, clean look.
- Scale and Size: The tutorial outlines specific dimensions for the units, but with careful recalculation, you could adapt the block size. A larger block might be quicker to assemble for a bigger quilt, while smaller blocks could create a more intricate miniature quilt or a striking table runner. Just remember that changing the strip sizes will require adjusting the background square sizes proportionally.
- Alternative Fabric Choices: Instead of traditional cotton quilting fabrics, consider incorporating other textures. Flannel could create a wonderfully cozy and warm quilt, perfect for winter snuggling. Linens or even specific home décor fabrics (if suitable for quilting) could offer a unique hand and drape. Always check fabric compatibility and care instructions before mixing.
- Border Variations: The border fabric is more than just a frame. You could use multiple borders in varying widths and colors, add a pieced border (such as a piano key border or half-square triangles), or even incorporate applique onto the border for added embellishment.
- Quilting Designs: Once your quilt top is pieced, the quilting itself offers another layer of design. You could follow the lines of the pinwheel shapes with straight-line quilting, use free-motion quilting to create swirling patterns, or opt for a simple stitch-in-the-ditch technique to emphasize the piecing. The quilting pattern can dramatically change the feel and texture of the finished piece.
- Backing Fabric as a Statement: Don’t overlook the back of your quilt! Instead of a single solid piece, consider using leftover block units, creating a strip pieced back, or incorporating a large-scale print that complements the front. Sometimes, the back of a quilt is just as beautiful as the front.
Embrace the freedom to experiment and let your imagination guide you. The Surprise Pinwheels Quilt is a versatile pattern that truly shines with a personal touch.
Learn from the Best: Surprise Pinwheels Quilt with Jenny Doan
For a complete visual walkthrough and invaluable tips directly from a quilting expert, be sure to watch the full video tutorial by Jenny Doan. Jenny’s clear, encouraging teaching style makes even complex steps feel achievable, guiding you through each stage with confidence. Her practical advice and enthusiastic approach will undoubtedly enhance your quilting experience, ensuring you master the nuances of the Surprise Pinwheels Quilt. Happy quilting!