
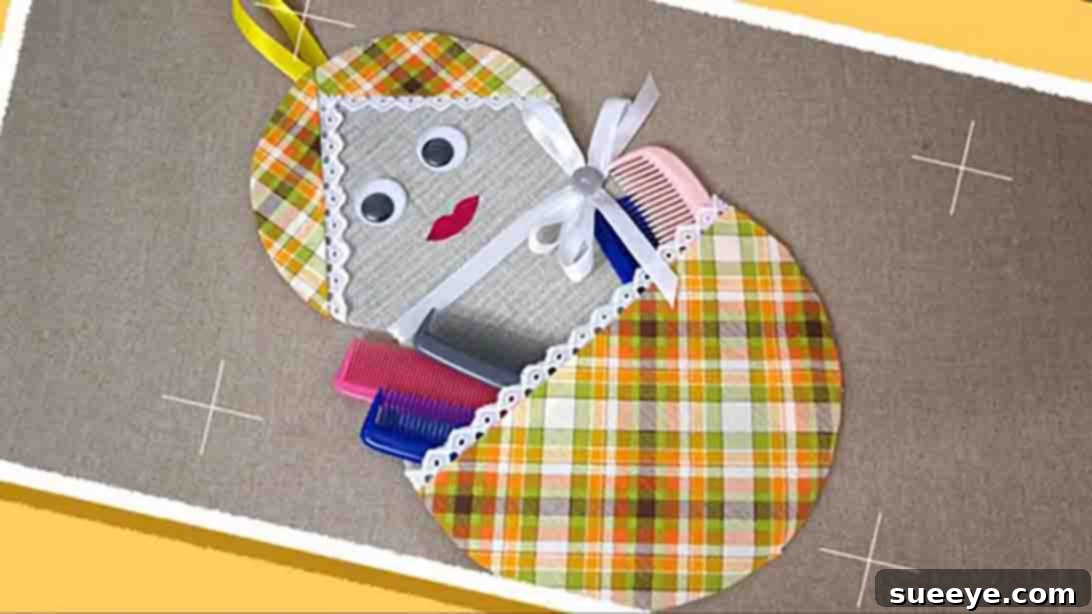
DIY Doll-Shaped Wall Hanging Organizer: Create Charming Storage for Any Room
Are you searching for a delightful and practical DIY project that combines creativity with organization? Look no further! This charming **DIY doll-shaped wall hanging organizer** is the perfect weekend craft to tackle, whether you’re working solo or with friends. Inspired by a fantastic tutorial from Joy of Creation on YouTube, this project offers an adorable way to manage clutter and infuse personality into any space. Imagine transforming simple crafting supplies into a functional piece of art that keeps your essentials neatly tucked away while enhancing your home’s aesthetic.
This isn’t just another craft; it’s a journey into creating something truly special. From holding stationery in a home office to organizing hair accessories in a child’s bedroom, or even corralling small tools in a craft corner, this handmade wall organizer proves its versatility. The best part? You likely have most of the materials already at hand, making it an incredibly budget-friendly and accessible endeavor. Forget about complicated tools or advanced techniques – this project is designed for beginners, promising a rewarding experience and a beautiful result.
Why Choose This DIY Doll-Shaped Wall Organizer Project?
In a world full of mass-produced items, there’s a unique satisfaction that comes from creating something with your own hands. This **DIY doll-shaped wall hanging organizer** offers numerous benefits beyond just storage:
- Unleash Your Creativity: Personalize every aspect, from fabric choices to facial expressions, making each organizer one-of-a-kind.
- Effective Decluttering: Provide a dedicated spot for small items that often get lost, helping you maintain a tidy and serene environment.
- Whimsical Home Decor: Add a touch of handmade charm and a playful element to a child’s room, a craft space, or even a cozy living area.
- Budget-Friendly: Utilize scraps of fabric, old ribbons, and basic craft supplies, turning potential waste into a treasure.
- Beginner-Friendly: The steps are straightforward and easy to follow, making it an ideal project for crafters of all skill levels, including those just starting out.
- Fun Group Activity: Gather your friends or family for a memorable crafting session. Making these organizers together is a fantastic way to bond and share creative ideas.
Inspired by the detailed guidance from Joy of Creation, this step-by-step tutorial will guide you through crafting this delightful doll-shaped organizer. Its simplicity ensures a successful outcome, and you’ll undoubtedly fall in love with your finished creation. It’s more than just an organizer; it’s a testament to the joy of making and the beauty of handmade decor.
RELATED: Dollar Tree DIY Wall Organizer
Materials You’ll Need:
Gathering your materials is the first exciting step in any DIY project. For this **doll-shaped wall organizer**, you’ll find that the list is simple and often includes items you might already have on hand. Don’t hesitate to get creative with colors and textures!
- Template: A crucial guide for shaping your doll. You can draw one freehand, print one from the internet, or create your own based on the provided dimensions.
- Strong Craft Glue: Fabric glue, hot glue (with adult supervision), or a strong PVA glue will work well for securing your fabric and embellishments.
- Assorted Fabrics: Choose a main fabric for the doll’s body and a complementary one for the pocket and hair. Cotton, felt, or even sturdy synthetic blends are great options. Fabric scraps are perfect for this!
- Sharp Scissors: Essential for precise cutting of both your template material and fabrics.
- Googly Eyes: Available in various sizes, these add a playful and expressive touch to your doll’s face.
- Silk Ribbon (or other decorative ribbon): Used for the doll’s “necktie” and as a hanger. Satin, grosgrain, or even twine can be substituted.
- Cardstock or Cardboard: Provides the sturdy base for your organizer. Cereal boxes, poster board, or thick craft paper are all suitable.
- Lace Trim (optional but recommended): Adds elegant detail for the hair and the pocket edge.
Step-by-Step Directions to Craft Your Doll Organizer:
Follow these detailed instructions to bring your charming **DIY doll-shaped wall hanging organizer** to life. Take your time with each step, and enjoy the creative process!
Step 1: Creating the Doll’s Base and Pocket
The foundation of your organizer begins with a sturdy base and a functional pocket. Precision here ensures a beautiful and durable finished product.
- Prepare Your Template: Begin by tracing your doll template onto a piece of cardstock or cardboard. For a standard size, use these measurements as a guide: an overall length of approximately 30 cm (about 12 inches). The top circular section, which will form the doll’s head and shoulders, should have a diameter of about 15 cm (6 inches). The bottom circular section, forming the doll’s skirt or body, should have a slightly larger diameter of 19 cm (7.5 inches). The two circles should be connected by a tapering body shape. You can sketch this freehand or print a template to match these dimensions. Ensure your lines are clear and precise.
- Apply Glue to the Base: Once your cardstock template is perfectly cut out, apply a thin, even layer of strong craft glue across its entire surface. Pay particular attention to the edges, ensuring complete coverage, as this will prevent your fabric from peeling later. Spread the glue thinly with a brush or your finger for a smooth finish.
- Attach the Main Fabric: Carefully place your chosen main fabric over the glued cardstock, pressing it down gently but firmly to eliminate any air bubbles or wrinkles. Allow the glue to set slightly before proceeding.
- Trim and Prepare for Backing: Using your sharp scissors, meticulously cut the fabric around the cardstock template, leaving a small allowance of about 1 to 1.5 cm (0.4 to 0.6 inches) around all edges. This allowance will be folded over later to create a neat finish on the back.
- Form the Functional Pocket: Take another piece of complementary fabric and cut it into a half-circle shape. The straight edge of this half-circle should be slightly wider than the widest part of your doll’s body (the 19 cm diameter section). This will form the main storage pocket.
- Secure the Pocket: Apply glue only along the curved edge and the two short straight sides of the half-circle fabric. Position this onto the bottom “skirt” section of your doll’s body, ensuring the straight top edge remains unglued and open. Press firmly to create a strong bond, allowing this section to form a pouch where items can be stored.
- Add Decorative Lace Trim (Optional but Recommended): For an extra touch of elegance and to define the pocket’s opening, glue a piece of lace trim along the straight, unglued edge of the pocket fabric. This detail adds a beautiful decorative touch and helps reinforce the pocket’s opening.
- Finish the Back: To create a clean and professional look, carefully fold the excess fabric allowance from step 4 over the edges of the cardboard base and glue it securely to the back. For a truly neat finish, you might also consider cutting another piece of fabric to match the exact shape of your doll and gluing it over the entire back, hiding all raw edges and glue. This creates a double-sided finish, making your organizer look good from any angle.
Step 2: Designing the Doll’s Face and Finishing Touches
Now comes the most exciting part – bringing your doll to life with its unique facial features and essential hanging elements. This is where your organizer truly gains its character.
- Create the Doll’s Hair: To give your doll a charming hairstyle, take two pieces of lace trim and arrange them in a triangular shape on the top circular section of the doll’s head. Glue them securely in place, forming the general outline of the hair. This technique adds texture and dimension. Alternatively, you could use yarn, felt cutouts, or even more fabric strips for different hair styles.
- Fill in the Hair Area: Once the lace trim ‘hairline’ is established, cut a piece of the same fabric you used for the main body (or a contrasting fabric for more visual interest) to fit the space at the top of the lace trims. Glue this fabric down firmly to complete the doll’s hair, ensuring a neat and polished look.
- Add the Doll’s Face: This step truly brings your organizer to life! Carefully glue a pair of googly eyes onto the face area. Experiment with placement to achieve different expressions – higher for a surprised look, lower for a thoughtful one. Next, cut a small, lip-shaped piece of fabric (red felt works wonderfully) and glue it below the eyes to form the doll’s mouth. For added detail, you could draw on small cheeks with fabric markers or use blush.
- Attach the Neck Ribbon and Hanger: Take a piece of silk ribbon (or your chosen alternative) and tie it neatly around the “neck” of your doll, forming a charming bow or a simple knot. This adds a sweet decorative touch. For hanging, create a loop with another piece of silk ribbon or string. Glue or securely attach the ends of this loop to the very top, back of the doll’s head, ensuring it’s strong enough to hold the organizer and its contents. Reinforce with extra glue if necessary.
- Conceal the Back (Optional but Recommended): To ensure your organizer looks pristine from all angles and to hide any visible glue or raw edges from the back, cut another piece of fabric to the exact shape of your completed doll. Glue this piece firmly onto the entire back of the organizer. This step provides a professional finish and adds durability, making your handmade wall organizer truly impressive.
Tips for a Perfect Finish and Creative Variations
Making your **DIY doll-shaped wall hanging organizer** is a personal journey. Here are some extra tips and ideas to make it even better and truly your own:
- Fabric Choices Matter: While cotton is versatile, consider using felt for a no-fray edge, denim for a sturdy, rustic look, or even satin for a more luxurious feel. Patterned fabrics can add a lot of visual interest without much effort.
- Embellish with Flair: Don’t stop at googly eyes and ribbon! Consider adding small buttons as accents, embroidering details like freckles or eyelashes, or gluing on tiny fabric flowers for a hair accessory. Sequins, beads, or glitter glue can also add sparkle.
- Vary the Size: Feel free to adjust the template dimensions to create smaller organizers for tiny trinkets or larger ones for bigger items. A collection of different-sized doll organizers could create a charming wall display.
- Pocket Power: Instead of one large pocket, you could create multiple smaller pockets on the doll’s “skirt” by sewing or gluing vertical seams. This is great for sorting smaller items like pens, hairpins, or craft supplies.
- Theme It Up: Design your doll organizer to match a room’s theme. A mermaid doll for a beach-themed room, a superhero doll for a comic-themed space, or a floral doll for a garden-inspired nook.
- Secure Hanging: Ensure the hanging loop is very robust, especially if you plan to store heavier items. You might use a strong metal D-ring or multiple layers of fabric/ribbon for extra security.
- Drying Time: Allow ample drying time for all glue applications. This prevents shifting and ensures a strong, lasting bond for your organizer.
Caring for Your Handmade Wall Organizer
To keep your **doll-shaped wall organizer** looking fresh and beautiful, a little care goes a long way. Since it’s made of fabric and glue, avoid harsh cleaning methods.
- Dust Regularly: Gently dust the organizer with a soft cloth or a feather duster to prevent dust buildup.
- Spot Clean Only: For any small marks or stains, lightly dampen a clean cloth with mild soap and water, and gently dab the affected area. Avoid saturating the fabric, as this could weaken the glue or distort the cardboard base.
- Avoid Direct Sunlight: Prolonged exposure to direct sunlight can fade fabric colors over time. Try to hang your organizer in a spot that receives indirect light.
Hang It Up and Enjoy!
Once your **DIY doll-shaped wall hanging organizer** is complete and fully dry, the only thing left to do is find the perfect spot for it in your home. Hang it anywhere that needs a touch of charm and a dose of organization: in a child’s bedroom for small toys or hair clips, in a craft room for tools and embellishments, by the entryway for keys and mail, or even in a kitchen for lightweight utensils. This delightful organizer is not just a storage solution; it’s a testament to your creativity and a wonderful addition to your home decor.
Embrace the satisfaction of crafting something beautiful and functional with your own hands. This project is a wonderful reminder that practical items can also be incredibly charming and personalized. So grab your supplies, unleash your inner artist, and get ready to enjoy your uniquely handcrafted doll organizer!