
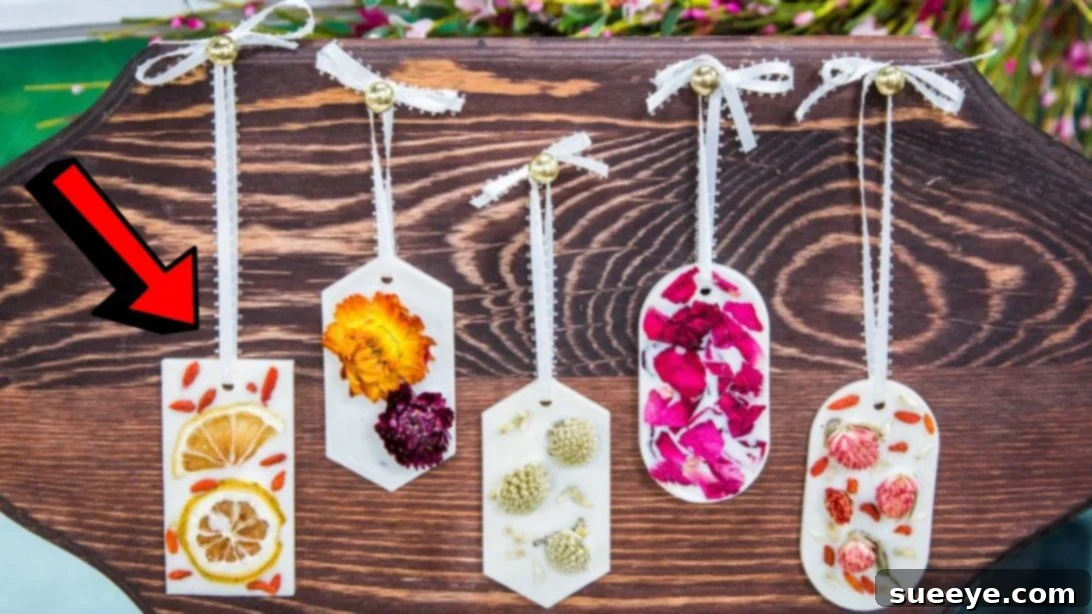
Embark on a delightful crafting journey to create your very own exquisite dried flower wax sachets. Inspired by a brilliant project idea from the Hallmark Channel on YouTube, these aromatic wonders are more than just air fresheners; they are a perfect blend of decorative elegance, natural fragrance, and thoughtful gifting. Super easy to make, incredibly cost-effective, and entirely customizable, these wax sachets offer a charming alternative to synthetic room sprays and generic store-bought decor. Whether you’re looking to infuse your living space with a subtle, long-lasting aroma, create unique handmade gifts for loved ones, or craft beautiful ornaments for your Christmas tree, this project is ideal for all skill levels. The finished sachets are not only visually appealing with their delicate floral embellishments but also radiate a captivating fragrance, transforming any room into a serene sanctuary.
Craft Your Own Aromatic Haven: DIY Dried Flower Wax Sachets
In an age where natural and homemade solutions are increasingly cherished, DIY dried flower wax sachets stand out as a beacon of simplicity, beauty, and sustainability. These charming fragrance discs offer a unique way to personalize your home’s scent profile while adding a touch of rustic elegance to your decor. Forget harsh chemical sprays; with wax sachets, you control every ingredient, ensuring a pure and natural aroma that is both invigorating and calming. This comprehensive guide will walk you through each step, from selecting your materials to the final decorative touches, empowering you to create beautiful, long-lasting fragrance adornments that reflect your personal style.
Why Choose DIY Wax Sachets for Your Home?
The appeal of homemade wax sachets extends far beyond their aesthetic charm. Opting for these DIY air fresheners offers a multitude of benefits that resonate with a mindful and health-conscious lifestyle:
- Natural and Non-Toxic: Unlike many commercial air fresheners filled with synthetic chemicals and volatile organic compounds (VOCs), homemade wax sachets use natural ingredients like soy wax and pure essential oils. This ensures a healthier indoor environment, free from potential allergens and toxins.
- Cost-Effective: Crafting your own sachets is significantly cheaper than purchasing high-end scented candles or diffusers. Basic materials are readily available and a small investment yields multiple fragrant creations.
- Fully Customizable: From the choice of essential oils to the dried botanicals, every aspect of your wax sachet can be tailored to your preference. Experiment with different scents, colors (via natural elements), and decorative themes to match your mood or decor.
- Long-Lasting Fragrance: Wax sachets slowly release their scent over weeks, sometimes months, providing a subtle yet consistent aroma without needing a flame or electricity.
- Beautiful Decor: These aren’t just air fresheners; they are decorative pieces. Hang them in closets, place them in drawers, display them on shelves, or even use them as charming ornaments during the holidays.
- Eco-Friendly: By using sustainable materials like soy wax and dried flowers, you reduce your environmental footprint compared to aerosol cans or plastic diffusers.
- Therapeutic Benefits: Incorporating pure essential oils allows you to harness the power of aromatherapy. Lavender for relaxation, citrus for upliftment, peppermint for invigoration – choose scents that support your well-being.
Essential Materials for Crafting Your Wax Sachets
Gathering the right materials is the first step to a successful and enjoyable crafting experience. Here’s a detailed look at what you’ll need:
- Wax Silicone Mold with a Hole for Hanging (or any mold you have): Silicone molds are ideal due to their flexibility, making it easy to remove the hardened wax sachets without damage. Look for molds specifically designed for wax tarts or soaps. Molds with a pre-existing hole are convenient for hanging, but don’t worry if yours doesn’t have one; we’ll cover how to add it later. Shapes like circles, ovals, hearts, or intricate floral designs work wonderfully.
- High-Quality Essential Oils: This is where the magic happens! Essential oils provide the natural fragrance. Opt for 100% pure therapeutic-grade essential oils for the best scent and potential aromatherapy benefits. Popular choices include:
- Calming: Lavender, Chamomile, Sandalwood, Cedarwood
- Uplifting: Lemon, Orange, Grapefruit, Bergamot
- Invigorating: Peppermint, Eucalyptus, Rosemary
- Warm/Spicy: Cinnamon, Clove, Frankincense (great for holiday themes)
- Floral: Ylang Ylang, Geranium
You can also blend different oils to create unique, complex fragrances.
- Natural Soy Wax Flakes: Soy wax is the preferred choice for wax sachets due to its numerous advantages. It’s derived from soybeans, making it a natural, renewable, and biodegradable resource. Soy wax burns cleaner than paraffin, producing less soot, and has an excellent “cold throw” (the scent released when unlit), which is perfect for sachets. It also holds essential oils exceptionally well, ensuring a long-lasting fragrance.
- Dried Flowers or Dried Fruits: These serve as beautiful, natural embellishments, adding a rustic and artistic touch to your sachets.
- Dried Flowers: Rose petals, lavender buds, baby’s breath, small daisies, statice, hydrangeas, or even tiny sprigs of dried herbs like rosemary and thyme.
- Dried Fruits: Thinly sliced oranges, lemons, limes, or apples (ensure they are thoroughly dried to prevent mold).
- Other Natural Elements: Small pinecones, star anise, cinnamon sticks, whole cloves, or even small decorative beads can be incorporated.
Ensure all botanicals are completely dry to prevent moisture from affecting the wax.
- Double Boiler Setup: This is crucial for safely and evenly melting the wax. A double boiler prevents the wax from scorching or igniting directly over heat. If you don’t have a dedicated double boiler, you can easily create one using two pots: a larger pot filled with a few inches of water, and a smaller, heat-safe pot (like a saucepan or glass measuring cup) that fits snugly on top without touching the water’s bottom.
- Measuring Cups and Spoons: For accurate measurement of wax and essential oils.
- Stirring Utensil: A heat-resistant spatula or wooden stick for stirring the melting wax and mixing in essential oils.
- Ribbon or Twine: For creating the hanging loop. Choose materials that complement your sachet’s design – satin ribbons, jute twine, or even raffia.
- Optional: Skewer or Punch Tool: If your mold doesn’t have a hole, you’ll need this to create one.
Step-by-Step Directions: Crafting Your Aromatic Wax Sachets
Follow these detailed instructions to create beautiful and fragrant wax sachets that will uplift your home’s ambiance.
Step 1: Preparing Your Wax and Workspace
Start by setting up your double boiler. Fill the larger pot with about 2-3 inches of water, ensuring that when the smaller pot is placed on top, its bottom does not touch the water. Place 3 cups of soy wax flakes into the smaller, heat-safe pot. Now, bring the water in the larger pot to a gentle boil over medium heat. Once the water is boiling, carefully place the pot containing the wax flakes on top. This indirect heat method is essential for melting wax safely and preventing overheating.
Step 2: Melting the Wax to Perfection
As the water heats, the wax will slowly begin to melt. Stir the wax gently and occasionally with a heat-resistant utensil to encourage even melting. Continue this process until the wax is completely liquid and smooth, with no solid flakes remaining. This usually takes about 10-15 minutes, depending on the heat and wax quantity. Once fully melted, carefully remove the smaller pot from the double boiler setup. Divide the melted wax evenly into three separate heat-resistant measuring cups, with approximately one cup of wax in each. This step allows for easy handling and ensures consistent essential oil distribution for each batch.
Step 3: Infusing with Fragrance
Now comes the aromatic part! To each cup of melted wax, add about 50 drops of your chosen essential oil. This ratio ensures a strong, lasting fragrance without being overpowering. Feel free to experiment with different essential oils in each cup if you wish to create a variety of scents. Immediately after adding the essential oils, stir each cup thoroughly for at least 30-60 seconds. This step is critical to ensure the essential oils are fully incorporated and evenly distributed throughout the wax, which helps to maintain a consistent scent throw as the sachet ages.
Step 4: Pouring and Layering
Carefully pour the scented wax into your silicone molds. Aim to fill each mold about ½-inch deep, or roughly 75% full. This leaves enough space for the dried flower embellishments without overflowing the mold. Work steadily but quickly, as the wax will start to cool and set. If you are using molds without a pre-existing hole, this is the stage where you would consider where to place your hole later.
Step 5: Embellishing with Dried Botanicals
Allow the poured wax to sit undisturbed for about 2 to 3 minutes, just until it begins to cool slightly and form a thin, semi-solid layer on the surface. The wax should still be liquid enough to allow the botanicals to adhere but firm enough to prevent them from sinking completely. This is the perfect time to artfully arrange your dried flowers, dried fruits, or other natural embellishments on top of the wax. Gently press them into the surface to ensure they are securely embedded. This step allows for maximum creativity, so have fun with your designs!
Step 6: The Cooling and Setting Process
Once the botanicals are in place, let the wax cool completely until it is firm and hardened. This can take several hours at room temperature. To speed up the process, you can carefully place the molds in the refrigerator for 30-60 minutes. Once fully cooled and set, gently pop each wax sachet out of its silicone mold. Silicone’s flexibility makes this process easy, but always handle them with care to avoid breaking delicate edges or dislodging flowers.
Step 7: Adding the Hanging Loop
If your wax sachets do not have a pre-made hole for hanging, now is the time to create one. You can use a small skewer, a thick needle, or a specialized punch tool. Gently but firmly push the tool through the top of the sachet where you want the ribbon to go. Be careful not to crack the wax. Once the hole is made, cut a piece of ribbon or twine to your desired length (usually 6-8 inches works well for a loop). Thread the ribbon through the hole, bring the ends together, and tie them securely in a knot or a bow. And just like that, your beautiful, fragrant wax sachets are complete!
Customization and Personalization Ideas
The beauty of DIY projects lies in the freedom to make them uniquely yours. Here are some ideas to personalize your dried flower wax sachets:
- Fragrance Blends: Don’t stick to single essential oils! Create custom blends for different moods or seasons.
- Relaxation Blend: Lavender, Chamomile, and a hint of Bergamot.
- Invigorating Blend: Lemon, Peppermint, and Eucalyptus.
- Holiday Spice: Cinnamon, Clove, and Sweet Orange.
- Woodsy Escape: Cedarwood, Fir Needle, and Patchouli.
- Botanical Variety: Explore beyond just dried flowers. Incorporate coffee beans, small pebbles, glitter (biodegradable!), or even tiny charms embedded into the wax before it fully sets.
- Mold Shapes: Invest in a variety of silicone molds. Heart-shaped sachets make lovely gifts, star shapes are perfect for Christmas, and geometric designs offer a modern flair.
- Coloring Wax: While the natural color of soy wax is beautiful, you can add small amounts of mica powder or natural wax dyes specifically designed for wax to tint your sachets. Be mindful that too much color can affect the scent throw.
- Gift Packaging: If you’re gifting these, get creative with your packaging. Place sachets in small organza bags, tie them with a handwritten tag, or arrange them in a decorative box with tissue paper.
Creative Uses for Your Aromatic Wax Sachets
Once created, your beautiful wax sachets can bring fragrance and charm to many areas of your life and home:
- Wardrobes and Drawers: Hang them on hangers or place them among clothes to keep garments smelling fresh and deter moths naturally.
- Linen Closets: Tuck them between sheets and towels for a subtle, inviting scent.
- Christmas Tree Ornaments: Use festive shapes and holiday-scented oils (like pine or frankincense) to create unique, fragrant ornaments that double as decor.
- Bathroom Air Fresheners: A safer, more elegant alternative to plug-ins or aerosols. Hang them near the toilet or sink.
- Small Spaces: Perfect for refreshing lockers, gym bags, or even a guest bedroom.
- Car Fresheners: Hang one from your rearview mirror for a natural, chemical-free car deodorizer.
- Party Favors or Wedding Gifts: A personalized and thoughtful favor for guests to remember your special occasion.
- Thoughtful Gifts: Present them to friends, family, or teachers as a heartfelt, handmade token of appreciation.
Tips for Success and Troubleshooting
To ensure your wax sachet crafting goes smoothly and yields perfect results every time, keep these tips in mind:
- Do Not Overheat Wax: Always use a double boiler. Direct heat can burn the wax, affecting its color and scent-holding properties, and it can be a fire hazard.
- Stir Essential Oils Thoroughly: Proper mixing ensures the fragrance is evenly distributed throughout the sachet and will last longer.
- Allow Complete Cooling: Rushing the cooling process can lead to brittle sachets or a less smooth finish. Patience is key for durability.
- Handle Botanicals Gently: Dried flowers can be delicate. Place them carefully and avoid pressing too hard.
- Store Supplies Properly: Keep essential oils in dark glass bottles away from direct sunlight and heat to preserve their potency. Store wax flakes in a cool, dry place.
- Clean Molds Promptly: After demolding, clean your silicone molds with warm, soapy water to remove any wax residue.
Easy DIY Dried Flower Room Fresheners Tutorial: Your Journey Begins!
Creating your own dried flower wax sachets is a truly rewarding experience. It’s a simple project that yields impressive results, offering a creative outlet while enhancing your home’s atmosphere with natural beauty and captivating scents. By following this detailed tutorial, you’ve gained all the knowledge to craft these charming items, transforming simple ingredients into personalized treasures. Whether you’re making them for yourself, as gifts, or for decorative purposes, these wax sachets are a testament to the power of handmade charm. So go ahead, unleash your creativity, and fill your home and the lives of your loved ones with the natural fragrance and beauty of these delightful DIY dried flower wax sachets. Happy crafting!
*All images are credited to Hallmark Channel via YouTube. Give their channel a visit and subscribe for more inspiring DIY projects!