
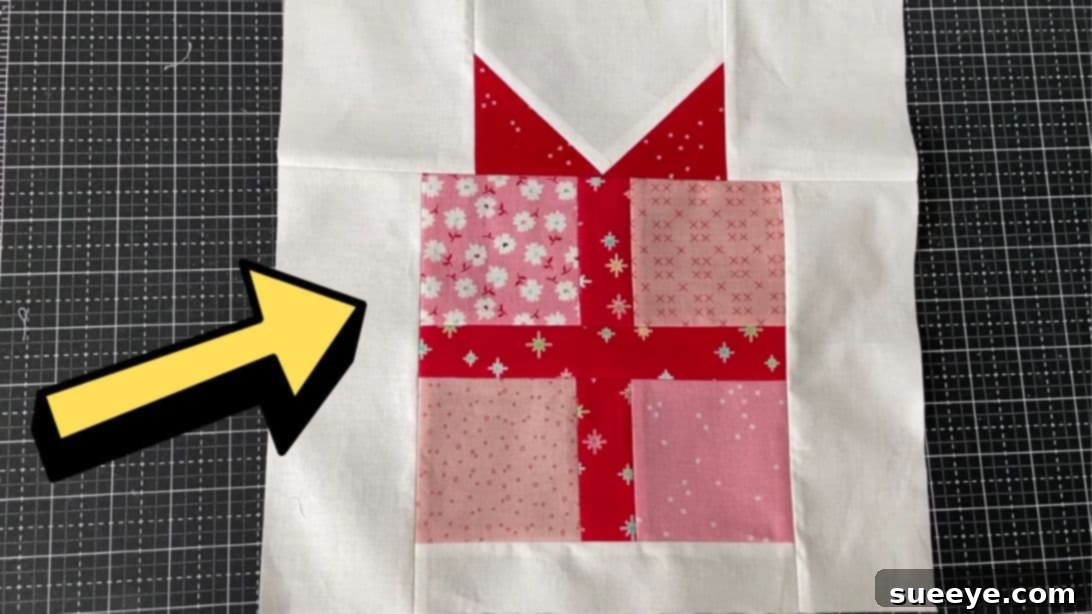
Master the Adorable Gift Quilt Block: A Beginner-Friendly Sewing Tutorial
Unleash your creativity and add a touch of heartfelt charm to your quilting projects with this incredibly adorable and super cute Gift Quilt Block! Designed by the talented Burlap and Blossom Patterns, this design is renowned for its straightforward construction, making it an absolute delight for sewers of all skill levels, especially beginners. You’ll be amazed at how quickly you can bring this festive block to life, often perfecting it on your very first attempt! Whether you’re aiming to create a unique personalized gift, adorn a special quilt, or simply enjoy the meditative process of fabric crafting, this tutorial offers clear, easy-to-follow instructions that will guide you every stitch of the way. Get ready to fall in love with the beautiful results and the joy of making something truly special with your own hands.
This delightful gift quilt block is more than just a sewing project; it’s an opportunity to create lasting memories and cherished items. Its versatile design makes it perfect for a variety of applications, from festive holiday quilts and cozy baby blankets to decorative pillows and charming wall hangings. Imagine the smiles when you present a handmade item featuring this cheerful motif! The simple techniques involved also make it an excellent confidence-builder for those new to quilting, introducing fundamental skills like precise cutting, consistent seam allowances, and careful pressing. Dive into the world of fabric art and let’s create something beautiful together that you can be proud to display or gift.
Why This Gift Quilt Block Is Perfect for Your Next Project
The “Gift Box” quilt block stands out as a fantastic choice for numerous reasons, making it a beloved pattern among quilters. Its iconic imagery evokes feelings of joy, celebration, and generosity, making it ideal for projects intended for special occasions such as birthdays, anniversaries, or holiday seasons. Beyond its sentimental value, the construction of this block introduces or reinforces several foundational quilting techniques, including snowball corners (or flip-and-stitch method) and precise strip piecing, all in an approachable manner.
For beginners, the clear-cut steps and manageable fabric pieces ensure a successful outcome, fostering a sense of accomplishment and encouraging further exploration into quilting. Experienced quilters will appreciate its quick assembly, making it a perfect pattern for adding quick accents to larger quilts, creating small, charming projects like mug rugs, or even for charity quilting. Furthermore, the design lends itself beautifully to creative fabric choices, allowing you to play with different color combinations and patterns to reflect various moods and themes – from whimsical and playful to elegant and sophisticated. This adaptability ensures that each gift quilt block you create can be truly unique, a reflection of your personal style and the intended recipient.
Essential Materials for Your Gift Quilt Block
Before you begin sewing, gathering all your materials and tools is crucial for a smooth and enjoyable quilting experience. Precision in cutting your fabric pieces will significantly impact the final look and accuracy of your quilt block, so take your time with this initial step. We recommend using a rotary cutter, a self-healing mat, and a quilting ruler for the most accurate results. Make sure your iron is ready and your sewing machine is threaded with good quality cotton thread. For this charming gift quilt block, you’ll need the following specific fabric cuts:
White Fabric, for the background and structural elements of your gift:
- (#1) 2 pieces @ 4” x 4½”
- (#2) 1 piece @ 4½” x 5½”
- (#3) 2 pieces @ 3” x 8½”
- (#4) 1 piece @ 1½” x 7½”
Red Fabric, for creating the distinctive bow on top of your gift:
- (#5) 2 pieces @ 3” x 3”
Light Red Fabric, for the elegant ribbon wrapping around the gift:
- (#6) 2 pieces @ 1½” x 3½”
- (#7) 1 piece @ 1½” x 7½”
Pink Fabric, for the main body of the gift box itself:
- (#8) 4 pieces @ 3½” x 3½”
Additional Tools You’ll Need:
- Sewing machine
- Good quality cotton thread (matching or neutral)
- Rotary cutter, self-healing mat, and quilting ruler
- Fabric scissors
- Iron and ironing board
- Pins or fabric clips
- Seam ripper (just in case!)
- Fabric marker or pencil (for drawing lines)
Step-by-Step Directions: Crafting Your Gift Quilt Block
With your materials prepped and ready, it’s time to bring your gift quilt block to life! Follow these instructions carefully, paying close attention to your seam allowances and pressing techniques for the best possible outcome. A consistent ¼-inch seam allowance is key to ensuring your block measures up correctly and all pieces fit together seamlessly. Don’t rush through the steps; enjoy the process of watching your fabric pieces transform into a beautiful design.
Step 1: Constructing the Festive Bow Unit
Begin by focusing on the number 5 pieces (red fabric squares designated for the bow) and the number 2 piece (a white background rectangle). Take one of the 3″ x 3″ red squares and place it onto one of the bottom corners of the 4½” x 5½” white rectangle. Before sewing, carefully draw a diagonal line from one corner of the red square to the opposite corner. This line should run from the inner edge of the white fabric towards the outer edge of the white fabric. Ensure the raw edges of the red square and the white rectangle are perfectly aligned. Now, stitch along this diagonal line with a precise ¼-inch seam allowance towards the outside of the drawn line (meaning, the seam should be on the side closer to the corner that will be trimmed). Once sewn, carefully trim off the excess fabric approximately ¼ inch from your stitching line. Press the seam open, or press the seam allowance towards the darker fabric (red, in this case) for a cleaner finish, creating your first “snowball corner.”
Next, repeat this process with the second number 5 piece (red square) on the opposite bottom corner of the number 2 white fabric. Again, draw a diagonal line from corner to corner, ensuring the line extends towards the outside of the fabric where it meets the edge. Align the raw edges meticulously, sew with a ¼-inch seam allowance from the drawn line, trim the excess fabric, and press it open or towards the red fabric. At this point, you will have successfully created the adorable bow unit for your gift box, featuring two neat red triangular corners on a white background. This unit forms the top part of your gift, complete with a festive bow.
Step 2: Assembling the Charming Gift Box Body
Now that your bow unit is complete, let’s move on to constructing the main body of the gift box. Take the four number 8 pieces (pink fabric squares, 3½” x 3½”) and the two number 1 pieces (white fabric strips, 4” x 4½”). You’ll assemble these into two rows. For the top row, sew one number 8 pink square to one number 1 white strip, and then sew another number 8 pink square to the other side of that white strip. This creates a row with pink-white-pink. For the bottom row, repeat this process, sewing a number 8 pink square, then a number 1 white strip, and finally another number 8 pink square. Press the seams open for both rows to ensure they lie flat and prevent bulk.
Next, take the number 7 piece (light red fabric strip, 1½” x 7½”), which will form the central ribbon of your gift box. Carefully place this strip between the two rows you just created. Align the raw edges precisely, pin liberally to prevent shifting, and then sew all three units together with a ¼-inch seam allowance. Once sewn, press the seams open. You should now have a distinct gift box body, complete with a horizontal ribbon running across its center. This segment beautifully defines the main present.
To finalize the gift box structure, you’ll attach the remaining border pieces. First, take the number 4 piece (white fabric strip, 1½” x 7½”) and sew it to the bottom edge of your assembled gift box body. Ensure all edges are aligned and sew with a consistent ¼-inch seam allowance. Press the seam open. Then, take the two number 3 pieces (white fabric strips, 3” x 8½”) and sew one to each side of the gift box body. Again, align, pin, sew with ¼-inch seam allowance, and press the seams open. These pieces frame the gift box beautifully.
Finally, attach your completed bow unit (from Step 1) to the top edge of the gift box body. Align it carefully, pin in place, and sew with your consistent ¼-inch seam allowance. Press this final seam open to create a smooth finish. Give the entire assembled quilt block a thorough and gentle press with a warm iron to set all the seams and eliminate any wrinkles. Congratulations, your charming Gift Quilt Block is now complete and ready to be incorporated into your next quilting masterpiece!
Tips for Achieving a Flawless Gift Quilt Block
Creating a beautiful quilt block relies on a few fundamental practices that can elevate your work from good to exceptional. Here are some pro tips to help you achieve a flawless Gift Quilt Block every time:
- Accurate Cutting is Key: Invest in a good quality rotary cutter, self-healing mat, and a clear acrylic ruler. Always cut accurately and consistently. Even a slight deviation in measurement can throw off the entire block’s alignment.
- Consistent Seam Allowance: The standard ¼-inch seam allowance is critical in quilting. Practice sewing a straight line with a consistent ¼-inch distance from the edge. A magnetic seam guide or a piece of painter’s tape on your sewing machine can be incredibly helpful.
- Pressing Matters: Pressing is not ironing. When pressing, you lift and place the iron, rather than sliding it, to avoid distorting your fabric. For this block, pressing seams open generally yields a flatter block, especially where multiple seams converge. Experiment to see what works best for you, but aim for flat, unpuckered seams.
- Starch for Stability: A light mist of spray starch on your fabric before cutting and sewing can add stability, making it easier to handle and less prone to stretching or distortion, especially with bias edges.
- Pinning Precisely: Don’t underestimate the power of pins! Pin your fabric pieces together at intersections and along longer seams to ensure they don’t shift while sewing. This is particularly important when joining rows or attaching larger units.
- Chain Piecing for Efficiency: If you’re making multiple blocks, consider chain piecing. This involves feeding one set of fabric pieces through your machine, then immediately feeding the next set without cutting the thread in between. It saves time and thread.
- Trim Those Threads: Snip loose threads as you go to keep your work tidy and prevent them from getting caught in seams or showing through lighter fabrics.
Creative Ideas for Incorporating Your Gift Quilt Blocks
Once you’ve mastered this adorable Gift Quilt Block, the possibilities for incorporating it into various projects are endless! Its charming design makes it perfect for adding a personal touch to a wide array of handmade items. Here are some inspiring ideas to spark your creativity:
- Full Quilt Projects: Assemble multiple gift blocks to create a festive holiday quilt, a thoughtful birthday quilt, or a delightful baby quilt. Vary the background colors or gift box fabrics for a diverse and playful look.
- Pillows and Cushions: One or two gift blocks can be the centerpiece of a decorative throw pillow, perfect for adding a pop of color and charm to your sofa or bed, especially during gifting seasons.
- Tote Bags and Pouches: Integrate a gift block into the design of a handmade tote bag or a small zippered pouch. It makes a wonderful, personalized accessory or a thoughtful gift bag for a special present.
- Table Runners or Placemats: Line up a few gift blocks to create a festive table runner for your dining room, or use individual blocks as unique placemats, perfect for holiday gatherings or special meals.
- Wall Hangings: Frame a single, beautifully made gift block or a small grouping of them to create a charming wall hanging that can be displayed year-round, or seasonally.
- Apparel Embellishments: Consider sewing a smaller version of the block onto a denim jacket, a plain apron, or a child’s garment for a unique, handcrafted embellishment.
- Greeting Cards or Tags: If you’re feeling adventurous, you could even scale down the pattern to create miniature fabric gift tags or embellishments for handmade greeting cards.
Each project is an opportunity to experiment with different fabrics, colors, and quilting techniques, making your creation truly one-of-a-kind. Let your imagination lead the way!
Final Thoughts on Your Quilting Journey
Completing this Gift Quilt Block is more than just finishing a craft project; it’s a testament to your patience, creativity, and growing skill as a quilter. The joy derived from transforming simple pieces of fabric into a cohesive and beautiful design is truly rewarding. Whether this is your first quilt block or one of many, each stitch contributes to a story, a memory, and a unique piece of art.
We encourage you to share your finished Gift Quilt Blocks with friends, family, or online quilting communities. Inspire others with your creations and perhaps even encourage them to embark on their own quilting journeys. Remember, quilting is a continuous learning process, and every project brings new insights and techniques to master. Keep exploring, keep creating, and most importantly, keep enjoying the wonderful world of fabric and thread.
A special thank you to Burlap and Blossom Patterns for sharing this fantastic and easy-to-follow tutorial. Their clear instructions make complex ideas accessible to everyone, fostering a love for quilting in countless individuals. Be sure to check out their other content and follow for more inspiring patterns and helpful tips!