
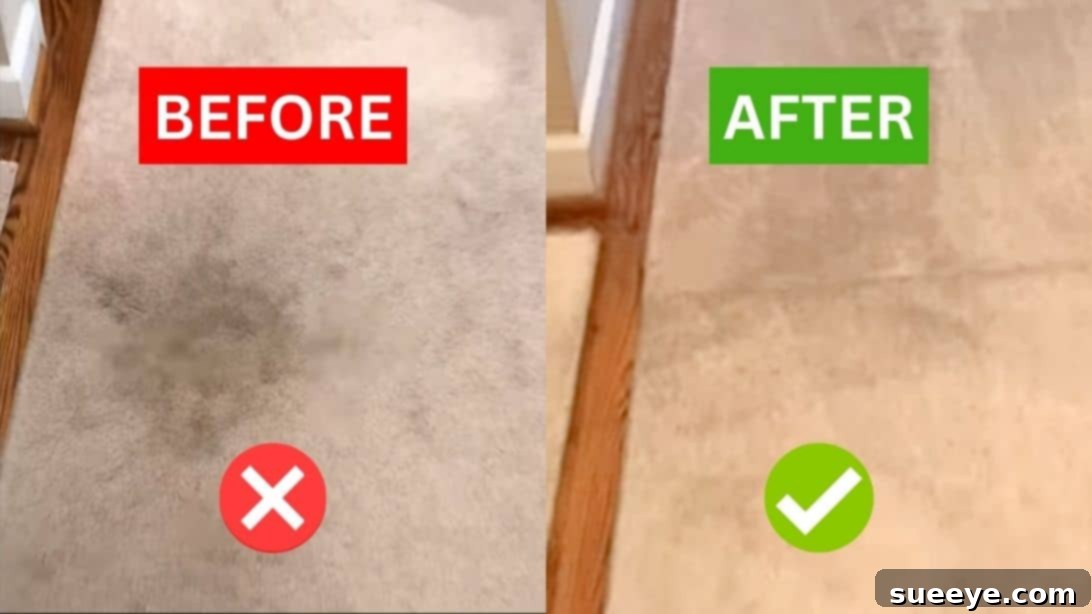
The Ultimate DIY Carpet Stain Remover: Effortlessly Erase Stains with Household Items
Accidental spills and stubborn stains are an inevitable part of life, especially in homes with active families, pets, or frequent guests. A pristine carpet can instantly elevate the look and feel of your living space, but even the smallest spill can feel like a disaster. The frustration of discovering a fresh mark or battling an old, set-in stain is something many homeowners know all too well. While professional carpet cleaning services can be expensive, and commercial stain removers often contain harsh chemicals, there’s a surprisingly effective, natural, and incredibly affordable solution right within your reach.
Don’t let a sudden spill or an unsightly mark dictate your day. Living Gratefully shares an ingenious DIY carpet stain remover that’s not only super easy to make but also utilizes products you likely already have on hand. Forget the need for specialized tools or complex instructions; this method is designed for simplicity and maximum impact. Prepare to be amazed by how effectively common household ingredients can tackle even the most challenging carpet stains, restoring your carpet’s beauty without breaking the bank. Read on to uncover the full instructions and transform your approach to carpet care.
Why Choose a DIY Carpet Stain Remover?
In a world brimming with commercial cleaning products, you might wonder why opt for a homemade solution. The reasons are compelling:
- Cost-Effective: This DIY concoction uses everyday items, significantly cutting down on cleaning expenses compared to store-bought products or professional services.
- Readily Available Ingredients: No last-minute dash to the store! The components are common household staples, meaning you can tackle stains as soon as they happen.
- Fewer Harsh Chemicals: Many commercial cleaners contain strong chemicals that can leave residues, irritate skin, or emit powerful fumes. This homemade solution uses gentler alternatives.
- Quick Response Time: The faster you address a stain, the higher the chance of complete removal. Having a go-to DIY recipe means you’re always prepared.
- Eco-Friendly: By using fewer manufactured products, you reduce your environmental footprint.
- Empowering: There’s a certain satisfaction that comes with successfully tackling a problem yourself, knowing exactly what went into your cleaning solution.
The Science Behind the Solution: How It Works
This simple yet powerful mixture relies on the synergistic action of its key ingredients:
- Dawn Dish Soap: Known for its incredible grease-cutting abilities, Dawn acts as a powerful surfactant. It breaks down surface tension and emulsifies oils, dirt, and grime, allowing them to be lifted away from the carpet fibers. It helps to loosen the stain’s grip on the fabric.
- 3% Hydrogen Peroxide: This mild bleach acts as an oxidizing agent. When it comes into contact with organic stains (like food, blood, coffee, pet accidents), it releases oxygen, which breaks down the chromophores (color-causing molecules) in the stain. This effectively bleaches out the color, making the stain disappear. Its mild concentration (3%) is generally safe for most carpet colors when used correctly.
- Warm Water: Warm water helps to dissolve the dish soap more effectively and opens up the carpet fibers slightly, allowing the cleaning agents to penetrate deeper into the stain and work more efficiently.
Together, these ingredients create a potent cleaner that not only lifts the dirt and grime but also tackles the discoloration, making it a formidable foe against a wide range of common carpet stains.
Materials You’ll Need
Gathering your materials is the first and easiest step. You’ll be surprised at how common these items are, making this solution incredibly accessible:
- Towel(s): You’ll need at least one clean, absorbent towel, preferably white to easily see the stain transfer. For larger or tougher stains, have a few on hand. Microfiber towels work exceptionally well due to their high absorbency.
- Measuring Cup: Essential for accurate proportions, ensuring your cleaning solution is mixed correctly for optimal effectiveness.
- One Cup of Warm Water: The base of our solution, helping to dissolve the soap and activate the peroxide.
- Two Tablespoons of Dawn Dish Soap: The grease-fighting champion that tackles oily residues and lifts dirt. Ensure it’s original Dawn blue or a similar highly concentrated degreasing dish soap.
- Half a Cup of 3% Hydrogen Peroxide: The oxidizing agent that breaks down and lightens stubborn colors and organic matter.
- Veggie Brush (or similar soft-bristled brush): A soft-bristled brush is perfect for gently agitating the carpet fibers without causing damage. A gentle scrubbing motion helps the solution penetrate and loosen the stain.
- Fan: Crucial for accelerating the drying process, preventing mildew, and discouraging re-soiling.
- Optional: Spray Bottle: While not listed in the original, a clean spray bottle can offer a more controlled and even application, especially for smaller or more dispersed stains.
Step-by-Step Instructions for a Spotless Carpet
Follow these straightforward steps to banish those unsightly carpet stains and restore your carpet’s original charm. Remember, acting quickly on fresh stains is always best!
Step 1: Prepare Your Potent Cleaning Solution
In your measuring cup or a clean mixing bowl, carefully combine the ingredients. Add one cup of warm water, followed by two tablespoons of Dawn dish soap, and finally, half a cup of 3% hydrogen peroxide. Gently mix until all components are well combined. Avoid creating excessive suds, as this can make rinsing more challenging. A gentle stir with a spoon or the veggie brush handle should suffice. This blend creates a powerful yet safe cleaning agent that’s ready to tackle a variety of stains.
Step 2: Pre-Treat and Apply with Care
Before applying the solution to the visible stain, always perform a discreet spot test in an inconspicuous area of your carpet. Apply a small amount of the solution, let it sit for a few minutes, then blot dry. Check for any color changes or damage. While 3% hydrogen peroxide is generally safe for most carpets and shouldn’t bleach them, this precautionary step is vital, especially for darker or delicate carpet fibers. Once you’re confident, carefully pour the solution directly onto the stained area, slowly covering the entire mark. If using a spray bottle, mist the stain thoroughly but avoid oversaturating the carpet, as excessive moisture can lead to other issues like mildew.
Step 3: Gently Agitate the Stain
Now it’s time to put your veggie brush to work. Using the soft bristles, gently scrub the stained area with circular motions. The veggie brush is perfect for this task because its softness prevents damage to your carpet fibers, while its size allows for focused agitation. This gentle scrubbing helps the cleaning solution penetrate deep into the fibers, loosening the dirt and allowing the hydrogen peroxide to work its magic on the discoloration. Avoid scrubbing too aggressively, as this can push the stain deeper or damage the carpet pile.
Step 4: Blot Away the Grime
This is a critical step for successful stain removal. Lay a clean, absorbent towel flat on top of the brushed area on the carpet. Apply firm, downward pressure to the towel to absorb the cleaning solution and, more importantly, the lifted stain. You will quickly notice how dirty your towel becomes as it draws the grime from the carpet. Instead of rubbing, which can spread the stain or fray carpet fibers, focus on blotting. Lift the towel, refold it to a clean section, and repeat the blotting process until no more stain transfers to the towel. Depending on the size and severity of the stain, one towel might not be enough. If the stain is still visible after several blotting attempts, don’t despair. Apply a bit more solution, gently scrub again, and continue blotting with fresh sections of your towel. The goal is to extract as much moisture and dirt as possible.
Step 5: Ensure Complete Drying
Once the stain looks clean and you’ve blotted as much moisture as possible, immediately toss your used towels into the wash. The final, crucial step is to ensure the carpet dries thoroughly and quickly. Position a fan, tilted directly towards the slightly damp spot, to help circulate air and accelerate evaporation. Rapid drying prevents the growth of mold or mildew, eliminates any lingering damp odors, and helps prevent the wicking up of residual stain particles from the carpet backing. You can also open windows to improve ventilation or use a dehumidifier in the room for even faster drying. Ensure the area is completely dry before walking on it or placing furniture back.
Expert Tips for Impeccable Results
To maximize the effectiveness of your DIY carpet stain remover and keep your carpets looking their best, consider these additional tips:
-
Act Fast!
The golden rule of stain removal: the quicker you act, the easier the stain will be to remove. Fresh stains haven’t had time to set into the carpet fibers, making them much more responsive to treatment.
-
Always Spot Test
As mentioned in Step 2, always test any cleaning solution on an inconspicuous area first. This is especially important for natural fibers like wool or delicate dyes.
-
Blot, Don’t Rub
Rubbing a stain can spread it, push it deeper into the fibers, and even damage the carpet pile. Always blot with a clean cloth, working from the outside of the stain inwards to prevent spreading.
-
Avoid Over-Saturating
While you want the solution to penetrate the stain, drenching the carpet can lead to mildew, damage the carpet backing, or cause the stain to wick back up as it dries. Use just enough solution to cover the stain effectively.
-
Know Your Carpet Type
This solution is generally safe for most synthetic carpets. However, for wool, silk, or other natural fibers, proceed with extreme caution and always test thoroughly, as hydrogen peroxide can potentially cause damage or discoloration.
-
Vacuum After Drying
Once the carpet is completely dry, a quick vacuum over the treated area can help restore the pile and remove any dried residue, leaving your carpet looking refreshed.
-
Consider a Spray Bottle
For more controlled application and to prevent oversaturation, transferring your mixed solution into a clean spray bottle can be very effective.
Safety First: Important Precautions
While this DIY cleaner uses common household items, it’s always wise to prioritize safety:
-
Ensure Good Ventilation
When using cleaning solutions, especially those containing hydrogen peroxide, ensure the area is well-ventilated. Open windows or use fans to circulate fresh air.
-
Protect Your Skin
While 3% hydrogen peroxide is mild, prolonged contact can irritate sensitive skin. Consider wearing rubber gloves, especially if you have cuts or scrapes.
-
Keep Away from Children and Pets
Store the mixed solution and ingredients out of reach of children and pets to prevent accidental ingestion or contact.
-
Proper Storage
It’s best to mix this solution fresh for each use. Hydrogen peroxide can lose its efficacy over time, especially when exposed to light. Do not store excess mixed solution in an airtight container for extended periods, as the oxygen release can cause pressure build-up.
Frequently Asked Questions (FAQ)
Here are answers to some common questions about this DIY carpet stain remover:
-
Q: Can I use this on all carpet types?
A: It’s generally safe for most synthetic carpets. However, caution is advised for natural fibers like wool, silk, or rayon. Always perform a spot test in an inconspicuous area first to check for discoloration or damage.
-
Q: What if the stain doesn’t come out completely on the first try?
A: For stubborn or old stains, you may need to repeat the process. Apply more solution, gently scrub, and blot again. Patience and persistence are key. Sometimes, several applications over a few hours or even a day may be necessary.
-
Q: Is hydrogen peroxide safe for colored carpets?
A: When used at a 3% concentration and with a proper spot test, it is generally safe for most colorfast carpets. The oxidizing action primarily targets organic matter, but always test first to be sure, especially on darker or highly pigmented carpets.
-
Q: How long does the solution last?
A: For best results, it’s recommended to mix the solution fresh each time you need it. Hydrogen peroxide can break down over time, especially when mixed with other substances or exposed to light, reducing its effectiveness.
-
Q: Can I use different dish soaps?
A: While other dish soaps might work, Dawn is specifically recommended due to its powerful grease-cutting properties. Using a clear, dye-free dish soap is also advisable to avoid introducing new stains from color additives.
Conclusion: Embrace a Cleaner Home for Pennies
Say goodbye to the stress and expense of stubborn carpet stains. With this incredibly effective and budget-friendly DIY carpet stain remover, you hold the power to keep your home’s carpets looking fresh and clean with minimal effort and cost. By harnessing the simple yet potent combination of warm water, Dawn dish soap, and hydrogen peroxide, you’re equipped to tackle almost any common household spill.
This method not only offers a practical solution to everyday messes but also promotes a more sustainable approach to home maintenance by utilizing readily available ingredients. So, the next time an unfortunate spill occurs, remember these simple steps. Act quickly, apply with care, and blot diligently, and you’ll soon have a spotless carpet that reflects the care you put into your home. Experience the satisfaction of a clean, vibrant living space, all for just pennies!