
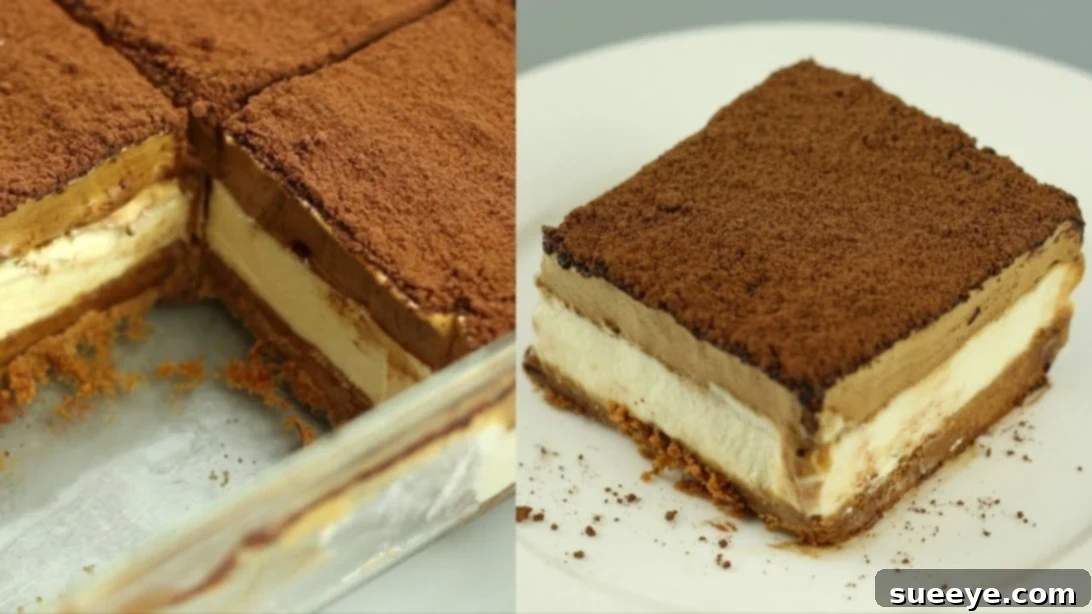
Are you a coffee lover with a sweet tooth who appreciates the convenience of a no-bake dessert? Then prepare to fall in love with this Kirbyyy-inspired No-Bake Coffee Cream Cake. It’s a delightful culinary creation that perfectly marries the rich, invigorating bitterness of coffee with a satisfying, creamy sweetness, all without ever needing to turn on your oven. This recipe is not just incredibly delicious; it’s also surprisingly simple to prepare, making it an ideal choice for both seasoned bakers and complete novices looking for a show-stopping dessert.
This exquisite dessert features three distinct layers, each contributing to a harmonious symphony of flavors and textures. First, a buttery, crumbly crust provides a delightful foundation. Next, a lusciously smooth, creamy filling offers a cool, sweet contrast. Finally, it’s crowned with a light and airy coffee cream topping that delivers that essential aromatic caffeine kick. The beauty of this no-bake cake lies in its effortless preparation and impressive presentation, guaranteeing rave reviews at any gathering or simply as a well-deserved personal treat. Dive into the full instructions below to create your own irresistible coffee cream cake!
Ingredients for Your Irresistible No-Bake Coffee Cream Cake
Creating this decadent dessert requires only a handful of readily available ingredients. Opting for quality ingredients will undoubtedly elevate the final taste, ensuring every bite is a memorable one. Here’s what you’ll need:
- For the Graham Cracker Crust:
- 1 cup of crushed graham crackers (approximately 10-12 full sheets)
- 1/4 cup of unsalted butter, melted
- For the Creamy Filling:
- 2 1/4 cups of all-purpose cream (or heavy whipping cream, well chilled)
- 3/4 cup of sweetened condensed milk
- For the Light Coffee Cream Topping:
- 3 tablespoons of granulated sugar
- 3 tablespoons of instant coffee powder (espresso powder works wonderfully for a richer flavor)
- 3 tablespoons of hot water
- Optional Garnish:
- Cocoa powder for dusting
- Chocolate shavings, coffee beans, or a drizzle of chocolate syrup
Ingredient Notes and Tips:
- Graham Crackers: If graham crackers are not available in your region, digestive biscuits, vanilla wafers, or even shortbread cookies can be excellent substitutes. Ensure they are finely crushed for an even crust.
- All-Purpose Cream: In many countries, this refers to a stable cream with a moderate fat content. If using heavy whipping cream, ensure it is very cold for best whipping results.
- Instant Coffee: The quality of your instant coffee significantly impacts the flavor of the topping. Choose a brand you enjoy for drinking. Espresso powder can intensify the coffee flavor beautifully.
Step-by-Step Guide to Crafting Your Coffee Cream Cake
Follow these simple steps to assemble your stunning no-bake coffee cream cake. Precision and a little patience with chilling times are key to achieving the perfect texture and layers.
Step 1: Preparing the Graham Cracker Crust
Begin by creating the sturdy foundation for your cake. In a medium-sized mixing bowl, combine 1 cup of finely crushed graham crackers with 1/4 cup of melted unsalted butter. Use a fork or spatula to mix these two ingredients thoroughly until all the graham cracker crumbs are evenly moistened and resemble wet sand. The mixture should hold together when pressed.
Step 2: Forming and Chilling the Crust
Carefully transfer the graham cracker mixture into your chosen pan (an 8 or 9-inch springform pan works perfectly for easy removal, but any baking dish will do). Spread the mixture evenly across the bottom of the pan. To create a compact and stable crust, firmly press it down. You can use the back of a spoon, a flat-bottomed glass, or a measuring cup. Ensure it’s as flat and even as possible. Once compacted, place the pan in the refrigerator for a minimum of 10 minutes to allow the butter to set, making the crust firm and less crumbly.
Step 3: Whipping the Creamy Filling
While the crust chills, prepare the rich creamy filling. In a separate, chilled large mixing bowl, pour 2 1/4 cups of cold all-purpose cream. Using an electric mixer (or a stand mixer with a whisk attachment), beat the cream on medium speed for approximately 8 to 10 minutes. Continue beating until the cream becomes thick, fluffy, and holds soft peaks. Be careful not to overbeat, as it can turn granular.
Step 4: Sweetening the Whipped Cream
Once your cream is beautifully whipped, gently add 3/4 cup of sweetened condensed milk. Using a rubber spatula, fold the condensed milk into the whipped cream until just combined. Take care not to deflate the air you’ve incorporated into the cream. Scrape down the sides of the bowl to ensure all ingredients are thoroughly blended, resulting in a smooth, sweet, and airy filling.
Step 5: Layering the Filling and Initial Freeze
Retrieve your chilled graham cracker crust from the refrigerator. Pour the creamy condensed milk mixture directly over the crust, spreading it evenly with a silicone spatula to create a smooth, level surface. Gently tap the pan a few times on your countertop to release any trapped air bubbles, ensuring a dense and uniform layer. Now, transfer the pan to the freezer and let it chill for at least 6 hours, or preferably until completely firm. This extended chilling time is crucial for the cake to set properly and maintain its shape when sliced.
Step 6: Crafting the Velvety Coffee Cream Topping
After the main filling has adequately set, it’s time to prepare the signature coffee cream topping. In a clean, separate bowl, combine 3 tablespoons of granulated sugar, 3 tablespoons of instant coffee powder, and 3 tablespoons of hot water. Using an electric mixer, beat this mixture vigorously. At first, it will be thin, but as you continue to beat, air will be incorporated, and the mixture will lighten in color and thicken into a luscious, airy coffee cream. Continue beating until soft peaks form, indicating a light and fluffy consistency perfect for spreading.
Step 7: Final Assembly and Garnish
Remove the cake from the freezer. Gently spoon or pipe the prepared coffee cream topping over the set condensed milk mixture. Carefully spread it out evenly, covering the entire surface of the cake. For an extra touch of elegance and flavor, lightly dust the top with cocoa powder using a fine-mesh sieve. This not only adds a beautiful visual contrast but also enhances the overall coffee and chocolate notes.
Step 8: Final Chill and Serve
For the ultimate indulgence, return the assembled cake to the refrigerator and allow it to chill overnight. This crucial step allows all the flavors to meld beautifully and the layers to fully set, making for clean, beautiful slices. When ready to serve, carefully remove the cake from the pan (if using a springform). Slice into generous portions, plate elegantly, and savor every delightful bite of your homemade, irresistible No-Bake Coffee Cream Cake!
Tips for No-Bake Cake Perfection
Achieving a flawless no-bake coffee cream cake is easier than you think, especially with these insider tips:
- Chill Your Tools: For the best results when whipping cream, place your mixing bowl and whisk attachment in the freezer for 10-15 minutes before you start. Cold tools help the cream whip faster and achieve a better, more stable consistency.
- Don’t Skimp on Chilling: The chilling times are not merely suggestions; they are vital for the cake to set properly. An under-chilled cake will be messy and difficult to slice. Patience is a virtue here!
- Quality Instant Coffee: The flavor of your coffee cream topping heavily relies on the quality of your instant coffee. Experiment with different brands or opt for espresso powder for a bolder coffee punch.
- Even Crust: Press the graham cracker crust very firmly and evenly into the pan. This prevents it from falling apart when you cut the first slice.
- Gentle Folding: When incorporating condensed milk into the whipped cream, use a gentle folding motion. This preserves the airy texture of the whipped cream, contributing to a light and fluffy filling.
Creative Variations and Customizations
While this recipe is perfect as is, feel free to unleash your creativity and customize it to your taste:
- Crust Alternatives: Beyond graham crackers, consider using crushed Oreo cookies for a chocolate-coffee twist, vanilla wafers for a milder flavor, or even gluten-free biscuits for those with dietary restrictions.
- Flavor Boosts: Add a teaspoon of vanilla extract or a tablespoon of coffee liqueur (like Kahlúa or Tia Maria) to the creamy filling for an extra layer of flavor complexity.
- Topping Adventures: Instead of just cocoa powder, garnish your cake with chocolate shavings, finely chopped toasted nuts (like pecans or almonds), mini chocolate chips, or a drizzle of chocolate fudge or caramel sauce.
- Individual Servings: For elegant individual desserts, prepare this recipe in small ramekins or parfait glasses. Adjust chilling times accordingly.
- Decaf Option: For a late-night treat, simply use decaffeinated instant coffee for the topping.
Serving and Storage Suggestions
This No-Bake Coffee Cream Cake is best served chilled. The clean, defined layers and firm texture make for an impressive presentation. It pairs wonderfully with a fresh cup of coffee or a glass of cold milk. Store any leftovers in an airtight container in the refrigerator for up to 3-4 days. While it can be frozen for longer storage (up to 2 weeks), the texture of the cream layers might change slightly upon thawing. If freezing, wrap the cake tightly in plastic wrap before placing it in a freezer-safe container.
Frequently Asked Questions (FAQ)
Here are answers to some common questions about making this delightful dessert:
Q: My whipped cream isn’t thickening. What went wrong?
A: This usually happens if the cream wasn’t cold enough or if the bowl and whisk weren’t chilled. Ensure all dairy ingredients and equipment are very cold. Also, make sure you’re using cream with a high enough fat content (all-purpose cream or heavy whipping cream, typically 35% fat or higher).
Q: Can I use regular brewed coffee instead of instant coffee for the topping?
A: Instant coffee is crucial for the coffee cream topping as it dissolves quickly and creates the necessary foam and texture. Brewed coffee is too diluted and will not whip into a stable cream. If you want a stronger coffee flavor, use espresso powder.
Q: How can I prevent my crust from crumbling?
A: Ensure you’ve used enough melted butter to bind the crumbs. More importantly, press the mixture very firmly and evenly into the pan. Adequate chilling time (at least 10 minutes in the fridge) allows the butter to solidify and bind the crust.
Q: Can I make this cake ahead of time for a party?
A: Absolutely! This cake is an excellent make-ahead dessert. In fact, chilling it overnight dramatically improves its flavor and texture. Just keep it well-covered in the refrigerator.
Q: What if I don’t have a springform pan?
A: You can use any 8 or 9-inch round or square baking dish. Line the dish with parchment paper, leaving an overhang on two sides, to easily lift the cake out once it’s set. Alternatively, serve it directly from the dish.
Concluding Thoughts on Your No-Bake Coffee Cream Cake
This No-Bake Coffee Cream Cake is more than just a dessert; it’s an experience. It’s a testament to how simple ingredients, when thoughtfully combined, can yield extraordinary results. The rich coffee, the sweet creaminess, and the delightful crunch of the crust create a symphony of textures and flavors that will tantalize your taste buds and leave you craving another slice. Whether you’re hosting a dinner party or simply looking for a delightful treat to enjoy at home, this easy-to-follow recipe promises a dessert that is both impressive and incredibly satisfying. Give it a try, and prepare to be amazed by the magic of no-bake desserts!