
Create an Unforgettable Haunted Look: Your Guide to a DIY Spooky Halloween Fence
As the days grow shorter and a crisp chill fills the air, there’s an undeniable excitement that builds for Halloween. This year, my ambition was to truly transform my yard into a spectacular, haunting display that would captivate every passerby. I embarked on an online quest for the ultimate yard decor ideas, hoping to find something unique, impactful, and ideally, a project I could tackle myself. That’s when I stumbled upon an absolute gem: an awesome DIY Halloween fence video tutorial by the incredibly creative Wicked Makers on YouTube. From the moment I saw it, I knew this was the centerpiece I needed for my Halloween yard.
What immediately drew me to this project was its surprising simplicity and the authentic, weathered aesthetic it achieves. You might expect a formidable fence to require complex carpentry, but this design is refreshingly straightforward. The materials are incredibly basic and readily available: a few pine strips or stakes, some wood stain to give it that aged, decrepit look, and a method to securely fasten them together. The beauty of this DIY Halloween fence lies in its intentionally haphazard construction. There’s no need for meticulous measuring or striving for perfection; in fact, the more broken down, uneven, and in disarray your fence appears, the more genuinely spooky and effective it becomes. This relaxed approach makes it an ideal project for DIY enthusiasts of all skill levels, ensuring that anyone can create a professional-looking, haunted barrier for their home.
Why Choose a DIY Spooky Fence for Your Halloween Yard?
Beyond the sheer joy of creating something with your own hands, a DIY spooky fence offers numerous advantages that make it a standout choice for Halloween decorating:
- Unmatched Authenticity: Store-bought decorations often lack the unique character and rustic charm that a handmade, intentionally distressed fence provides. Your DIY creation will have an authentic, aged appearance that truly sells the haunted vibe.
- Cost-Effectiveness: Building your own fence from basic lumber and stain is typically far more budget-friendly than purchasing pre-made decorative fencing, especially for larger displays. You can often find suitable materials at hardware stores or even salvage yards for minimal cost.
- Complete Customization: You have full control over the height, width, degree of “brokenness,” and finishing touches. Want it taller? Shorter? More decayed? You decide! This allows you to perfectly match your fence to your overall Halloween theme, whether it’s a haunted graveyard, a desolate farmhouse, or a creepy swamp.
- Engaging Project: It’s a rewarding activity for individuals or families. Getting creative with stain colors, assembly patterns, and adding cobwebs can be a fun way to get into the Halloween spirit long before October 31st.
- Durability (with proper care): By selecting outdoor-grade wood and applying a suitable stain or paint, your DIY fence can withstand the elements and be reused for many Halloweens to come, making it a sustainable decor choice.
Essential Materials For Your Haunted Halloween Fence:
Gathering your materials is the first exciting step towards transforming your yard. The Wicked Makers tutorial highlights the simplicity, and here’s a detailed list of what you’ll need to create your impressive spooky fence:
- 1″ x 2″ Pine Strips (or similar lumber): These will form the main vertical and horizontal elements of your fence. The quantity will depend on the length and height of the fence you plan to build. Pine is easy to work with and takes stain well. Look for lengths that can be cut into varying sizes to enhance the broken look.
- .25″ x 2″ Lattice Strips (optional): These thinner strips can be used to add cross-bracing, simulate broken planks, or create more intricate, decayed details on your fence panels. While optional, they can significantly enhance the aged aesthetic.
- Brown Twine (from Dollar Tree or similar store): Inexpensive and versatile, twine can be used to simulate old, frayed ropes binding the fence, or as a base for attaching cobwebs, adding to the neglected feel.
- Outdoor Wood Glue: Essential for strong, weather-resistant bonds between your wooden pieces. Even if you’re nailing, a good wood glue provides extra structural integrity, especially crucial for outdoor decor.
- Brown/Red Wood Stain (Minwax or similar exterior-grade brand recommended): This is key to achieving that aged, weathered, and decaying wood look. A dark brown or reddish-brown stain will give your pine strips the appearance of old, rotted timber. Ensure it’s suitable for outdoor use to protect your fence from the elements.
- Stretchy Spider Web Cob Webbing: The classic Halloween finishing touch! This synthetic webbing can be stretched thin to create realistic, eerie cobwebs that truly make your fence look abandoned and infested.
- Tools: Hammer or nail gun, nails (exterior grade), saw (if you need to cut wood), paintbrushes or rags for staining, safety gloves, and safety glasses.
Step-by-Step Guide: Building Your Spooky Halloween Fence
In this awesome DIY Halloween fence video tutorial by Wicked Makers, on YouTube, you will learn how to make this easy Halloween yard decoration in a few straightforward steps. Let’s break down the process to ensure your fence is both sturdy and spectacularly spooky.
Step 1: Prepare Your Wood Stakes and Strips
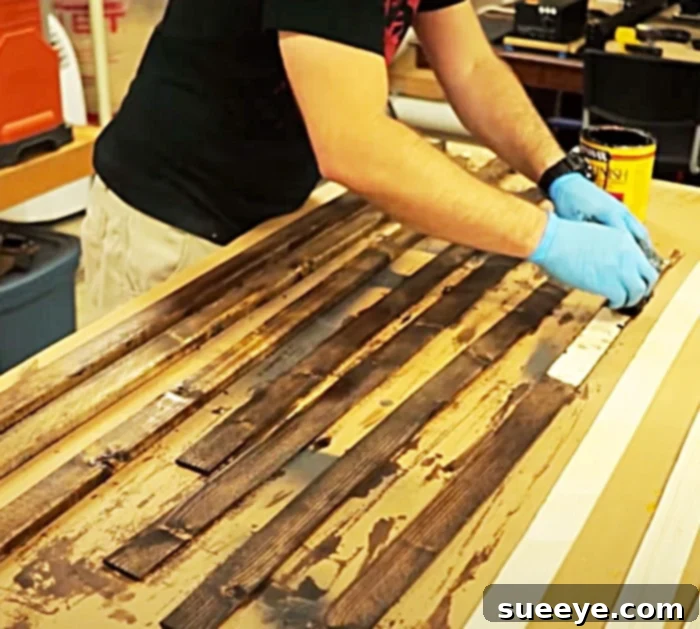
The first crucial step is to give your new pine strips that ancient, weathered look. You begin by staining all your wooden stakes and lattice strips (if using). If you prefer, painting them with dark, muted tones (like deep browns, charcoal greys, or even black) will work just as well, especially if you want a more uniform or specific color scheme. For a truly authentic aged appearance, apply a brown or reddish-brown wood stain. Use a brush or rag to apply the stain evenly, following the wood grain. Don’t be afraid to apply multiple coats or even slightly unevenly to create variations in color, mimicking natural decay. Allow adequate drying time according to the stain manufacturer’s instructions. Ensure you work in a well-ventilated area and wear appropriate safety gear, such as gloves and a mask, when handling stains or paints.
Step 2: Constructing the Fence Panels
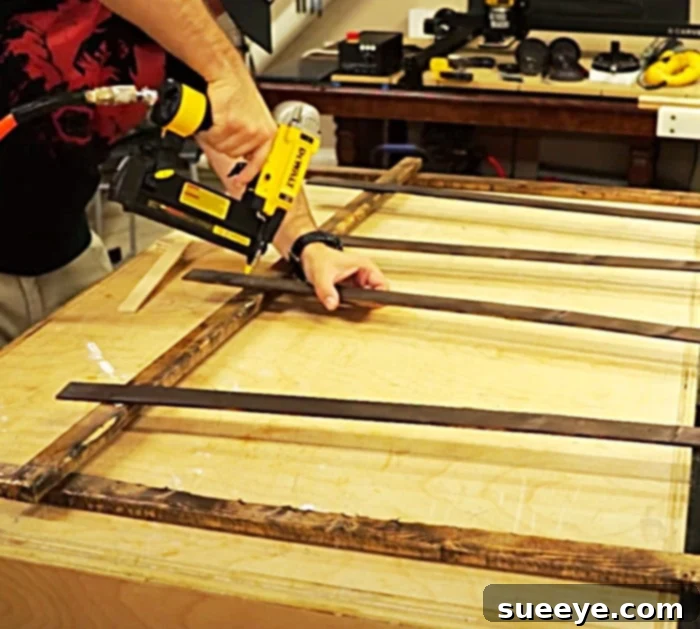
Once your wood is completely dry, it’s time for assembly. This is where the magic of “randomness” comes into play! Instead of precise measurements and perfectly aligned boards, embrace imperfection. Lay out your stained pine strips on a flat surface. Arrange them into fence “panels” by positioning vertical stakes at varying heights and angles. Use shorter horizontal pieces to connect them. The goal is to make it look like an old, rickety fence that’s on the verge of collapsing. Attach the boards together using exterior-grade nails and a hammer, or a nail gun for faster assembly. For added durability and to withstand outdoor conditions, apply outdoor wood glue to each joint before nailing. This combination creates a strong bond that will keep your fence intact throughout the Halloween season. Remember, the more jagged, uneven, and “broken” the pieces appear, the more effective your spooky fence will be.
Step 3: Adding Eerie Embellishments and Finishing Touches
With the main structure assembled, it’s time to truly bring the haunted elements to life. If you’re using lattice strips, you can nail or glue them onto your fence panels in a haphazard way to create splintered or broken cross-sections. Next, take your brown twine and wrap it around various points of the fence, making it look like old, frayed ropes barely holding the structure together. This adds another layer of texture and realism. Finally, stretch out the stretchy spider web cob webbing across the entire fence. Pull it thinly and drape it naturally over the various wooden pieces, snagging it on any rough edges to create convincing, dusty webs. These details will elevate your fence from simple wood to a truly terrifying barrier.
Placement and Integration: Bringing Your Yard to Life
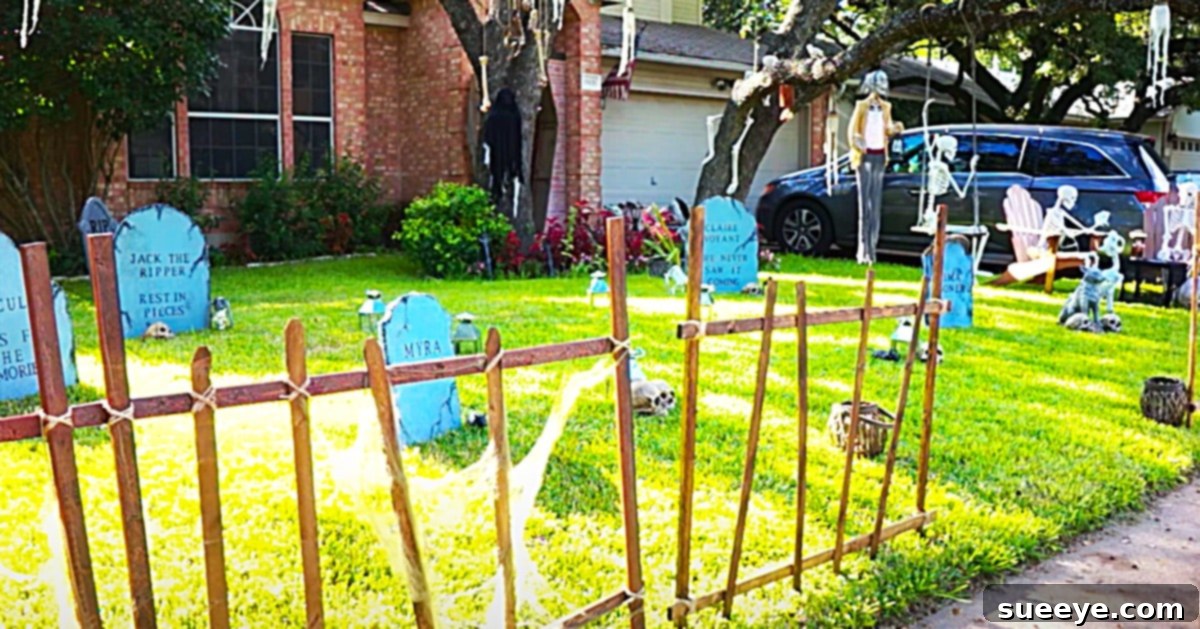
Once your spooky fence panels are complete, the final step is to strategically place them in your yard. This fence actually looked cuter than I even imagined it would, even with its intentionally disheveled appearance! I found that placing it along the front of our house, particularly where we had focal points like a witch’s cauldron bubbling with eerie fog and some skeletal figures lurking, truly maximized its impact. You can use garden stakes or rebar pounded into the ground to secure your fence panels upright, ensuring they are stable and safe, especially in windy conditions. Consider creating a perimeter around a designated “haunted zone” or lining a pathway leading up to your front door, guiding trick-or-treaters through a chilling experience.
The beauty of this DIY Halloween fence is how seamlessly it integrates with other decorations. Imagine it as a backdrop for a graveyard scene complete with tombstones and zombie arms reaching out. Or perhaps it serves as a barrier for a “cursed garden” filled with creepy plants and glowing eyes. The entire yard display, anchored by this fantastic fence, really gets everyone in the mood for Halloween. Add some flickering LED candles, purple or green floodlights to cast an ominous glow, or even a fog machine behind the fence to create an extra layer of mystery and creepiness.
Tips for an Even More Haunting Effect
To truly elevate your DIY spooky fence and create an unforgettable Halloween display, consider these additional tips:
- Creative Lighting: Uplight your fence from below with colored spotlights (green, purple, red) to cast dramatic shadows and highlight its distressed features. String orange or purple LED fairy lights along the top for a subtle, eerie glow.
- Soundscapes: Hide a Bluetooth speaker near the fence playing spooky sounds – creaking gates, howling winds, ghostly whispers, or distant monster growls – to engage another sense and heighten the fear factor.
- Fog Machine Integration: Position a fog machine behind your fence to create a low-lying mist that billows through the gaps, giving the impression of an otherworldly realm beyond the barrier.
- Prop Placement: Drape plastic chains, hang skull lanterns, or attach plastic crows and bats to the fence itself. Tuck artificial moss into crevices or at the base of the fence for an even older, more neglected look.
- Interactive Elements: If safe, consider adding a motion-activated prop near the fence that jumps out or makes a sudden noise when trick-or-treaters approach.
- Variety in Height: Don’t make all your fence panels the same height. Create varied heights and widths to make the fence appear even more chaotic and aged.
Safety Considerations for Your Outdoor Halloween Display
While creating a frightfully fun yard, safety should always be a top priority. Here are some key points to remember:
- Secure Installation: Ensure all fence panels are firmly anchored to the ground to prevent them from tipping over, especially in windy conditions or if bumped by children. Use sturdy stakes or rebar.
- Clear Pathways: If your fence borders a walkway, make sure it doesn’t obstruct pedestrian traffic or create tripping hazards.
- Electrical Safety: If incorporating lights or fog machines, use outdoor-rated extension cords and ensure all connections are protected from moisture. Avoid overloading circuits.
- Visibility at Night: While you want it spooky, ensure that your fence and surrounding decor are visible enough that no one accidentally runs into them, especially in low light. Subtle lighting can help with this.
- Sharp Edges: While you’re aiming for a “broken” look, ensure there are no truly dangerous sharp splinters or protruding nails that could cause injury. File down or cover any hazardous spots.
Embracing the DIY spirit for your Halloween decorations, especially with a project as impactful as this spooky fence, is incredibly rewarding. Not only do you get to unleash your creativity, but you also end up with a truly unique, custom display that perfectly captures the essence of the season. Following the guidance from Wicked Makers, constructing this weathered fence is surprisingly easy, and the visual payoff is immense. It adds an instant layer of chilling atmosphere, setting the perfect stage for all your other ghastly goodies. So, gather your materials, embrace the imperfect, and get ready to transform your yard into the most hauntingly beautiful scene on the block. Happy Halloween building!