
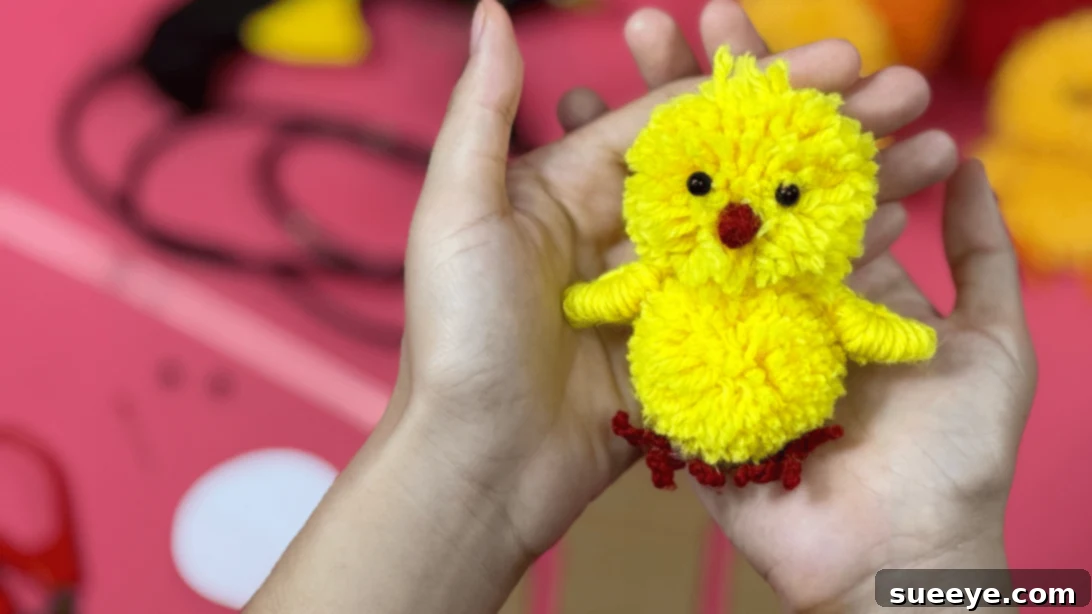
Crafting is more than just a pastime; it’s a delightful journey of self-expression, a therapeutic escape, and a wonderful way to bring joy to your home and loved ones. Whether you’re a seasoned artisan with years of experience or a curious beginner eager to embark on a new creative adventure, the world of DIY offers endless possibilities. Today, we’re diving into a project that promises both simplicity and charm: creating adorable DIY yarn chicks. These handmade fluffy friends are not only incredibly easy and budget-friendly to make but also serve as the perfect pop of color for any space, especially as spring blooms and Easter approaches. All you truly need is a handful of yarn, a trusty pair of scissors, and a hot glue gun to bring these little characters to life.
These charming yarn chicks are ideal for adding a touch of whimsical handmade flair to your decor. Imagine them nestled in an Easter basket, perched on a mantelpiece, or gracing a child’s nursery. They also make incredibly heartfelt gifts, showing recipients the care and effort you put into creating something unique just for them. Their undeniable cuteness is sure to bring a smile to anyone’s face. Get ready to transform simple yarn into an irresistible decorative piece or a beloved toy by following our comprehensive, step-by-step tutorial below. This guide will walk you through every detail, ensuring your crafting experience is smooth and enjoyable.
Why You’ll Love Making DIY Yarn Chicks
Embarking on this DIY yarn chick project offers a multitude of benefits, making it a perfect choice for crafters of all ages and skill levels. Beyond the satisfaction of creating something beautiful with your own hands, these little chicks bring practical advantages and endless joy.
Affordable Crafting Fun
One of the most appealing aspects of this project is its cost-effectiveness. Yarn is a readily available and often inexpensive material, and you might even have leftover scraps from previous projects that are perfect for this craft. By utilizing materials you already own, you can create charming decorations without breaking the bank, making it an excellent budget-friendly activity for families or anyone looking to get creative on a shoestring budget.
Perfect for Easter and Spring Decor
These yarn chicks are quintessential symbols of spring and new beginnings, making them absolutely ideal for Easter celebrations. Use them to fill Easter baskets, as charming table centerpieces, or incorporate them into a festive garland. They can add a touch of handmade warmth and joy to your spring decor, welcoming the season with a cheerful, whimsical vibe. They also make excellent additions to a spring-themed baby shower or a child’s bedroom decor, bringing a gentle touch of nature indoors.
Incredibly Adorable and Versatile
There’s no denying the sheer cuteness of these fluffy yarn chicks! Their soft texture and sweet appearance make them an instant favorite. They’re not just decorative items; they can also serve as lovely, soft toys for children, or even thoughtful handmade gifts for friends, family, or teachers. Their versatility extends to various themes beyond Easter, fitting beautifully into farm-themed decor, nursery decorations, or simply as a charming accent in any room that needs a little handmade character.
A Wonderful Family Activity
This project is perfectly suited for crafters of all ages, making it an excellent activity to share with family. Children can easily participate in the yarn wrapping and shaping steps (with adult supervision for scissors and hot glue), fostering their fine motor skills and creativity. Spending time together creating something beautiful builds cherished memories and encourages a love for handmade items.
Personalization and Customization
One of the joys of DIY is the ability to personalize your creations. With yarn chicks, you can choose any color yarn imaginable – classic yellow for a traditional look, or vibrant blues, pinks, and greens for a more whimsical touch. Experiment with different yarn textures, add tiny hats or bows, or even glitter to make each chick truly unique. This allows you to match them perfectly to your existing decor or to the personality of the person you’re gifting them to.
RELATED: How to Make a Yarn Dog
Essential Materials for Your DIY Yarn Chick:
Before you begin crafting your delightful yarn chicks, gather all your supplies. Having everything within reach will make the process much smoother and more enjoyable. Here’s a detailed list of what you’ll need:
- Yarn: The star of our project! Choose a soft, medium-weight yarn (like acrylic or cotton) in your desired chick color (classic yellow, white, or even pastel shades for a fun twist). The amount needed will depend on the size of your chicks, but a standard skein should be more than enough for several.
- Scissors: A sharp pair of craft scissors is crucial for cleanly cutting yarn and shaping your pom-poms.
- Beads: Small black beads are perfect for the eyes, giving your chicks an adorable, expressive look. You can also use small googly eyes for a more playful touch, or even embroider tiny eyes with black thread.
- Pin: A straight pin can be helpful for holding smaller pieces in place while glue dries or for detailed adjustments.
- Glue Gun and Glue Sticks: A low-temperature hot glue gun is recommended, especially if crafting with children, to safely and securely assemble your chick’s body parts. Have plenty of glue sticks on hand.
- Cardboard Templates: You’ll need three rectangular pieces of cardboard with a small slit cut in the middle. These will serve as your yarn winding templates.
- Large rectangle (approx. 6 cm): For the chick’s main body.
- Medium rectangle (approx. 5 cm): For the chick’s head.
- Small rectangle (approx. 2 cm): For the chick’s tiny wings.
If you don’t have pre-made templates, simply cut these sizes from an old cereal box or cardboard packaging. The slits are essential for tying the yarn bundles.
- Circle Templates: Two circular templates will help you achieve perfectly round pom-poms for the body and head.
- Large circle (approx. 6 cm diameter): To guide the shaping of the body.
- Small circle (approx. 5 cm diameter): To guide the shaping of the head.
You can use stencils, bottle caps, or simply draw circles on paper and cut them out to create these guides.
Having these materials ready will ensure a smooth and enjoyable crafting session, allowing you to focus on the fun of creating your cute yarn chicks!
How to Make Your Adorable DIY Yarn Chick: Step-by-Step
Follow these detailed instructions to craft your charming yarn chick. Precision in each step will ensure a beautiful, fluffy result.
Step 1: Create the Main Body Pom-Pom
Take your largest cardboard rectangle (approx. 6 cm) with the slit. Begin wrapping your chosen yarn around the length of this cardboard template. Wrap the yarn tightly and evenly around the template approximately 150 times. The more times you wrap, the denser and fluffier your chick’s body will be, so don’t be shy with the wraps!
Step 2: Trim the Excess Yarn
Once you’ve completed the required number of wraps, carefully cut the end of the yarn, leaving a short tail. Ensure it’s long enough to secure later but not so long that it becomes cumbersome.
Step 3: Secure the Yarn Bundle
Take a separate piece of yarn (about 8-10 inches long). Carefully thread it through the slit in the cardboard template, passing it under all the wrapped yarn loops. Bring the two ends of this new piece of yarn together on top of the wrapped yarn and tie them tightly in a double knot, securing all the loops in the middle. This knot is crucial for holding your pom-pom together. Once secured, gently slide the entire wrapped yarn bundle off the cardboard template. Now, tie another tight knot around the back of the bundle, ensuring everything is firmly in place. This double knotting technique ensures your pom-pom won’t unravel.
Step 4: Cut the Loops and Fluff
With your sharp scissors, carefully cut through all the yarn loops on both sides of the tied bundle. Once all loops are cut, you’ll have a shaggy, untamed pom-pom shape. Don’t worry if it looks messy at this stage; we’ll refine it next.
Step 5: Shape the Body into a Round Ball
Now, it’s time to give your pom-pom its characteristic round chick body shape. Using your larger circular template (approx. 6 cm diameter) as a guide, carefully trim the yarn strands with your scissors until you achieve a dense, symmetrical round ball. Take your time with this step, rotating the pom-pom and trimming little by little to get a perfectly spherical shape. This will be the main body of your yarn chick.
Step 6: Create the Head Pom-Pom
Repeat Steps 1 through 5, but this time use your smaller cardboard rectangle (approx. 5 cm) and wrap the yarn fewer times (around 100-120 wraps should suffice for a head proportionate to the body). Use the smaller circular template (approx. 5 cm diameter) as your guide for shaping. This will form the adorable, slightly smaller head of your chick.

Quick Tips for Perfect Pom-Poms
Even Wrapping
Maintain consistent tension as you wrap the yarn. This ensures an even density throughout your pom-pom, leading to a perfectly round and fluffy result.
Sharp Scissors are Key
Using very sharp scissors will make cutting through the yarn loops much easier and create cleaner edges when trimming. Dull scissors can fray the yarn and make shaping more difficult.
Trim Gradually
When shaping your pom-poms, it’s always better to trim a little at a time. You can always cut more yarn off, but you can’t put it back on! Rotate your pom-pom frequently to ensure even trimming from all angles.
Step 7: Prepare the Chick’s Feet Sections
For the feet, you’ll create smaller, denser bundles of yarn. Wrap yarn around the smallest cardboard template (approx. 2 cm rectangle) about 20-30 times for each segment. You will need to make three such small bundles initially.
Step 8: Assemble the Feet
Take the three small yarn bundles you made in Step 7. Tie them together securely at one end with another short piece of yarn. This will form a single chick foot with three distinct toes. Trim any excess tying yarn. Repeat this process to create the second chick foot. Ensure both feet are roughly the same size for symmetry.
Step 9: Craft the Beak
The beak can be made in a similar fashion to the feet, but with a slight modification. Wrap a small amount of yarn (e.g., 10-15 times) around the smallest cardboard template. Secure it in the middle with a tie, then cut the loops as you would for a pom-pom. Instead of shaping it into a ball, carefully trim and shape the yarn bundle into a small, triangular beak shape. You can use orange or yellow yarn for the beak for a more realistic look, or even red for a bolder statement. Alternatively, a small piece of orange or yellow felt cut into a diamond and folded in half makes a perfect beak.
Step 10: Make the Wings
Using the smallest cardboard template (approx. 2 cm rectangle), wrap yarn around it approximately 20 times. Similar to the feet and beak, tie the bundle in the middle and cut the loops. Instead of shaping it into a sphere, gently flatten and trim it into a small, elongated wing shape. You want them to be slightly oval or teardrop-shaped.
Step 11: Create a Pair of Wings
Repeat Step 10 to make a second wing, ensuring it is similar in size and shape to the first. You’ll need two wings for your chick.
Step 12: Assemble the Body and Head
Now it’s time to bring your chick to life! Apply a generous dab of hot glue to the top of the larger body pom-pom. Carefully position the smaller head pom-pom on top, pressing down gently to ensure a secure bond. Hold it in place for a few moments until the glue sets. You want the head to be centered and facing forward.
Step 13: Attach the Wings
Apply a small line of hot glue to one side of the chick’s body, near where the head meets the body. Carefully press one of the shaped wings onto the glue, holding it until it adheres. Repeat on the opposite side with the second wing, ensuring they are symmetrical and positioned naturally.
Step 14: Glue the Feet to the Body
Turn your chick upside down. Apply a small amount of hot glue to the top of each foot (the tied section). Position the feet on the bottom of the body, ensuring they are spaced appropriately and oriented to allow the chick to stand upright. Press firmly until the glue sets. Allow ample drying time for a strong bond.
Step 15: Add the Eyes and Beak for Personality
This is where your chick truly comes to life! Carefully glue the two beads onto the front of the head to create the eyes. Position them evenly and close enough to convey cuteness. Then, glue the shaped beak just below and between the eyes. Press gently until secure. Step back and admire your adorable new yarn chick!
CUTE LITTLE CHICK!

Pro Tips for a Perfect Yarn Chick
- Achieve Maximum Fluffiness: For an extra soft and fluffy appearance, gently comb out the yarn strands of your finished pom-poms. A fine-tooth comb, a pet slicker brush, or even a wire brush can work wonders in separating the fibers and creating a fuller, softer look.
- Alternative Beak Materials: If shaping a yarn beak feels tricky, a small piece of orange or yellow felt fabric cut into a small diamond shape and folded in half makes a fantastic and easy substitute. You can also use craft foam for a firmer beak.
- Customize with Colors: Don’t stick to just yellow! Experiment with different yarn colors like white, brown, or even multi-colored variegated yarn for unique chicks. Pastel shades are lovely for a spring theme.
- Add Personality with Embellishments: Consider adding tiny bows, flower stickers, or even a mini top hat for extra character. A little bit of blush applied with a Q-tip can give them rosy cheeks.
- Create a Chick Family: Vary the sizes of your cardboard templates to create chicks of different sizes – a mama chick and her babies! This makes for an even more charming display.
- Safety First: When using a hot glue gun, especially with children, always ensure adult supervision. A low-temperature glue gun is safer and still provides a strong bond for this project.
Displaying Your Easy DIY Yarn Chick
Once your adorable yarn chicks are complete, the fun doesn’t stop there! There are countless creative ways to display and enjoy your handmade creations:
- Easter Baskets: Nest your chicks among chocolate eggs and plastic grass for a charming Easter morning surprise.
- Spring Centerpieces: Arrange a few chicks with artificial flowers, greenery, and decorative eggs in a bowl or on a tray for a festive table centerpiece.
- Shelf or Mantle Decor: Perch your fluffy friends on bookshelves, windowsills, or your fireplace mantle to add a touch of handmade warmth to any room.
- Nursery Decorations: These soft, cuddly chicks make perfect additions to a baby’s nursery, either on a shelf or as part of a gentle mobile.
- Gift Toppers: Tie a yarn chick onto a gift bag or box for a unique and personal touch that makes any present extra special.
- Garlands and Wreaths: String multiple chicks together with beads or small pom-poms to create a festive garland, or attach them to a spring wreath for your front door.
- Classroom or Office Decor: Bring a little bit of cheerful spring energy to your workspace or classroom with these delightful crafts.
No matter how you choose to display them, these DIY yarn chicks are sure to bring a cheerful and personal touch to your home or make for a truly heartfelt gift.
Crafting these easy DIY yarn chicks is a wonderfully rewarding experience, perfect for injecting a bit of handmade charm into your life. From selecting your yarn to adding the final touches, each step is simple, enjoyable, and results in an irresistibly cute creation. We hope you’ve enjoyed this tutorial and feel inspired to create a whole flock of these adorable little birds. Happy crafting!
*If you loved this craft, visit our official website for more inspiration, follow our Facebook page for daily updates, and subscribe to our YouTube channel for video tutorials and creative ideas!