
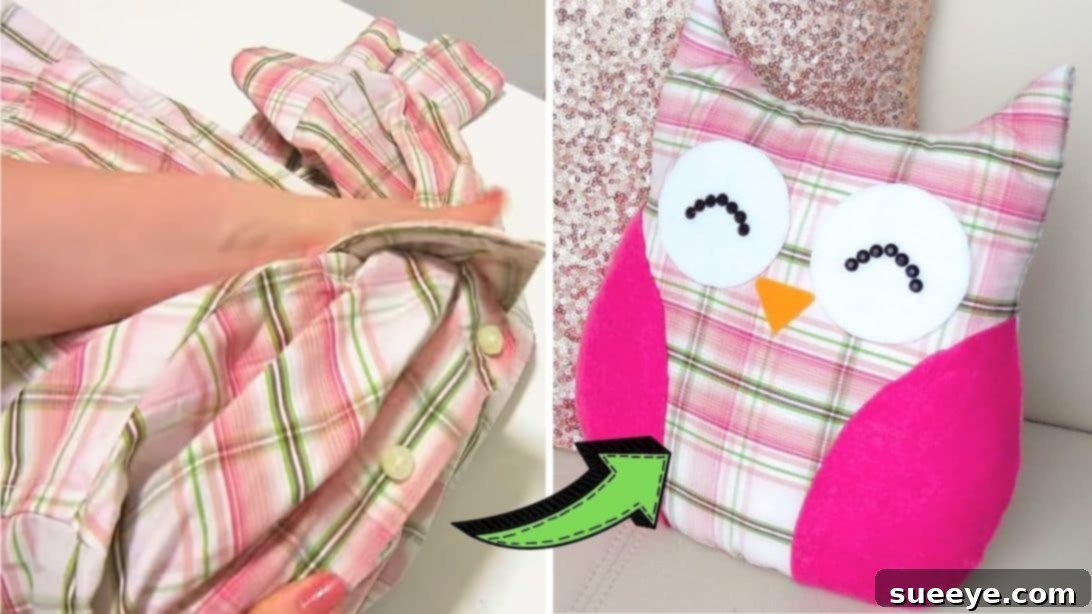
Craft Your Own Adorable Owl Pillow: An Easy DIY Sewing & No-Sew Tutorial
Welcome, creative spirits and crafting enthusiasts! Are you looking for a delightful project that combines creativity with sustainability? Look no further! This comprehensive guide will walk you through transforming an old shirt or any spare fabric into an irresistibly cute owl pillow. Whether you’re a seasoned sewist or a complete beginner exploring the world of DIY, this tutorial offers clear, simple steps to help you create a charming piece of home decor. We’ll cover everything from pattern creation to adding those adorable finishing touches, ensuring your handmade owl pillow becomes a cherished item in your home or a thoughtful gift for a loved one.
Crafting your own owl pillow is more than just a fun activity; it’s an opportunity to upcycle materials, reduce waste, and infuse your living space with unique, personalized charm. Imagine the satisfaction of seeing your old, forgotten textiles reborn into something beautiful and functional. Thanks to the inspiring tutorial by DIYlover via YouTube, we’ve adapted and expanded upon this project to provide even more detail, tips, and customization ideas to spark your imagination.
Why Choose an Owl Pillow Project?
Owl-themed decor has remained popular for its whimsical appeal and versatility. Owls symbolize wisdom, mystery, and a connection to nature, making them a comforting and stylish addition to any room. A handmade owl pillow:
- Adds Personality: It’s a fantastic way to introduce a touch of character and coziness to your sofa, bed, or reading nook.
- Is Sustainable: By upcycling an old shirt or fabric scraps, you’re giving materials a new lease on life and contributing to a more eco-friendly lifestyle.
- Offers Creative Expression: With endless possibilities for fabric choices, colors, and embellishments, each owl pillow can be a unique reflection of your personal style.
- Is Beginner-Friendly: This project is designed to be accessible, offering both sewing and no-sew options, making it perfect for crafters of all skill levels.
Essential Materials and Tools You’ll Need
Gathering your supplies is the first exciting step! Most items are readily available around your home or at a local craft store. Remember, creativity often thrives with what you already have!
Materials:
- Main Fabric: An old shirt, jeans, fleece, cotton fabric, or any durable fabric you wish to upcycle. Look for interesting patterns, textures, or colors that would suit an owl. You’ll need enough to cut two identical owl body pieces.
- Felt Fabric: Various colors for the owl’s features (eyes, beak, wings). White, black, and orange are standard, but feel free to get creative with other hues!
- Stuffing Material: Polyester fiberfill is ideal for a soft, plump pillow. Alternatively, you can use cotton batting, foam scraps, or even shredded fabric scraps from other projects for an eco-friendlier option.
- Embellishments: Rhinestones, beads, buttons, or small pieces of black felt for the pupils of the eyes. Consider embroidery floss for additional details or texture.
Tools:
- Paper or Newspaper: For creating your owl pattern. Any large sheet of paper will do.
- Pencil or Fabric Marking Pen: To draw and trace your pattern. A fabric pen is particularly useful as it often disappears or washes out.
- Sharp Scissors: Dedicated fabric scissors will ensure clean, precise cuts. Have another pair for paper.
- Fabric Glue: A strong, permanent fabric adhesive if you opt for the no-sew method, or to secure felt pieces. Look for one that dries clear and is washable.
- Pins: To hold fabric pieces together securely before sewing or gluing.
- Needle and Thread: Matching thread for hand-sewing the opening closed. If you choose the sewing method for the entire pillow, a sewing machine and appropriate thread will also be needed.
- Iron and Ironing Board (Optional): Useful for pressing seams flat for a more professional finish, especially if sewing.
Step-by-Step Guide to Creating Your Owl Pillow
Let’s dive into the fun part! Follow these detailed instructions to bring your adorable owl pillow to life.
Step 1: Crafting Your Owl Pattern and Preparing Fabric
The foundation of your owl pillow is a well-designed pattern. This step ensures your owl has the perfect shape and size.
- Find or Draw Your Owl Shape: Begin by searching online for “owl pillow pattern” or “owl silhouette” for inspiration. You can print a template or simply draw your own freehand onto a large sheet of paper or newspaper. Aim for a simple, symmetrical owl body shape, roughly the size you want your finished pillow to be.
- Refine for Symmetry: Once you have a basic outline, carefully cut out your paper pattern. To ensure perfect symmetry, fold your paper pattern in half vertically down the center. Trim any uneven edges so that both sides match perfectly when unfolded. This small step makes a big difference in the final look of your owl.
- Prepare Your Fabric: Lay your chosen main fabric flat and smooth it out. If using an old shirt, you might want to iron it first. Fold the fabric in half, ensuring the right sides (the pretty sides) are facing each other. This way, you’ll cut two mirror-image pieces at once.
- Trace the Owl Body: Place your paper owl pattern onto the folded fabric. Using a pencil or fabric marking pen, carefully trace around the entire outline of your pattern.
- Add Seam Allowance: This is crucial for sewing! Draw a second outline approximately ½ inch (1.25 cm) outside your traced line. This extra margin is your seam allowance, which will be used for stitching or gluing the two fabric pieces together. If you’re doing a no-sew project and plan to glue the edges directly without turning, you might not need a seam allowance, but adding one offers more flexibility.
- Cut Out Fabric Pieces: Carefully cut along the *outer* line (the seam allowance line). You should now have two identical owl body pieces from your main fabric. Set them aside.
Step 2: Assembling and Stuffing Your Pillow Base
Now it’s time to bring the two body pieces together and give your owl its plump form.
- Pin Fabric Pieces Together: Place your two owl fabric pieces together, ensuring their right sides (the pattern or outer side) are facing each other. Align all edges perfectly. Secure them in place with pins spaced every 1-2 inches (2.5-5 cm) around the entire perimeter.
- Sew or Glue the Edges:
- For Sewing: Using your sewing machine or a hand needle, stitch along the inner traced line (the original owl outline, not the seam allowance). Use a straight stitch. Remember to leave a 3-4 inch (7-10 cm) gap unstitched along the bottom edge of the owl. This opening is crucial for turning the pillow right side out and stuffing it. Backstitch at the beginning and end of your seam for durability.
- For No-Sew (Fabric Glue): Apply a thin, even line of fabric glue along the inner traced line on one of the fabric pieces. Carefully press the second fabric piece on top, aligning edges and securing with pins or clips. Pay close attention to the bottom edge, leaving a 3-4 inch (7-10 cm) gap without glue. Allow the glue to dry completely according to the manufacturer’s instructions, which may take several hours.
- Trim Seam Allowance (Optional, for sewing): If sewing, you can trim the seam allowance down to about ¼ inch (0.6 cm) after stitching, especially around curves. This helps the edges lay flatter once turned. Make small snips into the curve without cutting the seam.
- Turn Right Side Out: Once your seams are secure (and glue is dry, if applicable), reach into the unstitched or unglued gap and carefully pull the entire pillow right side out. Use a blunt object (like a chopstick or the back of a pencil) to gently push out all the curves and corners, ensuring a smooth, well-defined owl shape.
- Stuff Your Owl: Begin stuffing your owl pillow with your chosen filling. Start with the “ears” and corners, making sure they are well-filled. Continue adding stuffing, evenly distributing it throughout the body, until your owl is as plump and firm as you desire. Avoid overstuffing, which can strain seams, or understuffing, which can make it appear lumpy.
- Close the Opening: Once adequately stuffed, carefully hand-stitch the opening closed. A ladder stitch (or invisible stitch) is ideal here, as it creates a neat, almost invisible seam. If using fabric glue, you can carefully glue the edges of the opening together, ensuring they meet cleanly, and hold them with clips until dry.
Step 3: Adding the Adorable Owl Features
This is where your owl truly comes to life! The facial features and wings give your pillow its unique personality.
- Create the Wings: Use your original paper owl pattern as a guide to draw a wing shape that fits proportionally onto its body. Cut out this paper wing. Then, trace this wing pattern onto a sheet of felt fabric (choose a contrasting or complementary color to your main fabric). Cut out the felt wing. To create the second wing, simply flip your paper pattern over and trace it again onto the felt, then cut. This ensures you have two mirror-image wings. Before gluing, place them on your stuffed owl to ensure they fit nicely and are positioned symmetrically. Secure them onto the sides of the pillow with fabric glue, pressing firmly.
- Design the Eyes:
- White Eyeballs: Cut two circular pieces of white felt for the base of the eyes. The size will depend on your owl pillow’s overall dimensions.
- Pupils: For the pupils, you have several creative options:
- Black Rhinestones or Beads: These add a lovely sparkle. Secure them firmly with strong fabric glue. Be cautious if the pillow is for a small child, as small embellishments can be a choking hazard.
- Black Felt Circles: Cut two smaller black felt circles and glue them onto the center of the white felt eyeballs.
- Buttons: Two appropriately sized black or dark-colored buttons can also make charming eyes. Hand-sew them securely in place.
- Embroidery: For a soft, child-safe option, embroider the pupils with black embroidery floss.
Once you’ve decided on your pupils, glue or sew them onto the white felt circles. Then, glue the complete eyeballs onto your owl pillow, ensuring they are evenly spaced and positioned.
- Fashion the Beak: Cut a small triangle shape from orange or yellow felt for the beak. Place it just below and between the eyes, then secure it with fabric glue.
- Add Extra Details (Optional):
- Belly Patch: Cut a large oval or heart shape from another contrasting felt color and glue it onto the owl’s belly.
- Feet: Cut two small “foot” shapes from felt and glue them to the bottom front of the owl.
- Embroidery: Use embroidery floss to add feather details, eyelashes, or other decorative stitches.
Tips for Customization and Personalization
The beauty of DIY lies in making it truly yours. Here are some ideas to make your owl pillow unique:
- Fabric Play: Experiment with different fabric combinations. A patterned body with solid wings, or a textured body with smooth features. Denim, flannel, velvet, or even faux fur can create distinct looks.
- Eye Expressions: Vary the size and placement of the pupils to give your owl different expressions—wide-eyed, sleepy, curious. You can even add felt eyelashes for a feminine touch.
- Wing Designs: Instead of simple felt wings, consider layering different shades of felt to create a feathered effect, or use a contrasting fabric with a zigzag stitch for appliqué wings.
- Embellishment Galore: Buttons, small beads, pom-poms, lace trim, or even fabric paint can be used to add unique details. Create a bow tie for a dapper owl or a flower crown for a whimsical one.
- Size Variations: This tutorial can be scaled up or down. Make a tiny owl keychain, a medium-sized throw pillow, or a large floor cushion. Adjust your pattern size accordingly.
- Seasonal Themes: Dress your owl for different holidays! Add a Santa hat for Christmas, a witch hat for Halloween, or floral accents for spring.
No-Sew Owl Pillow Alternatives
If you’re not comfortable with a needle and thread, or simply prefer a quicker project, the no-sew method is a fantastic option:
- Fabric Glue Domination: As mentioned in Step 2, fabric glue can replace most of the sewing. Ensure you use a high-quality, permanent fabric glue and allow ample drying time for each stage.
- Iron-On Adhesive: For a more secure and durable no-sew seam, consider using iron-on fusible web (like HeatnBond). You’d cut strips of the adhesive, place them between your fabric layers (right sides together), and iron to create a strong bond. Remember to leave a gap for stuffing.
- Hemming Tape: Similar to fusible web, hemming tape can be used along the edges of your fabric to create a clean, durable seam without stitching.
For the features, fabric glue is your best friend. Press felt pieces firmly in place and let them dry completely.
Caring for Your Handmade Owl Pillow
To keep your adorable owl pillow looking fresh and lovely for years to come:
- Spot Cleaning: For small spills or dirt, use a damp cloth with mild soap to gently blot the affected area.
- Gentle Hand Wash: If the entire pillow needs cleaning, hand wash it gently in cool water with a mild detergent. Avoid harsh scrubbing or twisting, which can distort its shape.
- Machine Wash (Use Caution): If your fabric and embellishments are machine-wash friendly, place the pillow in a mesh laundry bag and wash on a delicate cycle with cold water.
- Air Dry: Always air dry your pillow, reshaping it as it dries. Avoid direct sunlight which can fade colors. Tumble drying is generally not recommended as it can clump the stuffing.
Troubleshooting Common DIY Pillow Issues
Don’t fret if things don’t go perfectly the first time. Here are some common issues and how to resolve them:
- Lumpy Stuffing: If your pillow feels lumpy, gently massage the stuffing to redistribute it evenly. Next time, pull apart your fiberfill into smaller wisps before stuffing.
- Uneven Seams: This can happen if you drift from your seam allowance. Practice tracing and cutting precisely. If sewing, using a walking foot on your machine can help.
- Glue Showing: Apply glue sparingly and precisely. If some squeezes out, try to wipe it quickly with a damp cloth or cotton swab before it dries.
- Features Falling Off: Ensure you’re using a strong fabric glue and applying enough pressure. Allow ample drying time. For high-traffic pillows, sewing on felt features offers more durability.
Conclusion: Your New Adorable Companion Awaits!
And there you have it! With a little creativity and these straightforward steps, you’ve successfully transformed simple materials into a charming, personalized owl pillow. This project is not just about making a decorative item; it’s about the joy of crafting, the satisfaction of creating something with your own hands, and the positive impact of upcycling. Your new owl friend is ready to add warmth, personality, and a touch of handmade magic to your home.
We encourage you to experiment with different fabrics, colors, and embellishments to make your owl truly unique. Share your creations with friends and family, and inspire others to embark on their own DIY adventures. Happy crafting!
*A special thank you and all image credit goes to DIYlover via YouTube for inspiring this delightful project. Be sure to visit and subscribe to her channel for more creative and easy-to-follow DIY ideas!