
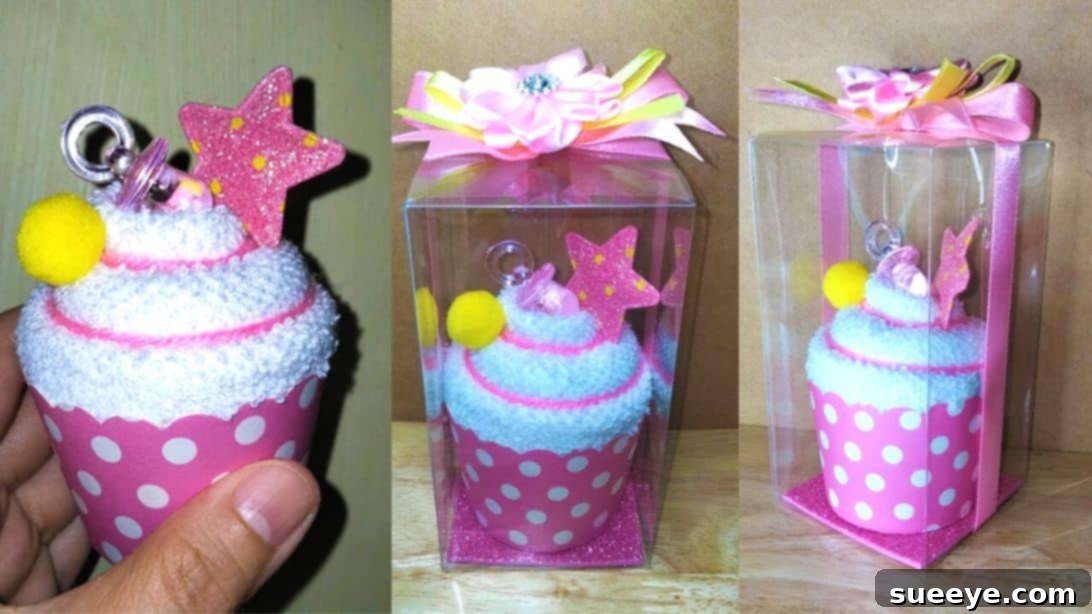
Craft Adorable DIY Cupcake Towel Gifts: A Charming and Easy Tutorial
In search of a unique, heartfelt, and utterly adorable gift or souvenir for that special occasion? Look no further! Dive into the delightful world of DIY crafting with this charming cupcake towel tutorial. These handcrafted towel ‘cupcakes’ are not just incredibly cute; they’re also surprisingly simple to create, making them perfect for a wide range of celebrations. Whether it’s a baby shower, a child’s birthday party, a christening, or even just a thoughtful token for a friend, these personalized gifts are guaranteed to bring smiles and leave a lasting impression. Forget generic store-bought items; with just a few readily available materials and a sprinkle of creativity, you can assemble a memorable keepsake that truly stands out. This comprehensive guide, inspired by the brilliant creators at Team Sophie Crafts on YouTube, will walk you through every step of transforming a simple face towel into an enchanting cupcake, ensuring your homemade gifts are picture-perfect and brimming with personal touch.
Why Choose a DIY Cupcake Towel for Your Next Event?
The appeal of the DIY cupcake towel extends far beyond its whimsical appearance. Opting for a handmade gift like this offers numerous advantages that resonate with both the giver and the receiver. Firstly, it embodies a deeply personal touch. In a world saturated with mass-produced goods, a gift crafted with your own hands speaks volumes about the thought and effort invested. This makes the recipient feel truly special and cherished. Secondly, these cupcake towels are wonderfully practical. While they look like delightful confections, they are, at their core, functional face towels that can be used or kept as a charming decorative item. This blend of utility and aesthetic appeal ensures your gift won’t be tucked away and forgotten. Thirdly, it’s a cost-effective alternative to many traditional souvenirs or party favors, allowing you to create beautiful, high-quality gifts without breaking the bank. Finally, the process of making them is incredibly enjoyable and therapeutic. It’s a creative outlet that allows for endless customization, ensuring each cupcake towel is as unique as the person receiving it. Embrace the joy of crafting and create something truly memorable!
Materials You’ll Need for Your Cupcake Towel Masterpiece
Before embarking on this delightful crafting journey, it’s essential to gather all your materials. Having everything at hand will ensure a smooth and enjoyable creation process. Here’s a detailed list of what you’ll need, along with some helpful tips for selection:
- Square Face Towel: This is the very foundation of your ‘cupcake’. For the best results and the most realistic cupcake illusion, opt for soft, high-quality square face towels. The size is crucial, as smaller towels are easier to manipulate and hold their shape better. Consider colors that align with your event’s theme – pastels for baby showers, vibrant hues for kids’ birthdays, or elegant neutrals for other occasions. The texture of the towel will also contribute to the final look of your “frosting.”
- Muffin Cup (2 oz): This will serve as the base, or ‘liner’, for your cupcake towel. A standard 2-ounce muffin or cupcake liner works perfectly. Choose a sturdy paper or foil cup that can maintain its shape when the towel is placed inside. You can select plain white, metallic, or patterned cups to complement your chosen towel color and overall design.
- 4.5″ x 2.5″ Acetate Box: This transparent box is ideal for showcasing your finished cupcake towel. Its clear walls allow the beautiful creation to be admired while also protecting it. The specified dimensions are perfect for a standard cupcake towel, ensuring a snug fit that prevents movement during transport.
- Yarn: A small amount of yarn will be used to create the detailed ‘swirls’ on your cupcake towel, mimicking the texture of real frosting. Select a yarn color that either contrasts subtly or blends harmoniously with your towel. A medium-weight yarn is generally easiest to work with for this detailing.
- Acrylic Pacifier Souvenir: A classic embellishment, especially perfect for baby-themed events. These small, decorative pacifiers add an unmistakable baby shower vibe. You can find them in various colors to match your theme.
- Pompom Ball: A soft, fluffy pompom ball adds a touch of playful charm. Choose one that complements your color scheme and theme. It often serves as the “cherry on top” or a cute decorative element.
- Star Glitter Centerpiece Embellishment: This adds a touch of sparkle and magic to your cupcake. The glittery star can be a focal point, reflecting light and catching the eye, making the souvenir feel extra special.
- Satin Ribbon Flower with Rhinestones: For an extra touch of elegance and sophistication, a pre-made satin ribbon flower adorned with rhinestones is a wonderful choice. This can be the crowning glory of your boxed gift.
- Glitter Foam: Used to create an attractive and stable base inside the acetate box. This not only adds a decorative sparkle but also provides a non-slip surface for your cupcake towel to rest on, enhancing its presentation.
- 1/2 inch Satin Ribbon: This wider ribbon will be used to tie around the acetate box, creating the main bow. Satin offers a luxurious sheen and drapes beautifully, elevating the overall gift presentation.
- 1/4 inch Satin Ribbon: A narrower satin ribbon, perfect for creating a smaller, accent bow that can be layered on top of the larger bow. This adds depth and a professional finish to your packaging.
Before you begin, ensure you have a hot glue gun and glue sticks ready, as secure adhesion is key for many steps of this project.
Step-by-Step Guide: Crafting Your DIY Cupcake Towel
Now that you have all your materials, let’s dive into the fun part: creating your adorable cupcake towels. Follow these detailed instructions carefully to achieve beautifully crafted results.
Step 1: The Foundation – Folding Your Towel into a Strip
Begin by taking your square face towel and laying it flat on a clean surface. Carefully fold the towel in half diagonally, bringing one corner to meet the opposite corner, forming a large triangle. Once folded diagonally, take the middle tip of this triangle – the longest point – and fold it downwards until it aligns with the bottom edge of the towel. This crucial fold starts to create the bulk for your cupcake. Next, fold the top edge of this new shape down by approximately one-third. After this, fold it one more time. The goal is to create a neat, compact strip of towel that will serve as the core of your cupcake, ensuring an even base for rolling.
Step 2: Sculpting the Cupcake Shape
With your neatly folded towel strip, you’re ready to create the iconic cupcake swirl. Start from one end of the strip and begin rolling it tightly and evenly towards the other end. As you roll, pay close attention to the very end of the strip; you’ll want to gently fold it slightly upward and outward. This intentional fold, made a few inches down from the start of your roll, is what gives your towel the realistic, rounded, and swirled “cupcake frosting” appearance. Maintain consistent tension throughout the roll to ensure a firm and stable shape. Once fully rolled, apply a small dab of hot glue to the very end of the towel strip, securing it firmly in place and preventing it from unraveling. This creates a cohesive, beautiful cupcake form.
Step 3: Nestling into the Muffin Cup
Now that your towel is beautifully rolled into a cupcake shape, it’s time to give it its proper base. Gently pick up your towel cupcake and carefully place it inside the 2-ounce muffin cup. Do not force it or push too hard, as this could deform the meticulously rolled towel or crush the delicate “frosting” top. Instead, lightly push the towel down into the muffin cup until it sits snugly and securely. The muffin cup should support the base of the towel, allowing the charming “frosting” part to proudly extend above the cup’s rim, just like a real cupcake.
Step 4: Adding Texture with Yarn Outlines
To enhance the realism of your cupcake towel, we’ll add some textural details using yarn, mimicking the ridges and swirls of piped frosting. Take your chosen yarn and carefully insert it into the natural crevices and folds that formed during the rolling process of your towel cupcake. Use a small, thin line of hot glue to secure the yarn along these outlines. The goal is to trace the “twirls” of the towel, giving it a more defined and appetizing appearance. You can experiment with different yarn colors or even multiple strands to add more depth. Ensure the glue is applied sparingly and precisely so it doesn’t show or stiffen the towel too much.
Step 5: Embellishing Your Cupcake
This is where your creativity truly shines! Take your acrylic pacifier, pompom ball, and star glitter centerpiece embellishment, and carefully arrange them on top of your cupcake towel. Use hot glue to securely attach each item. Think about placement: the pacifier can be nestled into a fold, the pompom could be the “cherry” on top, and the star can add a delightful sparkle. Don’t feel limited to these specific items; this step is all about personalization. You can swap these out for other small trinkets like miniature toys, artificial berries, small silk flowers, custom buttons, or anything else that fits your theme or the recipient’s taste. Ensure the embellishments are securely glued so they don’t fall off.
Step 6: Creating a Stable and Sparkling Base
To enhance the presentation and provide a stable resting place for your cupcake towel inside its box, we’ll use glitter foam. Take your sheet of glitter foam and cut it precisely to the same size and shape as the bottom of your 4.5″ x 2.5″ acetate box. Accuracy is key here for a professional look. Once cut, gently place the glitter foam inside the bottom of the acetate box. This shimmering base not only adds a festive sparkle but also helps to prevent the cupcake towel from sliding around, ensuring it remains perfectly centered and presented when the box is opened.
Step 7: Packaging Your Sweet Creation
With your cupcake towel fully embellished and its glittery bed prepared, it’s time to complete the packaging. Carefully lift your finished cupcake towel (still nestled in its muffin cup) and gently place it inside the acetate box, positioning it squarely on top of the glitter foam. Make sure the cupcake is centered and upright. Once it’s perfectly positioned, close the lid of the acetate box securely. The clear box provides a wonderful display, allowing the beauty of your handmade gift to be appreciated even before it’s opened, while also protecting it from dust and damage.
Step 8: Tying with Elegant Ribbons
Add a touch of sophistication and charm to your packaged cupcake towel with beautiful ribbons. Take your 1/2-inch satin ribbon and carefully tie it around the acetate box. Ensure the ribbon is centered and snug, but not so tight that it dents the box. Create a neat and attractive bow on the top of the box. Next, take your narrower 1/4-inch satin ribbon and form a smaller, equally neat bow. Once your smaller bow is tied, apply a tiny dot of hot glue to the center of the larger bow on the box and carefully attach the smaller bow on top. This layering of ribbons adds depth, texture, and a truly elegant finish to your gift.
Step 9: The Final Flourish – A Ribbon Flower
For the ultimate decorative touch, take your pre-made satin ribbon flower with rhinestones. Apply a small amount of hot glue to the back of the flower and carefully position it onto the center of the layered ribbon bows you just created. This beautiful flower serves as the crowning glory, adding a delicate sparkle and a professional, polished finish to your DIY cupcake towel gift. Step back and admire your handiwork – your adorable, handmade cupcake towel souvenir is now complete and ready to enchant its recipient!
Tips for Perfecting Your Cupcake Towel Creations
To ensure your DIY cupcake towels are always a resounding success, consider these helpful tips:
- Quality of Towels: Invest in soft, good-quality face towels. They not only feel nicer but also hold their shape better when folded and rolled, resulting in a more appealing ‘cupcake’ structure.
- Color Coordination: Pay attention to your color palette. Harmonizing the towel, muffin cup, yarn, ribbons, and embellishments will result in a visually stunning and cohesive gift.
- Practice Makes Perfect: If it’s your first time, try folding and rolling a practice towel. This will help you get a feel for the technique and achieve a firm, shapely cupcake.
- Hot Glue Safety: Always exercise caution when using a hot glue gun. Ensure good ventilation and keep glue sticks handy. Use small amounts of glue; too much can make the towel stiff or visible.
- Personalized Tags: For an extra special touch, attach a small, handwritten or printed gift tag with a personalized message or the event details.
- Bulk Production: If you’re making several for a party, create an assembly line. Complete all Step 1s, then all Step 2s, and so on. This can significantly speed up the process.
- Alternative Embellishments: Feel free to experiment! Instead of a pacifier, consider a tiny rubber duck, a small plastic animal, a custom button, or even a mini candy bar for older kids.
Personalization and Creative Variations
One of the most exciting aspects of DIY crafting is the boundless potential for personalization. While the core technique remains the same, you can easily adapt your cupcake towels to suit any theme, occasion, or recipient. Here are some ideas to spark your creativity:
- Themed Events:
- Baby Showers: Stick with pastel towels (pink, blue, yellow, green) and baby-themed embellishments like mini rubber ducks, tiny baby bottles, small booties, or custom tags with the baby’s name.
- Birthday Parties: Use vibrant, fun-colored towels. Embellishments can include small toy cars, superhero figures, princess wands, animal miniatures, or age-appropriate charms.
- Bridal Showers/Weddings: Opt for elegant white, cream, or silver towels. Adorn them with pearl beads, miniature silk roses, small wedding ring charms, or delicate lace ribbons.
- Seasonal/Holiday: Red and green towels for Christmas, orange and black for Halloween (with tiny spiders or pumpkins), spring colors for Easter (with mini eggs or bunnies).
- Different Towel Types:
- Washcloths: For smaller, more compact cupcakes, ideal for small favors or as part of a larger gift basket.
- Hand Towels: If you want a slightly larger ‘cupcake’, a hand towel can be folded to create a more substantial gift.
- Kitchen Towels: For housewarming gifts, roll up a kitchen towel and embellish it with miniature kitchen utensils or fruit charms.
- Embellishment Extravaganza:
- Edible Toppings: For display only (or if meant to be consumed quickly), consider adding wrapped candies, chocolate coins, or even a small lollipop sticking out.
- Fabric Paint/Markers: Lightly decorate the towel’s ‘frosting’ with subtle patterns or initials before rolling.
- Ribbon Variations: Experiment with different types of ribbons – polka-dotted, striped, sheer, or glitter-infused – to add texture and visual interest to your packaging.
- Handmade Tags: Design custom tags with catchy phrases like “Sweet Treats for Sweet Babies,” “A Little Treat for You,” or “Baked with Love.”
- Presentation Beyond the Box: While the acetate box is perfect, you can also place your cupcake towels in small gift bags, decorative baskets, or even display them on a multi-tiered stand for a stunning party centerpiece.
Let your imagination be your guide! Each variation offers an opportunity to make your gift truly unique and reflective of the care you’ve put into it.
Conclusion: A Sweet and Memorable DIY Gift
Crafting these adorable DIY cupcake towels is a delightful and rewarding experience, offering a perfect blend of creativity, practicality, and heartfelt sentiment. As we’ve explored through this detailed tutorial, transforming a simple face towel into a charming, frosting-swirled confection is not only surprisingly easy but also incredibly fun. Whether you’re preparing for a baby shower, a child’s birthday, or any special event where a unique touch is appreciated, these handmade souvenirs stand out as a testament to your thoughtfulness. Each carefully folded towel, adorned with sweet embellishments and elegantly packaged, speaks volumes about the care and personal effort you’ve invested. So gather your materials, follow these steps, and unleash your inner crafter. You’ll not only create a beautiful and memorable gift but also experience the immense satisfaction that comes from making something truly special with your own hands. Get ready to spread joy, one adorable cupcake towel at a time!