
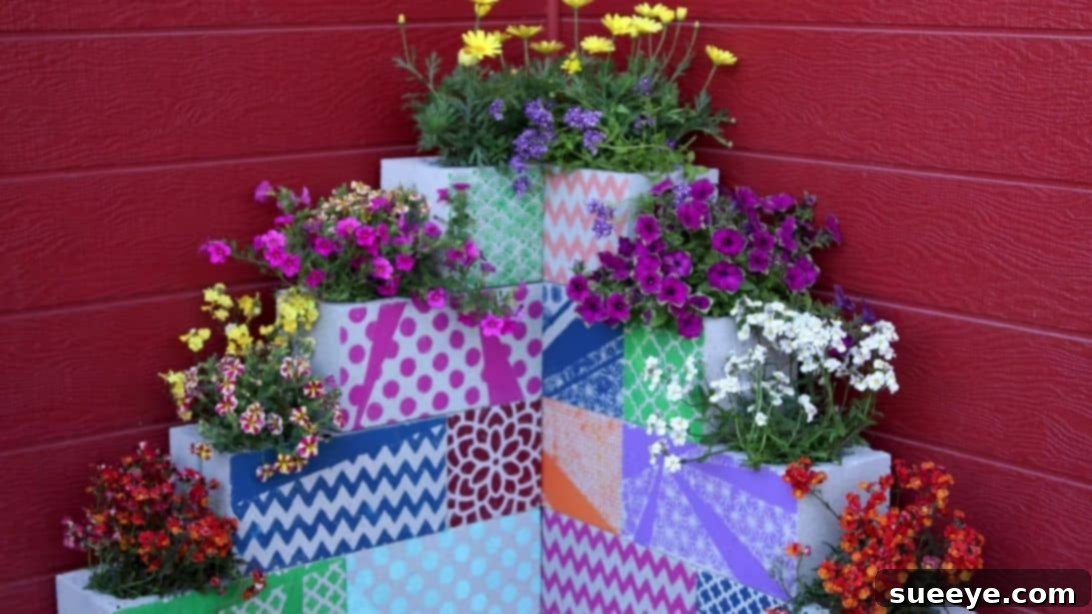
Are you looking for an ingenious way to declutter your yard or garage while adding a touch of personalized charm to your outdoor space? Those spare cinder blocks, often overlooked as mere construction remnants, hold incredible potential for transforming into beautiful and functional garden features. Instead of discarding them, consider embarking on a delightful DIY project that is both eco-friendly and incredibly satisfying. This comprehensive guide draws inspiration from a fantastic tutorial by Garden Answer on YouTube, demonstrating just how effortless it can be to create stunning, stenciled cinder block planters. This project is a testament to the power of upcycling, proving that you don’t need specialized tools or advanced skills to achieve professional-looking results. With a splash of paint and a few creative stencils, you can craft unique planters that reflect your personal style and breathe new life into your garden, patio, or balcony. Let’s dive into creating an eye-catching and durable addition to your home landscape!
Why Choose Cinder Block Planters for Your Garden?
Cinder blocks, also known as concrete blocks, are far more than just basic building materials. They are incredibly versatile, durable, and surprisingly attractive when given a creative makeover. Opting for cinder block planters offers a myriad of benefits that make them an excellent choice for any gardener, from beginner to expert. Firstly, they are exceptionally robust, capable of withstanding various weather conditions, which means your planters will last for many seasons to come without deteriorating. Secondly, cinder blocks are typically inexpensive and often readily available, sometimes even free if you have old construction materials lying around or can source them from local sites, making this a highly budget-friendly gardening solution. Their inherent weight provides stability, preventing your planters from easily tipping over in windy conditions, a common issue with lighter containers. Furthermore, the modular nature of cinder blocks allows for immense creativity in design. You can arrange them in countless configurations – stacked, staggered, in linear rows, or forming geometric patterns – to perfectly fit your space and aesthetic preferences. This adaptability makes them ideal for creating raised garden beds, retaining walls for smaller areas, or simply standalone decorative pieces. They also offer excellent drainage due to their porous structure, which is vital for healthy plant growth, preventing waterlogging that can harm roots. By transforming these utilitarian objects into vibrant plant homes, you’re not only enhancing your garden’s beauty but also engaging in a sustainable practice of upcycling materials that might otherwise end up in a landfill.
What You’ll Need: Materials for Your DIY Masterpiece
Gathering your materials is the first exciting step towards bringing your stenciled cinder block planter to life. This project requires only a handful of readily available items, ensuring a smooth and enjoyable crafting experience. Here’s a detailed list of what you’ll need:
- Cinder Blocks: The star of our project! The quantity will depend on the size and configuration of the planter you envision. Ensure they are clean and free from loose debris for optimal paint adhesion.
- Painter’s Tape: Essential for creating crisp, clean lines and geometric patterns. Choose a good quality tape that won’t bleed under the paint.
- Round Sponge Brush: Ideal for applying acrylic paint smoothly and evenly, especially when working with stencils. You might want a few sizes for different details.
- Acrylic Paint: A versatile choice for outdoor projects, available in a vast array of colors. Look for exterior-grade acrylic paint for enhanced weather resistance and longevity. Consider a primer if your blocks are particularly porous or stained.
- Hardware Cloth: This sturdy metal mesh serves a crucial purpose in supporting your planting medium and preventing soil from falling through the block cavities.
- Landscape Fabric: A breathable barrier that lines the block cavities, allowing water to drain while keeping soil contained and preventing weeds.
- Soil: High-quality potting soil suitable for the types of plants you intend to grow. Consider mixing in compost or other amendments for optimal plant health.
- Flowers (or Plants): The final touch! Select plants that thrive in your local climate and complement your chosen paint colors and design. Drought-tolerant or succulent varieties often do well in cinder block planters.
Getting Started: Planning Your Project
Before you dive into painting and assembling, a little planning goes a long way in ensuring your DIY cinder block planter project is a success. This preliminary stage is crucial for both aesthetics and functionality. First, consider the location where your finished planter will reside. Will it be on a sunny patio, a shaded porch, or as a focal point in your garden? The amount of sunlight the location receives will dictate the types of plants you can successfully grow. Next, think about the overall design and configuration of your planter. Cinder blocks can be stacked, arranged in a linear fashion, or creatively staggered to form unique multi-level displays. Sketching out a rough plan on paper can help visualize the layout and determine the exact number of cinder blocks you’ll need. This is also the time to consider your color palette and stencil patterns. Do you want a vibrant, eclectic look, or something more subdued and natural? The beauty of this project lies in its customizability, so let your creativity flow! Finally, ensure your workspace is flat, clean, and well-ventilated. Lay down a drop cloth or old newspaper to protect your surface from paint spills. Taking these planning steps will set the stage for a smooth and enjoyable crafting experience, leading to a truly impressive finished product.
Step-by-Step Guide to Your DIY Stenciled Cinder Block Planter
Step 1: Personalizing Your Cinder Blocks with Paint and Stencils
This is where the magic truly begins – transforming plain grey blocks into vibrant decorative elements. Start by ensuring your cinder blocks are clean and dry. A quick brush-down or rinse can remove any dust or loose particles that might prevent paint from adhering properly. Once dry, place a cinder block flat on its side on your protected work surface. This position provides easy access to the surfaces you’ll be decorating. Now, it’s time to introduce the painter’s tape. Apply strips of painter’s tape to the side of the cinder block. You can create geometric designs, diagonal lines, or any pattern that strikes your fancy. The tape acts as a barrier, ensuring clean, sharp lines and preventing paint from bleeding into unintended areas. For instance, masking off a diagonal section allows you to paint one half a distinct color, creating a striking two-toned effect.
With your design taped off, grab your round sponge brush and your chosen acrylic paint. Gently dab the paint onto the exposed surface of the cinder block, covering the area up to the edge of the tape. Applying multiple thin coats rather than one thick layer will result in a smoother finish and better paint adhesion. Don’t be afraid to experiment with different colors and techniques. You can add more tape to create intricate multi-color patterns or use stencils for more complex designs like floral motifs, abstract shapes, or even letters. For ease of use, consider self-adhesive stencils or hold regular stencils firmly in place while dabbing paint. Once you’re satisfied with your design, carefully peel off the painter’s tape while the paint is still slightly wet to avoid peeling off dried paint. This reveals crisp, clean lines that truly elevate the block’s appearance. Set your freshly painted cinder block aside in a well-ventilated area and allow it to dry completely. Drying time can vary depending on paint thickness and humidity, but generally, allow several hours or even overnight for the paint to fully cure. For added durability and protection against the elements, especially if your planter will be exposed to harsh weather, consider applying a clear, outdoor-grade sealant once the paint is fully dry.
Step 2: Assembling Your Planter and Bringing it to Life
Once all your personalized cinder blocks are completely dry, the next exciting phase is assembly. Begin by choosing the final location for your planter. Remember, cinder blocks are heavy, especially once filled with soil and plants, so moving the entire structure later will be challenging. Start arranging the blocks on your chosen spot according to your pre-planned design. You can stack them in a simple linear fashion, create a tiered design, or form a more complex geometric shape. The key is to ensure the base layer is level and stable. As you stack additional layers of blocks, it’s crucial to add a layer of hardware cloth. Cut pieces of hardware cloth to fit over the open cavities of the cinder blocks and place them between each layer, or within the cavities themselves if you are filling them individually. This mesh provides essential support for the soil, preventing it from washing out or sinking too far into the block’s interior, while also offering some pest control. It also helps to stabilize the stacked blocks, preventing them from shifting over time.
After your cinder block structure is complete and reinforced with hardware cloth, it’s time to prepare the planting cavities. Insert pieces of landscape fabric into each hole of the cinder blocks that you intend to use for planting. The landscape fabric acts as a permeable liner, allowing excess water to drain out while keeping the soil contained within the block and preventing weeds from growing up from below. Make sure the fabric lines the entire interior of the cavity. Once the landscape fabric is in place, begin filling the cavities with your chosen potting soil. Fill them nearly to the top, leaving a small lip for watering. Now comes the most rewarding part: planting your flowers or other chosen plants. Gently remove your plants from their nursery pots, loosen any compacted roots, and carefully place them into the soil-filled cavities. Backfill with more soil as needed, gently patting it around the base of the plants. Water thoroughly after planting to help settle the soil and give your new additions a good start. For an extra touch, consider adding a layer of mulch around your plants to help retain moisture and suppress weeds. Congratulations, you’ve just created a stunning, custom-designed DIY cinder block planter that will be a beautiful focal point in your outdoor space!
Beyond the Basics: Advanced Tips & Customization
While the basic stenciled cinder block planter is a fantastic project, there are countless ways to take your creation to the next level and truly make it your own. Consider incorporating different textures and finishes. Instead of just paint, you could apply stucco, mosaic tiles, or even natural stones to the exterior of the blocks for a more rustic or sophisticated look. For a cohesive garden design, integrate your cinder block planters with other elements like a matching cinder block bench, a small retaining wall, or even a fire pit. Think about adding lighting: small solar-powered lights placed within or around the blocks can illuminate your planter at night, creating a magical ambiance. Mobility can also be a valuable feature; attach heavy-duty caster wheels to the bottom layer of your cinder block base if you anticipate needing to move your planter around your patio or deck. This is particularly useful for sun-loving plants that might need to follow the light throughout the day. You can also vary the types of plants you use – don’t just stick to flowers! Succulents, herbs, small vegetables, or even trailing plants can create stunning displays. For areas with less sunlight, opt for shade-loving plants or foliage-focused varieties that add texture and color without needing blooms. Regular maintenance, such as checking soil moisture, fertilizing as needed, and pruning spent blooms, will ensure your plants thrive and your planter remains a beautiful focal point for years to come. With these advanced tips, your DIY cinder block planter can become a truly unique and dynamic part of your outdoor living space.
Conclusion: Your New Garden Masterpiece Awaits
Transforming ordinary cinder blocks into extraordinary garden planters is a rewarding and accessible DIY project that offers both aesthetic appeal and practical benefits. By following these simple steps, you can create a durable, custom-designed planter that not only adds beauty to your outdoor space but also provides a nurturing home for your favorite plants. This project is a fantastic way to embrace sustainability, unleash your creativity, and enhance your garden or patio without breaking the bank. Whether you opt for a minimalist design or a vibrant explosion of color and pattern, your stenciled cinder block planter will undoubtedly become a conversation starter and a testament to your DIY prowess. So, gather your materials, let your imagination guide you, and get ready to enjoy the satisfaction of bringing a truly unique garden masterpiece to life!
*A special thanks to Garden Answer via YouTube for providing the inspiration and valuable visual guidance for this fantastic DIY project. Their channel is a treasure trove of gardening wisdom and creative ideas, so be sure to give them a visit and subscribe for more amazing content!