
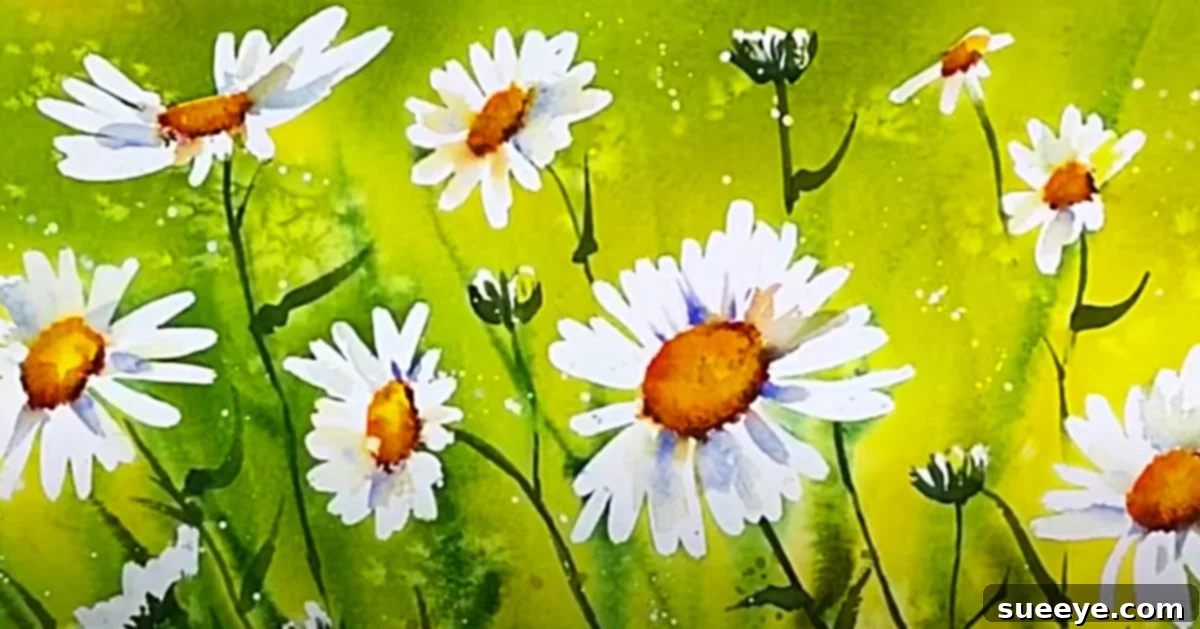
How to Paint Watercolor Daisies: A Beginner’s Guide to Capturing Floral Beauty
Embarking on a new artistic journey can be both exciting and a little daunting, especially when you’re faced with a fresh set of art supplies and an eagerness to create but aren’t quite sure where to begin. This was precisely my delightful dilemma recently when my thoughtful husband presented me with a beautiful set of watercolors for my birthday. While immensely grateful and thrilled with the gift, I quickly realized I didn’t know the first stroke about watercolor painting.
My quest for knowledge led me to the vast world of online tutorials, and it wasn’t long before I stumbled upon an absolute gem: an incredible daisy watercolor tutorial by Karen Rice Watercolour Channel on YouTube. What made this particular tutorial stand out for a complete novice like myself was its specific design to help beginners learn to paint using just one brush. Karen’s approach is nothing short of brilliant, guiding you through the process of building up colors layer by layer, starting with the vibrant green background, and progressively transforming simple washes into a breathtaking floral landscape. Her expert instruction makes the entire process feel accessible and incredibly rewarding.
This guide aims to expand upon that wonderful introduction, offering a more in-depth look at what makes watercolor daisies such a perfect subject for beginners, essential materials, and a detailed breakdown of the painting process, all while emphasizing the simplicity and beauty that Karen Rice’s method champions. If you’re ready to dip your brush into the enchanting world of watercolors and create your own cheerful daisy masterpiece, you’ve come to the right place.
Why Choose Watercolor Daisies for Your First Project?
Daisies, with their simple yet elegant form and bright, optimistic presence, are an ideal subject for anyone new to watercolor painting. Their characteristic white petals radiating from a central yellow disc offer a fantastic opportunity to practice basic shapes, color layering, and light application without overwhelming complexity. Watercolor, as a medium, lends itself beautifully to capturing the delicate, translucent quality of daisy petals. Furthermore, painting itself is a wonderfully therapeutic activity, offering a chance to unwind, focus your mind, and express creativity. Beginning with a subject that brings immediate visual satisfaction, like a daisy, can significantly boost a beginner’s confidence and foster a lasting love for the art form. It’s a forgiving subject, allowing for imperfections to often add to its natural charm, making it perfect for your inaugural watercolor adventure.
Essential Materials for Your Watercolor Daisy Painting
Before you dive into painting, gathering the right materials is crucial for a smooth and enjoyable experience. While watercolor painting can be simple, having suitable supplies makes a significant difference, especially when you’re just starting out. Here’s a detailed look at what you’ll need:
- Watercolor Paper: This is perhaps the most important item. Unlike regular paper, watercolor paper is specifically designed to withstand water without buckling or tearing. Look for cold-press paper, which has a slightly textured surface that holds pigment beautifully. A weight of at least 140lb (300gsm) is recommended for best results, as it minimizes warping.
- Watercolor Paints: Available in tubes or pans (solid cakes). For beginners, pan sets are often more convenient and affordable, offering a good range of basic colors. Opt for artist-grade if your budget allows, as they offer richer pigments and better lightfastness, but student-grade sets are perfectly fine for practice.
- Water: You’ll need two containers of clean water – one for rinsing your brush and another for mixing paints. This helps keep your colors vibrant and prevents muddying. Small jars or plastic cups work well.
- A Cleaning Rag (or Paper Towel): Essential for dabbing excess water from your brush, blending, and lifting paint. Always keep it handy to control the moisture levels on your brush and paper.
- Watercolor Paintbrushes: The Karen Rice tutorial brilliantly demonstrates how much you can achieve with just one brush. For a daisy, a round brush (size 6 or 8 is a versatile choice) is excellent for both broader washes and finer details. If you eventually expand, a larger flat brush for washes and a smaller detail brush for tiny elements can be added.
- Pencil and Eraser (Optional but Recommended): For lightly sketching your daisy outline before you commit with paint. Use a light hand and a hard lead (like 2H) so the lines don’t show through your transparent watercolor.
- Palette: A ceramic plate, a plastic palette, or even just the lid of your watercolor pan set works perfectly for mixing colors.
Having these materials ready will ensure you have everything you need to follow along with the tutorial and create beautiful watercolor daisies.
Getting Started with the Daisy Watercolor Tutorial: Step-by-Step Directions
Karen Rice’s tutorial is a fantastic resource, breaking down the seemingly complex process of painting into manageable, enjoyable steps. Her method emphasizes layering and building up color, which is an invaluable lesson for any budding watercolor artist. While we highly recommend watching her full video for the visual guidance, here’s an elaborated step-by-step breakdown of the process, designed to provide context and additional tips for each stage.
1. Prepare Your Workspace and Sketch
Before anything else, ensure your workspace is clean, well-lit, and organized. Lay out all your materials: watercolor paper, paints, water containers, rag, and your brush. If you choose to sketch, very lightly draw the basic shapes of your daisies on your watercolor paper. Don’t press too hard, as pencil lines can be difficult to erase or cover completely with transparent watercolors. Focus on the general placement of your flowers and their central points.
2. Mastering the Green Background
As Karen brilliantly shows, you begin by establishing the lush green background. This step is crucial as it sets the mood and provides a vibrant contrast for your white daisies.
Start with a light wash of green. Mix a soft, diluted green on your palette. Apply this evenly across the areas where you envision your background, working around the lightly sketched daisy shapes if you made them. Don’t be afraid to let it be a bit uneven; nature isn’t perfectly uniform! As this layer begins to dry, you can add slightly darker tones of green, perhaps mixing in a touch of blue or brown, to create depth and texture, simulating foliage. The key here is to build up the color gradually, letting each layer dry partially before adding the next, allowing the underlying colors to shine through and create a rich, layered effect. This technique, known as glazing, is fundamental in watercolor.
3. Laying the Foundation for Petals: The White of the Daisy
For the white petals of a daisy, the magic of watercolor often involves *not* painting white, but rather using the white of the paper itself and defining the shapes with subtle shadows. This step begins by very gently dampening the areas where your petals will be, or by applying a very diluted, almost invisible wash of a cool grey or very light blue around the edges of where your petals will be. This helps to create the illusion of form and light. Karen’s guidance here is key, as she shows how to outline and suggest the petal shapes without heavy-handed application, allowing the natural luminosity of the paper to represent the petals’ brightness.
4. Defining the Daisy Petals and Stems
Now it’s time to give your daisies their distinct shape and presence. With your single brush, you’ll start defining the individual petals. Using a very light wash of a cool grey, a hint of yellow, or even a pale lavender, gently paint strokes from the center outwards, suggesting the form of each petal. Vary the pressure and length of your strokes to create natural-looking petals. Remember, they don’t have to be perfectly symmetrical; nature is beautifully imperfect.
Next, focus on the stems. Using a slightly darker and more concentrated green than your background, paint slender, graceful lines for the stems connecting your daisies to the ground. You can also add a few leaves, varying their shapes and angles to add interest and realism. Again, Karen’s technique of building layers allows you to add subtle variations in color and value to give the stems and leaves dimension.
5. Adding the Daisy’s Golden Center
The bright yellow center is the heart of your daisy and adds a wonderful pop of color. Mix a vibrant yellow – perhaps a cadmium yellow or a bright lemon yellow. With a more concentrated mix, carefully paint small, circular dots or a textured circle in the center of each daisy. You can add a tiny touch of orange or even a very light brown while the yellow is still wet to create a sense of depth and texture, mimicking the intricate structure of a daisy’s disc florets. This detail brings your flowers to life.
6. Final Touches and Enhancements
Once your main elements are in place, step back and assess your painting. This is where you can add those subtle refinements that elevate your artwork. You might add a few more layers of green to the background for increased depth, or deepen the shadows on certain petals to give them more form. Perhaps a few small, lighter green strokes for grass blades, or tiny specks of color in the background to suggest distant flowers. Don’t be afraid to experiment with lifting a little color with a damp, clean brush or a corner of your paper towel to create highlights. These final adjustments add personality and polish to your watercolor daisy painting.
Tips for Aspiring Watercolorists
As you delve deeper into the world of watercolor, remember these foundational tips to help you on your artistic journey:
- Patience is Your Best Friend: Watercolor is all about layers and drying times. Resist the urge to rush. Let each wash dry before applying the next, especially when glazing, to avoid muddying colors.
- Embrace Imperfection: Watercolors have a mind of their own, and happy accidents are part of their charm. Don’t strive for photographic realism; instead, enjoy the fluid, expressive nature of the medium.
- Practice Consistently: Like any skill, watercolor painting improves with practice. Dedicate regular time, even short sessions, to experimenting with techniques, mixing colors, and painting simple subjects.
- Control Water, Control Paint: The ratio of water to pigment on your brush and paper is key. Experiment with different consistencies – from thin, transparent washes to thicker, more opaque applications – to understand their effects.
- Quality Materials Matter: While you don’t need the most expensive supplies, good quality watercolor paper makes a world of difference. It handles water better, allows for easier lifting, and prevents warping, making the learning process much less frustrating.
- Study Light and Shadow: Pay attention to how light hits objects and creates shadows. Understanding this will help you add depth and dimension to your paintings.
- Learn from Others: Watch more tutorials, follow artists you admire, and don’t hesitate to try replicating elements you like. This is a great way to discover new techniques and build your repertoire.
Your Daisy Masterpiece: A Ray of Sunshine
The sense of accomplishment that comes with creating something beautiful with your own hands is truly unparalleled. This daisy painting, born from a simple set of watercolors and a fantastic tutorial, is so much more than just a picture; it’s a testament to your newfound skill and creativity. Its gorgeous presence will undoubtedly infuse any room in your home with a ray of cheerful sunshine. Personally, I’m absolutely delighted with my finished daisy painting and plan to display it proudly in my kitchen, where its vibrant charm can bring joy to my entire family every single day.
Let this be just the beginning of your watercolor adventure. There’s a vast world of colors, techniques, and subjects waiting to be explored. Keep experimenting, keep creating, and most importantly, keep enjoying the process. Share your beautiful creations with others, and inspire them to discover the magic of watercolor painting too!