
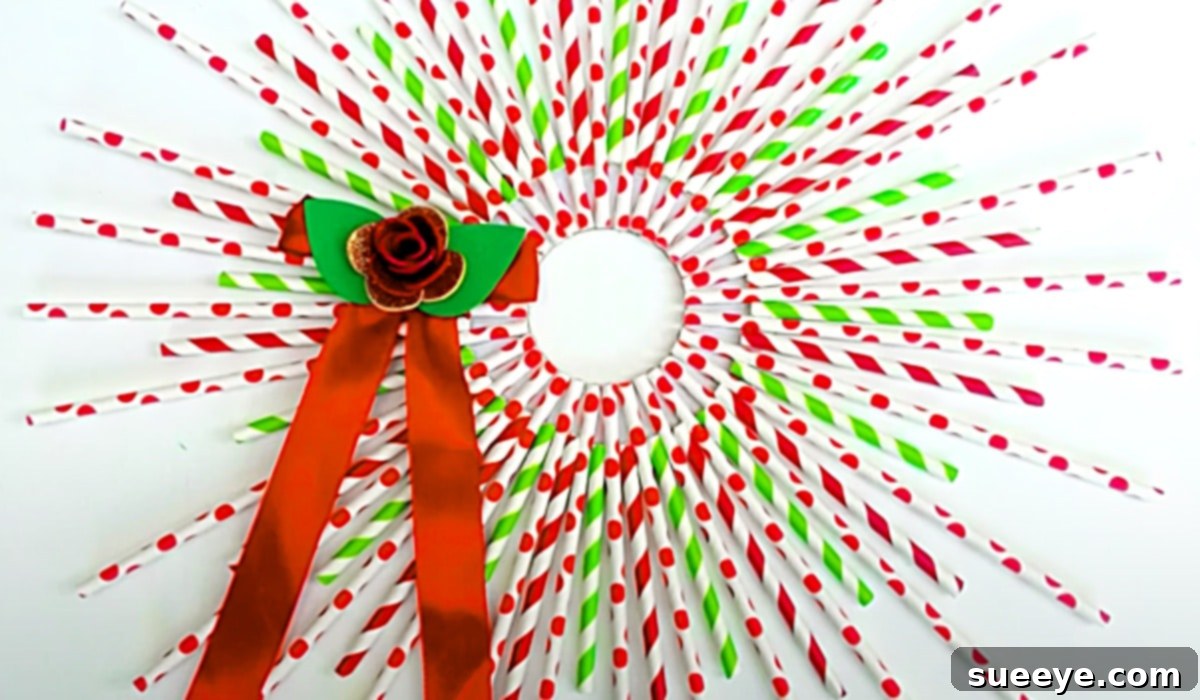
How To Make An Elegant DIY Straw Christmas Wreath
As the holiday season draws near, the desire to adorn our homes with festive cheer grows stronger. While store-bought decorations offer convenience, there’s an unparalleled joy and satisfaction in creating something truly special with your own hands. This year, move beyond traditional decor and embark on a crafting journey to create a stunning **DIY straw Christmas wreath**. Inspired by the ingenious idea shared by Ana DIY Crafts on YouTube, this project offers a refreshing take on holiday ornamentation. It’s incredibly easy to assemble, remarkably cost-effective, and boasts a distinct mid-century modern aesthetic that will effortlessly elevate your festive ambiance. Perfect for crafters of all skill levels and ages, this project promises a delightful experience and a beautiful, unique decoration for your home.
Embrace the Unique Charm of a Straw Christmas Wreath
The beauty of this particular Christmas wreath lies in its simplicity and striking visual appeal. Unlike wreaths made from evergreens or traditional baubles, a straw wreath offers a minimalist yet sophisticated look, making it a standout piece. The clean lines and repetitive patterns created by the straws lend themselves perfectly to a mid-century modern design ethos – think elegant, uncluttered, and effortlessly chic. This makes it an ideal choice for those who appreciate contemporary design but still want to infuse their space with holiday spirit.
Beyond aesthetics, this DIY project is also incredibly versatile. While perfect for Christmas, the fundamental design can be adapted for other seasons or year-round decor with different straw colors and embellishments. It’s an excellent way to add a personalized touch to your home without breaking the bank. Furthermore, engaging in DIY crafts, especially during the holidays, can be a wonderfully therapeutic and bonding experience, making memories as you create beautiful decorations together with family and friends.
Essential Materials for Your Elegant Straw Christmas Wreath
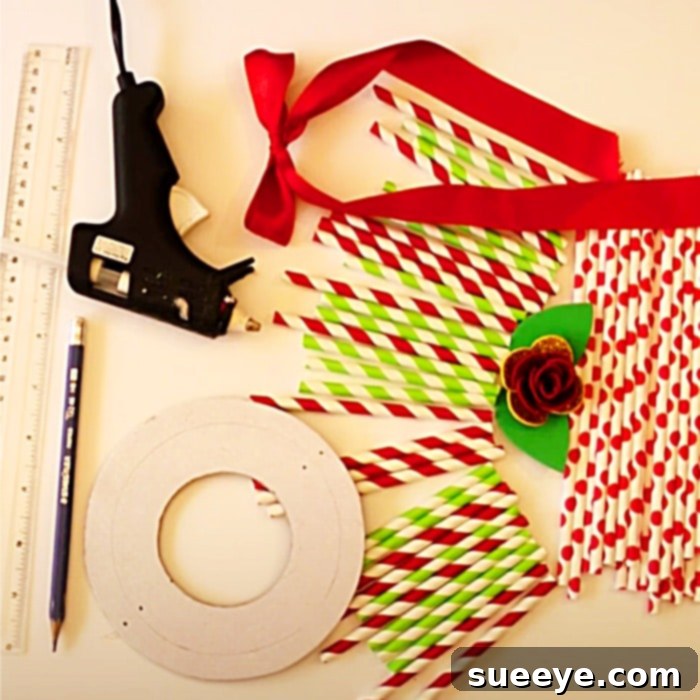
Before diving into the creative process, gathering all your materials is crucial. The beauty of this project is its accessibility; most items are readily available and inexpensive. Here’s what you’ll need to craft your beautiful **handmade holiday wreath**:
- Straws: This is the star of your project! While any type of straw can technically be used, paper straws – especially those with stripes or solid festive colors – deliver the best aesthetic for that desired mid-century modern vibe. They are also more eco-friendly and easier to cut. Consider a mix of colors like red, green, gold, silver, or even a sophisticated monochromatic scheme. You can find large packs at craft stores, party supply shops, or online retailers.
- A Hot Glue Gun and Glue Sticks: Your trusty hot glue gun will be indispensable for securely attaching the straws to the base. Ensure you have plenty of glue sticks on hand, as you’ll be using quite a few. Safety first: always be cautious when operating a hot glue gun.
- A Ruler and Pencil: These tools are vital for precision. You’ll use them to measure and mark the straws, ensuring they are cut to uniform lengths for a professional and symmetrical finish.
- Decorative Ribbon: A beautiful ribbon serves multiple purposes. It can be used to create an elegant hanging loop for your finished wreath, or fashioned into a bow or other decorative elements to add a touch of flair. Choose a ribbon that complements your chosen straw colors and overall Christmas theme – velvet, satin, or even burlap can work wonders.
- Various Christmas-Themed Embellishments: This is where you can truly personalize your **DIY Christmas decor**. Think small, lightweight ornaments, faux berries, miniature pinecones, tiny bells, glitter, or even small fabric cutouts. Consider a theme: rustic, glamorous, traditional, or whimsical. Less is often more with this minimalist design, so select a few key elements that enhance rather than overpower the straw pattern.
- A Sturdy Cardboard Circle: This will serve as the foundational base for your wreath. You can repurpose a cardboard box by tracing and cutting out a circle of your desired size, or purchase pre-cut craft circles from a hobby store. The size of your cardboard circle will determine the final diameter of your wreath. A larger circle will require more straws.
Having all these items ready before you begin will ensure a smooth and enjoyable crafting experience, allowing you to focus on the creative process of making your unique **Christmas wreath**.
Step-by-Step Guide: Crafting Your Masterpiece
Now that you have all your materials, let’s dive into the simple yet rewarding process of creating your **easy Christmas craft**. This guide will help you transform simple straws into a festive work of art, with a nod to the architectural style presented by Ana DIY Crafts.
1. Prepare Your Straws and Base
Begin by deciding on the desired length for your straws. Typically, cutting straws into 2 to 4-inch segments works well, but you can experiment with different lengths for varied textures. Use your ruler and pencil to mark the cutting points on a straw, then cut it. Use this first cut straw as a template to ensure all subsequent straws are cut to precisely the same length. This uniformity is key to achieving the clean, architectural look of this **mid-century modern wreath**. For your cardboard base, if you’re cutting it yourself, aim for a clean circle. You can even paint the cardboard a neutral color (like white or black) if you want to ensure no raw cardboard shows through your straw arrangement.
2. Begin Gluing the Straws
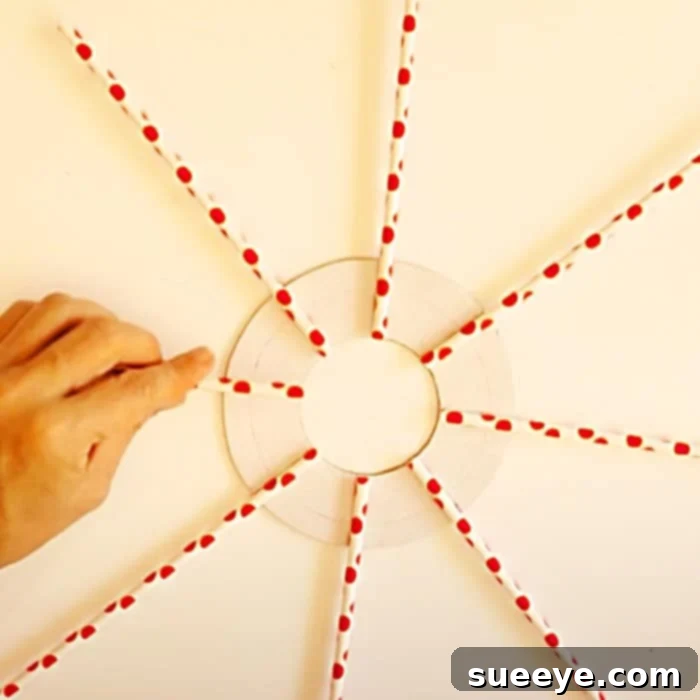
With your hot glue gun heated and ready, start attaching the straws to your cardboard base. The technique is straightforward: apply a small dot or thin line of hot glue to one end of a straw and press it firmly onto the cardboard. The core idea is to arrange the straws in a radial pattern, emanating outwards from the center of your cardboard circle. You can start by gluing a few straws at opposing points (like 12, 3, 6, and 9 o’clock) to create a framework, then fill in the gaps. Ensure the straws are spaced evenly and angled consistently to create a symmetrical and appealing design.
Work your way around the cardboard circle, carefully gluing each straw. Depending on your desired fullness, you might create a single layer of straws or overlap them slightly to add depth and dimension. For a truly architectural effect, try to keep the straws as straight and uniform as possible. Take your time, and don’t rush the gluing process. If you encounter any unsightly glue strings, gently remove them once the glue has cooled.
3. Add Decorative Embellishments
Once all your straws are securely glued in place and you’re happy with the overall straw arrangement, it’s time for the fun part: adding your chosen decorations! This step allows you to infuse your personality into the **DIY holiday decor**. Apply small dabs of hot glue to attach your selected embellishments – whether they are tiny ornaments, faux berries, a festive bow made from your ribbon, or other small accents. You can choose to concentrate decorations at the bottom, top, or evenly distribute them around the wreath. For a minimalist look, a single, elegant bow at the top or bottom might be all you need.
Finally, create a hanging mechanism. Cut a length of your decorative ribbon, form it into a loop, and securely hot glue it to the back of your cardboard base at the top. Ensure it’s strong enough to hold the weight of your finished wreath. And just like that, your unique **DIY straw project** is complete and ready to adorn your door or wall!
Tips for Customization and Long-lasting Beauty
One of the greatest advantages of crafting your own **Christmas wreath** is the endless potential for customization. Here are some ideas to make your straw wreath truly unique and ensure its longevity:
- Experiment with Color Schemes: Don’t feel confined to traditional red and green. Consider a sophisticated palette of metallics (gold, silver, bronze), icy blues and whites for a winter wonderland theme, or even pastels for a whimsical touch. Ombre effects with different colored straws can also be stunning.
- Vary Straw Lengths: Instead of uniform lengths, try cutting straws into varying lengths and arranging them to create a textured, layered effect. Shorter straws closer to the center, gradually getting longer towards the edge, can add a dynamic dimension.
- Incorporate Different Materials: While paper straws are excellent, you could also experiment with thin bamboo skewers, rolled craft paper, or even painted wooden dowels for a different look and feel.
- Seasonal Adaptability: Remove the Christmas-specific embellishments after the holidays, and you have a beautiful base that can be re-decorated for other seasons. Think pastel ribbons and small faux flowers for spring, or vibrant colors for summer.
- Durability and Storage: To protect your wreath, especially if you plan to reuse it year after year, consider a light spray of clear sealant or craft varnish (test on a spare straw first). Store your wreath in a sturdy box in a cool, dry place to prevent dust and damage.
- Involve the Family: This **Christmas craft for all ages** is a fantastic family activity. Younger children can help with sorting and counting straws (under supervision for cutting), while older kids can assist with gluing and decorating.
This project is more than just making a decoration; it’s about expressing your creativity and adding a heartfelt touch to your holiday celebrations.
This straw Christmas wreath project is truly a gorgeous idea that has captured my admiration. Its blend of simplicity, affordability, and sophisticated style makes it an absolute winner for anyone looking to add a unique touch to their holiday decorations. Whether you’re a seasoned crafter or a beginner, this **DIY Christmas decor** is sure to bring joy and beauty to your home. Give it a try – you’ll be amazed at what you can create!