
Mastering Acrylic Petal Painting: An Incredible Paper Towel Technique for Stunning Flowers
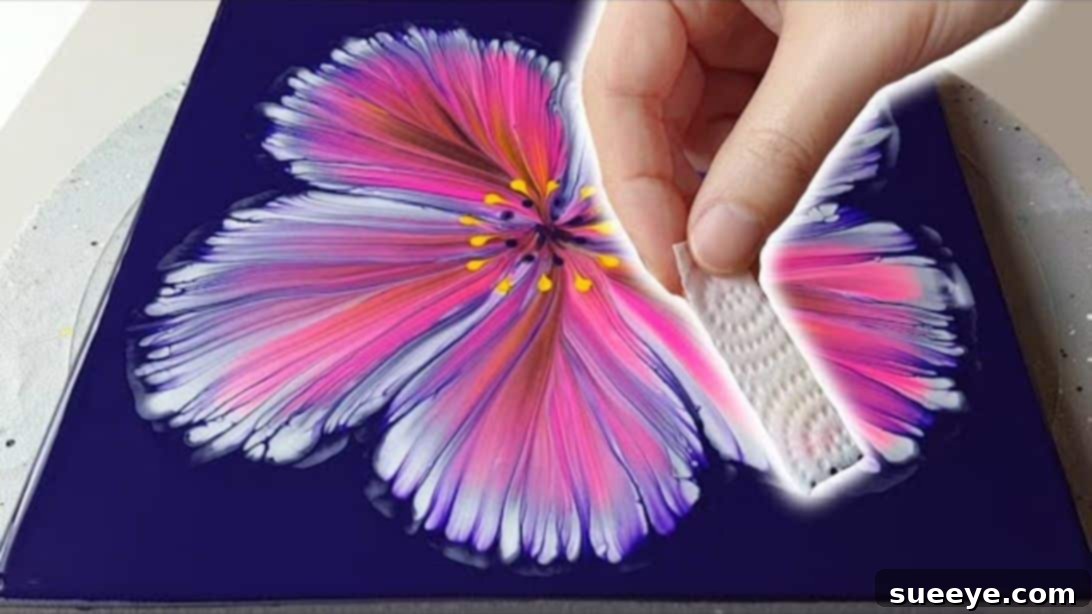
As an artist, the quest for innovative and captivating techniques to bring my subjects to life is a never-ending journey. Recently, I stumbled upon a truly remarkable method for painting exquisite flower petals using an everyday item: a simple piece of paper towel. This ingenious approach, brilliantly demonstrated by Designer Gemma77 on YouTube, transforms ordinary acrylic paint into vibrant, textured floral masterpieces. Whether you’re a seasoned painter or just starting your artistic exploration, this technique promises to elevate your work and impress anyone who lays eyes on your creations. Get ready to unlock a new dimension of artistic expression and discover the magic hidden within your kitchen cupboard!
This comprehensive guide will walk you through each step of this unique painting process, from preparing your materials to adding those final, intricate details that make your floral art truly pop. We’ll delve into the nuances of color application, the art of creating dynamic petal textures, and essential tips to ensure your painting experience is both enjoyable and rewarding. Prepare to be amazed by what you can achieve with just a few art supplies and the humble paper towel!
Materials Needed for Your Paper Towel Petal Painting
Before diving into the creative process, gathering all your materials is crucial. This technique utilizes a blend of common art supplies and household items, making it accessible and cost-effective. Here’s everything you’ll need to embark on your journey to painting stunning paper towel petals:
- Scissors: For precisely cutting your paper towel into manageable pieces.
- Paper Towel: The star of our technique! Opt for a sturdy, absorbent brand to achieve the best texture.
- Painting Knife (Palette Knife): Essential for spreading paint evenly across the canvas and creating smooth backgrounds.
- Acrylic Paint: We’ll focus on vibrant shades like blue (for the background), white, fluorescent pink, and yellow for the flower itself. Feel free to experiment with other complementary or contrasting colors as you gain confidence!
- Water: For diluting paint if needed to achieve desired consistency, and for cleaning your tools.
- Canvas: Your artistic playground. Any size will do, but starting with a medium-sized canvas (e.g., 12×16 or 16×20 inches) is recommended for your first attempt.
- Spoon: A surprisingly effective tool for defining and clearing the flower’s central area.
- Dotting Tool: For adding delicate details and creating the flower’s pollen-like center. If you don’t have a specialized dotting tool, the back of a paintbrush, a toothpick, or even a pen cap can serve as excellent alternatives!
- Stick: A simple wooden stick (like a skewer or even a sturdy toothpick) for creating fine lines and connecting dots, adding a touch of organic realism.
- Pointed Bottles (Optional but Recommended): Small squeeze bottles with fine tips are incredibly useful for applying paint for outlines and intricate details, allowing for greater control and precision than a standard brush.
- Heat Torch (Optional): A small butane torch (often used in resin art or cooking) can be used to gently remove trapped air bubbles from your acrylic paint layers, resulting in a perfectly smooth, professional finish. Always use with extreme caution and in a well-ventilated area.
- Protective Surface & Gloves: Acrylic paint can stain, so always protect your workspace with a drop cloth or newspaper, and consider wearing gloves to keep your hands clean.
Having all these items ready and within reach before you start will ensure a smooth and uninterrupted creative flow. Let’s prepare our canvas and materials for an exciting painting adventure!
Step-by-Step Instructions for Painting Beautiful Petals with Paper Towel
Step 1: Prepare Your Paper Towel “Petals”
The foundation of our unique petal texture lies in the preparation of your paper towel. Begin by taking a roll of paper towel and cutting it into numerous small, manageable rectangular pieces. The ideal size for these strips is roughly 1×2 inches or slightly larger, depending on the scale and size of the flower you intend to paint. The goal is to have pieces that are easy to hold and manipulate without getting excess paint on your fingers. Ensure you cut a generous supply, as you will be using a fresh piece for each individual petal stroke. This critical step prevents muddying of colors and ensures each petal maintains its crisp, distinct texture. Once cut, place these rectangular strips in a clean, accessible container or directly on your palette, ready for immediate use. This simple yet essential preparation step ensures you have a continuous flow during the creative process, allowing you to focus purely on forming those exquisite petals without interruption.
Step 2: Prepare the Canvas Background
With your paper towel ready, it’s time to set the stage on your canvas. Choose a base color for your painting – a serene blue is suggested in the original technique, providing a beautiful contrast to the vibrant floral hues. Apply a generous amount of acrylic paint directly onto your canvas surface. Using a painting knife, spread the paint evenly and smoothly across the entire canvas. The objective here is to create a consistent, uniform layer that will serve as the captivating backdrop for your flower. Pay close attention to the edges of the canvas, ensuring they are fully covered for a polished, professional finish. As you spread the paint, you might notice small air bubbles appearing on the surface. To achieve a perfectly smooth foundation, gently pass a heat torch over the wet paint. This helps to release trapped air, creating an impeccably flat and even surface. If you don’t have access to a heat torch, gently tilting the canvas or lightly blowing on the surface can help reduce bubbles, although perhaps not with the same precise effect. A uniform and smooth background is crucial for the subsequent steps, allowing the vibrant petal colors to truly stand out and take center stage.
Step 3: Outline Your Flower and Add Initial Colors
Now for the exciting part – bringing your flower to life! Begin by using white acrylic paint, ideally from a pointed bottle for enhanced precision. Carefully draw the outline of your desired flower shape directly onto the still-wet canvas background. This white outline serves as a crisp guide for your subsequent colors and also provides a luminous base. Once the primary outline is complete, it’s time to introduce more vibrant hues. Using yellow and fluorescent pink paints, also from pointed bottles, meticulously trace over sections of the white outline or fill in areas within it. The beauty of working with wet paint is how the colors subtly blend and interact, creating soft gradients and natural transitions that mimic the delicate appearance of real petals. You might create an inner ring of yellow and an outer ring of pink, or blend them more fluidly to achieve a soft, ethereal glow. After applying these initial layers, you may choose to gently pass the heat torch over the paint once more. This helps to meld the colors together seamlessly, remove any new air bubbles that may have formed during application, and partially set the paint, preparing it perfectly for the unique paper towel texturing technique that follows. This step lays the vibrant and fluid foundation upon which your textured petals will exquisitely emerge.
Step 4: Create Stunning Petals with Paper Towel
This is where the true magic of the paper towel technique unfolds! Pick up one of your pre-cut rectangular pieces of paper towel, holding it firmly at one end. Position the other end onto the white paint of your flower outline, or directly onto the wet colored sections, and with a gentle, smooth, and consistent motion, glide it inwards towards the center of the flower. As you glide, the paper towel will delicately pick up and drag the wet paint, creating a beautiful, feathered, and layered texture that perfectly mimics the intricate veins and soft, ruffled edges of real flower petals. The absolute key to success in this step is to use a fresh, clean piece of paper towel for each individual petal stroke. This meticulous approach prevents the colors from muddying and ensures that each petal retains its crisp, distinct texture and vibrant hue, adding incredible depth to your artwork. For the outer corners and tighter curves of your flower, where a full-width glide might be too broad, adapt your technique: hold the paper towel at a slight angle or use just a corner of the paper. This slanted approach allows for greater precision, enabling you to define the unique contours and subtle variations of each petal, thereby adding significant depth and realism to your blossoming bloom. Experiment with varying pressure and angles as you glide to achieve a diverse range of textural effects, making your petals truly unique and dynamically lifelike.
Step 5: Define the Flower’s Center
With your petals beautifully textured and taking shape, the next crucial step is to create a clean, distinct, and defined center for your flower. This clear central area will allow any subsequent intricate details to truly pop and become the focal point. Take a clean spoon and gently tap its convex side onto the very center of the flower, precisely where all your petal strokes converge. The spoon, acting as a small suction, will lift some of the wet paint from this concentrated area. Immediately after tapping, carefully wipe the paint off the spoon with a clean piece of paper towel. It is essential to repeat this process several times – tap, lift, and wipe – until a significant amount of paint has been removed from the central region. This repeated action not only creates a clear void that elegantly separates the individual petals but also provides a distinct, lighter, and cleaner area. This lighter space will serve as the perfect canvas for adding the intricate details that will bring your flower to its final, stunning completion. This clear separation enhances the overall structure, contrast, and realism of your flower, expertly drawing the viewer’s eye towards its captivating core.
Step 6: Add Vibrant Dots and Stems
To truly complete your floral masterpiece and imbue it with life and character, it’s time to add the intricate details of the flower’s reproductive parts. Begin by squeezing a small, manageable amount of yellow acrylic paint onto a clean palette or any non-porous surface. Using your dotting tool, carefully create small, uniform dots around the perimeter of the now-defined clean center of your flower. These dots are designed to represent the anthers or pollen, adding a crucial layer of botanical accuracy and visual interest to your artwork. Strive for even spacing and consistent size among your dots for a polished and harmonious look. Once your yellow dots are meticulously in place, take your stick – a simple wooden skewer or even a sturdy toothpick will work perfectly. For each dot you’ve created, gently drag the tip of the stick inwards, creating a fine, delicate line that extends from the base of the dot towards the very center of the flower. These subtle lines act as tiny stems or filaments, further enhancing the realistic appearance of your flower’s core. After completing the yellow details, repeat this entire process using blue paint, creating another layer of dots and connecting lines. The striking contrast of blue and yellow dots will add incredible depth, vibrancy, and a unique artistic touch to your flower’s core, making it truly captivating and multi-dimensional. Feel free to experiment with other complementary or contrasting color combinations for your dots to create diverse and personalized floral effects, showcasing your individual artistic flair.
Tips for Success with Your Paper Towel Painting
Achieving stunning results with this unique paper towel technique is incredibly rewarding, and incorporating a few expert tips can further enhance your artistic journey and refine your finished product:
- Practice Makes Perfect: Do not be discouraged if your first attempt isn’t exactly as envisioned. This technique, like any other artistic method, significantly benefits from practice. Consider trying it out on smaller canvas boards or even thick paper before committing to a larger, more elaborate project.
- Consistency of Paint: The wetness and consistency of your acrylic paint are paramount to the success of this technique. If the paint is too dry, the paper towel won’t effectively pick it up or drag it to create the desired texture. If it’s too wet, the colors might bleed excessively and lose their distinctness. Aim for a creamy, workable consistency, similar to soft butter or yogurt.
- Fresh Paper Towel Every Time: As emphasized throughout the instructions, using a new, clean piece of paper towel for each individual petal stroke is absolutely paramount. This prevents unintended color mixing that can lead to muddy results and ensures clean, crisp textures for every single petal, maintaining the vibrancy of your artwork.
- Experiment with Pressure and Angle: The amount of pressure you apply when gliding the paper towel and the specific angle at which you hold it will significantly affect the texture and overall appearance of your petals. Play around with these variables – apply more pressure for a denser texture, less for a feathery touch, and vary the angle to create dynamic petal shapes.
- Thoughtful Color Choices: While blue, white, pink, and yellow are suggested, feel completely free to explore and experiment with other color palettes. Analogous colors (those located next to each other on the color wheel) create harmonious and soothing blends, while complementary colors (those directly opposite on the wheel) offer vibrant, eye-catching contrast and energy.
- Optimal Lighting: Ensure your workspace is brightly and evenly lit. Good lighting is essential as it helps you accurately perceive the true colors and delicate textures you are creating, preventing errors and enhancing precision.
- Patience is a Virtue: Acrylic paints generally dry relatively quickly, but some steps and layers will benefit from a moment for the paint to settle or for previous layers to partially dry. Avoid rushing the process; allow each stage to unfold naturally.
- Prompt Clean Up: Acrylic paint can harden quickly once dry, becoming difficult to remove. Make it a habit to clean all your tools – painting knife, spoon, dotting tool, etc. – immediately after use with warm water and soap to ensure their longevity.
Unleash Your Creativity: Beyond the Tutorial
The true beauty of the paper towel petal technique lies in its incredible versatility and adaptability. While this tutorial focuses on a specific flower design, the fundamental principles and steps can be applied to a multitude of floral shapes, sizes, and compositions. Once you’ve mastered the basic technique, consider experimenting with these ideas to further unleash your artistic potential:
- Explore Different Flower Types: Don’t limit yourself to one design. Apply the paper towel method to create the lush, layered petals of roses, the delicate forms of peonies, or even abstract and fantastical floral interpretations.
- Vary Backgrounds: Instead of a solid blue, try a captivating gradient background that transitions between two or more colors, or create subtle textural effects on your backdrop to add more depth.
- Incorporate Leaves and Stems: Once your paper towel flower is completely dry, you can seamlessly integrate other elements. Use fine brushes to paint in realistic or stylized leaves and stems, further grounding your artwork within a natural setting.
- Play with Sizes and Clusters: Create a dynamic composition by painting a cluster of flowers, varying their sizes from large focal points to smaller, supporting blooms, to add depth, perspective, and visual interest to your canvas.
- Embrace Mixed Media: Once the acrylic base layers are thoroughly dry, consider integrating other artistic elements. Experiment with glitter, beads, metallic flakes, or even small collage pieces to add unique embellishments and textures.
Conclusion: Your Journey to Incredible Petal Painting
Embarking on this artistic adventure with a simple paper towel will undoubtedly change the way you view painting and everyday objects. The ingenious technique pioneered by Designer Gemma77 is a testament to the idea that creativity knows no bounds and that extraordinary art can emerge from the most unexpected places and with the most accessible tools. Through this detailed guide, you have now learned how to transform basic acrylic paints and a common household item into captivating floral designs, effortlessly creating stunning, textured petals that beautifully evoke the intricate elegance of nature.
We sincerely hope this comprehensive tutorial empowers you to experiment with confidence, innovate with enthusiasm, and find immense joy and fulfillment in the entire creative process. Remember, every stroke is an opportunity to express your unique vision. Don’t hesitate to share your incredible paper towel creations with friends, family, or online communities; your unique artwork is sure to inspire others to pick up a brush and a piece of paper towel themselves. Happy painting, and may your canvas bloom with endless possibilities!