
Embarking on your quilting journey? Mastering straight line quilting is a foundational skill that will transform your projects, adding both stability and a professional finish. This comprehensive guide, inspired by expert tips from American Patchwork & Quilting on YouTube, is designed specifically for beginners. You’ll discover how to stitch impeccably straight lines right from the start, building a strong quilting foundation that will serve you well in all your future creative endeavors. Even if you’ve never quilted before, by following these detailed steps and practical advice, you’ll gain the confidence and skill to achieve stunning results.
RELATED: 4 Tips on How to Use Quilting Rulers Properly
Whether you prefer visual learning or a written checklist, we’ve got you covered. Watch the insightful video tutorial from American Patchwork & Quilting for a dynamic demonstration, or continue reading below for an in-depth breakdown of each essential tip. We extend our sincere gratitude to American Patchwork & Quilting for sharing these invaluable beginner tips that empower quilters to create beautiful, well-finished pieces with ease.
Mastering Straight Line Quilting: Essential Tips & Techniques
Straight line quilting is more than just sewing in a line; it’s about precision, consistency, and understanding your tools. These six core tips will guide you through the process, ensuring your quilting is not only straight but also beautiful and secure.
#1 Marking Your Quilt for Precision
Accurate marking is the crucial first step to achieving perfectly straight lines. Before your needle even touches the fabric, you need a clear path to follow. While you might be tempted to skip this step, proper marking eliminates guesswork and significantly boosts your confidence, especially as a beginner.
There are several effective tools for marking your quilt:
- Water-Soluble Pens: These pens create clear lines that vanish with a spritz of water or a damp cloth, making them ideal for temporary guides. Always test on a scrap fabric first to ensure it disappears completely and doesn’t stain your specific fabric type.
- Air-Erasable Pens: Similar to water-soluble pens, these lines disappear on their own over a few hours or days. Perfect for quick marking jobs, but be mindful of the vanishing time to ensure your lines are still visible when you quilt.
- Quilter’s Chalk or Pencils: These provide a visible line that brushes or washes away easily. They are a great choice for various fabric colors and textures.
- Painter’s Tape or Masking Tape: If you prefer not to draw directly on your quilt, long strips of painter’s tape or masking tape can serve as excellent guides. Simply apply them in the desired straight lines, stitch alongside the edge, and then remove. This method is particularly useful for creating perfectly parallel lines without the need for intricate measuring.
- Hera Marker: This tool creates a crease in the fabric rather than a drawn line, making it completely removable. It’s ideal for lighter fabrics where pen marks might be harder to remove.
When marking, always use a quilting ruler to ensure your lines are truly straight. Measure twice, mark once, and remember that clear, precise marks are your best friends in straight line quilting.
#2 Optimizing Your Machine Setup with a Walking Foot
While not always included with every sewing machine, a walking foot is an indispensable accessory for any serious quilter, especially when aiming for flawless straight lines. It’s truly a worthy investment that will elevate the quality of your quilting significantly.
What is a Walking Foot and Why is it Essential?
A standard sewing machine foot feeds the top layer of fabric while the feed dogs underneath pull the bottom layer. When quilting, you’re dealing with three layers (quilt top, batting, and backing), which can cause them to shift unevenly, resulting in puckers, stretched fabric, and crooked lines.
A walking foot, also known as an “even feed foot,” has its own set of feed dogs on the top. These upper feed dogs work in conjunction with your machine’s lower feed dogs, ensuring that all three layers of your quilt sandwich are fed through the machine at the same rate. This synchronization is critical for:
- Preventing Shifting: Keeps layers perfectly aligned, eliminating puckers and ripples.
- Ensuring Straight Lines: By maintaining even tension on all layers, the fabric doesn’t distort, allowing your stitches to follow your marked lines accurately.
- Handling Bulky Fabrics: Excellent for quilting through thick batting or sewing multiple layers for binding.
Beyond the walking foot, ensure your machine’s stitch length is appropriate for quilting (typically 2.5mm to 3.5mm, depending on your batting and desired look) and that your tension is balanced. Always do a test stitch on a scrap quilt sandwich to check your settings before quilting your actual project.
#3 Harnessing the Power of Quilting Guide Bars
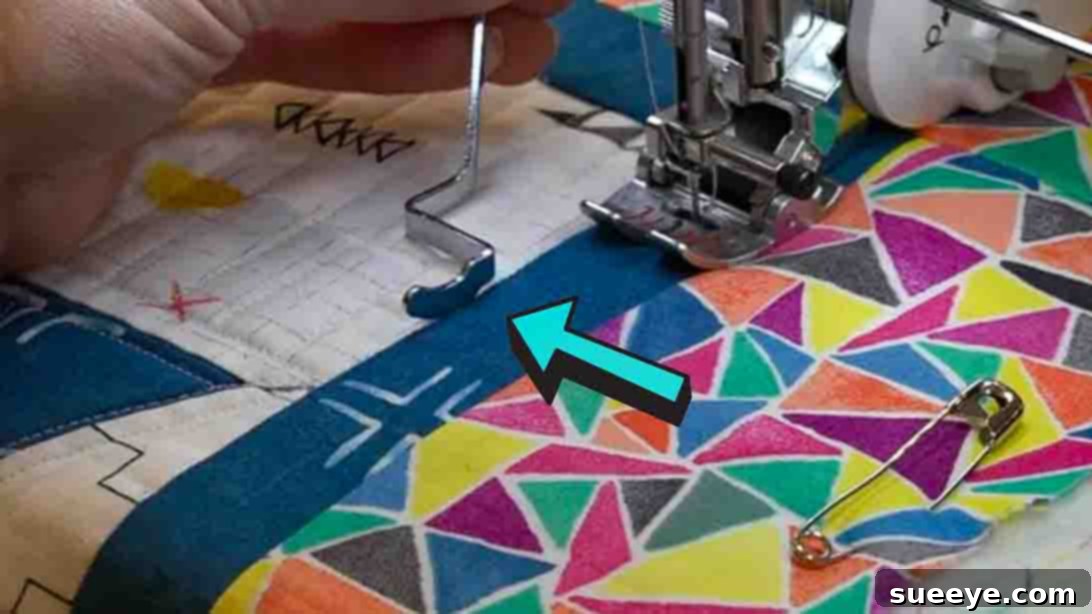
To further enhance precision and consistency in your straight line quilting, quilting guide bars are incredibly helpful accessories that often attach directly to your walking foot. These simple yet ingenious tools allow you to achieve perfectly spaced parallel lines without the need to mark every single line on your quilt.
How Guide Bars Work:
A guide bar is typically a metal bar that can be inserted into a designated slot on the right or left side of your walking foot. Once attached, you adjust its position so that the end of the bar rests on a previously stitched line or a marked reference line. As you sew, the guide bar acts as a fence, keeping your current stitching line perfectly parallel to the one it’s riding against.
The benefits of using guide bars are significant:
- Perfect Spacing: Ensures consistent distances between your quilting lines.
- Reduced Marking: Once you’ve established your first line, you may not need to mark subsequent lines, saving time and effort.
- Increased Efficiency: Speeds up the quilting process, especially for large areas requiring many parallel lines.
- Beginner Friendly: Provides an excellent physical guide, making it easier for new quilters to maintain straightness.
Pairing your walking foot with a guide bar creates a powerful combination for achieving professional-looking, evenly spaced straight line quilting.
#4 Planning Your Design: The Versatility of a Crosshatch
Once you’re comfortable with your marking and machine setup, it’s time to choose a design. For straight line quilting, a crosshatch pattern is an incredibly popular and beginner-friendly choice. It’s a classic design that adds beautiful texture, stability, and visual interest to any quilt.
What is a Crosshatch?
A crosshatch consists of diagonal lines that intersect, forming a grid of diamonds. These lines can span across an entire quilt top, individual blocks, or specific sections. The beauty of the crosshatch lies in its simplicity and its ability to add elegance without being overly complex to stitch.
Why Choose a Crosshatch?
- Stability: It effectively secures all three layers of your quilt, preventing batting migration and adding durability.
- Texture: Creates a lovely geometric texture that enhances the overall look of the quilt.
- Forgiving: Minor inconsistencies in your straight lines are less noticeable when crossed by another set of lines, making it perfect for beginners.
- Continuous Stitching: As you’ll discover, it can often be stitched in one continuous motion, minimizing starts and stops and reducing thread tails.
To plan your crosshatch, first determine the spacing you desire between your lines. Common spacing ranges from 1/2 inch to 2 inches, depending on your batting’s recommended quilting distance and the look you want to achieve. Use your chosen marking tool and a long ruler to mark your first set of parallel diagonal lines across your quilt. You can choose a 45-degree angle or any other angle that complements your quilt’s design.
#5 Executing the Stitch: A Continuous Crosshatch
The most efficient and satisfying way to quilt a crosshatch is by striving for a continuous line of stitching, minimizing thread breaks and tie-offs. This technique not only saves time but also results in a cleaner finish on the back of your quilt.
Step-by-Step Continuous Stitching:
- Start with the Longest Diagonal: Begin stitching along the longest marked diagonal line on your quilt. This often provides the best starting point for establishing your pattern. Secure your stitches at the beginning by taking a few small stitches forward, then backward, then forward again (or by leaving long tails to tie off later).
- Stitch to the Corner: Quilt along your marked line until you reach the very edge or corner of your quilt.
- Needle Down and Pivot: Crucially, when you reach the end of a line, make sure your needle is in the “down” position. This anchors your fabric. Lift your presser foot, pivot your quilt 90 degrees (or the appropriate angle to align with the next marked line), and then lower your presser foot.
- Stitch in the Seam Allowance (or to the next line): Instead of cutting your thread, continue sewing into the seam allowance or the unquilted border of your quilt until you reach the next marked line that needs quilting. This creates a “travel” stitch that will be trimmed away later or hidden by your binding, allowing you to seamlessly transition to the next line without stopping and starting your machine.
- Repeat: Continue this process, stitching along your marked lines, pivoting at the edges, and traveling to the next line. You’ll be quilting a series of parallel lines in one direction.
Once you’ve completed all the lines in the first diagonal direction, repeat the entire process for the second set of diagonal lines, ensuring they intersect the first set to form your crosshatch pattern. Remember to keep an eye on your marked lines and let your walking foot do the work of feeding the fabric evenly.
#6 Achieving a Seamless Finished Crosshatch
The true beauty of the continuous stitching method for crosshatch quilting reveals itself in the finished product. By strategically traveling along the edges, you’ll find that you can complete the entire quilting design with a single, unbroken line of stitching for each set of diagonals, or at most, very few breaks.
What to Expect from Your Finished Crosshatch:
- Minimal Thread Ends: Without constant stopping and starting, you’ll have significantly fewer thread tails to bury or tie off, which saves a tremendous amount of time and effort.
- Consistent Texture: The continuous flow of stitching helps maintain even tension throughout the quilt, leading to a smooth, uniform texture.
- Professional Appearance: The clean back of the quilt, free from numerous knots and starts, gives your project a polished, professional look.
Once your crosshatch quilting is complete, give your quilt a gentle press to settle the stitches and smooth out any remaining wrinkles. Trim any excess batting and backing, and you’re ready to add your binding. The crosshatch pattern not only looks fantastic but also securely holds your quilt layers together, ensuring your creation will be cherished for years to come. Celebrate your accomplishment – you’ve successfully mastered a fundamental straight line quilting technique!
Why Straight Line Quilting is Essential
Beyond its aesthetic appeal, straight line quilting serves several critical purposes that make it an indispensable skill for every quilter.
- Quilt Stability: The primary function of quilting is to secure the three layers of your quilt sandwich together. Straight lines, especially in a grid or crosshatch pattern, effectively prevent the batting from shifting, bunching, or migrating over time and with washing. This ensures the longevity and integrity of your quilt.
- Versatility: Straight lines can complement virtually any quilt top design, from traditional blocks to modern improvisational piecing. They can be subtle or bold, creating texture without competing with the piecing.
- Texture and Dimension: Even simple straight lines add beautiful texture and dimension to your quilt. When washed, the fabric often crinkles around the stitches, enhancing the cozy, tactile feel of the finished piece.
- Beginner-Friendly: It’s a fantastic entry point into machine quilting. The techniques learned here – machine setup, marking, pivoting – are transferable to more complex quilting styles.
Common Straight Line Quilting Challenges & Solutions
Even with the best preparation, you might encounter a few hurdles. Here are some common issues and how to troubleshoot them:
- Wavy Lines: This is often caused by fabric shifting. Ensure your walking foot is properly installed and functioning. Use adequate basting (pins or spray) to hold your layers securely. Avoid pushing or pulling the fabric; let the machine and walking foot do the work.
- Puckers or Folds: Again, uneven feeding of layers is usually the culprit. A walking foot is crucial. Make sure your quilt sandwich is smooth before you start, without any wrinkles in the backing or batting. Start quilting from the center of the quilt outwards to push excess fabric towards the edges, where it can be trimmed.
- Broken or Skipped Stitches: Check your needle – it should be sharp and appropriate for quilting (e.g., a topstitch or quilting needle). Re-thread your machine, checking for proper tension. Ensure your bobbin is wound evenly.
- Inconsistent Stitch Length: This often relates to the speed at which you’re sewing. Try to maintain a consistent speed with your foot pedal. If your machine allows, adjust the speed setting.
Practice Makes Perfect & Next Steps
Like any skill, straight line quilting improves with practice. Don’t be afraid to start with smaller projects like placemats, pot holders, or mug rugs to build your confidence before tackling a large quilt. Use scrap fabric to experiment with different marking tools, thread colors, and stitch lengths.
Once you’ve mastered the basics of straight line quilting, you’ll open up a world of creative possibilities. You can explore more intricate straight line patterns, combine them with free-motion quilting, or even move on to ruler quilting with specialty rulers. The foundation you build with straight lines is invaluable.
Final Thoughts
Straight line quilting is a fundamental and rewarding skill that every quilter should embrace. By focusing on precise marking, optimizing your machine with a walking foot, utilizing guide bars, and practicing continuous stitching techniques like the crosshatch, you can achieve beautiful, stable, and professional-looking results. Take your time, enjoy the process, and watch as your quilting projects transform with the magic of perfectly straight lines. Happy quilting!